To avoid these ads, REGISTER NOW!

Modifications to the HF 4 and 5 drawer service carts - what changes have you made?

TerryH

Well-known member
Joined
Dec 8, 2012
Messages
2,248
Location
Springdale, AR
How do you plan to secure it in the trailer? I strapped mine to the wall using a couple of "D ring" tie downs.

R1chy

I put rows of E-track in the trailer so I could secure the cart and all that other stuff that it seems like we have to have with us.

<a href="http://www.flickr.com/photos/93396776@N06/8504834069/" title="005 by TerryHatfield, on Flickr"><img src="http://farm9.staticflickr.com/8094/8504834069_1e985a63fb.jpg" width="500" height="375" alt="005"></a>

<a href="http://www.flickr.com/photos/93396776@N06/8505942434/" title="004 by TerryHatfield, on Flickr"><img src="http://farm9.staticflickr.com/8507/8505942434_10f1a988e4.jpg" width="500" height="375" alt="004"></a>
 
To avoid these ads, REGISTER NOW!

dctacoma

Member
Joined
Jun 1, 2010
Messages
10
002.jpg

004.jpg

003.jpg

010.jpg

008.jpg

007.jpg
 

kool_BOY8323

Well-known member
Joined
Feb 23, 2013
Messages
280
Location
arizona
I used the HF magnetic strips on this using 3M super strength molding tape.
Will see how it holds when I close the lid. I heated up the metal with my heat gun before applying the tape. I had to move one strip and had to use a pry bar to get it up :lol:
Also removed the drawer locking mechanism.

Randy

i used the 3m mounting tape, and carriage bolts for mine. the tape was mostly a spacer but it ended up grabbing enough of the carriage bolt that it wasnt a pain to get them tight.
 

alpinewhite

Well-known member
Joined
Aug 4, 2012
Messages
1,315
Location
Orange County, California, USA
Walmart, Autozone, O'Reilly, ect. It's fantastic stuff.

I picked this up from AutoZone yesterday for $6.99. Using a blow dryer, I heated up the magnet bar and the cover of the tool cart to get it above 65 degrees per installation instructions. I attached this to the entire length of the magnet bar. I used another magnet bar as a guide as I installed this. This stuff is AWESOME. It is stuck there so well that it feels like it's bolted on.

4
 
Last edited:

STGFordCrazy04

Well-known member
Joined
Dec 20, 2012
Messages
289
Location
St. George, SC
I cut up an old Lance cookie rack to make mine. I have seen them made from CD racks, wire shelving and dish drying racks also.

Plyworx sell them through several vendors for $20/30" iirc.
 

oneandgone

Well-known member
Joined
Dec 4, 2012
Messages
159
I finally got the stuff to install a Snap On tube type lock in my cart. I ordered it keyed the same as my SO box so now I can used just one key for both of them. As an added bonus any time you buy a lock you get 2 keys, so now I have extras!
 

Attachments

  • cart.jpg
    cart.jpg
    51.5 KB · Views: 376

kool_BOY8323

Well-known member
Joined
Feb 23, 2013
Messages
280
Location
arizona
started the 7 drawer cabinet mod tonite. ive taken what id consider some pretty detailed pictures of vital measurements of the cabinet. stuff that ISNT available on the HF website. right now all i have is a sort of working mock up of what i want to do, but i desperately need the box at work, and with schoolwork and home renovations piling up, i just dont have the time to get it 'absolutely right'. more pics to come, but here's a preview
 

dctacoma

Member
Joined
Jun 1, 2010
Messages
10
^^^^^^^^
I took the cabinet off an old craftsman box and painted it red. The drawers arent that deep but still useful... sorry i dont have any more pics.
 

kool_BOY8323

Well-known member
Joined
Feb 23, 2013
Messages
280
Location
arizona
so as promised here are the slightly-more-detailed details of the 7 drawer cabinet from harbor freight. these are what id consider important details if you plan to use this box as an addition to the HF carts.

first up, bottom dimensions:

20130304143436.jpg


i started the yard stick on 3 inches so it would be accurate and so it would balance when i took the pictures. adjusted for that the width of the bottom is 16.5 inches. this is again not a measurement available on the HF website. up next, a VERY important measurment for adding casters.

the depth of the dish at the bottom of the cabinet:

20130304143516.jpg


as you can see, its about 2 1/8" deep, this can make adding 5 inch casters tricky. to match the height of the HF tool cart, and fill the gap, you need to come up with a 4 1/2" 'spacer' of sorts, for temporary use i ended up using 3 2x6's 17" long, stacked on top one another, and screwed together. more on that later, for now, a third measurement.

the depth of the top of the cabinet:

20130304143633.jpg


again, adjusting for the 3 inch start of the yard stick, its right about 18" deep. this is not as deep as the HF cart, as has been previously established by several of us. the cart is listed on the HF site as 20 and 3/4" deep, and id have to agree with that, being as i didnt measure my cart. but the gap left after i mounted it seems about a 2 and 3/4" difference. up next is another important measurement im not sure is listed on the HF site,

the overall standing height of the cabinet:

20130304143714.jpg


this time there is no adjusting for the yard stick and its right about at 33 and 1/4" give or take for the carpet it is sitting on. i took all these measurements for whats up in the next post, the mounting of 5 inch casters and a 'lift kit' of sorts for matching the height of the HF cart.
 

kool_BOY8323

Well-known member
Joined
Feb 23, 2013
Messages
280
Location
arizona
before we get to the 'lift kit' a couple more important and sought after measurements: the drawers. i did not measure depth, but i did get width and length. up first, width:

20130304143913.jpg


again adjusting for the 3 inch yard stick start, the width of the drawers is right about 12 ". up next is the length of the drawers:

20130304143946.jpg


adjusted for the 3 inches, the drawers are right about 15 and 3/4" long. also of note is that the drawers on the cabinet differ in that the back of the drawer is absolutely visible and easy to access, where the as on the cart they are recessed about an inch. the next two pictures show my knife in the back of the drawer in the cabinet, and then in my cart for a reference to the difference in depth.

knife in cabinet:

20130304144121.jpg


knife in cart:

20130309175350.jpg
 
To avoid these ads, REGISTER NOW!

kool_BOY8323

Well-known member
Joined
Feb 23, 2013
Messages
280
Location
arizona
interesting little tidbit before i get to more pictures, the cabinet weighs ~100 lbs on its own, and the cart is listed at 120 lbs, so combined weight before tools is around 220 lbs. know that before you do this mod, and be ready to sling not only the additonal weight, but the extra 18" off the side of your cart!

now, onto the 'lift kit'.

as i said before, getting the ~33 inch cabinet to match the height of the 41.25 inch cart isnt an easy task. especially if you want it to look clean. at this point, my need for the cart out-weighed my want for it to be as pretty as possible, so in a pinch, the 2x6's work just fine. this isnt my permanent solution, but it does work for now, rather nicely.

something else that should be considered is that unless you get your lumber raw, the actual measurements of a 2x4 or 2x6 is smaller than the true 2x4 or 2x6 label. so YES stacking 3 2x6's sounds like it would give you a 6 inch lift where you only need 4.5, but in reality you only get 4.5 by stacking the lumber.

now that the lumber lesson is out of the way, on with the pics!

the inside edge /bottom of the cab:
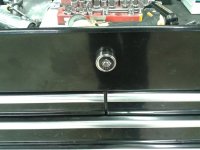
20130305211448.jpg


the front edge:

20130305211500.jpg


the outer edge:

20130305211513.jpg


i did not get much in the way of actual build pics of the block. but its pretty self explanitory what i did to make it. 3 chunks of 2x6" cut to 17" (roughly) stacked and screwed together, then drilled holes in both the block and bottom outer edge of the cabinet to match the casters, and sent bolts through to hold it all together. the trick was in all the afforementioned measurements, and the drilling holes in the cabinet. THAT THING IS RUGGED to say the least. i had to not only drill the holes, but cut out sections of the inside of the box to allow for access to the bolts. yes. i said CUT OUT sections. adding this box was already not for the timid, but if you're the least bit against breaking out the cut off wheel on your brand new box, than throw some big heavy bricks in the bottom of your cart, hang the cab and call it a day, because adding the casters was a job and a half.

so here it is, all mounted up to the cart at work. the last bit of drilling you have to do to mount it is marking and drilling the holes where the bottom of the cab meets the bottom shelf of the cart, then just hang it up top and bolt it to the bottom.

20130306175827.jpg


oh yeah, and did i mention, i modded the lid of the cart to close?? more on that in the next post.
 

kool_BOY8323

Well-known member
Joined
Feb 23, 2013
Messages
280
Location
arizona
What are you putting together? Is this a stand-alone HF 7-drawer on wheels?

no, its the 7 drawer added to the 5 drawer service cart, matched to the height of the cart, with casters for stability. basically a 'super service cart'. i plan to post all the details with as many pictures as possible, ive gotten a few of the posts done, but its time to go play video games with my 6 year old, so more to come later!

although, now that you mention it, i could see some uses for such a mod as well...hmmmm
 
Last edited:

jjjrmx5

Well-known member
Joined
Dec 30, 2010
Messages
3,431
Location
Cincinnati, OH
something else that should be considered is that unless you get your lumber raw, the actual measurements of a 2x4 or 2x6 is smaller than the true 2x4 or 2x6 label. so YES stacking 3 2x6's sounds like it would give you a 6 inch lift where you only need 4.5, but in reality you only get 4.5 by stacking the lumber.

now that the lumber lesson is out of the way, on with the pics!

LOL.

Yes--raw lumber is measured in quarters, meaning 4/4 = 1" raw.

I always just assumed that by the time one got to be a teenager that were tought that and the difference in finished lumber. Or at least knew how to use a tape measure when they went to the lumberyard.

In the world of Google and the infinite teachings of the world wide web, I LOL'd.
 

alpinewhite

Well-known member
Joined
Aug 4, 2012
Messages
1,315
Location
Orange County, California, USA
no, its the 7 drawer added to the 5 drawer service cart, matched to the height of the cart, with casters for stability. basically a 'super service cart'. i plan to post all the details with as many pictures as possible, ive gotten a few of the posts done, but its time to go play video games with my 6 year old, so more to come later!
Here's a similar mod by another GJ user
http://www.garagejournal.com/forum/showthread.php?p=2932335&highlight=modifications#post2932335
attachment.php
 
Last edited:

kool_BOY8323

Well-known member
Joined
Feb 23, 2013
Messages
280
Location
arizona
yeah ive seen this mod done several times, but not quite how i did it. most are either not using any additional stability, or still only using 4 casters. im using 6 total casters, all of which swivel.
 

kool_BOY8323

Well-known member
Joined
Feb 23, 2013
Messages
280
Location
arizona
now onto the lid mod, and more gratuitius pics.

the lid mod isnt all that hard to figure out, assuming you're not squeamish with the cut off wheel. you take enough out of the lid at the back, and at the front, to clear the rear lip and front lip of the cabinet, then bend the remaining edge of the lid to clear the new lip on the cabinet. again mine isnt perfect, but i did all of these mods in less than 4 hours total, with basic hand tools and a cut off wheel or 12v drill, so i suppose both mickey mouse and mcgyver should be proud :lol:

first up, lid mod pics:

rear of lid:

20130307171801.jpg


front of lid:

20130307171750.jpg


side of lid:

20130307171740.jpg


and now the beginings of the gratuitous self absorbed tool-cart loving pics:

the complete unit open:

20130307103938.jpg
 

kool_BOY8323

Well-known member
Joined
Feb 23, 2013
Messages
280
Location
arizona
more 'i love this cart and mod' pics:

cabinet side:

20130307103957.jpg


rear of cart/ cabinet with creeper hook:

20130307104011.jpg


as you can see here, that little gap at the rear of the cabinet that is shallower than the cart ended up being quite useful. it mounts my creeper perfectly.

up top:

20130307104039.jpg


top six drawers:

20130307104146r.jpg
 

kool_BOY8323

Well-known member
Joined
Feb 23, 2013
Messages
280
Location
arizona
more of the same (and end to the madness):

middle 3 drawers:

20130307104223.jpg


bottom 3 drawers:

20130307104254.jpg


so there it is in all its glory. so far the mods to the cart are as follows:

portable speakers for mp3 player or phones
creeper hook
lid magnets
custom socket organizers
old fuel filter bracket for power screwdriver
multiple magnetic and coat hanger hooks
updated longer and stronger hood struts
digital clock
washers for screwdriver holes
side cabinet with casters and relocated creeper hook
modded lid to close over side cabinet

up next i plan to mount some sort of swinging / spill resistant cup holder, something along the lines of what they use in boats. and probly a custom side table off the handle side that allows me to keep that side the way it is, with my air tools there and the handle, but fold up a table if i need it.

so whaddya guys think? one last tidbit of interest, the cart is listed on HF.com as being 37.75" wide before the cabinet mod, add that 16.5" of cabinet and you're at 54.25" wide. so interestingly enough, doing this one mod may actually give you more or equal room but more usability than just getting the 44" 13 drawer lower cab from HF. and at right about the same price, maybe a bit more. :)
 
Last edited:

kool_BOY8323

Well-known member
Joined
Feb 23, 2013
Messages
280
Location
arizona
LOL.

Yes--raw lumber is measured in quarters, meaning 4/4 = 1" raw.

I always just assumed that by the time one got to be a teenager that were tought that and the difference in finished lumber. Or at least knew how to use a tape measure when they went to the lumberyard.

In the world of Google and the infinite teachings of the world wide web, I LOL'd.

honestly, you'd be shocked to know how many people dont know this. :willy_nil
 

kool_BOY8323

Well-known member
Joined
Feb 23, 2013
Messages
280
Location
arizona
okay, last post for the night about my 'super-service-cart'. promise :thumbup:

i thought it important to add what might me obvious to some and not so clear to others, as with most of the info in my many posts tonite. and being that my drive for not only the mods but all the details is that there isnt all that much out there in the way of this particular set of boxes (aside from GJ that is much love to this forum) i wanted the next guy to have less to figure out than we all did.

so on to it then. 2 additional points i feel need be made about this cabinet mod.

1. the drawers on the cab and the cart open differently, and the cab drawers dont have the nifty lock to one side like the cart does. instead it almost feels like some kind of magnet, or secondary internal latch or detent that keeps them shut. unknown how long that latch will stay strong, but going on 2 years on the cart latches with no issues.

2. the keys on the locks, and the way the locks work, are quite different. the cart is just a hook that catches a loop on the lid when the key is turned, and the act of closing the lid actually latches all the drawers shut. i dont know as much about the cabinet, but im guessing there is alot more linkages involved.
the key on the cabinet is bigger than the cart and the lock almost feels sort of spring loaded. its not easy to get the key to hang in the lock if you desire it so.

so here's a pic of the 2 keys side by side for comparison. again, the posts ive made are detailed for the next poor shmoe who decides to do this mod. i hope its been detailed enough :dunno:

20130309224831.jpg


to the left is the cabinet key, the right is the cart key.

and because we all like to remember fondly of where we came from, here's how i started out at work. a 2 drawer box on top of a BS used and broken service cart. ahh memories... :needpics:

loanercartwithmyold2dra.jpg
 

sberry

Banned
Joined
Jun 18, 2005
Messages
35,747
Location
Brethren, Michigan
The little one above is cool but I like the US general with the extra drawers, thats pretty good. I could find my way around that in short order, plenty and then some to get the daily user items in.
 

kool_BOY8323

Well-known member
Joined
Feb 23, 2013
Messages
280
Location
arizona
I like the creeper hanger, I think I may borrow that idea for my next changes.

that creeper hook is completely a custom job. i didnt come up with the original idea, but mine was the first one at my shop to be permanetly mounted to the cart. everyone elses comes off so they didnt have to drill holes in their carts. wussies.

after i did mine, another guy's broke and we ended up re-working it from some old wiper blade display hooks. id say his is probly stronger than mine now.
 

kool_BOY8323

Well-known member
Joined
Feb 23, 2013
Messages
280
Location
arizona
The little one above is cool but I like the US general with the extra drawers, thats pretty good. I could find my way around that in short order, plenty and then some to get the daily user items in.

that little one is how i started out at my shop. its the 'FNG loaner cart' for those who dont have a cart when they start work.

my 5+7 drawer rig up there is what i use everyday, and its way too much to load and unload at the beginning and end of every work day. plus at this point im pretty sure it has more storage than my stationary box at the back of the shop. i just close the lid, lock up, and roll it out of everyones way.
 

skulldrinker

Well-known member
Joined
Dec 25, 2011
Messages
1,171
Location
Bolingbrook, IL
that creeper hook is completely a custom job. i didnt come up with the original idea, but mine was the first one at my shop to be permanetly mounted to the cart. everyone elses comes off so they didnt have to drill holes in their carts. wussies.

after i did mine, another guy's broke and we ended up re-working it from some old wiper blade display hooks. id say his is probly stronger than mine now.


$500 Snap On carts and they don't want to drill holes in them, Wussies! LOL :bounce:
 

kool_BOY8323

Well-known member
Joined
Feb 23, 2013
Messages
280
Location
arizona
$500 Snap On carts and they don't want to drill holes in them, Wussies! LOL :bounce:

lol. funny you should mention snap on. the guy who ended up using old wiper blade display hooks has a 5 year old blue point cart, and he puts screws, holes, and all sorts of stuff through it.

the wuss is the guy with the MAC cart that had the idea originally, and yeah, no holes drilled or extra screws there..
 

ex-x-fire

Well-known member
Joined
Nov 10, 2012
Messages
3,751
Location
Sheboygan Falls Wi.
I got my side shelfs done, been using them for a week & they are very stong. They have a much higher weight capacity then those popular ones (30lbs), I need to get some pictures of them.
I think a piece of butcher block w/ some stainless trim, would look good as a side shelf. It would certainly look good w/ the glossy red paint thats on the cart.
 

Attachments

  • Cutting-Board-Butcher-Block-12-x-16-x-1_5-2-1024x768.jpg
    Cutting-Board-Butcher-Block-12-x-16-x-1_5-2-1024x768.jpg
    111.7 KB · Views: 262

kool_BOY8323

Well-known member
Joined
Feb 23, 2013
Messages
280
Location
arizona
so i just priced out a 4.5" x 4.5" square steel tube. the smallest i can order it online is 2 ft, and its 79 dollars. i think the wood blocks will have to remain for a while longer..
 

kapster

Well-known member
Joined
Dec 14, 2011
Messages
517
Location
Wooster, Ohio
so i just priced out a 4.5" x 4.5" square steel tube. the smallest i can order it online is 2 ft, and its 79 dollars. i think the wood blocks will have to remain for a while longer..

What if you use taller casters under the side shelf so that the wood doesn't need to be as thick and therefore doesn't show? But if you don't mind the wood showing I say there's nothing wrong with it. Wood is more then adequate for that.
 
To avoid these ads, REGISTER NOW!
Top Bottom