skulldrinker
Well-known member
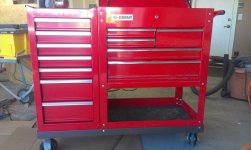
all swivels are best. I can maneuver mine into any tight space or any direction while under a vehicle. I have the black 4 drawer and that's how mine came.


")
all swivels are best. I can maneuver mine into any tight space or any direction while under a vehicle. I have the black 4 drawer and that's how mine came.


 ive even still got my FIRST toolbox. oh how ive grown since then
 i got my creeper in the same place! Mine doesn't tip over
i got my creeper in the same place! Mine doesn't tip over
Can't wait to see yours...looks great so far
to organize the drawers in the same general way the others are, that way its just a natural extension to more of the same types of tools. just a bit more to the right for more sockets, ratchets, wrenches etc. if its not in the drawer on the left, its in the one on the right kind of thing. i'll only be into mine 400 AFTER the side box and new casters... and even the metal thickness is equal. he's kickin himself now. he's even considering bolting one of the side mods onto his blue point cart and tellin the snap on dealer where to stick it. gotta love harbor freight..I just wish the drawers were the same depth as the cart
about how much is the difference? post pics? maybe one drawer out from each?
im still totally doing the mod, but there isnt all that much info out there on things like that.
The drawers pull out the same length but the carts drawers have a little more room. I flush mounted the side box with the front of the cart but there is a 1 inch gap in the back and it's 2 inches shorter.
Anybody see what people are selling these carts for on all of craigs? They mark them up alot, esp. the black one.
<a href="http://www.flickr.com/photos/93396776@N06/8500747805/" title="041 by TerryHatfield, on Flickr"><img src="http://farm9.staticflickr.com/8091/8500747805_38ea713a2a.jpg" width="500" height="375" alt="041"></a>
Look at the shenanigans with this auction...
http://www.ebay.com/itm/HARBOR-FREI...7?pt=Sanders_Sandblasters&hash=item19d8fbad7f
I'm only assuming there's some not-so-bright folks thinking that this auction is for the box itself and not noticing that the guy's simply selling a coupon.
Very nice. I like it as it also prevents the other screwdrivers on the stock holes from hitting the side of the box and scratching it.
Finally got time to work on the cart again. Today was the day to put my plan for the prybars and big screwdriver into motion. I considered getting the Sunex prybar side box but after much thought I decided that I would cut out a portion of the area on the handle side of the cart and make my own piece to solve the problem. This cart is specifically for my race trailer so I only need to make room for the 3 biggest prybars and 1 big screwdriiver since I only take part of my tools to the track.
I began by laying out where the cut would be. I actually used a 2" hole saw to punch out most of the material and then trimmed it up with my little HF air recip saw. I taped up the inside of the compartment to minimize the paint damage.
Where I needed to start the hole saw there where holes already in the metal so I cut a piece of 1/4" hardboard and put it in the bottom of the compartment so I could drill through that first so the holesaw had a pilot hole.
<a href="http://www.flickr.com/photos/93396776@N06/8500508021/" title="004 by TerryHatfield, on Flickr"><img src="http://farm9.staticflickr.com/8227/8500508021_af35d30cb2.jpg" width="500" height="375" alt="004"></a>
Here's a shot from the bottom of the hole all trimmed up.
<a href="http://www.flickr.com/photos/93396776@N06/8500483049/" title="006 by TerryHatfield, on Flickr"><img src="http://farm9.staticflickr.com/8508/8500483049_06196321c9.jpg" width="500" height="375" alt="006"></a>
I'm using a piece of 2 x 2 x 1/8" angle 18 5/8" long.
<a href="http://www.flickr.com/photos/93396776@N06/8501624972/" title="034 by TerryHatfield, on Flickr"><img src="http://farm9.staticflickr.com/8088/8501624972_415c494b19.jpg" width="500" height="375" alt="034"></a>
I marked and drilled the necessary holes in the angle. Here is the test fit.
<a href="http://www.flickr.com/photos/93396776@N06/8501590468/" title="008 by TerryHatfield, on Flickr"><img src="http://farm9.staticflickr.com/8366/8501590468_5ec1b42204.jpg" width="500" height="375" alt="008"></a>
I sprayed a few coats of Seymour MRO Safety Red on it which is almost a dead on match to the HF color. I used the same to touch up the hole in the box as well.
<a href="http://www.flickr.com/photos/93396776@N06/8500508001/" title="032 by TerryHatfield, on Flickr"><img src="http://farm9.staticflickr.com/8250/8500508001_60abd2d80a.jpg" width="500" height="375" alt="032"></a>
I put some door edge guard on the ends of the hole to make sure that the handles didn't get beat up when the trailer is going down the road.
<a href="http://www.flickr.com/photos/93396776@N06/8500747851/" title="036 by TerryHatfield, on Flickr"><img src="http://farm9.staticflickr.com/8511/8500747851_5ecc3c0c29.jpg" width="500" height="375" alt="036"></a>
Here is the new piece mounted with 2 - 5/16" x 3/4" stainless button heads. It was quite a trick to get the nut on the one on the right. Took me about 30 mintues of fishing through the hole for the prybars with the nut taped to the open end of a 1/2" wrench with vise grips chomped on the box end but I finally got it. It was worth the hassle. I realized after it was too late that I could have just drilled the hole in the angle bigger in that end and just went through that hole. Oh well. Live and learn.
<a href="http://www.flickr.com/photos/93396776@N06/8500747805/" title="041 by TerryHatfield, on Flickr"><img src="http://farm9.staticflickr.com/8091/8500747805_38ea713a2a.jpg" width="500" height="375" alt="041"></a>
Everything fits perfectly under the lid now. I'm super happy with how this turned out!!!
<a href="http://www.flickr.com/photos/93396776@N06/8501855546/" title="039 by TerryHatfield, on Flickr"><img src="http://farm9.staticflickr.com/8247/8501855546_26183b9eed.jpg" width="500" height="375" alt="039"></a>
<a href="http://www.flickr.com/photos/93396776@N06/8500747829/" title="038 by TerryHatfield, on Flickr"><img src="http://farm9.staticflickr.com/8372/8500747829_f37133dd5c.jpg" width="500" height="375" alt="038"></a>
probly the cleanest prybar mod ive seen. awesome work! and i love seeing all that snap-on in a 200 dollar tool cart. just proves how awesome these HF carts really are.


Thanks! I've pretty much always been a Snap On guy all the way but these carts and the HF 44" box that I have now as well are just too good not to have. They are not to the quality level of Snap On but they are plenty good enough for me and they don't look out of place in the tool box lineup at all.
<a href="http://www.flickr.com/photos/93396776@N06/8502574091/" title="043 by TerryHatfield, on Flickr"><img src="http://farm9.staticflickr.com/8529/8502574091_ab6d074176.jpg" width="500" height="375" alt="043"></a>
I got my red cart last, found a pair of swivle casters locally for $12 each. Good quality rubber wheels. I might have to get a another set b/c they are red.
I'll worry about that later, I'm gonna make my side shelfs soon. I'm using those folding shelf brackets that oneandgone used. I'm using the 12" versions rated at 130lbs each.
For the shelf I'm using the top of a torin cart that I've had since the mid 90s, the bottom is damaged so it would have been scraped sooner or later. The top fells like its made from 12 gauge metal,plenty strong, I'm gonna cut it across the width wise.
... I took the chance to actually load all the tools I will be taking to the track into the cart just to see how everything would fit. As I said before, the purpose of this cart is to go in our race trailer only....
I used the HF magnetic strips on this using 3M super strength molding tape.
Will see how it holds when I close the lid. I heated up the metal with my heat gun before applying the tape. I had to move one strip and had to use a pry bar to get it up
Also removed the drawer locking mechanism.
Randy