To avoid these ads, REGISTER NOW!

Remodeling my attached 27x44 shop

T_Raven

Well-known member
Joined
Oct 17, 2009
Messages
209
Location
Idaho
Bought my house a little over a year ago. Just finished a year contract in Afghanistan and now I'm home and getting to work on the shop.

Here's what the inside looked like when I moved in

shop4_zps20aee00c.jpg


Pile of random **** shelves I ripped out

shop11_zpsb20c0d6c.jpg


The shop is an addition and there was still exterior siding on the garage wall

shop9_zps27afe1ff.jpg


A lot of the drywall was damaged and I need to add a lot of wiring so I removed all of it from the walls and will replace it all. For some weird reason half of one wall had styrofoam sheets behind the drywall so it was spaced out further than the rest.

DSC01437_zpsa408307a.jpg


Pulled all the siding off. I hope there's no asbestos in it. It's long and I've only been able to find info on asbestos siding that was much shorter pieces. Anyone know if there's long siding like this that had asbestos in it?

DSC01436_zps0020bba9.jpg


Getting all the plywood that was behind the siding off was a pain but I got it.

DSC01439_zpsce8eaa57.jpg


Who ever added the shop on didn't get the new wall flush with the old garage wall. The garage wall sticks out a little further than the rest of the wall. I'm hoping I can just use thinner drywall on the high part and have it line up well enough it won't be noticeable.


Next up is wiring. This is the old breaker box I'll be replacing. The house has a 200A panel with a 100A breaker supplying the shop. I got lucky there, so I'll just put in a new 100A panel and wire the additional circuits I need.

DSC01438_zps9f3b340a.jpg


Plans are to get everything wired, drywall, actually mud and tape it this time. It's going to **** but it'll be worth it. I'm probably going to paint the walls a combination of white and red.

I've got a bendpack lift, shop press, transmission jack, strut compressor, and a Quincy air compressor on the way. I'm going to get a tire changer and balancer and maybe a metal lathe. Haven't decided on heat yet but planning to put in a radiant tube heater.
 
To avoid these ads, REGISTER NOW!

gooned

Well-known member
Joined
Jul 6, 2011
Messages
507
Location
B.C.
That plywood may have been part of a sheer wall? Nice space.

The asbestos worry is more so if you are cutting it up or sanding it, just pulling it and disposing you should be good with a paper mask.
 

CNGsaves

Well-known member
Joined
Sep 26, 2012
Messages
13,233
Location
KS and OK
Siding looks more like masonite so likely no worries of asbestos. Most asbestos "siding" was the small pieces that were like 12" x 24" rectangles.

For the uneven wall (ie firewall between house and garage), I would not use thinner sheetrock, as you'll want 5/8" minimum between the 2 spaces. Why not shim the studs with some wood (ie to even out / square up all the walls) and just use same sheetrock like 3/4" over the entire space??

Be sure to install anything you could possibly want in that wall BEFORE you close it all up . . . ie electrical wiring for more outlets, telco, internet, etc. Also whether in future you might want air line system to go from garage to say basement (might as well install some black pipe steel between spaces while all tore apart).

Electrical subpanel looks pretty small so while wall is tore up would be perfect time to upgrade any electrical needs like 220v for welder, 220v for air compressor, etc. Thus, box itself may need to be bigger.

Finally, is that tore up wall the shortest distance that you might get natural gas line to provide heat for garage (ie from basement to garage)? If so, plan on installing black pipe steel for your natural gas line before the wall is all closed up.

Good luck with rest of remodel . . . . looking good!!

P.S. See the late 60's Camaro (maybe '68 ??) and nose of maybe a Firebird? How about better pics of each ride for our viewing pleasure?? ;)
 
Last edited:
OP
T

T_Raven

Well-known member
Joined
Oct 17, 2009
Messages
209
Location
Idaho
That plywood may have been part of a sheer wall?

Well that was the exterior wall of the garage before the shop was added on. I assumed the plywood wasn't necessary now that it's an interior wall. Anyone know if I should still have plywood there?

For the uneven wall (ie firewall between house and garage), I would not use thinner sheetrock, as you'll want 5/8" minimum between the 2 spaces. Why not shim the studs with some wood (ie to even out / square up all the walls) and just use same sheetrock like 3/4" over the entire space??

I was thinking about shimming the studs. It's probably only about 1/8" difference. Would strips of plywood on each stud be a good way to do it or should I put full sheets of plywood up?


Electrical subpanel looks pretty small so while wall is tore up would be perfect time to upgrade any electrical needs like 220v for welder, 220v for air compressor, etc. Thus, box itself may need to be bigger.

I have a new 100A 24 circuit panel I'm working on putting in now. I'm adding 3 outlets for my welders and wiring for the lift and compressor.

Finally, is that tore up wall the shortest distance that you might get natural gas line to provide heat for garage (ie from basement to garage)? If so, plan on installing black pipe steel for your natural gas line before the wall is all closed up.

Good luck with rest of remodel . . . . looking good!!

I'm going to redo the gas line that is there and run it above the ceiling in the shop and garage and down the garage wall to route it into the crawl space under the house for the furnace I plan to put in. My dad is in the propane business so luckily I'm familiar with gas piping and have him to answer questions. He should be in town in a couple weeks so I'll have him come check out what I plan to do and have him tell me the best way to do it.

P.S. See the late 60's Camaro (maybe '68 ??) and nose of maybe a Firebird? How about better pics of each ride for our viewing pleasure?? ;)

The black one is my 68 Firebird. It's just a rusty pile I picked up for a future project. I don't have many pics and it's under a tarp in the back yard, but here's one of the exterior

2010-11-13_12-48-54_201.jpg


The white one is my baby. It's a 67 Firebird I've had since I was 15. After all these years I finally have some money to spend on it lol. It'll be coming completely apart when I get the shop done. It's currently got a 455 in it and I'll be installing a 6 speed and fuel injection. It has vintage air AC, Fikse profile 5s wheels. I'm going to fix all the body damage, build a custom suspension and paint it.

2nhosas.jpg


Those are 2 of my projects. I currently have 7 Firebirds and a 98 Camaro here at the house lol. The Camaro and my 00 TA were just donors for my other cars. My 89 GTA got the LS1 and t56 from the 00 and my 69 Firebird will be getting the LS1 and t56 from the Camaro.
 
Last edited:

CNGsaves

Well-known member
Joined
Sep 26, 2012
Messages
13,233
Location
KS and OK
. . . {clip} . . . I was thinking about shimming the studs. It's probably only about 1/8" difference. Would strips of plywood on each stud be a good way to do it or should I put full sheets of plywood up?

I'd use hardwood (ie like portions of 1x2) to shim up the studs so everything is square and flat (thus can easily cut at various tapers if wall is way out of whack). Once that's done, it's your call if you want the 2 layers (ie plywood and then sheetrock). Since you've got all the plywood anyway, wouldn't hurt putting it back up (assuming sheets are all same thickness), then topping off with 5/8" sheetrock. That would give you nice solid wall to hang stuff since the plywood would be behind the sheetrock. Would just need to adjust all your mounts for electrical panel, outlets, etc. so that extra thickness of plywood was accounted for.

T_Raven said:
. . . {clip} . . I currently have 7 Firebirds and a 98 Camaro here at the house lol. The Camaro and my 00 TA were just donors for my other cars. My 89 GTA got the LS1 and t56 from the 00 and my 69 Firebird will be getting the LS1 and t56 from the Camaro.

HOLY cow. . . that's project central for sure!! Sounds like your handle should instead be BIRD-Man . . . . ie for all the Firebirds!! :thumbup:

Had chance back in high school to get '69 Firebird 400 ci but didn't have the cash . . . . opportunity lost. :sad:

Best of luck on rest of garage remodel . . . . AND all those resto's of Birds!
 
Last edited:
OP
T

T_Raven

Well-known member
Joined
Oct 17, 2009
Messages
209
Location
Idaho
Thanks guys.

Made a little progress on the electrical stuff. I'm going to try to post a lot of pictures so if anyone sees anything I've done wrong or could do better don't hesitate to tell me.

I had to go get a ground bar for the load panel. I didn't realize it didn't come with one until I got home and opened it. But I got it hung. The old one was on the addition wall and I decided to put the new one on the garage wall. One reason was to give me plenty of slack on the cables but I'm hoping to push that added portion of the wall out a little further at some point. There's 18' from the back of the garage to the back of the shop. I figure I could move that out 10'. That'd give me another 180 sq ft next to the lift and would be a good place to store equipment, put my tire machines and metal lathe.

DSC01440_zpsf38fc6b4.jpg


Wired power to the panel

DSC01442_zps4c276bc7.jpg


Other than that I was up in the crawl space removing some of the old wiring that won't be reused.

I'm trying to decide what to do with the light switches. There are 6 lights wired in pairs. The front door to the shop only has a switch for one pair of lights and near the back door there are three switches. So I have to turn on 2 lights when I walk in and then walk all the way to the back of the shop to turn the other 4 on. I figure my options are to add 2 switches by the front door and wire them all so a switch on each end controls each pair. Or what I would like to do is have one switch by each door that controls all 6. They are all on the same breaker so I don't see why I couldn't have them all on one switch. The only problem is this mess of wires in the 3 gang box. I don't know what I would do here to only have one switch. I know how to wire it, I just don't know what box to use or what would meet code. Any suggestions?

DSC01441_zps8c0d6226.jpg
 
Last edited:
OP
T

T_Raven

Well-known member
Joined
Oct 17, 2009
Messages
209
Location
Idaho
Made a little drawing to better show where the shop was added on and what part I would like to add on to. The wall between the garage and shop is where the siding was and what is now out a little further than the rest of the frame work. You can also see why I moved the load panel.

shopadditiondrawing_zpsf234dd12.png
 
OP
T

T_Raven

Well-known member
Joined
Oct 17, 2009
Messages
209
Location
Idaho
Anyone know if removing two of those switches and wiring all to one switch in that 3 gang box and installing this cover would be up to code?

YW3G2BL1TS_m_zpsdcd9fce8.jpg


All of the lights are on a 20A breaker and there are 20A light switches, so I don't see wiring them all together being a problem. The only thing I think would be a problem is the volume of that 3 gang box. I guess the other option would be to connect the pairs of lights in the boxes in the ceiling that they are wiring in and have one run of wire to the light switch.

Any thoughts?
 
OP
T

T_Raven

Well-known member
Joined
Oct 17, 2009
Messages
209
Location
Idaho
I like your plans and I always wanted an old firebird. What quincydid you get?

Got the 5 hp, 60 gal from aircompressorsdirect.com

I was originally going to get the 60 gal IR that they sell, but northern tool had a better price. When I went to buy it the nt price was the same as ACD. I read about some problems with the motors on some IRs, though that was a few years ago. But I decided to spend the extra $100 and get the Quincy. Almost decided to spend the couple hundred more to get a Champion but I had to draw the line somewhere lol.
 
OP
T

T_Raven

Well-known member
Joined
Oct 17, 2009
Messages
209
Location
Idaho
Ok, think I figured out what to do with the lights. 6 lights, 2 bulbs each, 75 W each bulb is 900W/120v = 7.5A. A lot less than I figured, does that sound right? I guess I'll drop down to a 15A breaker and use two three way 15A switches and wire them like this:

Current wiring is on the left, right is how I'll wire them

lightdiagram_zps3780d612.png
 

nettelec

Member
Joined
Feb 22, 2012
Messages
7
Looking at your picture of your switch box and guessing a little bit on wire sizes coming in to it. Figuring one switch, 3 #14-3, 4 #12-2= box fill of 40.5 cubic inches. Boxes have the allowable cubic inch box fill stamped inside of them. The only way I know that you could fit all that into a box with a single gang plate would be to use a 4-11/16" square metal box with a single gang mud ring on it. Leaving the three gang box with the cover you showed would meet code.
 
OP
T

T_Raven

Well-known member
Joined
Oct 17, 2009
Messages
209
Location
Idaho
Looking at your picture of your switch box and guessing a little bit on wire sizes coming in to it. Figuring one switch, 3 #14-3, 4 #12-2= box fill of 40.5 cubic inches. Boxes have the allowable cubic inch box fill stamped inside of them. The only way I know that you could fit all that into a box with a single gang plate would be to use a 4-11/16" square metal box with a single gang mud ring on it. Leaving the three gang box with the cover you showed would meet code.

I went ahead and wired it up like the little drawing I made. There's now one 12/3 cable between the two switches, and one 12/2 cable from the rear switch up to the lights and then they are wired in parallel up in the rafters.
 

gooned

Well-known member
Joined
Jul 6, 2011
Messages
507
Location
B.C.
Usually that is done on the outside.

Yup :thumbup: since this shop is an addition we are looking at the " outside" of the house wall...I have an attached garage on the end of my house and the whole wall is sheathed in plywood, inside the garage now but it used to be the exterior of the house.

That wiring space issue is no problem in a three gang, keep those updates coming :beer:
 
OP
T

T_Raven

Well-known member
Joined
Oct 17, 2009
Messages
209
Location
Idaho
Got some wires ran to the three 50A outlets for my welders.

Went and picked up my red Bendpak

IMG_20130312_220828_259_zps4e97249d.jpg


There are some pretty big scratches on it unfortunately. I have a separate thread about the lift though so I won't put all that here.

My compressor shipped yesterday so that should be here soon.
 
OP
T

T_Raven

Well-known member
Joined
Oct 17, 2009
Messages
209
Location
Idaho
Made some progress yesterday and today.

Installed 3 50A outlets for my welders

DSC01479_zps4ce247b8.jpg


Figured out where I want the lift and ran a wire to the ceiling. Gotta figure out what electrical box to use.

Covered up the hole where the vent for the old heater was. I'm most likely getting a radiant tube heater so I'll relocate the gas line and vent. The siding a took off the wall is the same as what's outside that hole so I can use a piece to cover where that hole is.

DSC01478_zps5e4719d2.jpg


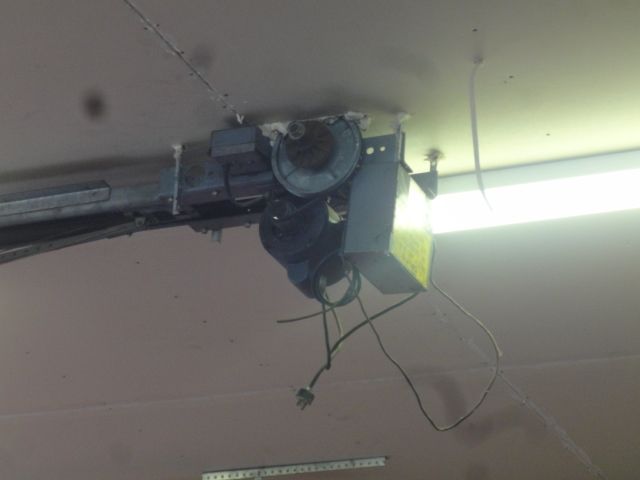
This monstrosity of a garage door opener is above my front over head door but it's not useable at the moment and there's not an outlet up there. I ran a wire from the breaker and I'll install an outlet and see if I can get it to work. The Pulley is in a slot in the drywall lol. If I can get it to work I'm going to paint it and recess the drywall around the pulley.

DSC01480_zps4b910046.jpg


The wire dangling below the light switch is for the motion light outside. It never worked and now I know why, it wasn't connected to anything.

DSC01483_zps22bf8776.jpg


I ran wire from the panel to the light switch box, leaving room to add two outlets along the wall. So the circuit will power two outlets and the motion light which will be on a switch to easily turn it off. I put in a new double gang box for the interior light switch and ext motion light switch. The old switch was too high so I put the new box at a better height.

DSC01484_zpsbdd4390b.jpg


Air compressor showed up. It only took 2 days to get from IL to my house.

DSC01485_zps4c00053b.jpg


I'll be ordering some sheet metal for my 67 and 69 Firebirds soon. Both need driver's side doors. The 67 needs a deck lid, and the 69 needs a cowl panel. When I went to pick up the lift, a guy in the same town has some parts for sale. He had both doors, a good deck lid, and a cowl panel. All of that new would cost me about $1300 with shipping. I gave him $650 for both driver's doors, the deck lid, cowl panel, a pair of 68 doors, and a bare 71 400 Pontiac block. They all need a little work but they're all useable. I've been looking for a good early 70s 400 block to build a stroker for the 67.

DSC01481_zps63304ac1.jpg


DSC01482_zpseea2e5f2.jpg
 
To avoid these ads, REGISTER NOW!
OP
T

T_Raven

Well-known member
Joined
Oct 17, 2009
Messages
209
Location
Idaho
I agree, your handle should be "Birdman". Love those year Firebirds. Loving the garage refurb direction.

Thanks man. I've gotta have a nice work space. I'm trying to get it done quick because the disorganization is killing me lol. I'm almost done with the electrical and should be having it inspected and starting drywall next week. Gotta decide how I want to paint. Thinking a combo of white, red and black. I have 2 white and red Yamahas so I want them to match lol.
 
OP
T

T_Raven

Well-known member
Joined
Oct 17, 2009
Messages
209
Location
Idaho
I'm almost done with the wiring so I'm going to call tomorrow to schedule an inspection. Been busy with other stuff the last couple days but I stood the lift up and laid out where I want it. I've got about 1 1/2' on the left side, enough to walk around, and 13' on the right side, plenty to have a car sitting there and have room to work on it.

DSC01486_zps63d8b922.jpg


My strut tamer showed up today. Not only is it a better design than what I've used in the shops I've worked for but it's cheaper

DSC01487_zps40c07a11.jpg
 

CNGsaves

Well-known member
Joined
Sep 26, 2012
Messages
13,233
Location
KS and OK
Looking good "Bird-man" . . . . .transformation is well underway!!

Garage envy for your lift . . . I'm sure you'll get great use for resto's on all those sweet Firebirds.

Your color ideas of black, red and white sound terrific. I'd recommend you have the red match your lift.

Keep the pics coming. Good luck on electrical inspection. :thumbup:
 
OP
T

T_Raven

Well-known member
Joined
Oct 17, 2009
Messages
209
Location
Idaho
Finished up my wiring today and called to schedule an inspection. You have to leave a message so hopefully they call me back tomorrow.

Here's my load panel all wired up. If anyone sees anything I need to correct let me know

DSC01490_zpsdec57b3d.jpg


Other than that I worked on setting up the lift. It's all loosely together. I didn't drill the floor yet because my dad needs to come to town tomorrow so I told him to bring his hammer drill rather than going and renting one.

DSC01488_zps414d2157.jpg


Once I pass the electrical inspection I'll start putting up the drywall. I think I've decided to take the over head door down from the rear wall and move it to the front. Then I'll make a sweet looking barn door style door for the rear hole. I'll leave the drywall off the front wall until I've made a hole for the over head door.
 
OP
T

T_Raven

Well-known member
Joined
Oct 17, 2009
Messages
209
Location
Idaho
I wanna make a cool looking door to replace the over head door in the back. Something like one of these, either like a dark grey or black, or something that would go well with however I end up painting the walls. Better looking that the over head door and I can move it to the front where it would be more useful.

depositphotos_2462088-Medieval-door_zps9228ae3e.jpg


wooden-swing-garage-door-49452-2039111_zps5e1bb1dd.jpg
 
OP
T

T_Raven

Well-known member
Joined
Oct 17, 2009
Messages
209
Location
Idaho
Electrical inspector came by Friday. He was here for about 5 mins and told me to go ahead with the sheet rock. Got two walls done. The guy that built this shop must not have had plans to sheet rock it lol. There were sections that were on 16" centers but not all of it was so I had to put up 8' pieces where I could and cut pieces to fit in between. Also the stick part of the wall above the footer is 3" shy of 12' so for the bottom row I've had to cut 3" off the length of each piece. If the wall was 12' above the footer and it was all on 16" centers it would've been much easier. I took down the tracks for the rear over head door and just secured the door to the hole until I can build a door.

DSC01491_zpsb2143b9c.jpg


The lift is bolted down fully functional. I just need to secure the wiring. My dad lives quite a ways away but had to come to town for a convention so I had him bring his hammer drill so I could bolt the lift down. I had him bring his old Honda while he was at it. It's a 71 SL100 that he bought in 73, so he's had it 40 years. It was the first motorcycle I ever rode before I was old enough to walk lol. It's been in pieces since I was 15 when it broke down and I took it apart to fix it. I bought a replacement engine on ebay and had him bring it to me so I can repaint it and get it ride-able again.

DSC01492_zpse30f7e66.jpg
 
Last edited:
OP
T

T_Raven

Well-known member
Joined
Oct 17, 2009
Messages
209
Location
Idaho
Got the two walls taped yesterday and a second coat of mud on today.

DSC01493_zps01a80bfe.jpg


While waiting for coats of joint compound to dry, I'll be working on my brother's truck. My dad brought it down last week to have me rebuild the transmission. They're on spring break next week and want to come back to get it. So it had the privilege of being the first vehicle on my lift today. My nice air over hydraulic trans jack hasn't shown up yet so I had to improvise.

DSC01494_zpsb47f6837.jpg


I figured the jack would show up today after I already had it out and a big box showed up on the porch lol. It was my oil drain though. Which would've been nice for draining the trans and t case but not a big deal with out it. I managed to keep the floor pretty clean. This looks like the same one at HF but I bought it on ebay for about $30 less than the sell price at HF.

DSC01495_zpsb9fc5d65.jpg
 
Last edited:
OP
T

T_Raven

Well-known member
Joined
Oct 17, 2009
Messages
209
Location
Idaho
Nice mate, even with having to have your shed gear randomly placed at the moment, it already looks hheaps better. :) cheers andy

Thanks man, I'm trying to get done as soon as I can so I can get things organized and relax a little lol. Having things out of order drives me crazy.

That's a cool bike in your avi by the way.
 
OP
T

T_Raven

Well-known member
Joined
Oct 17, 2009
Messages
209
Location
Idaho
Spent the day rebuilding my brother's transmission so I didn't do anything to the shop. Tuesday was my birthday so on the way back from picking up parts I stopped at the pawn shop and bought myself a birthday present.

DSC01499_zps2e61412f.jpg


Fortunately I live on a busy street and the building next to the shop is just my neighbor's garage.
 
OP
T

T_Raven

Well-known member
Joined
Oct 17, 2009
Messages
209
Location
Idaho
Got all my sheetrock up and mostly taped. Gotta run get some more joint compound. I got tired of working around everything so I moved out everything I could.


I was trying to plan adding the roll up door I took down to the front wall and adding onto the shop on the left side of the hoist. After talking to the building department and a structural engineer, doing what I want is going to require a lot of work to support the structure so I'm ditching the front door, and if I do add on by the lift I'll just have to keep the wall there and use the man door to access the new room.

I've got one hose reel I've had for a while but I got a HF coupon in the mail so I went and picked up another. I might even get two more and put one in each corner of the shop. The green hose on top is a PVC/rubber hybrid that's a lot lighter than rubber so I'm going to replace the old hose in my other reel with this lighter hose. Every less pound you have to drag around the shop all day helps lol.

 
OP
T

T_Raven

Well-known member
Joined
Oct 17, 2009
Messages
209
Location
Idaho
I'm trying to decide what to do to my floor. I've been talking to Legacy about using their jet black floor dye, with their epoxy/urethane "ultimate" sealer on top. I like the look of a black floor and I'm hoping it'll hide some of the stains already there. I didn't realize how much paint is on my floor. The last guy worked with wood, so there aren't many oil stains but there's a lot of paint. I'm open to suggestions for floor staining/coating options and could use some opinions on what to do to prep and try to remove some of the paint


jagwinn

Well-known member
Joined
Apr 10, 2013
Messages
487
Location
Virden, Illinois
Owned several Poncho 400`s. IMHO best GM engine. Great garage...I get the feeling that you are one of the few that get to do your hobby as your job.
 
OP
T

T_Raven

Well-known member
Joined
Oct 17, 2009
Messages
209
Location
Idaho
Owned several Poncho 400`s. IMHO best GM engine. Great garage...I get the feeling that you are one of the few that get to do your hobby as your job.

That's actually been the problem lol. I always loved cars and growing up just figured I'd be a mechanic. I'm older and wiser now and realize crappy income makes you hate what you do. I even worked at a custom shop that builds exactly the cars I'm into and doing it for other people takes the fun out of it. And after 5 years over seas living in **** conditions to make 6 figures, I've learned a good income will make you like a job.

I don't know where or when I'll try to do it, but I want to open a gym. I've been slowly working on a business model. I'll turn my other hobby into a career for a change and just play with cars.
 
To avoid these ads, REGISTER NOW!
Top Bottom