To avoid these ads, REGISTER NOW!

The fruits of my labor

FunkyfullWidth

Well-known member
Joined
Oct 3, 2011
Messages
1,238
Location
Three Rivers, ma
I've been craving more space, and a space of my own for a while. After completely taking over my parents garage, side yard, shed, and back yard it was evident I needed a big garage with plenty of storage space. Not to mention Having a girlfriend (who is wonderful) for going on three years we felt the need to have a place of our own. We looked around for a couple of months, made an offer on a place and within 5 months, it was ours.... So after alot of corporate bank BS we moved in last week. I have most of my tools, yet none of my projects here yet, so sorry dad but you'll have your space soon enough.

Here's some pics of what I'm dealing with. It's roughly 28x40 inside with a loft space above for whatever I chose to do with it. So far the garage has got my tool boxes, some furniture we picked up, and some odd ball things.

Outside
100_0844.jpg

100_0845.jpg

100_0840.jpg


Inside
100_0838.jpg

100_0843.jpg

100_0842.jpg

100_0841.jpg

100_0860.jpg


So my issues right now, there's currently only 4 outlets, all on the same wall including one 220, and 4 spot lights (that work) all on the same wall. During the day open the garage doors and you can see fine, but at night it's shadowy. So I need to figure out lighting and wiring and then plumbing for my compressor. I have a line on a nice snap on 2 post lift for a good price so I'm hoping that deal works out. I'm still working on getting alot of my stuff here then I can see how much room I have to work with as far as shelving, possibly stairs going upstairs from the floor and space for workstations.

The plans for the loft are a place for all my instruments, and a bar/game area. Starting from scratch in a house, let alone a shop is EXPENSIVE. Been here a week and already made friends with lowes associates. So as the home expenses slow down, the garage will be tackled properly. For now, it's useable space, but still needs alot of little things. I'd like to put ply wood on the ceiling and finish painting the walls before the winter strikes. I'll keep this post updated.
 
Last edited:
To avoid these ads, REGISTER NOW!

K2sno311

Well-known member
Joined
Jul 12, 2012
Messages
62
Location
Southern CT
Congratulations on the new place, looks nice!!

what are some of your projects? any pics of those?

best of luck to you
 

don long

Well-known member
Joined
Mar 31, 2012
Messages
8,852
Location
southern california
Congrats. on the new house
You are going to love those tall garage doors
after looking around here for a while I'm convinced that a man can put 10 lbs
of stuff in a 5 lb bag in the garage with a little help from we friends at the GJ

Lots of luck
Don
 
OP
F

FunkyfullWidth

Well-known member
Joined
Oct 3, 2011
Messages
1,238
Location
Three Rivers, ma
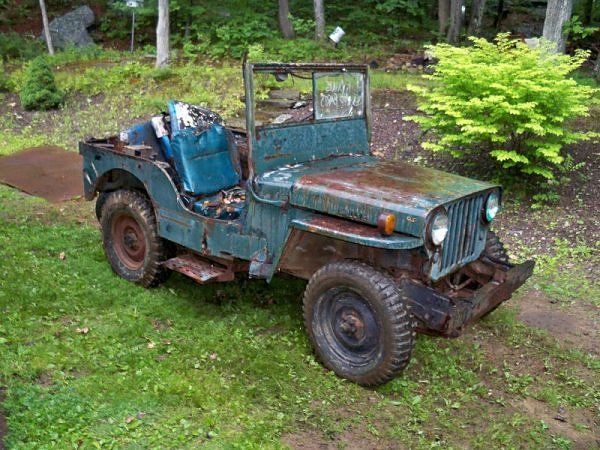
Ya i'm diggin it. Thanks for the feedback guys. The talls doors are a definate plus. lets in that much more light as well. And as for projects I have a few. My 92 wrangler, a 46 willys cj-2a, several 70's enduro bikes, a nissan 300z, a samurai.

Right now my biggest issue is going to be organizing. I've never been good at it. Aestetically at least.... Organized messes are all I usually accomplish. But with a blank slate I'm excited to try. In the next few weeks, i'm hoping to run conduit and hook up some lighting.
 

KULIWOBBY

Well-known member
Joined
Feb 28, 2011
Messages
227
Location
NE Iowa
Awesome blank slate to start with. the upstairs will be nice. Are there stairs inside the building or just the outside?
 
OP
F

FunkyfullWidth

Well-known member
Joined
Oct 3, 2011
Messages
1,238
Location
Three Rivers, ma
There are not stairs inside... yet. I might put in some sprial stairs in the corner where there was already an opening cut and ready. And I agree, it is begging for a lift install....

lift2.jpg

lift.jpg


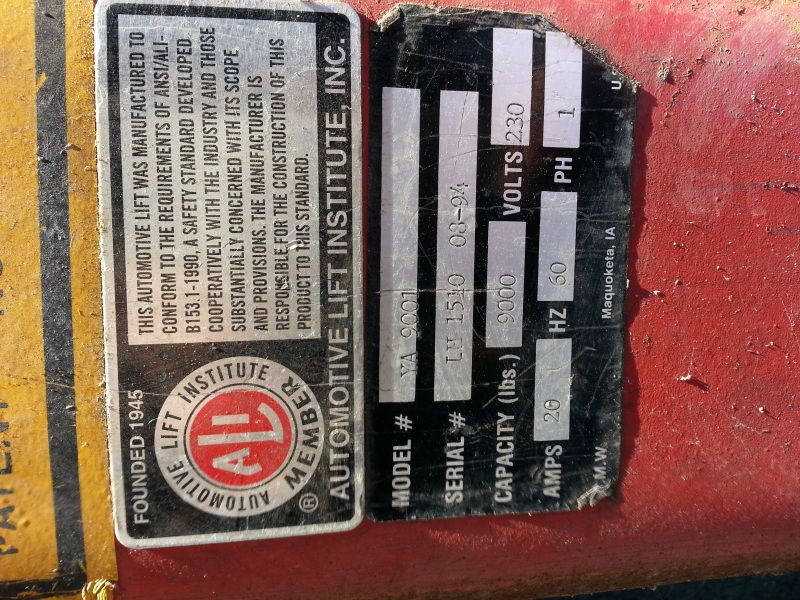
There's a snap on sticker on it and i'm pretty sure ya-9001 is a snappy number. Only problem is, I have to replace one cable. and... there's no pump on it. Nothing is set in stone on it yet. The guy I got it from didn't realize the pump was missing until I pointed it out. He's had it for seven years and never installed it... I originally told him a grand, assuming it was complete. but now We'll see. He delivered it, and is going to help install and source a pump, so it'll get worked out...

On a side note, I've been scouring the web for good light deals and I know there's a forum dedicated to lighting but oh well. I've pretty much decided on 8 footers with 4 4' lights. t8's. I just haven't worked out a grid yet. I'm thinking of running them the short way, 5 rows of 3. 15 fixtures, at 9,*** lumens a peice (according to the box) in a 1200 sq. foot area would be, 112.5 lumens/sq. ft. rounding to 9,000 lumens per fixture... I can live with that. The lights I saw were the lithonia's at home depot, but could not find them on the website.

anyway, Hoping to have the lift at least installed this week. Then I'll worry about the pump and cable after the fact.
 
Last edited:

tdkkart

Well-known member
Joined
Jun 17, 2006
Messages
6,887
Location
Eastern Iowa
Don't forget a ceiling, do it now before you get the place all full of ****, you'll be glad you did it when you turn on the lights.
 
OP
F

FunkyfullWidth

Well-known member
Joined
Oct 3, 2011
Messages
1,238
Location
Three Rivers, ma
Oh absolutley, definately gonna do the ceiling, then white paint all around. I'm probably just gonna run osb all over. A co worker told me to do sheet rock... but the walls already have osb. That's alot to redo. Not to mention cost.
 
OP
F

FunkyfullWidth

Well-known member
Joined
Oct 3, 2011
Messages
1,238
Location
Three Rivers, ma
So a couple of things. I got the lift standing upright. I've been waiting on a pump for it and now just waiting on anchor bolts, adapters and a hose.
100_0857.jpg

100_0856.jpg

100_0866.jpg


I just don't know if the way I have the pulley's set in there, if their orientation is correct or not. I cannot find a blow up of this model lift. I asked the snap on equiptment guy and he hasn't responded yet. Also Would it be better to have a solid line connecting the pistons with compression fittings, or a rubber hose connecting the two?

Progress on this will most likely be slow as available money will be tight until next year. But I hope to get SOME things done this winter.

Heres shots of the upstairs.

100_0861.jpg

100_0862.jpg


and this is what the PO did underneath the shot above.
100_0859.jpg


Stairs are on the agenda, but it looks like tight quarters up there. I'm thinking of having stairs go up to a landing then pull a 180 and go back up. MIGHT work.

100_0860.jpg


another area I wish were done differently. I would like to have seen the fuse panel moved away from the door some to allow more light switches with out looking too cramped. Realistically I'd like to move the 220 outlet to the center of the garage, and also move the compressor underneath where I'd like the stairs to be in a little room and have it hard wired.

thus far I have been waiting on the lift to be installed where I want it so i can work on the final layout of where I want everything else. But then I want to wait for stairs, and ceiling and paint, lights, outlets... etc...etc.
 
Last edited:

LutzTD

Well-known member
Joined
Dec 31, 2011
Messages
3,673
Location
Lutz, Florida
looks like a nice shop, you even have the obligitory steel tanker desk :). That opening going to the second floor doesnt look right for stairs, seems like the roof pitch comes in too much. Looks like it was setup as a lift for bringing up storage. Personally I would think stairs inside, while it sounds nice, is just too much of a floorspace stealer. You have stairs out side and you could put a winch and bucket at that opening to get stuff up and down inside. just my thoughts, the size is awesome and it looks like it fits the house too, great find.
 

Kevin54

MEMBER EMERITUS
Joined
Jan 12, 2005
Messages
29,341
Location
Urbana, Ohio
Well shoot....I'm a little jealous. I need me a lift and an upstairs. :thumbup:

Looking forward to seeing the progress pics. Just make sure that you don't get so involved in it that you can't snap some. :lol:
 
OP
F

FunkyfullWidth

Well-known member
Joined
Oct 3, 2011
Messages
1,238
Location
Three Rivers, ma
I went to look at this post the other day and found that all the pictures were "temporarily unavailable." I've always used webshots, but they changed to "Smile".... BS....I'm gonna use photobucket from now on. Point being. Some of the pics are what I had there originally. Sorry about the changes.

either way, I have a few updates nothing major. I sourced a pump from these guys. http://www.automotiveshopequipment.net/

Bolted right on. I also got a solid line cut and installed to connect the pistons. Everything is mounted, just waiting on electric and I have to figure out how the safety latches work. I even managed to get my jeep and a few other things.

100_0863.jpg

20121121_184600.jpg


Lowes had a sale on plywood so I bought 20 sheets. True story, had them all in the back of my dads dakota, with a few straps going across them. 5 minutes from home, up hill hit a nasty bump and every sheet fell out and landed right on top of each other. he was going about 10 mph. Man, embarassing. I shouldn't have shared that ha ha...

anyway, found some free time and also was able to mount the lights I had bought a few months back. Once again, waiting for electric.

2012-12-08173816.jpg

2012-12-23131233.jpg


I really wanted to paint and have everything *******. But That's the way it goes. Running the plywood one half at a time might mess running the other half up but we'll see. Next on the list is one more light up, then gotta buy some conduit, wire, switches and breakers.

For the lights I have them 5 feet off the back wall, and 18" off the sides. I have enough room for one more 8 footer in between If I feel the need. After the first light the next ones are spaced 6 feet away. i wanted to worry about the work areas before the front by the garage doors. Well, that's all for now.
 

jhelrey

Well-known member
Joined
Sep 15, 2010
Messages
7,253
Location
MN
I'd have that walkway and stairs down in a heartbeat... Mainly due to security.
 
OP
F

FunkyfullWidth

Well-known member
Joined
Oct 3, 2011
Messages
1,238
Location
Three Rivers, ma
Are you saying you'd get rid of the outside stairs and have the only way to the loft through inside the garage? Doesn't seem practical. If someone wanted in they're gonna get in, either through a window, door or set of stairs. Plus, when it comes time to move things upstairs, having the sliding door and that set of stairs will be awesome. Rather then snake around everything in the garage and have to worry about making a set of stairs big enough to accomodate things.
 
OP
F

FunkyfullWidth

Well-known member
Joined
Oct 3, 2011
Messages
1,238
Location
Three Rivers, ma
So it's been a while since I've really done any actual work on the garage. I found that my boiler is operating at 75% efficiency, which explains the 800 a month i've been spending on oil. Then I got laid off from my job of over 2 years after being dicked around for a few months. Needless to say, it was a blessing in disguise. I've picked up enough side work making more money and spending less time. And I'm not sure if it's stupid or not, but I haven't been getting unemployment either, which part of me is proud of. Either way, I have a few extra dollars laying around now and apparently have a good amount of people that want to send some work my way but it revolves around my lift being operational. So right now I have new cables being made up and then All it needs is juice.

On a side note, i've been doing alot of reading on other peoples garage builds. The 50's craftsman garage by Red Leader is an incredible read, If you haven't looked, do it. Another great build has been this one Let the games begin...30' x 45'

His garage has inspired me to build a mezanine. I won't have as much headroom up there as he does, but it will be primarily for storage and a second entrance to the loft above. I've got my lines snapped, i'm going to cut out channels for 2x8's and then nail em to the walls. The floor joists will be 2x6's to maximize head room both above and below with a 6x6 as the center support. The mezanine will run the entire length of the back wall so we'll see around a 27x7ish storage area.

I want to get the mezanine roughed in before i start running conduit for my lighting so I can finish the plywood up to the ceiling and move my lighting around if need be.

Here's a shot with my line snapped to give a better Idea. I'm going to cut on the line, then fill that gap with 2x8, then slide the top peices of osb down, and fill the gap above with the peice I cut out. If I measured right, I should have to trim some of the boards just a little bit.
2013-03-06084116_zps847670d9.jpg


And Just to keep curiosity peaked in here, heres a few shots of the things i'll someday be working on in my garage.

1946 early cj-2a
willys_zps12fa030e.jpg


1992 Wrangler stock 4.0 ford trans transfercase and axles. I did the cage and tube fenders, still got a few things to do on it. It's only seen the trails once and it didn't do too badly...
2013-03-06092304_zps1ab9ca9d.jpg

2013-03-06092315_zps71f6a423.jpg

1987 Nissan 300z turbo
100_0539_zps9be6e04f.jpg


I also have a couple of old 70's enduro bikes that need some work. But those 3 are my main projects. I'll post a few of the old tools and boxes that I have later on as well as any progress I make with the mezzanine and lift.
 
Last edited:

dubber

Well-known member
Joined
Dec 31, 2012
Messages
5,326
Location
Canada's Capital
No wonder you chose that house, that is a huge garage. Tons of potential there. Glad to hear that the layoff ended up being a blessing, and good on you not to draw welfare.
 
To avoid these ads, REGISTER NOW!
OP
F

FunkyfullWidth

Well-known member
Joined
Oct 3, 2011
Messages
1,238
Location
Three Rivers, ma
No wonder you chose that house, that is a huge garage. Tons of potential there. Glad to hear that the layoff ended up being a blessing, and good on you not to draw welfare.

Well the thing for me with unemployment is that I knew a few people years ago that took advantage of it, and it just left a sour taste in my mouth. Theres people nowadays that do legitimately need it. With the job market the way it is there isn't much out there that people can live on. I'm not trying to start a unemployment debate here, but the facts are, some people need it when others take advantage of. It's not the same as welfare.

Now in other garage related news, big things happened today. I got the replacement cables for my lift made and ****, were those pricier than I thought they were going to be. 314 balloons for 2 cables. I was also given a 10 gauge extension chord for temporary purposes, I just have to change the ends out. I also went and picked up the wood for the mezzanine this morning and started cutting the walls for the framing.

2013-03-06161826_zpsf6fc24a0.jpg

So what I did was made some measurements off the floor, then pulled a chalk line with a level bubble hanging from it, snapped off and double checked with a 2 foot level. Then I measured an 1 1/4 off the chalk line and screwed that strip of osb up to use as a guide for the skil saw.

2013-03-06171351_zpsbac0cf7c.jpg

I cut the opening all the way around. A friend of mine said he'd help me nail framing up this weekend. We settled on 2 2x10's sandwhiched for the front with a 6x6 post in the center. Then 2x6's nailed to the wall and for floor joists. He thinks i'm insane for building a mezzanine in this garage, but oh well. It's already firmly planted in my head that I NEED it. I can store all my project parts up there as well as whatever else fits, and it'll serve as a landing for the stairs to the loft. 2 birds if you ask me...
 
Last edited:

Omphaloskeptic

Well-known member
Joined
Oct 11, 2008
Messages
2,346
Location
Ultima Ratio, Wa.
" I can store all my project parts up there as well as whatever else fits, and it'll serve as a landing for the stairs to the loft. 2 birds if you ask me... "


I have to agree with you on the two birds with one stone idea, but I'd consider the interior access stairway to be the 'bigger' payoff rather than the loft. Six of one, half a dozen of the other....

Speaking of the stairway, have you designed the rise/run, width, materials, layout, etc., etc., etc.? Doing all that now may save you some headaches than if you built the loft/landing first and then try bodging the stairway on as an afterthought. Will you add some kind of door to the upstairs to help control heating/cooling? Might as well design that in now also. One additional 'suggestion', since you are going with 2"x6" for the floor joists, how about setting them a 12" O.C. instead of 16" O.C., and maybe even doubling the joist that falls on the post? Are you going to place a post beneath the 2"x10" where the top/inside of the stairway stringer will fasten? Will the stairway underside become the compressor closet? It's so-o-o-o much easier to make your 'mistakes' on paper than on wood! LOL


P.S. - If you are able to design for the center post to run up into the second floor, it might serve you well for mounting a boom/winch for moving heavy stuff up and down from the mezzanine.
 
Last edited:
OP
F

FunkyfullWidth

Well-known member
Joined
Oct 3, 2011
Messages
1,238
Location
Three Rivers, ma
" I can store all my project parts up there as well as whatever else fits, and it'll serve as a landing for the stairs to the loft. 2 birds if you ask me... "


I have to agree with you on the two birds with one stone idea, but I'd consider the interior access stairway to be the 'bigger' payoff rather than the loft. Six of one, half a dozen of the other....

Speaking of the stairway, have you designed the rise/run, width, materials, layout, etc., etc., etc.? Doing all that now may save you some headaches than if you built the loft/landing first and then try bodging the stairway on as an afterthought. Will you add some kind of door to the upstairs to help control heating/cooling? Might as well design that in now also. One additional 'suggestion', since you are going with 2"x6" for the floor joists, how about setting them a 12" O.C. instead of 16" O.C., and maybe even doubling the joist that falls on the post? Are you going to place a post beneath the 2"x10" where the top/inside of the stairway stringer will fasten? Will the stairway underside become the compressor closet? It's so-o-o-o much easier to make your 'mistakes' on paper than on wood! LOL


P.S. - If you are able to design for the center post to run up into the second floor, it might serve you well for mounting a boom/winch for moving heavy stuff up and down from the mezzanine.

I was going to double up the joists that land on the post. I haven't exacly designed where the lower stairs will be yet, and I most likely won't get to do the stairs going to the loft until summer. Depending on funds and time, I was going to just Put up the outer frames and the floor joists where I KNOW the stairs won't be. The stairs to the mezzanine Will be against the back wall going up on the left side, the side with out the lift as I want as much room in front of the lift as possible. I should have enough room to start the stairs going to the loft Right off the center where the joists will be doubled. I'll have to take some measurements of the upstairs to see where they would come out. And yes I was planning on making a little entrance sealed off to keep both fumes and temperature seperate from the garage and loft.

All that said... It's all subject to change. I tend to move real slowly on things like this. I like to do one step at a time to give myself enough time to visualize it in my head. I really debated this mezzanine for a while until finally it clicked and made perfect sense to do it.
 
OP
F

FunkyfullWidth

Well-known member
Joined
Oct 3, 2011
Messages
1,238
Location
Three Rivers, ma
So I've primarily been into welding, auto work and metal work. But being a new home owner, I suppose I should delve into a little wood work as well. I had inherited somethings from my grandfather. In his old age of 93 my family has decided he shouldn't be allowed to touch tools anymore. He's been suffering from dimensia and he just shouldn't be allowed to use power tools. So me and my dad took a day a while back and packed up his stuff and I took it home with me. It was a sad day to realize I was packing up a man's life long accumulation of home owner realated stuff. Screws, light fixture repair parts, tools.... I would probably beat someone half to death for even taking my only set of screw drivers let alone my entire collection of stuff.

So either way, it made me proud to receive his things. Some of the stuff was his fathers, and other things possibly older.

This tool box was mounted to the wall of his basement for the better part of fifty years... I tried to get a picture of everything as it was but my dad beat me to it and started taking things out before I could. This box belonged to My grandfathers father. Making it probably close to 100 years old.
2012-11-03084657.jpg


Also here is two older craftsman tools, a sander and a jig saw.
2013-03-06084420_zps7e18c0cf.jpg


2013-03-06084223_zps805b4873.jpg


Now fast forward a few months and my girlfriends grandfather calls and says he cleaning out some space. He wants to know If i'd be interested in an older craftsman radial arm saw. I say sure, why not. I get to his house and he has a pile of old tools, bolt cutters, pry bars, hammers, a plumb axe, a few big pipe cutters, and pipe wrenches. Then he asks if I have any need for an old jointer. Not even really knowing what it is, but knowing that I need it I of course say yes...He tells me it's a Delta. So after we dig out the RAS, we go to dig out the jointer. And it's an older craftsman 4" jointer. Awesome. I had just read throught Red Leaders thread so these things were pretty much stuck in my head. So heres the pics of todays "mini haul."

2013-03-09151602_zps334c6c92.jpg

2013-03-09151619_zps26f2abaa.jpg


2013-03-09151506_zpsa59d5d2d.jpg


2013-03-09151513_zps54bcb468.jpg

2013-03-09151529_zps41189025.jpg
 

Red Leader

Well-known member
Joined
May 15, 2011
Messages
2,689
Location
Denver, CO
I bet the former owners would be pleased to know that such a caretaker is in charge of their tools now.

Any parts needed for that radial saw can be found by placing a 'WTB' ad over at the OWWM forum. To be honest, you may even get the parts for free - Craftsman made a ton of those saws and they are very common. What is not as common is the fact that yours is a '58. That is a very early saw. Craftsman had no 1958 power tool catalog, so we'll never know for sure when exactly these saws were introduced. They were not in the 1957 catalog, but there is a chance that they were in the stores at that time. Still, nice saw! Mine, when I had it, was a '60. If you look around, you'll find some restoration threads on these saws both on OWWM and right here.

Congrats!
 
OP
F

FunkyfullWidth

Well-known member
Joined
Oct 3, 2011
Messages
1,238
Location
Three Rivers, ma
It looks like on the line that reads code, I beleive it says A 58. So that is in fact a date code? It's kind of a bummer, when I turn the saw on it sounds great. But as I was trying to free everything up I noticed a few issues. The plate underneath the column was cracked into a few peices. My guess is something seized up when someone tried to get the column to go up and down they forced it, and it cracked. The other busted part is the motor mount where the notches are for the swivel...

That leaves me with a few options. Wait and look around for another saw to use parts from and if this saw qualifies for the rebate, take that head right off and get my hundred bucks to go towards the new saw. Assuming this 100 incentive is for real.
 
OP
F

FunkyfullWidth

Well-known member
Joined
Oct 3, 2011
Messages
1,238
Location
Three Rivers, ma
Making a little progress slowly but surely here. I got some more boards up, and cut the 6x6 as well as drilled and anchored the mounting bracket for the 6x. I couldn't figure out how to measure for the height of the beam, so what I did was put some finish nails into the walls, pull a chalk line across the span and measure from the ground up.

Heres the beam in place!
2013-03-11172448_zps4321ae0d.jpg


Now came my next problem. I think I may have prematurely put the 2x6's on the side walls prematurely. I'm no framing expert but do I want the front 2x10's to meet the side 2x6's or do I want the 2x6's to meet the 10s. either way, can I get away with nailing the ends of the 2x10's to the wall, Or should I really have beams at the corners too. I was almost thinking about notching 4x4s to hug the footing and then lagging them to the walls. What do you guys think?
 
OP
F

FunkyfullWidth

Well-known member
Joined
Oct 3, 2011
Messages
1,238
Location
Three Rivers, ma
Big things happened today...

2013-03-12164638_zps26320fc2.jpg


I got some much needed help from the girlfriends grandfather today. I got to work this morning and about 4 transformers on the street blew. So I was pretty much free for the day. We got just about all of the mezzanine framed up and are hoping to focus on the stairs this weekend.

This is what we did for the ends..
2013-03-12133222_zpscb684ee8.jpg


I'm pumped about this, and figured i'd share! Now I can finally get some clutter off the ground.
 

LShee778

Well-known member
Joined
Jan 14, 2013
Messages
169
Location
Central PA
I will trade my YJ and garage for your garage alone. Sound good?

Seriously though, awesome space and vehicle selection. Can't wait to see this come alive.

More jeep pics!
 

LShee778

Well-known member
Joined
Jan 14, 2013
Messages
169
Location
Central PA
Ooooooh, what an awesome work/play space just awaiting a remarkable transformation!!!
:beer:

Keep us posted...

Marty close your eyes! I dont think either of us should be looking at his YJ. It just causes our wallets to suddenly get the urge to lose some weight
 
OP
F

FunkyfullWidth

Well-known member
Joined
Oct 3, 2011
Messages
1,238
Location
Three Rivers, ma
Don't be fooled, it's not really anything special. I lucked out with the drivetrain really. I had a good 4.0 to start. And for the axles, trans and xfer case... well, I found an ad on craigslist for "some" ford parts. The list was impressive... 1976 ranger f250, 1978 f250 cab, frame, 2 sets of doors, transmission and transfer case, axles. Then several extra axles and transmissions and a early 70's f100. All for 500. I picked it all up minus the f100 which was trashed... Everything from the 78' went into the jeep. HP 44, dana 60, np435, np 205.

I sat on the highboy for a few years, then sold it for 300. I had huge plans for the 78, but never had the time or ambition, so sold that last year for 300. Sold a few transfercases. I made out.

The rest of the jeep sat untouched after 07 until last winter where I finally finished everything major up. I modified the np205 for twin stick operation and rebuilt it at the same time. Suspension is cherokee springs with a chevy spring added in the rear and 1.5 soa rubicon express in the front.. Built the cage, welded up some driveshafts and figured out my steering. Full hydro it was. I sourced a danfoss steering valve with steering column off ebay for like 60 bucks shipped. Then got a double ended ram from trail gear. bought a cooler and fan from ebay. It works allright, but spits fluid out of the reservoir and wines unless it's completely full. Hoping to fixing that in the summer. I took it out ONCE last year to a trail. It did better then i'd hoped.

This was the jeep shortly after I bought it, probably around 2005...
 
Last edited:

bj383ss

Well-known member
Joined
Sep 29, 2011
Messages
3,166
Location
TX
Nice space. Love all the old tools you got. A little green myself:D. And on top of that they were your grandfathers that is just awesome. I have a bunch of my grandpa's stuff made in the good ol USA. And like you very proud to have them and use them. I think he would be proud to see you using them and giving them a good home.

Bret
 
OP
F

FunkyfullWidth

Well-known member
Joined
Oct 3, 2011
Messages
1,238
Location
Three Rivers, ma
So I've been makin good progress in here the last few weeks.... Got most everything framed up, I was short 2 joists and still have to build the stairs. The diffence was split to make the stair opening around 42" and I want to say a 9 1/4 tread... Here's what it looks like from the top..

2013-03-16123428_zps4417bf7e.jpg


And those friggen lights that were installed on the walls kept blowing bulbs, I woulda gone broken replacing those. They are not meant for indoor lighting... So I went out, bought a box of bulbs and temporarily hitched up the front 3 lights

2013-03-18165233_zps16da670d.jpg


My god what a world of difference. I'm gonna grab a few lengths of conduit and tie the other side in, then When I run the conduit From the main I just gotta tie into the row along the wall...

Here are my future plans for the lighting.... I may or may not add a seperate switch for the last lights over the mezzanine, but I do have a few ceiling fans I'm going to put up. Do I have to run 3 wires, or can I get away with just running a hot wire and using the ground and neutral off the lights circuit? The back 6 lights are going to be on a seperate circuit from the (future) front lights... I would definately have a seperate switch or 2 for the fans. The fans I have came out of a house, so they have light sockets.

And here's another question. The front beam on the mezzanine, Should I paint it? I don't want too much white in the garage... I was thinking about sanding it and staining it with a light stain. There's a few nail heads in the middle... How could I cover those? Sink em a little bit and mix some saw dust and glue?
 

larry_g

Well-known member
Joined
Apr 28, 2007
Messages
16,891
Location
oregon
And here's another question. The front beam on the mezzanine, Should I paint it? I don't want too much white in the garage... I was thinking about sanding it and staining it with a light stain. There's a few nail heads in the middle... How could I cover those? Sink em a little bit and mix some saw dust and glue?

As is popular these days, Paint it red,or the color of your choice, and then continue the red along both walls to make a stripe around the building.

lg
no neat sig line
 
OP
F

FunkyfullWidth

Well-known member
Joined
Oct 3, 2011
Messages
1,238
Location
Three Rivers, ma
That's an idea to kick around, a stripe around the 7 foot mark would aestetically break up the height of the walls. I'm gonna do some thinking about potential shelving and cabinet height and see where that might break into the stripe...

this mezanine is finally almost done... Got the stairs put up and started to kind of make organized messes.. finally starting to organize nuts and bolts, and storing un necessary parts up top. Hopefully these pics are a little clearer...

Before:
2013-03-20165245_zps339d55c2.jpg


After:
2013-03-21174014_zps9dc2ef69.jpg


I still gotta put two peices of plywood down up top. I'm pulling everything away from the wall and sweepin up sawdust... Gave some love to the drill press, scuffing up all the little rusts spots showin on the chrome... I put some conduit with boxes in between all the light fixtures, bought some 12ga thhn and made myself a helper for pullin the wires through...

2013-03-20131548_zpsa55b8806.jpg

2013-03-20145535_zpsefd7103e.jpg


Made life alot easier. I just nailed a board to the top and drill a hole in it to snake the wires through so they wouldn't unwind on me...

Much brighter with all 6 lights are. I went with sylvania 4100k cool white. Even without a painted ceiling or half a wall, it was nice and bright in there... Also got a torpedo heater in there cookin and I was in a T shirt..
 
OP
F

FunkyfullWidth

Well-known member
Joined
Oct 3, 2011
Messages
1,238
Location
Three Rivers, ma
So with the stairs up, here's a few more shots of puttin things away. My only problem is the epiq which I have no clue where to put....

ac8c0bb2-e25b-4f8b-8fc1-c9a91c4ba530_zps217b3a06.jpg


The other side
2013-03-22065614_zps6f9f84d4.jpg


And after shimmying the car back and forth a few times to pick things up and get it lined up...

2013-03-22144857_zps0099c2f5.jpg


I played around with it at the 4 foot height for a while adjusting the cables. Now both sides hit the locks at the same time. I plan to run the car up and down a few more times, lube the cables, the bearings, rollers and guides. Then double check all the anchors. Then I'll start runnin the list of cars that were in line for this.

This will be the only thing I need to keep an eye on.. I'm hoping it won't be a problem though.
2013-03-22145033_zpsde19a039.jpg
 
OP
F

FunkyfullWidth

Well-known member
Joined
Oct 3, 2011
Messages
1,238
Location
Three Rivers, ma
This lift has been fighting me since day one. It's less and less of a deal every day. The guy I bought it from, bought it probably 5 years ago and never had it installed. And I bugged him about it that entire 5 years.. After we moved in here, i was able to pin him down.

Side line story:

Never mess with a crane sink made in the 30's... It had a slow drip underneath. I figured I could replace or reseal the basket strainer/ drain.... Boy was I wrong. I would have needed a custom adapter to a bar drain. apparently the drain hole opening and taper are different than the standard today. So what started as a gasket/seal change, ended up being a gut all the base cabinets sink and plumbing and replace it all...

Old
100_0847_zps168804b3.jpg


New
100_0854_zps75595b28.jpg


So the guy that had the lift helped me rip everything out, go get the materials, install the base cabinets, sink and related plumbing and put the trim back up...

After all that he finally brough the lift over and still hadn't given me a price yet though... ugh. Now I noticed that the cables were frayed, and that it was missing a pump, and the hose to connect both sides... With knowing all that, I offered him a grand considering the work he helped me do... I'm considering that being me, paying 500 for the lift. Then I bought a new pump to the tune of 500, new cables for 300, 50 bucks for the top hose... Wrapping this up,

Now it's installed, filled with fluid and anchors have been re checked. Here's my problem.

When I run it up and let off the button, it settles a good couple of inches and then rests. However, when I'm lowering it manually and holding the locks open and let go of the lowering valve, it stops and doesn't move. It only creeps down after you let off the up button.... I'm leaning towards a leak somewhere and have been going around tightening up all the connections, but something just doesn't seem right on this. Any insight?
 
To avoid these ads, REGISTER NOW!
Top Bottom