To avoid these ads, REGISTER NOW!

Dub's Hello Custom GJ Inspired Garage Remodel

AWoodwell

Active member
Joined
Feb 11, 2013
Messages
32
Location
Phoenix, AZ
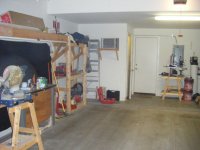
Well, I really just wanted to come here and show off my months of hard work :evil:. To be honest, when I first got the the idea in my head, all I had planned on doing was clearing things out...

attachment.php

attachment.php


Laying down some epoxy...

attachment.php


And calling it a day.

However, as my search lead me to the great site know as the Garage Journal, I was convinced I had to do more. After seeing what so many of the guys on this forum had done, I knew I had to step up my game!

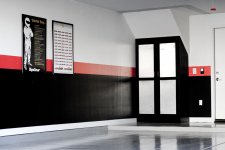
So I ended up going with the epoxy as planned, plus some custom painting and custom cabinets w/ integrated workbench.

The materials used are as follows:

Epoxy - Sherwin Williams Tile Clad HS solvent borne epoxy
Chips/Fleck - Original Color Chips custom blend
Top Coat - Original Color Chips High Performance Urethane 747
Wall Paint - Sherwin Williams Duration
Cabinets - Custom built by me!

Cabinet Installation

attachment.php


Left view after completion

attachment.php


Right after completion

attachment.php


Workbench closeup

attachment.php


I have a bunch more pics and descriptions on my blog writeup Dub's Hella Custom Garage Remodel

Let me know what you guys think!
 

Attachments

  • DSCF0060.jpg
    DSCF0060.jpg
    79.6 KB · Views: 1,116
  • DSCF0063.jpg
    DSCF0063.jpg
    65.4 KB · Views: 1,107
  • 2013-03-30_22-47-45_308.jpg
    2013-03-30_22-47-45_308.jpg
    58.2 KB · Views: 1,115
  • DSCF0070.jpg
    DSCF0070.jpg
    69.7 KB · Views: 1,112
  • left_slr_web.jpg
    left_slr_web.jpg
    84.2 KB · Views: 1,134
  • right_slr_web.jpg
    right_slr_web.jpg
    105.1 KB · Views: 1,138
  • left_workbench_HDR_web.jpg
    left_workbench_HDR_web.jpg
    114.4 KB · Views: 1,107
To avoid these ads, REGISTER NOW!

slackgt

Member
Joined
Mar 18, 2011
Messages
13
Location
Boyertown,PA
Love it !! Even with the black ,it looks so bright. I love the black,but always thought it would make my garage look too dark.
 

Kevin54

MEMBER EMERITUS
Joined
Jan 12, 2005
Messages
29,341
Location
Urbana, Ohio
Sweet job. :thumbup: See what kind of effect this place has on a person? :lol:

What did you put on the inserts of your cabinet doors? Is it thin aluminum? I think they look great.

OOPS....I forgot...WELCOME TO GARAGE JOURNAL. :hellobye:
 

kfainf

Well-known member
Joined
Jul 28, 2007
Messages
300
Great looking garage! You did a fantastic job, and I really like your cabinet builds!
 
To avoid these ads, REGISTER NOW!

HSpencer

ALLIANCE MEMBER
Joined
Nov 28, 2010
Messages
2,854
Location
South Central US
Fantastic work. Quite a transformation. Everything so neat and well arranged. I like it a lot!! Love the black and red!!!

Best Regards
Herb Spencer
 
OP
A

AWoodwell

Active member
Joined
Feb 11, 2013
Messages
32
Location
Phoenix, AZ
Nice! Looks clean... how wide are your red stripes?

Thanks! Red stripes are 8" above 36" of black

Sweet job. :thumbup: See what kind of effect this place has on a person? :lol:

What did you put on the inserts of your cabinet doors? Is it thin aluminum? I think they look great.

OOPS....I forgot...WELCOME TO GARAGE JOURNAL. :hellobye:

Hey Kevin. The cabinet door panels were my favorite part of the build. You're right, they are aluminum. But aluminum thick enough for a panel on 12 doors would have been too expensive. So, what I did was buy aluminum flashing at Home Depot...and laminate it to 3/16" hardboard, basically using the aluminum as a veneer. I came up with the idea when I was at work one day, and when I got home and tried it, I was shocked that it actually worked.:rocker:
 

scab

Well-known member
Joined
Sep 20, 2012
Messages
462
Looks very nice. I like the Stig poster and the way you made the cabinet under the stairs angled at the top. Big improvement.
 

Barnuba

Well-known member
Joined
Apr 29, 2013
Messages
57
Location
Spring Grove, PA
Thanks! Red stripes are 8" above 36" of black


Hey Kevin. The cabinet door panels were my favorite part of the build. You're right, they are aluminum. But aluminum thick enough for a panel on 12 doors would have been too expensive. So, what I did was buy aluminum flashing at Home Depot...and laminate it to 3/16" hardboard, basically using the aluminum as a veneer. I came up with the idea when I was at work one day, and when I got home and tried it, I was shocked that it actually worked.:rocker:

Your cabinets look sweet!!

How did you laminate the flashing to the hardboard? Liquid nails? I am interested in the process you used as I am looking to do something similar.
 
OP
A

AWoodwell

Active member
Joined
Feb 11, 2013
Messages
32
Location
Phoenix, AZ
Your cabinets look sweet!!

How did you laminate the flashing to the hardboard? Liquid nails? I am interested in the process you used as I am looking to do something similar.

I did not use liquid nails, I used solvent based contact cement, much as you'd use when doing any other type of veneering. Specifically, I cut the hardboard panels to size after all the door frames were build and semi-finished. After I had the ready-cut hardboard panels, I cut a piece of flashing a little bit oversized(so it overlapped the hardboard on all four sides), rolled the contact cement to both surfaces, let dry for about 10 minutes then bonded. Finally, I used my trim router to flush the aluminum with the hardboard panel.

One other thing to consider when doing this, is to use the thinnest flashing possible. The stuff I bought at Home Depot worked great, I believe it was 26 or 28 gauge. It cut with ordinary scissors and was thin enough to bond to the hardboard without trying to re-curl(as it comes in a roll). However, when I ran out, I ran over to Lowes and bought what I thought was the same stuff. It actually was thicker, I believe 22 gauge. Too thick to cut or bond correctly. That mistake cost me about $40 in wasted material.
 

Kevin54

MEMBER EMERITUS
Joined
Jan 12, 2005
Messages
29,341
Location
Urbana, Ohio
So how well did the trim router work? I would think that it would throw a hell of a burr on the aluminum?
 
OP
A

AWoodwell

Active member
Joined
Feb 11, 2013
Messages
32
Location
Phoenix, AZ
So how well did the trim router work? I would think that it would throw a hell of a burr on the aluminum?

Not at all. In my experience, aluminum is just about the easiest stuff in the world to work with. Assuming you're not welding that is. I taped all the edges before routing, maybe that helped. But in general, smooth, clean lines. I wish I had an extra panel or something to give you a better idea of the edge. Though the routing did create tons of little aluminum shavings that were razor sharp...those sucked to deal with.
 
To avoid these ads, REGISTER NOW!
Top Bottom