To avoid these ads, REGISTER NOW!

Learn from my mistakes on my Wolverine floor

srracer

Member
Joined
Mar 8, 2007
Messages
20
Location
Hudson, MA
I should start by saying that the Wolverine flooring is an incredible product. However, since you rarely hear much from people who screwed up enough that they had to redo parts of their floor, I figured I'd take one for the team and relay what I did wrong and how I went about fixing it in case it helps anybody out. But I also feel like I have a bunch of suggestions that aren't in the instructions and haven't been talked about as much regarding the application, so I'll relay my whole process.

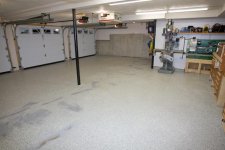
...So last spring when it seemed that Wolverine may not be selling to the public, I bought enough epoxy to do my ~800 sqft garage. It wasn't until 3 weeks ago where I was finally ready to be able to put it down.

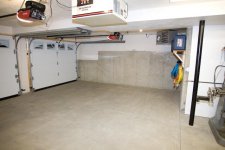
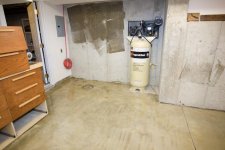
The house is relatively new - the slab was poured about 15 months ago and for the most part, cars never stayed in there as it was mainly storage for motorcycles, mower, etc etc... (also the main reason I wasn't ready to do the floor until now).

This is my 3rd epoxy flooring job... I used the rustoleum stuff from HD for my old house about 5-6 years ago, and while our new house was being built I coated my parents' garage with Epoxy coat. The rustoleum stuff honestly wasn't too bad, but after 5 years, it was flaking up pretty good. The Epoxy coat was much better than the Rustoleum, but I still wasn't thrilled with the uncoated flakes (in retrospect - the Epoxy coat has gotten very badly stained from my parents tires, so I do think that they would be much better off with a clear coating). For what its worth, my background is in mechanical engineering.

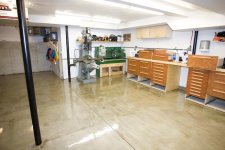
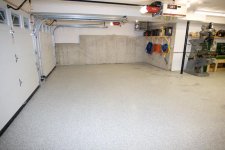
So I decided to break the bank and go with the Wolverine - especially after seeing FFPL's results.

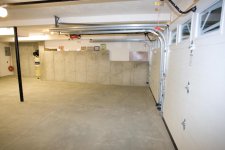
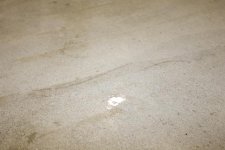
I pressure washed it, then acid etched it. Which leads me to suggestion #1: regarding the acid etching, IMHO, muriatic acid works the best. Dilute it 1:1 with water and have at least 2 gallons of diluted mixture per 100 square feet. If its a relatively polished newish floor, you will need closer to 4 gallons per 100 square feet.

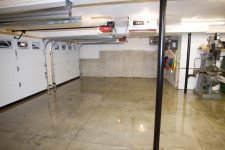
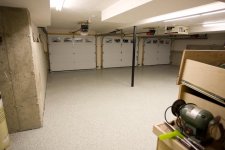
When DHL finally arrived with my extra deco-flakes (more on that later), I got started. I used (1) 3 gallon container for the ~780 sqft of coated floor and split it into 3 separate sections, mixing about 1 gallon worth of mixed product per batch. I think this is particularly important for the first primer coat as the bondtite goes on thinner and it would be harder to evenly pour out the 3 gallon mix and then spread it properly.

I used a 16" window washing squeegee from HD to spread it around the floor section by section and used a brush to attempt to brush it into the grooves. I say attempt, because it really isn't thin enough to brush it into the grooves well enough to completely coat the inside of the grooves. Which leads me to my #2 suggestion: Don't bother bondtiting the expansion grooves before filling them with integraflex. It just stresses you out for your working time of filling the grooves with the integraflex. After working with the integraflex, I have NO doubts that it would bond just as well and it would have been much easier to do the integraflex first.

[to be continued]
 

Attachments

  • GP0T9550.jpg
    GP0T9550.jpg
    55.9 KB · Views: 225
  • GP0T9552.jpg
    GP0T9552.jpg
    51.8 KB · Views: 214
Last edited:
To avoid these ads, REGISTER NOW!
OP
S

srracer

Member
Joined
Mar 8, 2007
Messages
20
Location
Hudson, MA
When I put the bondtite down, it didn't go down as glass smooth as I expected it to. It concerned me a little at the time, but in retrospect, it is of little importance. You may see little bubbles when it is wet, but they smooth out by the time it dries. I did get a few e actual bubbles, which I just hit quickly with a scraper prior to the color coat.

Regarding the integraflex.. this stuff is MESSY. Especially when you mix as much at a time as I chose to. Later I read of somebody who only mixed about (1) 8 oz cup at a time... I mixed about 2 quarts at a time, thinking it was going to flow very smoothly into the expansion cracks.. Wrong! It is very thick - nearly JB weld thick. 8 oz at a time will take a really long time, but if your **** like I am, its probably the better route.... which is also why doing it first is a better idea. Suggestion #3: Integraflex batches are best off at 1 quart at a time or less and mixing them in a container with a spout may be helpful.

Next night was the color coats. I was EXCITED. I had ordered (4) 3 gallon containers for the color and I had marked off 4 roughly equal sections of the room. I mixed a full 3 gallon container at a time, each of which would cover approximately 195 square feet. Even though I have a heater in the garage - which I had set to 75 degrees - the slab was still relatively cool, (about 30-40 deg outside when I was doing this). For these temps, there was PLENTY of time to pour out the container of epoxy and roll it out. No squeegee necessary this time - the 18 inch roller was plenty to get it spread, just pour it out into even figure '8's over the length of flooring that you're covering. Now, we're getting up to my big mistake so pay attention!....(first, a quick background)...I know how important it is to properly mix epoxy. As I said, this was my 3rd floor. In addition, I've done tons and tons of work on my boat used the West System epoxies. I've also coated a few bar tops.

As such, I was VERY persistent in making sure my first batches were well mixed. So much so, in fact, that as I was pouring out the second batch, I was seeing little 'chunks' coming out with the epoxy as I was pouring it out. I was using one of those metal-spiral mixers and I had actually shredded up the side of plastic tub enough that it was pouring out all of these flecks. My A.R. self got all panicky that these were going to ruin the floor. In reality, with a healthy coating of flakes, these would NEVER be seen, but I didn't realize that at the time. So on the next batch I was very careful not to grind the mixer into the sides of the bin. This was a BIG mistake!!! Suggestion #4: GRIND THE MIXER INTO THE SIDES AND BOTTOM OF THE CONTAINER. For those of you planning to cover with deco flakes, any impurities from little bits of plastic will not be seen - for those of you that want a solid color, I don't recommend using the round spiral metal mixers. Somebody recently mentioned that the squirrel cage mixers worked well for the color coating - I'm going to try one of those next as I believe it will have less chance for chipping the plastic tub. In any case I ended up with a bunch of epoxy that didn't really cure after 1 week of keeping the garage at 80 degrees. It kind of cured on the top, but if you pushed really hard with your finger, you could tell that is wasn't cured below... This is kind of the worse kind of 'uncure' as you could be led to believe that its solid, but the weight and traction of a tire would peel it right off.

[to be continued]
 

Attachments

  • GP0T9557.jpg
    GP0T9557.jpg
    62.9 KB · Views: 177
  • GP0T9558.jpg
    GP0T9558.jpg
    69.3 KB · Views: 205
  • GP0T9559.jpg
    GP0T9559.jpg
    62.8 KB · Views: 149
  • GP0T9560.jpg
    GP0T9560.jpg
    55.5 KB · Views: 210
  • GP0T9561.jpg
    GP0T9561.jpg
    59.2 KB · Views: 221
Last edited:
OP
S

srracer

Member
Joined
Mar 8, 2007
Messages
20
Location
Hudson, MA
So back to the deco flakes for a minute...

Wolverine says .01 lbs per square foot gives medium coverage. Initially I had ordered 20lbs (in the spring), but I kept thinking that I'd probably want heavier coverage. So I ordered an additional 50 lbs from Fred to get me to their 'medium coverage'. I ended up using only about 45 lbs of the 70 lbs I had and I thought it was pretty heavily covered (see closeup below). There is little color coat shown overall. THere are a couple of areas that I suspect fall into their full coverage, and I can see why you'd need that many more flakes to get there, but if you were like me and wanted a lot of flakes, but didn't mind if a little color coat shows through, I'd bet you be just fine with about .005 lbs per square foot. In the end, because of my mixing mistake, I'm lucky I have a bunch left over.

Another thing about flakes - they hide imperfections BEAUTIFULLY. I really struggled to get the integraflex as smooth as I wanted (note: this was due to my process more than the material, I believe). I was convinced the floor was not going to look terrific with all the uneveness of the integraflex. The color coat does a pretty damn good job at smoothing out most of that, but the second you toss the flakes out, the imperfections pretty much disappear. If you have a working garage and want a look that doesn't show problems, I highly recommend flakes. Another bonus with the heavy coverage is that if you have to repair or patch areas, you can go heavy with the flakes and if your color layer doesnt' match, I'm pretty sure you'd never be able to tell.

Back to my mixing faux pas... After a week, there were some definite areas in the 3rd batch that didn't cure so I took my medicine and ordered another 3 gallon kit from Fred. Then I got into trying to remove the uncured epoxy.. I couldn't find much advice on how to do this online, so hopefully if you didn't learn enough from my mistake to avoid repeating it, at least this info may help you deal with it. For me, it wasn't a matter of trying to remove a whole section - really just find the areas that were soft and scrape them up. You will want a stiff painters scraper - and the smaller one (I think 1.5" wide). Any wider and its too hard to push it through.. the flexible ones just bend their way back up out of the epoxy. My walls were still marked with the start and stop areas of my 3rd batch, so I just started at one corner and pressed either my finger or the scraper into the epoxy trying to do at least one 'push' every 4 square inches or so. When I found a soft spot - which was easier to find with the scraper as it would dig in and wrinkle the epoxy adjacent to it - I would scrape it up ..expanding in diameter until I felt that I had reached cured epoxy in all directions. I used a mud tub (joint compound tub) to scrape the scraper into. Depending on your area, you'll need more than one of these tubs as they're pretty difficult to clean up afterwards.

This work was excruciating on a number of levels. The physical level is obvious.. the mental level - knowing that if I just mixed these more thoroughly I wouldn't be here - was worse in some regards. And the $$.. well that's just insult to injury.

After a a little bit, a pattern emerged - the pattern was the figure 8's I had poured out. Suggestion #5: If you suspect you mixed the batch poorly and just poured it out anyways - break out the squeegee and mix it as well as you can on the floor!!! - you might just save yourself a big headache.

After that, I got some rags, donned my VOC respirator, and started with the MEK wiping up the areas that I scraped. All told, the scraping probably took me 15 hours of crappy labor, so believe me when I say its something to avoid.

I now wait for my color epoxy to patch my scraped areas and then I can finish up the floor... I do have a couple of questions for Fred or Eric that I'll post in the next message.
 

Attachments

  • GP0T9587.jpg
    GP0T9587.jpg
    63.5 KB · Views: 138
  • GP0T9586.jpg
    GP0T9586.jpg
    71.1 KB · Views: 107
  • GP0T9585.jpg
    GP0T9585.jpg
    63.9 KB · Views: 101
  • GP0T9584.jpg
    GP0T9584.jpg
    58.8 KB · Views: 152
  • GP0T9581.jpg
    GP0T9581.jpg
    63.1 KB · Views: 132
  • GP0T9589.jpg
    GP0T9589.jpg
    67.6 KB · Views: 175
  • GP0T9583.jpg
    GP0T9583.jpg
    63.9 KB · Views: 218
Last edited:
OP
S

srracer

Member
Joined
Mar 8, 2007
Messages
20
Location
Hudson, MA
Fred/Eric,

Since I waited for the epoxy to cure, its now been 2 weeks since the color coat went down. I can't really wipe the floor with Acetone without compromising the flakes.....do I need to worry that the clear coat will not adhere well considering that there is relatively little color showing?

Any suggestions?

And as a praise, I would like to commend Wolverine for a truly superior product. The semi-cured stuff that I ended up scraping was harder to scrape up than fully cured Rustoleum and possibly even fully cured Epoxy Coat. The fully cured Liquatile is ridiculously stout. To be fair, its significantly thicker than either of the other coatings I mentioned (and significantly more $$$), but I have no doubts that this is a sound product.... any failures I'm afraid will be due to my mistakes and not the product..but hopefully my dilligence in scraping will save me...


Thanks!!
-Chris
 
Last edited:
OP
S

srracer

Member
Joined
Mar 8, 2007
Messages
20
Location
Hudson, MA
Why did you apply your LiquaTile at almost 25 mils? Isn't that way overkill?

At the time, the minimum recommendation was 15 mils if I remember correctly. I wanted the floor to be stout since my intention was that if $200 more now meant that it would hold up better to my abuse and I didn't have to do it over again, then it would be well worth it.

I don't regret going with that thickness and if I had to do it again, I would probably go the same amount.

-Chris
 

drivinhard

Well-known member
Joined
Sep 9, 2007
Messages
98
Location
Braselton, GA
good gosh! :shocking:
Fred/Eric,And as a praise, I would like to commend Wolverine for a truly superior product. The semi-cured stuff that I ended up scraping was harder to scrape up than fully cured Rustoleum and possibly even fully cured Epoxy Coat.

When I did mine, I got a few spills outside the slab on the driveway. Obviously this wasn't prep'd at all, and had dirt/stains on it. Even with a 4000 psi pressure washer, the spill drips are hard to get off. I reckon with proper prep on clean concrete, it should be impossible. What I found, was the liquatile is harder to get off than the bondtite, I would have thought the opposite.
 

tojan19

Well-known member
Joined
Jul 14, 2008
Messages
67
I'm really surprised you laid it so thick. I really don't think it's going to be a big durability issue going half as thick which is what I did. I applied 1 gal liquatile per 120sf. I think the regular mixers worked fine with out grinding the sides of the containers. Proper speed is important. That stuff is really thick before the hardener thins out the mix. I thought my 1/2 dewalt drill was going to break my wrist when I fired it up. After it started to mix, it got easier and I kicked up the speed. The more your mixing at once, the longer you need to mix. I did some small 1.5 qt batches of LT and BT and just mixed by hand for 3-4 min. For the 2.25gal batch of LT I did the other night I went for a good 4 min with the drill once it started to mix. I just finished the 2nd half of my garage last night. Probably almost 2 months after finishing the first half. I think I'm going to have a little bit of a visible seam. I had to overlap a little bit with each coat. The flakes came out a little different between the sides. Everything went a lot better and more even on the second side. Experience make a big difference. You can definitely tell that the first side has changed color/yellowed a little since it went down. I figure it will be a few months before the color between the 2 evens up.

Don't feel bad about the Iflex. The first batch I did, I didn't stir the can with all the filler stuff in it. Poured real easy. Then I went to do the second batch and was wondering what the heck was inthe bottom of the can. Ever try to Unpour epoxy from a groove and remix? I can't believe how fast I worked and that it actually still cured properly.
 
OP
S

srracer

Member
Joined
Mar 8, 2007
Messages
20
Location
Hudson, MA
I'm really surprised you laid it so thick. I really don't think it's going to be a big durability issue going half as thick which is what I did. I applied 1 gal liquatile per 120sf.

At the time, the minimum thickness being tossed around was .015" and Eric said they really preferred .020". The kits were only being offered in 3 gallon kits (at least that I was aware of), so 3 kits only got me to .018" thickness. I went with 4 to get me to Eric's recommendation and the extra .005" was just bonus.

For the money being spent, the additional $200 was a heck of a lot less than if I had to do it over by not sticking to Eric's suggestion, so that's what I chose to do...

-Chris
 

roger55

Well-known member
Joined
Mar 19, 2006
Messages
595
Location
Fort Collins, CO
The minimum recommended is 12 mils for LiquaTile.

I am going to do my floor with 5 mils of BondTite, 14.5 mils of LiquaTile and 8.2 mils dry of EnduraShield (in 2 coats) for a total of 27.7 mils.

My guess is extra thickness of LiquaTile would add no more durability. If you needed more filling, then going thicker would be better. Obviously Fred or Eric would be better to answer that though.
 
OP
S

srracer

Member
Joined
Mar 8, 2007
Messages
20
Location
Hudson, MA
The minimum recommended is 12 mils for LiquaTile.

I am going to do my floor with 5 mils of BondTite, 14.5 mils of LiquaTile and 8.2 mils dry of EnduraShield (in 2 coats) for a total of 27.7 mils.

My guess is extra thickness of LiquaTile would add no more durability. If you needed more filling, then going thicker would be better. Obviously Fred or Eric would be better to answer that though.

Hi Roger, I'm sure your choice will work out fine for you, but this was an email I received from Eric regarding thickness:

"We don't offer a 1-Gallon kit at this time.

As far as flake coverage goes, it is all a matter of opinion. Reducing the
flakes is the best place to save money. A thicker coat of LiquaTile 1184 (20
mils) will always be better than a thinner coat at 15 mils. Of course, if
you are comparing the LiquaTile 1184 to other products on the market the
1184 at 15 mils is going to blow the others away.

Eric"

So, I opted for the thicker solution. Good luck on your floor though!

-Chris
 

FFPL

Well-known member
Joined
Oct 12, 2007
Messages
157
Location
Massachusetts
Hi Roger, I'm sure your choice will work out fine for you, but this was an email I received from Eric regarding thickness:

"We don't offer a 1-Gallon kit at this time.

As far as flake coverage goes, it is all a matter of opinion. Reducing the
flakes is the best place to save money. A thicker coat of LiquaTile 1184 (20
mils) will always be better than a thinner coat at 15 mils. Of course, if
you are comparing the LiquaTile 1184 to other products on the market the
1184 at 15 mils is going to blow the others away.

Eric"

So, I opted for the thicker solution. Good luck on your floor though!

-Chris
Good looking floor.

I would put down as much liquatile as you can afford. I've dropped so many things on my floor now that I don't think about it too much anymore. Seems that the thicker it is the better it absorbs the shock.

The only thing I would do differently on my floor is that I would consider the use of endurashield for the top coat; mostly for its UV resistance. Although I actually prefer the texture of the bondtite.
 

WolverineCoatings

Well-known member
Joined
Oct 22, 2007
Messages
833
Location
Spartanburg, SC
Hi Guys,

I haven't had time to read all of this yet. I just popped into the forums for a spare 5 minutes. My mother passed away on Wednesday and it may be a week before I have time to read all of this. But, I'll try to get to it as soon as possible. I'm sure we'll hear from Fred as well. See you guys soon...

Eric
 
To avoid these ads, REGISTER NOW!

Jaguar Fan

Well-known member
Joined
Mar 13, 2008
Messages
5,507
Location
Park City for Ski Season; Las Vegas for Poker Seas
...My mother passed away on Wednesday...

My condolences. May your faith give you comfort.

condolences.jpg
 
OP
S

srracer

Member
Joined
Mar 8, 2007
Messages
20
Location
Hudson, MA
Well, the floor is repaired and finished and it looks great. Unfortunately, my repaired areas are noticeable, as the decoflakes didn't quite settle the same way as when I did it the first time - particularly in the areas where I tried to blend the repairs into the floor... the color coat was thinner, so the deco flakes stood much more proudly on the surface than where the coat was thicker and the flakes settled down.

Nonetheless, it is finished. Woohoo!

I'm going to give it 2 weeks before parking any cars on it... In the meantime, I'm going to work on the furring strips on the concrete walls. I'll post pics of the repaired areas this evening.

-Chris
 

Dave88LX

Well-known member
Joined
Nov 25, 2006
Messages
664
Location
York, PA
Eric, sorry to hear about your mother. :( That is terrible news.


Regarding the Integraflex, don't feel too bad, I had the same problem trying to get it flat. I spoke with Fred, and apparently "self-leveling" is a bit misleading. In a big hole, like filling a gap in a roadway or whatever, it's self leveling, but in these small repairs we are doing, not so much. He told me a good trick I wished I had thought of before, and I feel stupid for not thinking of it.

When you fill your cracks, fill it a little higher than you need it to be. Once it sets up, you can take a razor blade and then cut it flush with the surface of the concrete, and it will be flat.

My Integraflex repair is pretty noticeable b/c I didn't think about this, and it's incredibly gooey/sticky.
 

FFPL

Well-known member
Joined
Oct 12, 2007
Messages
157
Location
Massachusetts
I spoke with Fred, and apparently "self-leveling" is a bit misleading.
My Integraflex repair is pretty noticeable b/c I didn't think about this, and it's incredibly gooey/sticky.
Are we all using the same integraflex ? The one I used just flowed and leveled really easily and i just scrapped with a 'putty' knife. The joints certainly move around but at least I know its going to stay put. There are not obvious areas where it was applied though.

Any YES it is definitely gooey !!!!!!
 
OP
S

srracer

Member
Joined
Mar 8, 2007
Messages
20
Location
Hudson, MA
Here are some high resolution photos of the finished floor:

http://picasaweb.google.com/slideruleracer/GarageFloorEpoxyJob#

I've started moving some of the tools back in and just need to finish furring out the concrete walls and putting up drywall before I can get the cars back in.

Even though I screwed up, I'm very pleased that I went with the Wolverine...it looks great and compared to the other kits I've used and at this point in its life certainly seems a heck of a lot more durable.

-Chris
 

michael Mccoy

Well-known member
Joined
Sep 19, 2007
Messages
578
Location
Athens,Ga
The wood cabinets are some of the nicest I have seen. And I may try picassa, great way to let us see your place, Mike
 

SUPERFORD

Well-known member
Joined
Jun 7, 2008
Messages
138
I just finished the 2nd half of my garage last night. Probably almost 2 months after finishing the first half... ...You can definitely tell that the first side has changed color/yellowed a little since it went down. I figure it will be a few months before the color between the 2 evens up.

I am going to do my floor with 5 mils of BondTite, 14.5 mils of LiquaTile and 8.2 mils dry of EnduraShield (in 2 coats) for a total of 27.7 mils.

I'm not terribly pleased to hear that the Wolverine floor yellowed after just 2 months. How much sunlight gets into your garage?

I had done a bunch of reading (I won't call it research) on this subject last year and at that time Wolverine supposedly had a UV stable topcoat "coming soon".

Is this EnduraShield mentioned above the UV safe product? Because I seem to remember Wolverine had been recommending a top coat of the same material as the primer or base coat (bondtite?).

If EnduraShield is indeed this UV stable top coat product, then what are the strengths (obviously uv stability would be the first), and what are any weaknesses compared to the bondite product?

also, how noticeable is the yellowing of the bondtite to the naked eye. is it enough to bother you. I plan to do my floor in all white (no flakes), so this is a major concern for me.

thanks,
chris

P.S. thanks for the write up and tips!

I had hoped to do my floor last year, but economic conditions have postponed things. hopefully this year I'll make some more progress on things in my garage. that's why I'm keeping my eye on this topic.
 

roger55

Well-known member
Joined
Mar 19, 2006
Messages
595
Location
Fort Collins, CO
I am sure Fred will chime in here to answer your questions.

I just finished my floor and used the EnduraShield (2 coats) for the topcoat.
Yes, the EnduraShield is UV protected. It is also a more durable topcoat than the BondTite and is crystal clear.

When you get a chance, read through my thread titled "Wolverine floor for my Gas Station Workshop".

I think some of the things I observed during my installation process might be valuable to you. Especially since you are doing a light color without DecoFlakes.
 

WolverineCoatings

Well-known member
Joined
Oct 22, 2007
Messages
833
Location
Spartanburg, SC
The EnduraShield 2254 (there are tons of EnduraShield products so the number matters) is a 90% solids 2K aliphatic polyester urethane hybrid. The UV resistance is awesome. In addition, it is incredibly tough! Last year when we said the UV stable product was coming soon to the DIYer we modified a quick cure (no pot life) product. Now, the EnduraShield has a long potlife which makes it easy enough for the DIYer to install. This product is a derivative of the same types of hybrid polyester urethanes being used on Aerospace vehicles. As you can imagine, even the lowliest jet airplanes see huge temerature variations, constant sunlight, and let's not forget the abrasion from travelling 500 mph+ in harsh weather. The bottom line... it's overkill for your garage floor!

Here are the weaknesses as a clearcoat compared to BondTite 1101:
You need to be careful not to put it (EnduraShield 2254) on too thick in one coat.
Have enough light to see where you've rolled... it (EnduraShield 2254) is crystal clear!
The EnduraShield 2254 is more expensive.
 

WolverineCoatings

Well-known member
Joined
Oct 22, 2007
Messages
833
Location
Spartanburg, SC
Oh, about white garage floors. If you are going to go with solid white then I would suggest doing the following after getting your floor properly prepped:

1) Prime with BondTite 1101
2) LiquaTile 1184 WH2A White (thick enough to fill in all the imperfections... etc.)
3) EnduraShield 2254 WH2A White
4) EnduraShield 2254 Clear

The point of the extra coat in there is to use the LiquaTile 1184 to make the floor look good (level and smooth) and also that it will act as your shock absorption layer. You've probably read that many people drop tools and it bounces right off.

We weren't really going to offer the ES2254 in colors to the DIY markey but we'll make an exception for you. Just point Fred (AlphaGarage) to this post.
 
To avoid these ads, REGISTER NOW!
Top Bottom