To avoid these ads, REGISTER NOW!

Between 265 & 485 SQ/FT 1950s Craftsman Garage retro remodel

Workspaces sized between 265 and 485 squarefeet.
OP
R

Red Leader

Well-known member
Joined
May 15, 2011
Messages
2,689
Location
Denver, CO
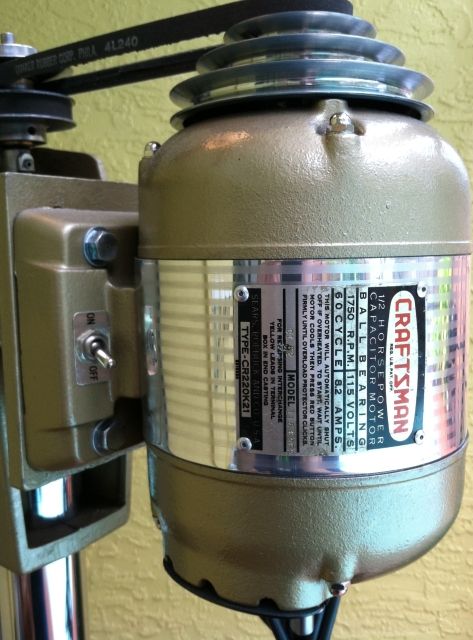
The sanders rarely turn up around here. I was looking at a Crown one at a pawn shop for around $200 when I found the power bronze one buried in an auction warehouse 15 miles away. Town was having flea market in the closed off downtown streets. I had taken a quick look in the warehouse and when was leaving when I saw a flash of gold. Owner said it ran and wanted $100, plugged it up and no go LOL. I asked how much for it as is and he said $25, I also picked up a 9" power bronze table saw that had a broken motor mount and stripped lift gears for $25, worth it for the good running 1HP motor, cast iron wings and pedestal stand.

Great deals. What was the issue with the sander? Usually those issues are so small that someone as electrically inept as me can work it out, so they make for great price reductions while presently not too great of a challenge.

Are you keeping two or going to get down to one?
 
To avoid these ads, REGISTER NOW!
OP
R

Red Leader

Well-known member
Joined
May 15, 2011
Messages
2,689
Location
Denver, CO
Its slow going, but here is the update -


Base painted and assembled:

PB301180-vi.jpg


Here are some pictures of the other bits of the sander:

PB301177-vi.jpg


PB301178-vi.jpg


PB301179-vi.jpg


As I am looking over the parts, I'm realizing that I missed some coverage, so I'll have to get another can and do touch up, but that's okay, since I still have this bracket to fill and paint:

PB301182-vi.jpg


It is an extra support for the motor. I can't tell if its oem or homade, but not a bad idea, so it stays.

Once get some paint and get these parts done, we'll be ready to assemble.

That's all for now!
 

bluebolt

Well-known member
Joined
Dec 28, 2008
Messages
5,447
Location
Benton LA
Great deals. What was the issue with the sander? Usually those issues are so small that someone as electrically inept as me can work it out, so they make for great price reductions while presently not too great of a challenge.

Are you keeping two or going to get down to one?

Sander was just a bad power cord a little work and motor runs fine. :beer:

I am planning on having one for wood in the house garage and one for metal in the big shop.

I don't see that extra metal motor bracket on my setup either.
 
OP
R

Red Leader

Well-known member
Joined
May 15, 2011
Messages
2,689
Location
Denver, CO
I don't see that extra metal motor bracket on my setup either.


Interesting. I wonder if the PO added it as a way to reduce vibration.

There were two different versions of this stand, or motor mount, I should say. The first one, was like the 6" jointer base, where the motor base attaches vertically along the post, with all 4 holes. I would assume that they were going for a cost cutting measure, but the 2nd rendition of this base (the one I have), has the stamped sheet metal part that only allows a connection point a 2 holes in the motor base, not all 4. To me, it seems much less rigid, but also much less expensive to made. I can't remember from my old jointer, but the motor mount may have been a cast part, so the new method would have definitely been cheaper.

I think the change happened sometime around 1960 or so when the old logo changed to the crown logo. It is consistent with other cost cutting measures that we start seeing major tool manufacturers do inthe 1960s.

Any pictures of yours?

By the way, that's a good plan to keep both sanders for different things.
 

Wingnut65

Well-known member
Joined
Apr 21, 2010
Messages
3,170
Location
Tampa Bay, FL
Nice work on the sander. Can you give a little info on how you fill the irregularities in the motor bracket before you paint it?
 
OP
R

Red Leader

Well-known member
Joined
May 15, 2011
Messages
2,689
Location
Denver, CO
Nice work on the sander. Can you give a little info on how you fill the irregularities in the motor bracket before you paint it?

Yep, sure thing. I'll probably use a little body filler.

The steel front drum tension brackets (shown above, highly polished part x2) - one of them was pretty pitted - I used the belt sander to carefully sand out the pits and then used the 3M wheel to polish it like the other - turned out really good.

There was a guy on the OWWM forum that was restoring a Craftsman drill press. I've never seen anything like it. His restoration was amazing. He has some pretty unconventional methods of doing it, too. I'll see if I can find the thread. It is definitely worth the read. The press turned out way better than new.
 

Wingnut65

Well-known member
Joined
Apr 21, 2010
Messages
3,170
Location
Tampa Bay, FL
Found it.

For anyone interested in tool restorations or restorations in general, you have to see this thread:

http://www.owwm.org/viewtopic.php?f=1&t=114313


It floors me every time I see it.

sample photo from above link
dfe5d7df.jpg

Wow! That restoration is amazing! And, jtbinvalrico is also on GJ! :thumbup:

I don't know how the rest of us garage restorers can come closet to work of this quality. :shocking:
 

bluebolt

Well-known member
Joined
Dec 28, 2008
Messages
5,447
Location
Benton LA
Interesting. I wonder if the PO added it as a way to reduce vibration.

There were two different versions of this stand, or motor mount, I should say. The first one, was like the 6" jointer base, where the motor base attaches vertically along the post, with all 4 holes. I would assume that they were going for a cost cutting measure, but the 2nd rendition of this base (the one I have), has the stamped sheet metal part that only allows a connection point a 2 holes in the motor base, not all 4. To me, it seems much less rigid, but also much less expensive to made. I can't remember from my old jointer, but the motor mount may have been a cast part, so the new method would have definitely been cheaper.

I think the change happened sometime around 1960 or so when the old logo changed to the crown logo. It is consistent with other cost cutting measures that we start seeing major tool manufacturers do inthe 1960s.

Any pictures of yours?

By the way, that's a good plan to keep both sanders for different things.

Pictures of the $25 here in the Craftsman Crown thread.

http://www.garagejournal.com/forum/showthread.php?p=3094841&highlight=sander#post3094841
 
OP
R

Red Leader

Well-known member
Joined
May 15, 2011
Messages
2,689
Location
Denver, CO
Just read that DP rebuild, what a great job!

It must be a joy to use a toll like that after you've rebuilt it.

It definitely takes it to 'another' level...just amazing.

The gentleman really makes good use of a wood lathe in his restorations.
 
OP
R

Red Leader

Well-known member
Joined
May 15, 2011
Messages
2,689
Location
Denver, CO
sample photo from above link
dfe5d7df.jpg

Wow! That restoration is amazing! And, jtbinvalrico is also on GJ! :thumbup:

I don't know how the rest of us garage restorers can come closet to work of this quality. :shocking:

A few other favorites:

IMG_1438.jpg


Used a stationary belt sander to achieve this, frickin brilliant:

e99b2b24.jpg


I'm almost ruining for you guys now:

0a7d9452.jpg


He made his own motor band after the original was too far pitted:

82c5958c.jpg

IMG_25182_zps48cbbda2.jpg


For those just now catching up, this is NOT my work. I wish it was!!!:D
 
OP
R

Red Leader

Well-known member
Joined
May 15, 2011
Messages
2,689
Location
Denver, CO
Welp, I decided, along with another can of the hammered gold, to pick up a can of the sage green.

PC021188-vi.jpg


For kicks I sprayed a small section of the band saw to see what it would look like on metal. Here is the result:

PC021194-vi.jpg


PC021195-vi.jpg


For reference, here is the panel cover -

PC021193-vi.jpg


All photos adjusted for white balance.


So, what do you guys think of the sage green?
 

Dan in Pasadena

Well-known member
Joined
Feb 18, 2009
Messages
13,158
Location
Pasadena, CA
What do we think of Rusto Sage green?

Do these tell you? The dash and door panels on my '55 Chevy truck. Sage and Krylon Celery green two tone. I think they look good together but a little of the Celery goes a long way. A little too much and it makes you wanna puke. I'm considering changing it out to a rich vanilla.


Last edited:

Wingnut65

Well-known member
Joined
Apr 21, 2010
Messages
3,170
Location
Tampa Bay, FL
Nice ride, Dan. The color combo is to compliment the whole truck. Look at the big picture, not just the celery.

I don't know, RL, he may be good, but I still like the results that this shop is putting out! :thumbup:
PB301177-vi.jpg


PB301178-vi.jpg


PB301179-vi.jpg
 
OP
R

Red Leader

Well-known member
Joined
May 15, 2011
Messages
2,689
Location
Denver, CO
Someone had remarked that the Sage Green color was more of a 1930s color. I can see that.

I do see it working for 1950-1960s stuff, but for the band saw I think I am going to go for something more like this:

closet-10-0310-de.jpg


This, combined with some gloss top coating and black accents will do the trick.

However, those Sage Green instrument clusters and side panels look really great with the cream accents - I think those help the color from turning into a broccoli color.
 
OP
R

Red Leader

Well-known member
Joined
May 15, 2011
Messages
2,689
Location
Denver, CO
So tomorrow is supposed to bring anywhere between 5-12" of snow, with a high of 11 degrees and a low of -3.

And if I'm home tomorrow, I'm organizing my (unheated) garage!!!! Before and after pictures to be included:)
 

Dan in Pasadena

Well-known member
Joined
Feb 18, 2009
Messages
13,158
Location
Pasadena, CA
Well you certainly won't be spray painting in those temperatures.

As for my el mondo Cheapo spray can truck interior, I told myself it was just temporary because it looked SO terrible before in faded, chipped black. Now I like it too much to change it!

Red Leader, I love all your stuff. But I'm wondering why you didn't pick one or two colors as your scheme and stick with them like you've done with your overall design motif?
 

nine4gmc

Well-known member
Joined
Mar 24, 2012
Messages
14,357
Location
Dallas
great job on the sander, I just picked one up a while back and I'm looking for a base and motor now, then it'll get the resto treatment. Can't wait to see yours finished!
 
To avoid these ads, REGISTER NOW!
OP
R

Red Leader

Well-known member
Joined
May 15, 2011
Messages
2,689
Location
Denver, CO
Well you certainly won't be spray painting in those temperatures.

As for my el mondo Cheapo spray can truck interior, I told myself it was just temporary because it looked SO terrible before in faded, chipped black. Now I like it too much to change it!

Red Leader, I love all your stuff. But I'm wondering why you didn't pick one or two colors as your scheme and stick with them like you've done with your overall design motif?

Haha, yeah no kidding.

You did a great job on that interior. Looks very classy.

Regarding the tool color choices, I've kinda kept the restoration philosophy separate from the actual garage. The garage started as a blank slate, but a lot of these tools started out as something, usually within a certain color palette. There is also some aspect of originality, which doesn't really factor into the garage itself as much. I first got inspired by a restored DeWalt radial arm saw and started looking up colors for restos and thats when I found verde green. It is a phenomenal color, one of my favorites.

However, I'm a little more flexible on tool colors. The power bronze color for the sander is somewhat true to the original and still looks great, so that works for me. I always wonder what other color will help make a tool look great. To be honest, I think my favorite color is going to be a surf/seafoam green. It screams 1950s, but can also work for earlier eras as well - its definitely got a vintage vibe.

My personality type is one where I enjoy change, which is why my tool quest list has morphed a lot over time, as well as why I want to try different colors. I think each tool has an ideal color. The sander is power bronze. If I ever find a 1950s lathe on pedestal base, it will be power bronze as well. The drill presses also look great in it. If I ever refinish the Craftsman cabinet saw, it will be in the mint green, which will look awesome with the engine turned front plate. I'm planning to redo the art deco grinder in a green/black format - I don't know if the mint green will be a little too retro, I might need to tone it down for that one. But I think the bandsaw would look killer in a mint/black color combo. So its been a bit of an experimentation, but I also like the variety. If I had to choose one single color combination for all the tools, it would be the mint green and black.
 
OP
R

Red Leader

Well-known member
Joined
May 15, 2011
Messages
2,689
Location
Denver, CO
great job on the sander, I just picked one up a while back and I'm looking for a base and motor now, then it'll get the resto treatment. Can't wait to see yours finished!

Thanks! I'll be looking for a motor as well, since the motor that came with it is not period correct.

I'm expecting it to get a lot of use!
 

Wingnut65

Well-known member
Joined
Apr 21, 2010
Messages
3,170
Location
Tampa Bay, FL
I feel for ya on the weather. I see it rolling in your way... Stay warm and stay safe. As you work in your shop, remember that my offer is still open, we had 63 this morning and will have a high of 80 today.

Just a little update on my latest acquisition... And it's all because of YOU!!! :shocking: And I thank you for that! :thumbup:

I really had no interest in bringing this home, but after seeing all the cool vintage tools that have been saved in your shop and by others because of your shop, I now own a mid 1960's Craftsman Model 100, Radial Arm Saw (113.29401) with original base and cool rare accessories.

attachment.php


attachment.php


And here it is at home
attachment.php


attachment.php


This model came out in 1963. My brother thinks my dad bought it in mid 1966, but the 1966 catalog shows a different switch with a twisted cord. Mine looks like the one in the 1963 and 1964 catalog. I can't find the 1965 catalog online.

I have the original manual and instruction sheets for the original stand 10307, Sabre Saw Attachment 605.29521, Rotary Surface Planer 605.29510, Fence Attachment 9-2953 and Molding Head and Shaper Guard 9-29525. These may have come from the Combo Accessory Kit 605.29529. And I may have the Hold Down 9-3230.

The best part about this is that no restoration is needed, except to replace the brittle cord. :thumbup: The paint is in perfect condition and there is very little surface rust on the corners of the metal base. After the Christmas decorations are up, I will start the clean-up and reassembly of my Christmas Present to myself!
 

Attachments

  • DSCN4042.jpg
    DSCN4042.jpg
    72.7 KB · Views: 994
  • DSCN4080.jpg
    DSCN4080.jpg
    67.2 KB · Views: 992
  • DSCN4079.jpg
    DSCN4079.jpg
    66.7 KB · Views: 1,600
Last edited:

kbuhagiar

Well-known member
Joined
Dec 27, 2005
Messages
1,755
Location
Escondido, CA
Just a little update on my latest acquisition... And it's all because of YOU!!! :shocking: And I thank you for that! :thumbup:!

Red Leader,

Congratulations on your latest acquisition. :thumbup:

Do you have an additional storage building, or does all of this stuff live in your garage?

Just curious...thanks!
 

toddjb

Well-known member
Joined
Aug 15, 2013
Messages
81
Red Leader, I highly recommend this video for your BS set up. This guy is a guru.


Also, do those tires need to be crowned?

The sander is looking fantastic. It's currently 6 degrees out... I'm sure that's fine for panting ;)
 
Last edited:
OP
R

Red Leader

Well-known member
Joined
May 15, 2011
Messages
2,689
Location
Denver, CO
Red Leader,

Congratulations on your latest acquisition. :thumbup:

Do you have an additional storage building, or does all of this stuff live in your garage?

Just curious...thanks!

Additional storage? Haha, I wish!

Nope, just the garage. I do have a tool in the basement, but it is a gift that will be leaving.

Right now, what I have out in the garage:

3 grinders
3 bandsaws
2 table saws
1 planer
2 sanders
1 drill press (+ drill press parts: base and column)
Radial Arm saw

So right now, pretty modest.

I used to have 3-4 table saws, a huge wood lathe, and a couple radial saws. So technically, I have room to take on more:D

Here are some of the things that are still on the 'list', things that no matter what, I will always have room for:

1942 (only) Craftsman machine shop vise;

ScreenShot20131126at11_49_01PM-vi.png


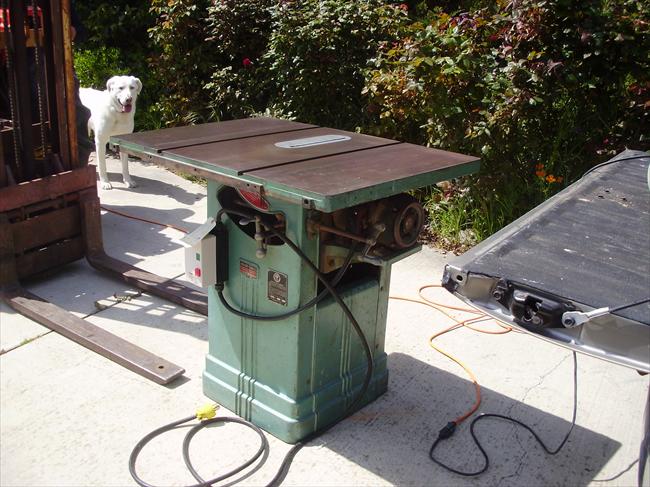
1940-1941 Craftsman 9" cabinet saw (code 101.02180)

ScreenShot20131205at10_49_48AM-vi.png


1940s-1950s (?) Craftsman-badged version of the Darra James 95 table saw:

ScreenShot20131205at10_58_51AM-vi.png


Any size (2 sizes made) 1940-1941 Craftsman sheet metal enclosed base for lathes:

ScreenShot20131205at10_51_54AM-vi.png


1940-1941 Companion/Craftsman sheet metal enclosed base for tools:

ScreenShot20131205at10_52_35AM-vi.png


1956-1957 Craftsman 12" Belsaw planer with enclosed stand:

12incmanplaner.jpg


Mid-1940s Craftsman 103.0304 floor press OR a '100' model with table raising attachment:

5787-A.jpg


OR

9538-A.jpg


Although I'm a Craftsman junkie, I gotta say, I would not have the willpower to turn down any of these following tools. 1939 was a special year for the home hobbyist. Before that time, many machines were simply 'hobbyist' grade, meaning small, somewhat unsubstantial, bronze bearing, lineshaft, making use of 1 motor for multiple tools (makes sense, i.e. depression era), etc. 1939 saw the introduction of some industrial grade tools marketed at the home hobbyist. This does not represent the very first industrial grade tools that a home hobbyist could buy, but it marked a shift in the amount and the grade of tools offered. What also makes 1939 special is that it was the one and only year that some of the most beautiful and most desirable tools were made or offered for sale.

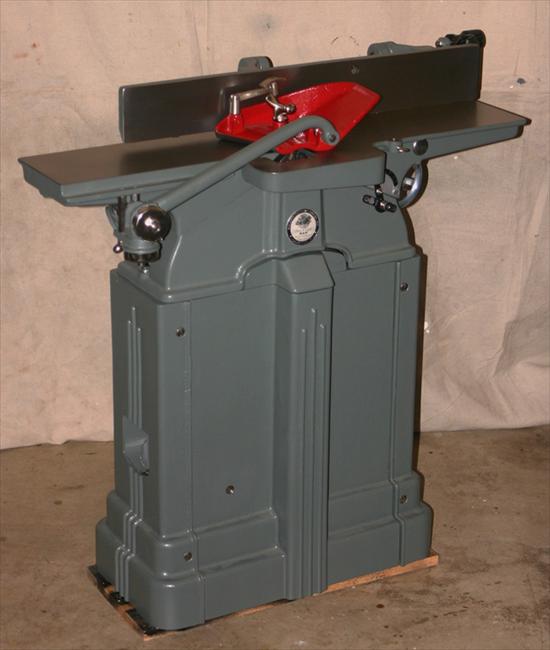
While I'm all about Craftsman, I'll be the first to admit that this single photo below probably best represents the absolute pinnacle of design for power tools and, in this humble collectors opinion, also represents 2 of the most beautiful tools ever made, the 1939 Walker Turner P907 jointer and the TA 1165 table saw:


ScreenShot20131205at10_55_55AM-vi.png


I would love to have either of these in my shop, period! The fact that Craftsman was also contracting with Walker Turner at the time for tools also means that there is a Craftsman connection. Good enough for me!


Here is the table saw, including a real world example:


ScreenShot20131205at10_55_14AM-vi.png

14148-B.jpg


And the jointer:

ScreenShot20131205at10_56_09AM-vi.png

8298-A.jpg


If anyone has any leads on any of these tools, this is what my current quest list looks like. I'll make sure to make it worth your time:thumbup:

[/nerding out]

:D

-RL
 
OP
R

Red Leader

Well-known member
Joined
May 15, 2011
Messages
2,689
Location
Denver, CO
Red Leader, I highly recommend this video for your BS set up. This guy is a guru.


Also, do those tires need to be crowned?

The sander is looking fantastic. It's currently 6 degrees out... I'm sure that's fine for panting ;)

Thanks Todd! I'll check the video out.

The sander is getting there. My only big rush is that in another week and a half, I won't have time for anything haha. I think it got down to -7 or so last night. It's definitely a little nippy.

RE: bandsaw tires, the sweet news is that the bandsaw wheels come pre-crowned, so the rubber follow the arc. Go Parks!
 

toddjb

Well-known member
Joined
Aug 15, 2013
Messages
81
RL, I'm not sure if it's the vise your looking for but the Habitat for Humanity off of Santa Fe has a craftsman vise that has a lot of denominational shape to it, it's mounted to the bench in their receiving room. You can see if from the show room. They might sell it on the cheap or be willing to trade for another vise. I saw it the other day and thought "I wonder if RL has seen that?"
 
OP
R

Red Leader

Well-known member
Joined
May 15, 2011
Messages
2,689
Location
Denver, CO
Alright! Got to spend about 3 hours in the garage cleaning up stuff!

It was a little nippy but I was moving fast! No worries there!

Here is what it looked like before, and what it normally looks like, despite whatever magazine inserts you're familiar with:lol: -

PC051217-vi.jpg


wow.

PC051218-vi.jpg


In process shot:

PC051219-vi.jpg


And FINALLY, things looking how they should:

PC051221-vi.jpg

PC051220-vi.jpg

PC051222-vi.jpg

PC051223-vi.jpg


As always, a LOT to do, but its always better not having to stumble over everything. I guess it's pretty lame when updates just consist of a 'shop clean up' but maybe it will inspire others with messy shops:D
 
OP
R

Red Leader

Well-known member
Joined
May 15, 2011
Messages
2,689
Location
Denver, CO
I feel for ya on the weather. I see it rolling in your way... Stay warm and stay safe. As you work in your shop, remember that my offer is still open, we had 63 this morning and will have a high of 80 today.

Just a little update on my latest acquisition... And it's all because of YOU!!! :shocking: And I thank you for that! :thumbup:

I really had no interest in bringing this home, but after seeing all the cool vintage tools that have been saved in your shop and by others because of your shop, I now own a mid 1960's Craftsman Model 100, Radial Arm Saw (113.29401) with original base and cool rare accessories.

attachment.php


attachment.php


And here it is at home
attachment.php


attachment.php


This model came out in 1963. My brother thinks my dad bought it in mid 1966, but the 1966 catalog shows a different switch with a twisted cord. Mine looks like the one in the 1963 and 1964 catalog. I can't find the 1965 catalog online.

I have the original manual and instruction sheets for the original stand 10307, Sabre Saw Attachment 605.29521, Rotary Surface Planer 605.29510, Fence Attachment 9-2953 and Molding Head and Shaper Guard 9-29525. These may have come from the Combo Accessory Kit 605.29529. And I may have the Hold Down 9-3230.

The best part about this is that no restoration is needed, except to replace the brittle cord. :thumbup: The paint is in perfect condition and there is very little surface rust on the corners of the metal base. After the Christmas decorations are up, I will start the clean-up and reassembly of my Christmas Present to myself!

Jeff,

The Accra-Arm radials had date codes on them, at least the early ones did. If you can find the Sears tag (on my old one, it was on the square base, left side if facing the saw), it might have the date on it.
 
OP
R

Red Leader

Well-known member
Joined
May 15, 2011
Messages
2,689
Location
Denver, CO
RL, I'm not sure if it's the vise your looking for but the Habitat for Humanity off of Santa Fe has a craftsman vise that has a lot of denominational shape to it, it's mounted to the bench in their receiving room. You can see if from the show room. They might sell it on the cheap or be willing to trade for another vise. I saw it the other day and thought "I wonder if RL has seen that?"

Hmm...I've never noticed it! Next time I'm there I'll take a peek. Thanks for the hint!
 
OP
R

Red Leader

Well-known member
Joined
May 15, 2011
Messages
2,689
Location
Denver, CO
Forgot one last picture:

PC051224-vi.jpg


Lol...I'm so dumb. I did this just to see if I could. After getting out of the 4runner and closing the garage I realized I left the far side wall light on, so I ended up crawling like a gopher underneath the table saw and front bumper, underneath and around the front wheel, and underneath the bandsaw just to get to it...and back the same way.

At least I can't say life isn't interesting:dunno::lol_hitti
 
To avoid these ads, REGISTER NOW!
Top Bottom