To avoid these ads, REGISTER NOW!

Between 265 & 485 SQ/FT 1950s Craftsman Garage retro remodel

Workspaces sized between 265 and 485 squarefeet.

Wingnut65

Well-known member
Joined
Apr 21, 2010
Messages
3,170
Location
Tampa Bay, FL
Ummm, Couldn't you have gone through the 4Runner to get to the switch?

I was wondering what that white stuff was on the step out the side door! BTW, in your progress photos, it looks like you have the overhead door open. Of course it will be cold in the shop if you leave the doors open in the winter! Or, at least that is what I've heard :thumbup:

Jeff,

The Accra-Arm radials had date codes on them, at least the early ones did. If you can find the Sears tag (on my old one, it was on the square base, left side if facing the saw), it might have the date on it.

That would explain what the '163' is for the 'Code' on the tag. I wasn't sure what code they were referring to. I'm assuming that would be January of '63, which would put this one at the very beginning of the of the production run for this design.
 

Attachments

  • DSCN5670.jpg
    DSCN5670.jpg
    53.3 KB · Views: 38
To avoid these ads, REGISTER NOW!
OP
R

Red Leader

Well-known member
Joined
May 15, 2011
Messages
2,689
Location
Denver, CO
Ummm, Couldn't you have gone through the 4Runner to get to the switch?

I was wondering what that white stuff was on the step out the side door! BTW, in your progress photos, it looks like you have the overhead door open. Of course it will be cold in the shop if you leave the doors open in the winter! Or, at least that is what I've heard :thumbup:


That would explain what the '163' is for the 'Code' on the tag. I wasn't sure what code they were referring to. I'm assuming that would be January of '63, which would put this one at the very beginning of the of the production run for this design.

Lol...the ideas you don't think of at the time:lol:

As far as the door being open, I needed to get the car out of the garage to move it, but didn't want to back it all the way down the driveway since I probably wouldn't be able to get it back up (we have a steep driveway). Actually, sometimes the garage is actually colder than outside. Although...that wasn't really the case yesterday:D

Yeah, the 163 would be the date code. Typically, Sears did 1 number for the month, with a space and then 2 number for the year, so it would look like '1 63'...or sometimes there was a slash. If you see a 113 on there, that would be the manufacturer code for Emerson, who most likely made the saw. Mine, when I had it, was from 1960.

Its always cool to know right when it is from. Syncro was also really really good about dating their tools.

I'm hoping along the way through this whole journey, to get some more information/literature on Red Star Products, who made the radial arm saw.

Each saw has an individual serial number, but it has never been deciphered or linked to a specific date. A good place to start would be finding some kind of documentation that linked a serial with a date - either a letter to a customer or a shipping ledger or something of that sort. As it stands, there is very, very little to identify when these saws were made. Red Star was sold to Delta in 1948, I believe, and there was a small transition in that period in which the saws become identifiable, but for the main production run, its anyone's guess.

I'd really love to pin down when my 40A was made...but it may be a long time coming. Sometimes you get really lucky and actually get ahold of someone that used to work at the company, but seeing as how most of these mystery tools were made in the 1930s and 1940s, that chance is all but gone now. Still, I'm surprised that nobody ever did that research in the past? Maybe nobody really took too much interest.

-RL


EDIT: Wrote that information before I saw your picture! Nice to know for sure! Cool to think that tool is almost 51 years old, huh?
 
Last edited:
OP
R

Red Leader

Well-known member
Joined
May 15, 2011
Messages
2,689
Location
Denver, CO
The Garage Door Opener

Okay, so this is something I've wanted to do for a long time.

While out on the east coast last year, I stopped off at an antique store and found a great GE control switch:

PC061227-vi.jpg

PC061228-vi.jpg


I'm thinking of keeping all the wear and patina, since they really do no damage, it shows its history, and it is less work!


It will be replacing this:

PC061225-vi.jpg


Now, the key was to figure out how to get the garage door switch to mount inside the control unit and still be functional. After taking a peek inside and studying it, I think I've found a great solution.


It will be mounted to the lower switch and therefore controlled by the big red push button.

It looks like it will mount pretty easily!

PC061229-vi.jpg

PC061230-vi.jpg

PC061231-vi.jpg

PC061232-vi.jpg

PC061233-vi.jpg

PC061234-vi.jpg


In that last picture, you can see how it will work. With it mounted directly, the backside of the big red button is a spring pressure activated switch with a barrel that pops out the backside, which will act like a big thumb to push the garage door opener mounted directly behind it.

I can get at least one hole to mount directly. The other hole is then off about 1/4". Without doing anything irreversible, I'll mount the other bolt through the plastic door opener and attach it via clamping action against the securing tab on the control unit.

I goofed a bit and drilled a hole I shouldn't have on the plastic door opener, so that is being repaired currently (should be ready to go tomorrow), so in the meantime, I decided to mount the back of the control unit, which went smoothly.

PC061226-vi.jpg

PC061237-vi.jpg

PC061238-vi.jpg

PC061239-vi.jpg

PC061240-vi.jpg

PC061241-vi.jpg


I'll have to do some trimming of the conduit (actually just move it 'up'), and get a conduit reducer to link it all up, but should all be relatively easy.

Something else I realized while doing this is it is FRICKIN FREEZING out there! We have a high of 4 degrees F, and it feels every bit of it out there. I don't think I noticed when I was out there yesterday since I was running around like a hamster on a wheel, but man, I could only be out there for about 2-4 minutes today, period. I was going to do some more rearranging of the garage today, but man I dunno if I can swing it. We'll see!

We should be back up to 40F on Wednesday.
 
Last edited:

toddjb

Well-known member
Joined
Aug 15, 2013
Messages
81
That thing is so cool! Could you get your lights hooked up to it too? And eventually dust collection and a heater?
 
OP
R

Red Leader

Well-known member
Joined
May 15, 2011
Messages
2,689
Location
Denver, CO
Hmm, I'm pretty sure I could! One set of buttons is an on/off like a Cutler Hammer type switch, and then below that is a momentary on. So I could probably only do one more thing on the box. Lights would be pretty cool. I could always pull romex from the lightswitch from the other side that controls my lights right now and wire it down through that thing. Then cover up the lightswitch with a first aid kit box:D:D:D


Dang it Todd stop giving me ideas!
 
OP
R

Red Leader

Well-known member
Joined
May 15, 2011
Messages
2,689
Location
Denver, CO
So here is the other switch on the control unit:

PC061248-vi.jpg


PC061249-vi.jpg


I'm thinking I could work something out there.


Speaking of lights...does anyone know how/why the cold has an influence on lighting? I say that because this is my current lighting situation in the garage:

PC061253-vi.jpg


Out of my 4 overheads, only 2 work and of those 2, only 2 out of the four bulbs are coming on. I feel like the same thing happened last winter when the lights were slow to come on. However, it is -4F right now which is making it even worse.

Speaking of the cold, the garage took another hit. I just noticed this today after cleaning the floor. It got so cold that my floor cracked:

PC061251-vi.jpg


This is the large joint/crack that I repaired, filled, and epoxied over. I know exactly what happened. The joint was v-notched and filled with Integraflex 1921, which is an elastomeric epoxy that is designed to both stretch and bond to concrete/epoxy at the same time. The stuff is expensive, but it rocks. This summer it was doing its job. The slab had moved a bit, and it squeezed on the crack. Instead of breaking the bond with either the concrete or the floor coating, the Integraflex moved with the slab and I noticed a very slight bulge where the repair was - which is exactly what you want, instead of a break or a crack.

Well, it just got too cold outside and either the slabs moved even more or the epoxy flooring became more brittle in the extreme cold and gave way. It is only a hairline crack and might be repairable, but it just goes to show how cold it is right now. Its cold!!!!:shocking:

BTW, Jeff if you are reading this, I got your voicemail just today. I'll try and give you a call this weekend:)
 
Last edited:

fred26t

Member
Joined
Jan 19, 2011
Messages
13
Location
So California
I need the ones that hold the blade cover onto a 12" Craftsman band saw I bought new in about 1964. The look very much like the cover nut you showed in one of your photos. Thanks, Fred26t
 
OP
R

Red Leader

Well-known member
Joined
May 15, 2011
Messages
2,689
Location
Denver, CO
Haha...it's still -1F out.

What's funny/sad is I went outside to the garage to grab a combination square and it actually felt warmer outside.:wtf::scared:

-Dave, officially goin' nuts over here at the 1950s Craftsman Garage:lol_hitti
 
OP
R

Red Leader

Well-known member
Joined
May 15, 2011
Messages
2,689
Location
Denver, CO
How are you going about polishing your metal pieces?

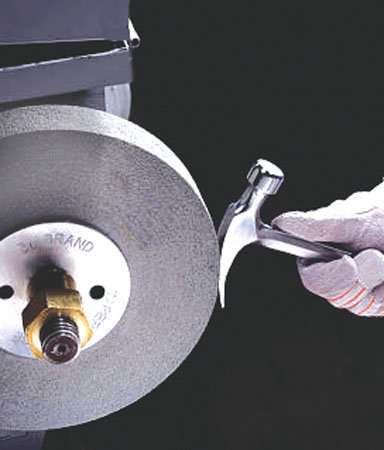
I have seen this question pop up every now and then on this thread. Most of my polishing comes from using the 3M EXL wheel. This is the exact wheel I have, from the exact place I ordered it from:

http://www.amazon.com/dp/B002P51S72/?tag=atomicindus08-20

41S7doTDtgL.jpg


It has been worth its weight in gold in my shop. I use it on every single restoration/refurb. It comes in so handy, everytime. It also doesn't really hurt if you accidentally get bit, which I can't say for a wire wheel.

They aren't really cheap, but are excellent for removing that 'old surface', including surface rust. They leave a polished, if somewhat sanded/uniform surface that isn't exactly like a mirror finish, but still looks very finished and nice.

On those two sanding drum retainer bolts I had to sand one a bit on the belt sander to remove the pitting, but then it got the EXL treatment:

PB301179-vi.jpg


I use a thinner wheel to get the inside corners because the 1" wheel cannot totally get inside, but it works great nearly everywhere else.


BTW - I think I found a solution for the combo machine! I'm hoping I can get it out to you early next year.
 
Last edited:
OP
R

Red Leader

Well-known member
Joined
May 15, 2011
Messages
2,689
Location
Denver, CO
I have one of these in original paint and operational if you're interested. Kind far though :/

9538-A.jpg


PS: Also have one of these.

http://vintagemachinery.org/photoindex/detail.aspx?ID=6129

Both my grinder and my sander came from PA. My 20" jigsaw came from Illinois.

Never underestimate the power of the OWWM shipping service!:)

I'd love to see pictures of both tools - do you know if your drill press has the table raising attachment?

-RL
 
OP
R

Red Leader

Well-known member
Joined
May 15, 2011
Messages
2,689
Location
Denver, CO
Alrighty-o! Things are looking up! It's warmed up to 7 degrees F so I can work from the garage in relative comfort. I have 2 1/2 working lights instead of 2.

This is gonna be my day!


Progress continues...
 
OP
R

Red Leader

Well-known member
Joined
May 15, 2011
Messages
2,689
Location
Denver, CO
Conclusion to the Garage Opener


Well, it has been a cold, if anything, saga. Work yet again commenced today.

I stopped by HD to get an adapter I needed -

PC071259-vi.jpg


Which goes here:

PC071260-vi.jpg


I wanted to get the conduit out of the way so it didn't pull on the wire. FYI, duct tape doesn't fare too well in 7F -->


PC071261-vi.jpg


PC071262-vi.jpg


With the tape now supporting the conduit line, I reattached the box -

PC071264-vi.jpg


Switch back together -

PC071265-vi.jpg


Switch in -

PC071266-vi.jpg


Switch getting installed on front plate -

PC071269-vi.jpg


I had to cut a small screw to fit the push button switch and the control unit face together and to do so I had to use the dremel. Special care must be given to any corded tool when it's this cold - I dare not wrap up any loose extension cords for fear of ruining them!

PC071271-vi.jpg


Here is how the switch is mounted -

PC071267-vi.jpg

PC071274-vi.jpg


Pop quiz - what is this difference between these two pictures? (Besides the second piece of wood)


I forgot to attach the gasket. D'oh!


(EDIT: I just now realized I could have slipped the gasket over the control unit plate instead of having to undo the switch again! Double D'oh!!!)


One hole is screwed directly into the threaded hold of the control plate. The other hole in the push button switch was about 1/4" too far out to mate up with the other hole, so I extended the screw, got a few washers and a nut and used them together as a clamp onto the back of the other threaded tab of the control unit face - holds it on there pretty good!

The wood pieces are there to insulate the mounting hardware from the screws holding on the wires - if no spacer was there the switch would be grounded out.


And the final product?


SHAZAM!!


PC071276-vi.jpg

PC071277-vi.jpg

PC071278-vi.jpg


At first, I had some trouble getting the control unit plate mounted on front because the gasket shrunk in the cold, but after seeing what the problem was and coaxing it into shape, all is well:)


And now the real test...does it work?


PC071281-vi.jpg


Oooooooooooohhhhh yeah!!!

PC071280-vi.jpg
 
OP
R

Red Leader

Well-known member
Joined
May 15, 2011
Messages
2,689
Location
Denver, CO
I need the ones that hold the blade cover onto a 12" Craftsman band saw I bought new in about 1964. The look very much like the cover nut you showed in one of your photos. Thanks, Fred26t

I just looked up some 12" bandsaws from that period - you probably saw a knob that looked the same, but it would have been different.

If you post a 'want to buy' ad over in the classifieds section of the www.owwm.org forum, you'd probably get some responses pretty quickly. They made a lot of those bandsaws and you would be amazed at what people have in their 'rat holes' :)
 

SD39

Member
Joined
Nov 4, 2010
Messages
20
I'll take some pictures next time I have the camera in the shop (off site from the house). The grinder is in very good condition. If I recall the table does move on the drill press.

BTW your garage opener turned out great!
 
To avoid these ads, REGISTER NOW!
OP
R

Red Leader

Well-known member
Joined
May 15, 2011
Messages
2,689
Location
Denver, CO
I'll take some pictures next time I have the camera in the shop (off site from the house). The grinder is in very good condition. If I recall the table does move on the drill press.

BTW your garage opener turned out great!


Thanks! I'm glad it turned out okay. Better to freeze my rear end off over a good project than a lousy one:lol:


Regarding the grinder and drill press, yes I'd love to see pictures of both! As far as the drill press goes - if it does have that table raiser on it and you are interested in moving it, we might be able to work something out! Or, if you were interested in selling just the table raising attachment (for easier shipping), that would also be something I'd be highly interested in. I'll PM you about it:)
 

7th Kahuna

Well-known member
Joined
Aug 4, 2012
Messages
1,704
Location
Los Angeles, CA
Speaking of lights...does anyone know how/why the cold has an influence on lighting?

Out of my 4 overheads, only 2 work and of those 2, only 2 out of the four bulbs are coming on. I feel like the same thing happened last winter when the lights were slow to come on. However, it is -4F right now which is making it even worse.

Speaking of the cold, the garage took another hit. I just noticed this today after cleaning the floor. It got so cold that my floor cracked. This is the large joint/crack that I repaired, filled, and epoxied over. I know exactly what happened. The joint was v-notched and filled with Integraflex 1921, which is an elastomeric epoxy that is designed to both stretch and bond to concrete/epoxy at the same time. The stuff is expensive, but it rocks. This summer it was doing its job. The slab had moved a bit, and it squeezed on the crack. Instead of breaking the bond with either the concrete or the floor coating, the Integraflex moved with the slab and I noticed a very slight bulge where the repair was - which is exactly what you want, instead of a break or a crack.

Fluorescent lamps definitely do not like cold temps. Many older fixtures take time to warm up and come up to full intensity. If it is too cold and the fixture does not retain the heat some lamps will never get there. The following is excerpted from Family Handyman:

"Keep in mind that not all fluorescent lights work in cold weather. Select your fluorescent fixture based on the lowest temperature in your garage. Refer to starting temperatures printed on the ballast. Regular magnetic ballasts in standard T12 fluorescent fixtures (which have 1-1/2 in. diameter lamps) are not recommended for temperatures below 50 degrees F.

If the temperature in your garage drops below 50 degrees, buy fixtures with electronic ballasts (not electromagnetic) because they start in temperatures down to 0 degrees F and lower. We recommend you buy fixtures that take size T8 lamps (1 in. wide), which are more energy efficient. They cost more initially but will save you money over time. Avoid energy-saver T12 lamps; they need a minimum of 60 degrees to operate properly."


I had never heard to avoid the energy saver lamps. That might be a simple place to start. The electronic ballasts help but don't seem to be a total solution (at least in my limited experience). They make LED 'replacements' for T12 lamps which would solve the problem by eliminating the ballast entirely but the last time I checked they were fairly pricy. Upgrading to electronic ballast on the other hand would be fairly cheap, if infact you have magnetic now.

Sorry to see the slab cracks coming through. My guess is the elastomeric epoxy flexed and the epoxy floor paint didn't. I suspect there was nothing you could have done to prevent it. Blame the builder (again :sad:).

Nice job on the door opener button. :thumbup:
 
Last edited:
OP
R

Red Leader

Well-known member
Joined
May 15, 2011
Messages
2,689
Location
Denver, CO
Well, that is all news to me! I appreciate the info, 7th Kahuna.


Here's hoping it won't really be a problem because at some point I'd actually like to get a heater in the shop!!! :fingersx:
 
OP
R

Red Leader

Well-known member
Joined
May 15, 2011
Messages
2,689
Location
Denver, CO
I'm stepping a little out of the '1950s' bounds by this, but check this out. It is way out of my price range, but man oh man, I'd LOVE to have something like this in the shop...can you just imagine when it lights up?

artdecoexitsign-vi.jpg


EDIT: Any metalworkers in the house want to make something like this??? :D:D:D
 

7th Kahuna

Well-known member
Joined
Aug 4, 2012
Messages
1,704
Location
Los Angeles, CA
Well, that is all news to me! I appreciate the info, 7th Kahuna.

Here's hoping it won't really be a problem because at some point I'd actually like to get a heater in the shop!!! :fingersx:

No problem, nice to be able to send some information in the other direction for a change. I have learned so much from your posts. Good luck with that heater.

I'm stepping a little out of the '1950s' bounds by this, but check this out. It is way out of my price range, but man oh man, I'd LOVE to have something like this in the shop...can you just imagine when it lights up.

That is cool, only I'm thinking 1930's. Shouldn't be that hard to make though, I know you've got skills. :D Just need to find a 50's font.
 
OP
R

Red Leader

Well-known member
Joined
May 15, 2011
Messages
2,689
Location
Denver, CO
No problem, nice to be able to send some information in the other direction for a change. I have learned so much from your posts. Good luck with that heater.


That is cool, only I'm thinking 1930's. Shouldn't be that hard to make though, I know you've got skills. :D Just need to find a 50's font.


Yep, I was definitely thinking 1930s too. But...I'm a little embarrassed to admit this, given the title of my garage, but I think in the several years that I've had this project going, I've developed probably more appreciation for 1930s style than 1950s. I guess I can say that my style palette has grown. The 1950s 'style' is definitely awesome...lots of chrome, sweeping lines, neon, space themes, etc. But the 1930s ushered in a timeless, classic beauty in artistic expression through geometry, symmetry, and aztec/mayan/egyptian themes. There is something about art deco that just gets to me. Truthfully, if one was being period correct (I am not:eek:) to what actual garages looked like back in the day, there would be plenty of 20 year old stuff (ala 1930s) in 1950s garages. That is the overarching principle. The small, minute detail...is that probably nobody back then would have stuck a hotel exit sign in there garage just for fun:lol:

So! All that to say...I'm a little lenient with the time periods, just because I have a real soft spot for the style:) Plus, if I was hard and fast on the 1950s, that would also limit the tool choices. I like to think of this garage project as inclusive...I just can't turn away those wayward 1930s, 1940s, and 1960s tools that are in need of a good home:D

The other element that plays into all this is, realistically, we probably won't live in this house forever. Which means that the 1950s Craftsman Garage probably won't always be mine. So I am constantly thinking about design elements and tools and props and garage items that could be 'portable' and 'flexible'. The next garage project I do (I know, I'm getting a little ahead of myself here) might have a slightly different theme, but I'd still want the movable garage stuff to 'fit', if that makes sense.
 
OP
R

Red Leader

Well-known member
Joined
May 15, 2011
Messages
2,689
Location
Denver, CO
Okay, small update. Didn't really do too much, just moved stuff around. I decided to move the bench back to the other wall again. While it may make a little more sense to keep it on the back wall, there are design limitations with that setup. I'm not able to continue building on the bench. It also limits some of the space that I'm able to have, after reviewing a lot of possible setups.

So, moved some tools around, generally cleaned up (it is still pretty dirty in there), and enjoyed the heat wave we're having tonight (28F). No hurt back, no broken tools, all good over here at the 50s C-man Garage tonight:thumbup:


PC111296-vi.jpg

PC111297-vi.jpg

PC111299-vi.jpg

PC111300-vi.jpg

PC111301-vi.jpg


Oh, so this crazy thing happened - I have these big moving blankets that I use to slide tools and put stuff on. Well, I had some lying around and I needed to put them up, so I first folded them up and draped them over the table saw. Well, fast forward an hour later, I'm cleaning up and about to throw them up in the rafters and I pull them off the table saw and there is a puddle of water on the table top! Somehow one of the blankets must have picked up some water from the floor (snow on tires melted)...and its starting to discolor the top a little. So I'm thinking shoot! I need to get that dry in a hurry! So I soak up the water and dry it out pretty good. Then I decide to grab the polishing compound to get rid of the rust spots starting to form (man, the rust appears QUICK on bare cast iron), so I take the polishing compound out and its pretty hard from being in the garage while it so cold...so I try and get some out on a rag and rub it into the table. It looks kind of weird and when I take a closer look, its ice lol - from it being so cold. I'm rubbing ice into the table hoping to make the rust spots go away. The funny thing was, the ice actually kind of worked haha. So then I just did a wax coat and called it good:)
 
OP
R

Red Leader

Well-known member
Joined
May 15, 2011
Messages
2,689
Location
Denver, CO
what's your plan for the unisaw under the bench?

At this point, I'm not sure. It needs to be completely torn down and restored - every little piece. A lot of the small parts - the fence rail spacers, the fence knob and locking bracket, the tilt gauge, the lock knobs, the entire switch and housing, the Delta logos, are 'missing'.

I cannot reveal too much about this tool, but in the future you'll hear more about it.
 
OP
R

Red Leader

Well-known member
Joined
May 15, 2011
Messages
2,689
Location
Denver, CO
well ive made it so far. 152 pages of awesome. only took a week. very nice garage. the tool resto work is amazing. thanks for the thread

Thanks for your kind words!

You're about the best person to ask this - did most/all of the pictures seem to work? The photo hosting site I had my pictures with was having some difficulties but I noticed a lot of pictures started to come back.
 

7th Kahuna

Well-known member
Joined
Aug 4, 2012
Messages
1,704
Location
Los Angeles, CA
Truthfully, if one was being period correct (I am not:eek:) to what actual garages looked like back in the day, there would be plenty of 20 year old stuff (ala 1930s) in 1950s garages. That is the overarching principle. The small, minute detail...is that probably nobody back then would have stuck a hotel exit sign in there garage just for fun:lol:

So! All that to say...I'm a little lenient with the time periods, just because I have a real soft spot for the style:) Plus, if I was hard and fast on the 1950s, that would also limit the tool choices. I like to think of this garage project as inclusive...I just can't turn away those wayward 1930s, 1940s, and 1960s tools that are in need of a good home:D

That is very true, garages have always been about getting things done and come together over time. Not too many of us start out one day with nothing and fall into bed that night with a complete and newly stocked garage awaiting our first project. :D

Interestingly there was an ad on Craigslist today for a handful of 1980's era Craftsman stationary tools that had never been removed from their boxes. All together it lead me to think that was a garage that got set up on a whim and never found a use, the antithesis of the 1950's Craftsman Garage.

Besides, the design of your garage borrows nicely from 1930's art deco already. :thumbup:

At this point, I'm not sure. It needs to be completely torn down and restored - every little piece. A lot of the small parts - the fence rail spacers, the fence knob and locking bracket, the tilt gauge, the lock knobs, the entire switch and housing, the Delta logos, are 'missing'.

I cannot reveal too much about this tool, but in the future you'll hear more about it.

I noticed the Uni tucked away down there too. I'm glad you brought it home and look forward to seeing you breath life back into it, if possible.

I hope things are progressing smoothly for your buddy.
 
Last edited:
OP
R

Red Leader

Well-known member
Joined
May 15, 2011
Messages
2,689
Location
Denver, CO
That is very true, garages have always been about getting things done and come together over time. Not too many of us start out one day with nothing and fall into bed that night with a complete and newly stocked garage awaiting our first project. :D

Interestingly there was an ad on Craigslist today for a handful of 1980's era Craftsman stationary tools that had never been removed from their boxes. All together it lead me to think that was a garage that got set up on a whim and never found a use, the antithesis of the 1950's Craftsman Garage.

Besides, the design of your garage borrows nicely from 1930's art deco already. :thumbup:


I noticed the Uni tucked away down there too. I'm glad you brought it home and look forward to seeing you breath life back into it, if possible.

I hope things are progressing smoothly for your buddy.


My first order of business regarding certain items is to get a certain bandsaw up and running first. I'm not sure the Uni will stay with the garage. I'd love to fix it up...truthfully...it was my first Unisaw.

Remember this one, from page 1??

1004003k.jpg


And this one??

PC111301-vi.jpg


...same saw:sad::(

So...I've kinda got some emotional investment in it. The hard thing is that the top/extensions will need to be blanchard ground (warped), and most of the more expensive and harder to get stuff (badges, switch assembly, etc) is all gone. All the sheet metal, fence rails, bolts, etc. are all annealed, so I'm not really sure how that may affect its durability. From what I've heard, cast iron does okay.

Its sure got potential and nothing is impossible...but it will make for a monumental amount of work.

I'd like to get some other projects out of the way before attempting a restore of that one. The good news is I have a buddy in our local OWWM group that has laser etched the switch plate and dust door logos and is a pretty generous fellow. I might have to hit him up:D
 

bluebolt

Well-known member
Joined
Dec 28, 2008
Messages
5,447
Location
Benton LA
I'm stepping a little out of the '1950s' bounds by this, but check this out. It is way out of my price range, but man oh man, I'd LOVE to have something like this in the shop...can you just imagine when it lights up?

artdecoexitsign-vi.jpg


EDIT: Any metalworkers in the house want to make something like this??? :D:D:D

A very similar one sold on Ebay for $110 plus $40 shipping in WAY better shape. It even had an extra piece of EXIT glass (3 total)
 

e-tek

Well-known member
Joined
Dec 19, 2007
Messages
10,690
Location
Saskatoon, SK
Your garage is one of the best - style wise - on the board! It's a testament to the man who can see his surroundings as such an important part of his creative abilities.
 
OP
R

Red Leader

Well-known member
Joined
May 15, 2011
Messages
2,689
Location
Denver, CO
Your garage is one of the best - style wise - on the board! It's a testament to the man who can see his surroundings as such an important part of his creative abilities.

Thanks man! I appreciate your kind words!

That's at least how it starts out, but then kind of morphs into a disability haha. I look at something and then all the little gears up there start whirring and turning and I start thinking of a lot of ways to make things more difficult for myself:lol:
 
OP
R

Red Leader

Well-known member
Joined
May 15, 2011
Messages
2,689
Location
Denver, CO
Alright guys,

One big last post and then I'm going to disappear for a while (okay, maybe not, but I won't be working in the garage for a few weeks)...which might be a good thing, because I won't have a chance to mess it up!

I've been cleaning the garage like a mad man in anticipation of tomorrow. I've probably spent 15 hours in the last couple of weeks just on cleaning alone. I was able to reclaim a wall! Most of the clutter is gone! This is as good as it is going to get until I get some more storage solutions built (which are in the plans down the road, but won't happen for a little while).

In any case, I hope you enjoy the photo show, and my apologies in advance to people that have already seen these same type of pictures about 1000 times and are pretty tired of the lack of creativity:lol:


First up, I decided to polish up a little more of the fridge.

Here is how it was looking before:

PC131340-vi.jpg


Not bad, but not great. I clean up parts of it, but it had been sitting like this for a while. This only took an hour or two, but now it looks a little more fresh:

PC161405-vi.jpg


There is some corrosion at the bottom of the feet and I'm going to leave it for now. Eventually, I'd like to hit those feet with some Evaporust and then try and match the paint as closely as possible. On this bad boy, the wear and patina adds to its character, so I only want to be as invasive as I need to be for preservation's sake.

Some art deco goodness:

PC161406-vi.jpg


Another part of 'cleaning up' the garage was to do something with the Red Star cabinet. Here is a visual of the saw:

p3312946-vi.jpg


And the base:

p3312938-vi.jpg


I had it broken down into 4 separate parts for storage, but wanted to get it a little further apart. It is comprised of 4 side panels and 4 corners that attach everything together on the inside. Some of the bolts were pretty rusty, but they used these flat spring steel squares as 'nuts' so once they broke loose they were actually able to come off pretty easily. It might have been a little bit of a cost saving measure, but I thank the engineers (or is it the bean counters?) at Red Star for this:D

Also, the stand had these huge chunky adjustable steel feet that were put on, only they weren't so adjustable - they were welded on after whoever it was adjusted them:

p3312933-vi.jpg


So to get the saw back to a lower working level and retain some originality, off they came.

Once I got those off, I started inspecting the panels. This is the front panel:

PC141358-vi.jpg


I'm not sure how much work these panels are going to take to get restored. I will use electrolysis to pull all the rust off, then see how bad the pitting is. If it isn't horrible, I'll probably just move along with priming and paint eventually. If the pitting is really bad, then I might try and use some filler, at least on the front where it is the most visible. The worst rust is on the inside and near the bottom of the panels, so I might be able to just get away with using a sanding primer.

Also, once we are done with the de-rusting, we're going to need some bodywork:

PC141359-vi.jpg


Is doesn't look that bad, but the bend gets compounded the further up it goes on the door. We've got a specialist metalworker in our local OWWM group and so I'll probably either pick his brain (or his tools!) to attempt to flatten out the door. The tricky part is that it is attached to the panel. I may or may not be able to punch the rod that holds it together to remove the door. We'll see.

Now check out the logo:


PC141361-vi.jpg


What I love about this logo is that it is raised - so the painted parts are slightly 'recessed', which means a resto will be super easy. For the plates that are completely flat and painted - it basically means you destroy the plate/originality if you refinish. The 1940s Craftsman grinder I have has a flat tag and I can't really touch it, unless I generated a computer image and recreated either a decal or a stencil. I'm sure there are some professionals who restore those kinds of tags and plates. I'm sure they also charge top dollar and that it is worth every penny. Fortunately I won't have to use that route on this one.

PC141360-vi.jpg


On the front of the door, there is this little lock. At first, I didn't think much about it, but now after a close examination, I don't think it is OEM. Take a look at the cutout hole for the key and the location of the rivets:

PC141362-vi.jpg


The back is kind of messy too:

PC141363-vi.jpg


I think that top bracket might be original, but it is broken. I'll probably reach out to some other Red Star owners and maybe see if I can get some pictures of their cabinet doors.

Next up was the panel that has this switch on it:

PC141364-vi.jpg


Inside:

PC141365-vi.jpg


I tried to locate a date on the fuses or the box to try to get more of an indication as to when the saw was made (which is not necessarily an accurate method, but would provide a starting point), but no luck. I'd love to restore and use it with the saw once the saw is rebuilt, but I'll have to double check the electrical integrity and test for function - look a little closer at those fuses:

PC141366-vi.jpg


And with working out there for hours on end, this is the fruit of the labor (sorry that this seems to be all I ever take pictures of anymore):

PC161386-vi.jpg


My reclaimed wall!
PC161387-vi.jpg


I rearranged things just a bit - I never liked when the tool chest nor the fridge was on the side wall - I kept worrying about the car getting a little too close while parking and clipping it. So I moved the fridge to the back wall (right next to an outlet!) and the tool chest to an easily accessible location. Its nice to have it right near the door because many times I find myself going outside the house and into the garage just to get a tool to bring back into the house (the only access to the garage is from outside, there is no direct house-garage entrance) so it is nice being close to the door. I had some plans for that spot that the fridge is in, but these are the limitations working within a smaller space and compromises must be made. Its all good:thumbup:

Reclaimed wall:

PC161391-vi.jpg


I cleaned/scrubbed the floor and probably swept it about 11 times. You cannot see the hairline crack on this quadrant where the crack repair buckled the epoxy during the extreme cold week, but its down there. If the extra epoxy I have in the bins is still good, I'll have enough for a repair.

PC161392-vi.jpg


Wider shot:

PC161394-vi.jpg


'Tool alley' (I'm still playing around with the floor layout here):

PC161396-vi.jpg

PC161397-vi.jpg


Some goofy shots for the heck of it:

PC161399-vi.jpg

PC161400-vi.jpg

PC161402-vi.jpg

PC161403-vi.jpg


Well, that's all for now. The next project will be continuing to work on my overhead storage and the workbench header, both of which I've gotten recent inspiration to do.

Thanks everyone for following along and for your encouragement! I'm not sure when the next update will come, but if it is an update made soon, it will not be garage related;)

Catch you all as soon as I can!

-RL
 
Last edited:

Cptn_Howdy

New member
Joined
Dec 17, 2013
Messages
1
I recently picked up one of these Craftsman/Parks 18 inch band saws for $40.00 at an Auction. It needs new tires and guides. I am looking for a part source for these, if you guys know of a place.
 

HSpencer

ALLIANCE MEMBER
Joined
Nov 28, 2010
Messages
2,854
Location
South Central US
Red there is only one thing that is sad about your set up. And that is the fact that we can no longer purchase "new" the kinds of tools and equipment that you are so fortunate to own in your excellent shop! We have lost a lot over the last 50 years.
Your equipment stands and tells us what we once were----(and I better stop here).

Best Regards
Herb Spencer
 
To avoid these ads, REGISTER NOW!
Top Bottom