To avoid these ads, REGISTER NOW!

Old School Iron: Restoring a 50's Walker Turner 20" Drill Press

95riosnake

Well-known member
Joined
Oct 26, 2013
Messages
394
Location
Pittsburgh, PA
I thought I'd share my project with all of you, and I'm sure at some point I'll need some help and advice from you all :beer: Progress will probably be slow, as this is my first large tool restoration. I'm sometimes too meticulous for my own good and often free time is hard for me to come by. But I'm a patient man, and I hope you will be as well as I gradually update this thread. ;)

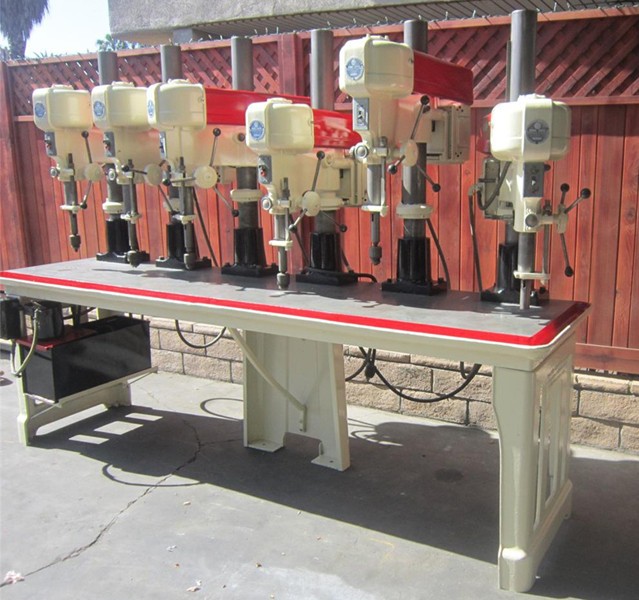
I've been searching high and low for a vintage drill press for about 6 months now, missed out on a couple great machines that at the time I thought I couldn't live without, and blamed myself for not acting quick enough on them. Well in the end that turned out to be a blessing in disguise. Last weekend a friend and I took a trip to the Akron, OH area and picked up a machine from my drill press bucket list; a 50's Walker Turner 20" drill press with the production table and table raising mechanism. The seller was a man in his late 60's who owns a local fastener business in the Akron area and told me he was selling off everything in hopes that he could retire. He couldn't keep his shop competitive in this economy anymore. It was sad to hear of another small business throwing in the towel, but of course I'm glad I found this piece of American iron before it ended up in a scrap yard. I ended picking it up for a cool $125, the serial number is 5E2B2. If anyone here has the ability to turn that information into a production year, I'd love to know some of the machine's history!

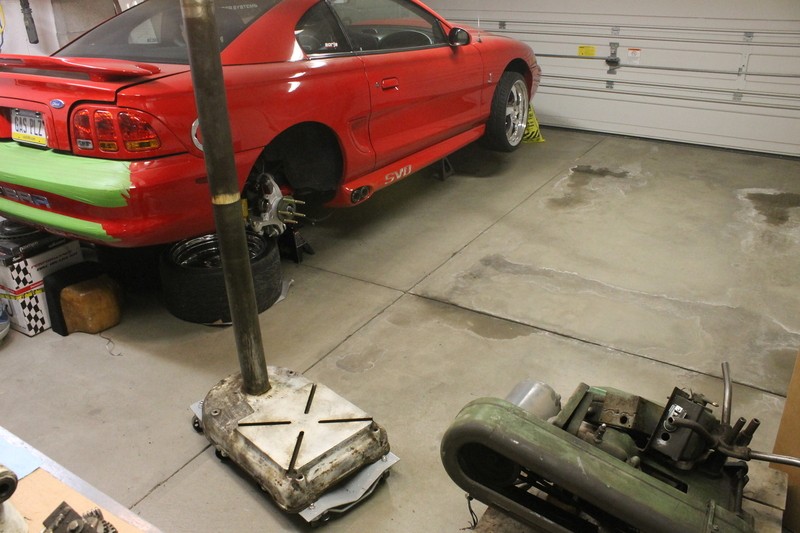
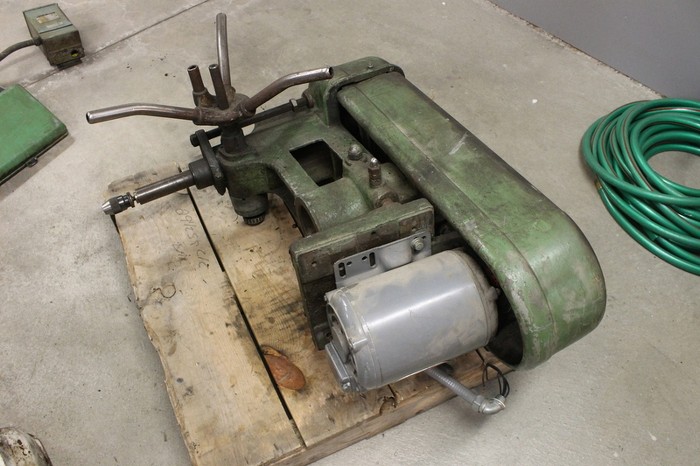
Here it is after getting it unloaded into my garage. With the help of the seller we lifted the head off with a forklift to make it easier to load and unload (this thing is HEAVY).

bdio.jpg


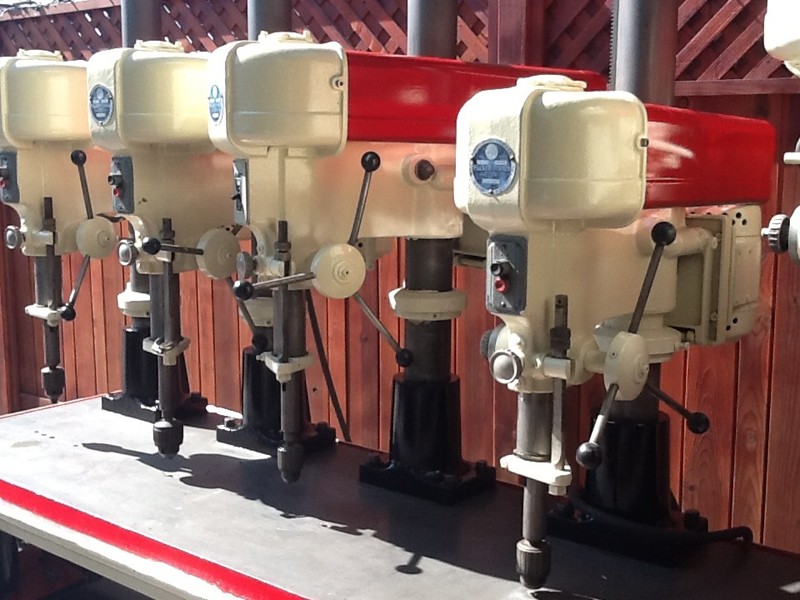
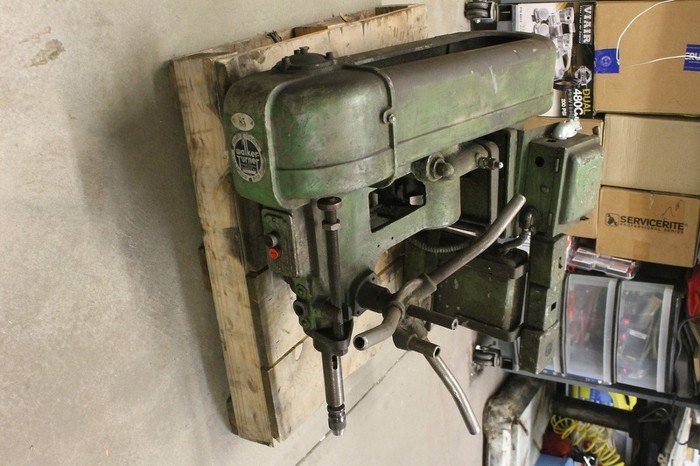
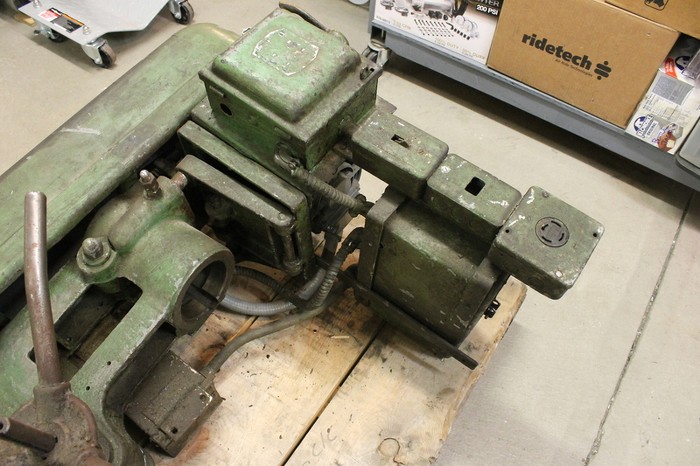
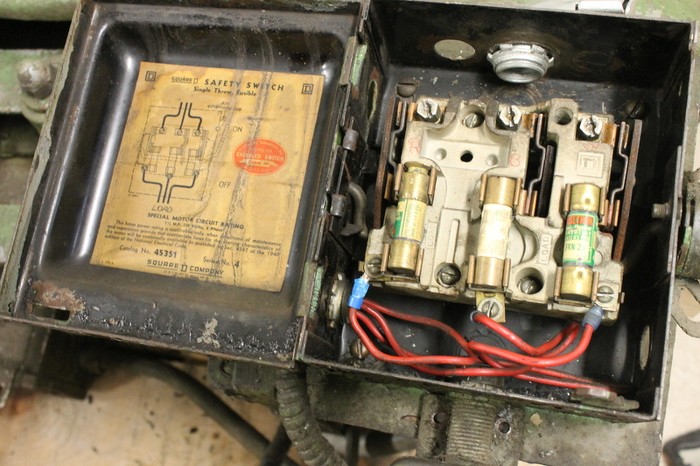
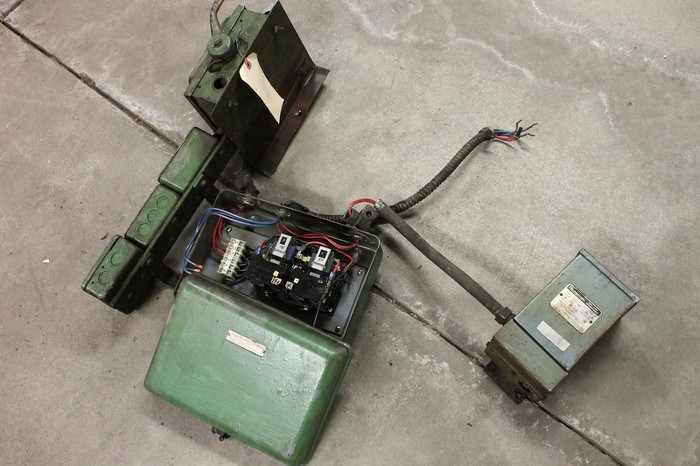
As you can see, there are several add ons hung on it like a power disconnect, 220v outlet, power disconnect, and a step down 115v transformer (for a work light or cutting fluid pump) that I'll be removing as I won't need them. I'll be wiring in a VFD to run this machine on single phase power so things will be simplified substantially in the wiring department.

4fgq.jpg


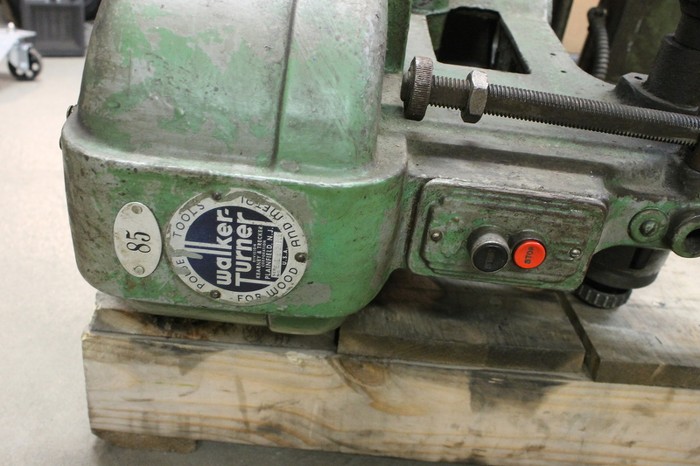
Gotta love that WT plate!

oa3l.jpg


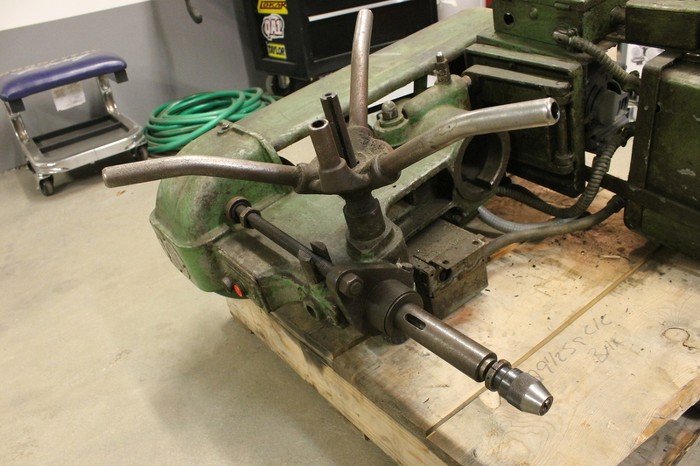
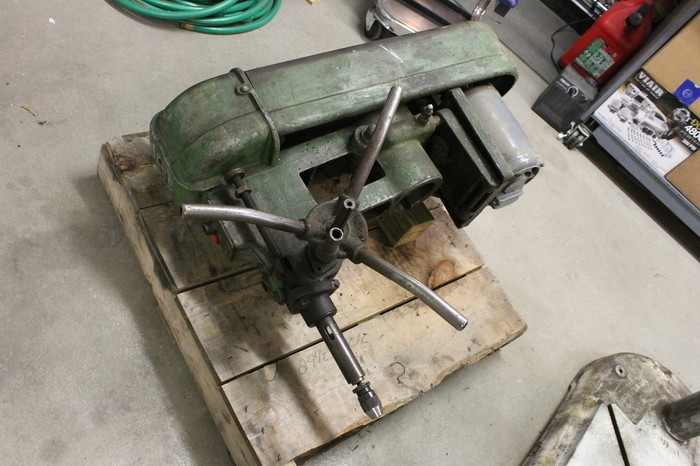
It's sporting a no. 3 morse taper, and I'm not sure but that extra post coming off the handle has me wondering if this machine might have had a foot pedal down feed setup or something.

cy29.jpg


lmvp.jpg


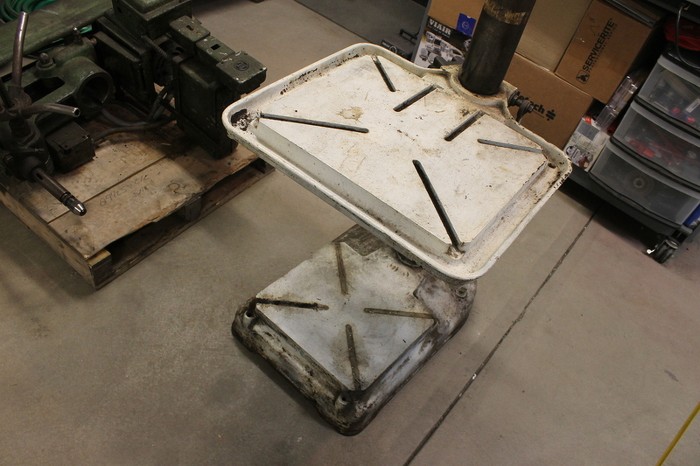
The table looks to be in great shape, but I'll have to see what I discover under the paint...

r6tg.jpg


The first oddity about this press was that the T-slots in the base were filled in with something before being painted over. I hoped that it wasn't something too hard to remove, and luckily it wasn't too bad. Turns out at some point someone had made pieces of wood cut exactly the shape of the slots and hammered them in. My guess is they were tired of cleaning chips and oil out of them? Who knows. Nevertheless I grabbed a screwdriver and a hammer and went to work.

x7cx.jpg


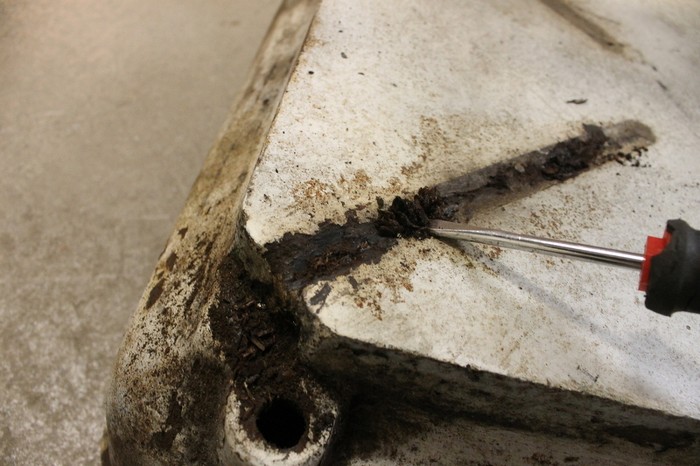
What came out was very old wood thoroughly saturated with cutting oil. How they got paint to lay over this much oil is beyond me!

8atl.jpg


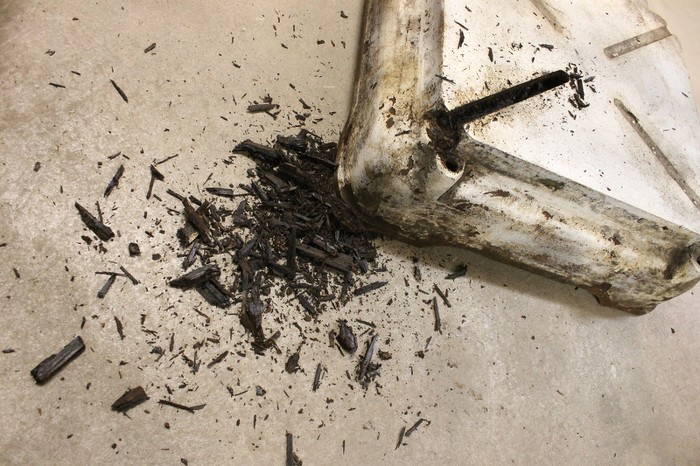
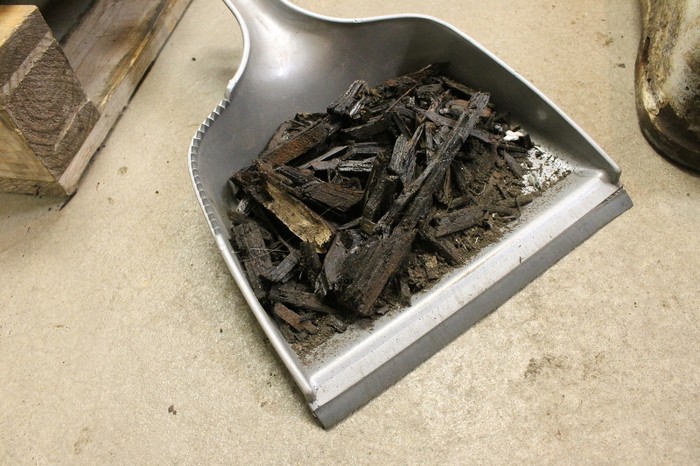
The total amount of oil-saturated wood removed:

elmn.jpg


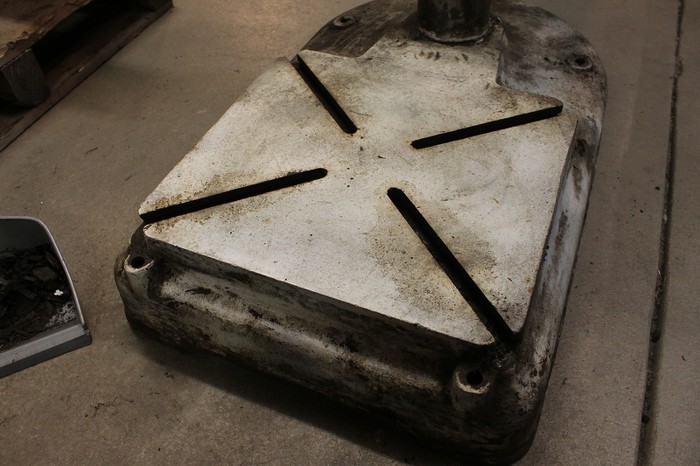
And the T-slots looking as they should now :) :

nrep.jpg


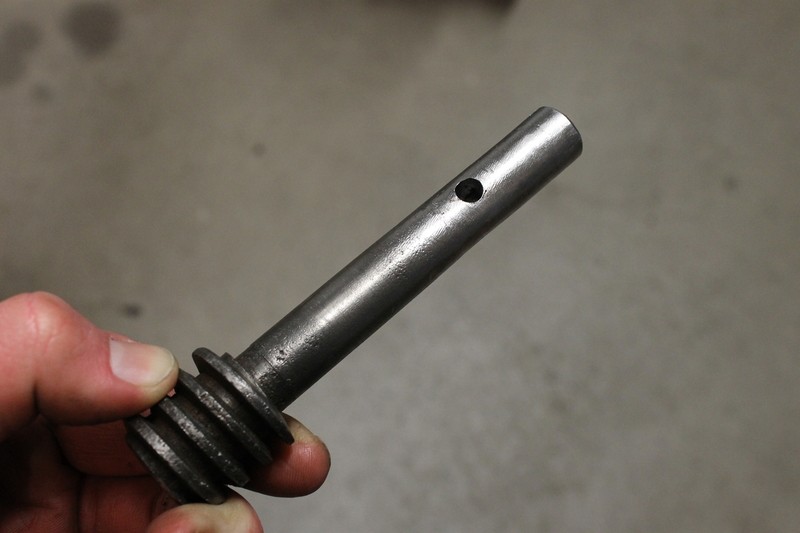
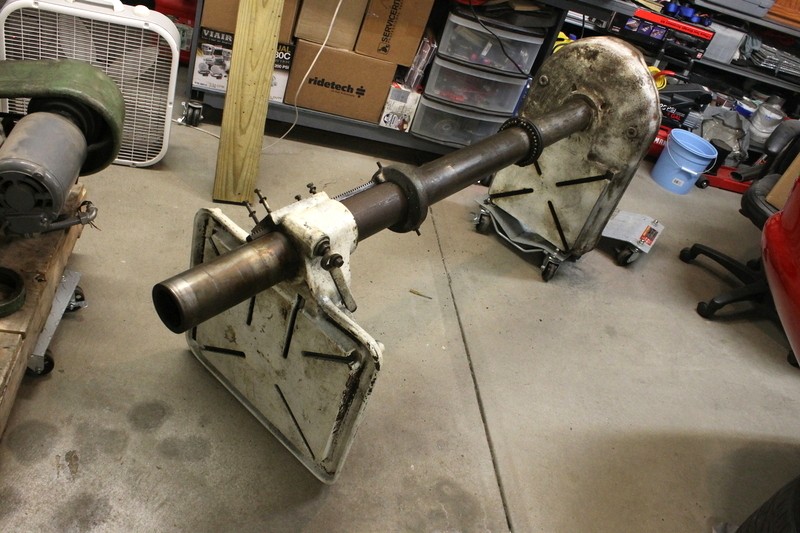
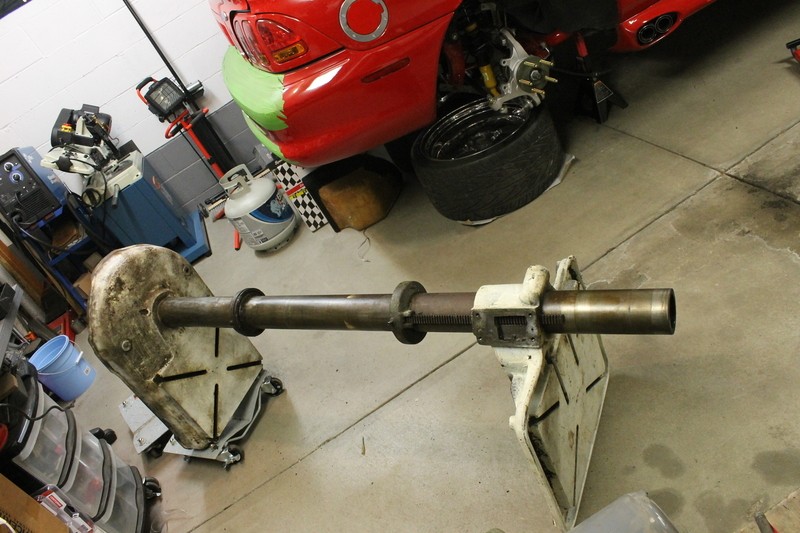
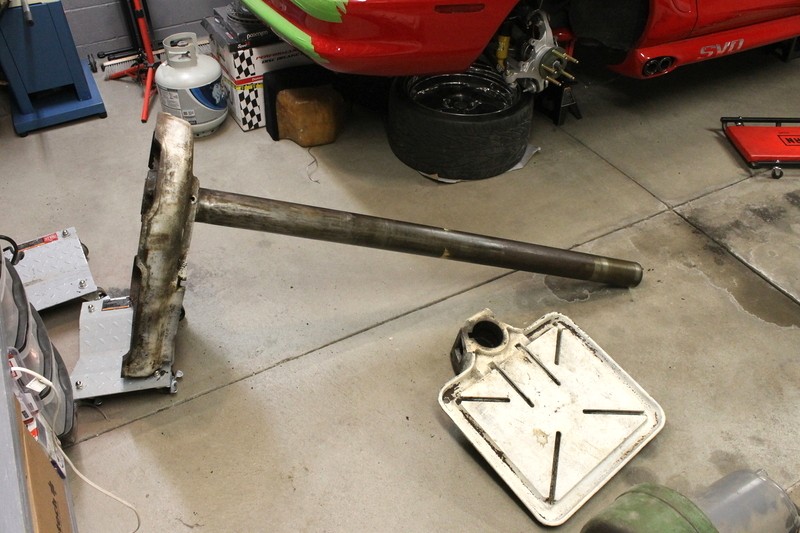
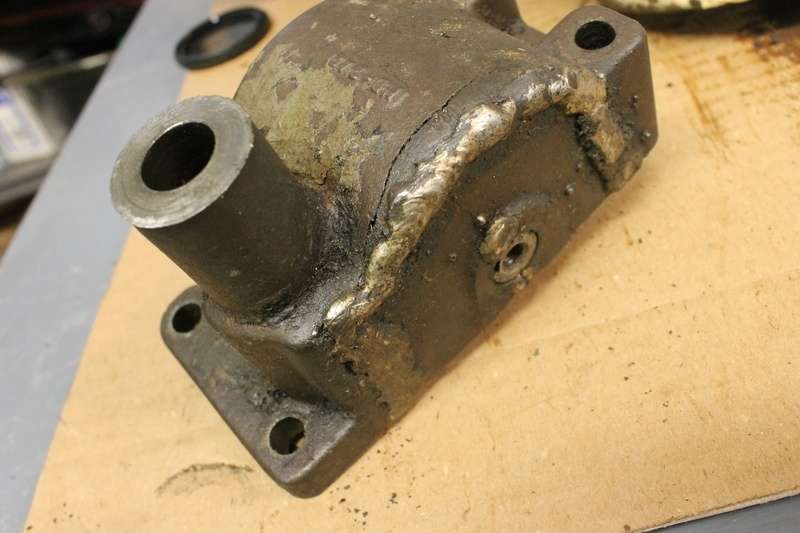
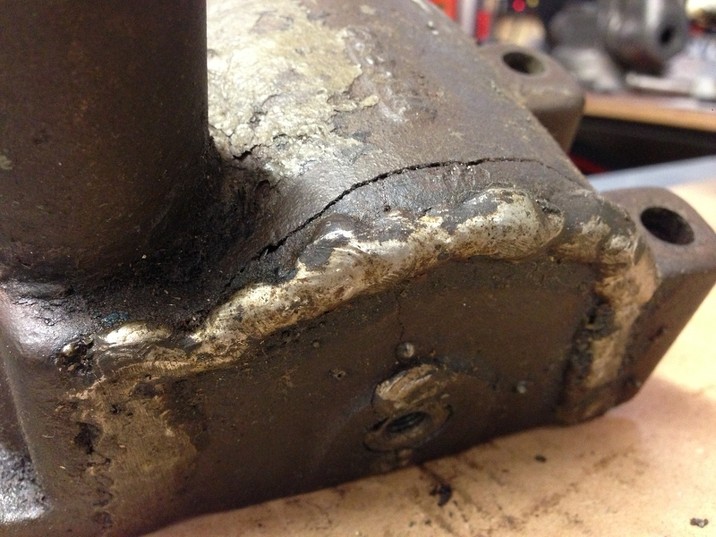
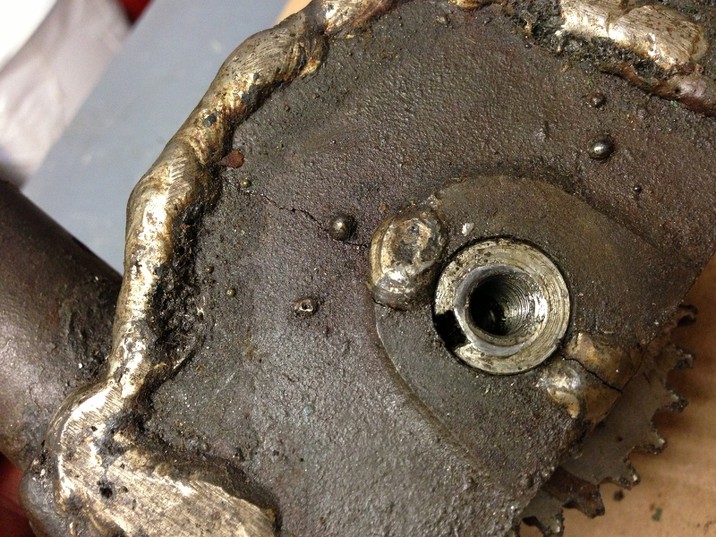
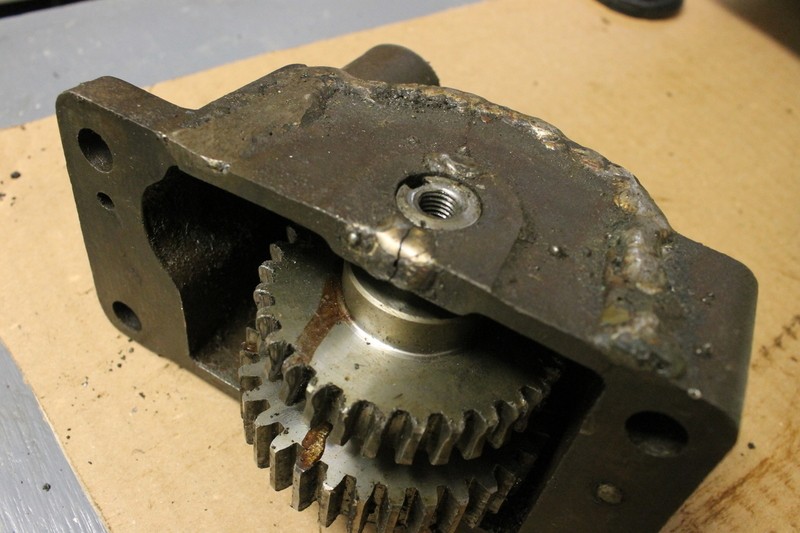
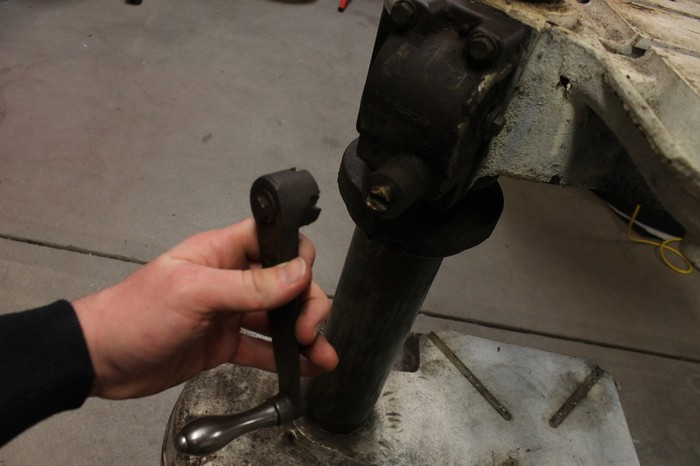
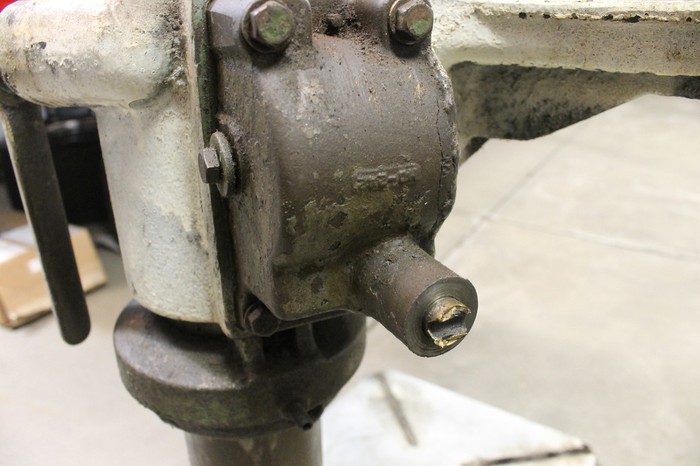
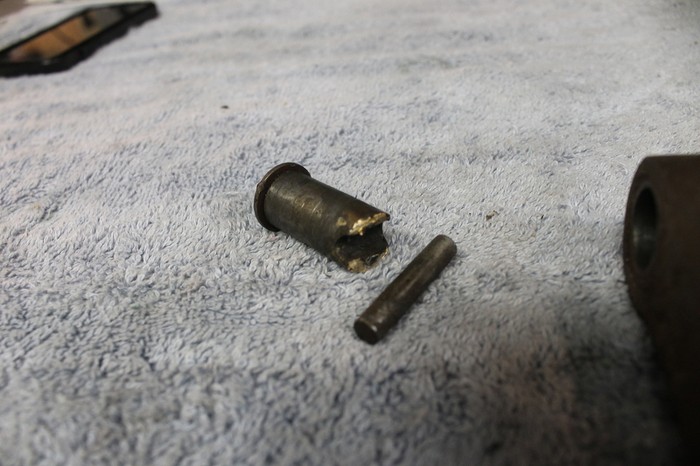
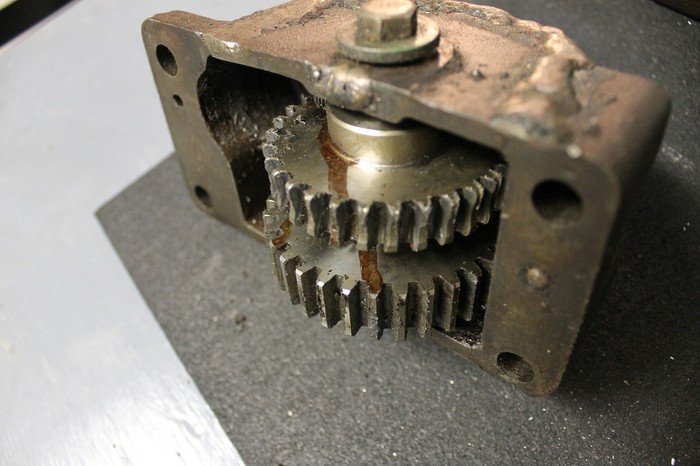
The next issue to address was the table raising mechanism. When we were unloading the press. I momentarily touched the table raising lever to the tailgate and it simply fell off. At first I was furious with myself, but upon further investigation I realized the shaft of the handle had been broken and braised in the past where the engagement pin went through. My guess is something had smashed the handle at some point because the gearbox for the mechanism shows a weld repair along one edge. There's a small crack still untouched, but the gearbox appears to be sound. I'm open to suggestions as to what I should do about the remaining crack. I will most likely prep and weld the shaft back together, filling the hole for the pin, then re-drill the hole for it.

w06c.jpg


xwkf.jpg


6cxg.jpg


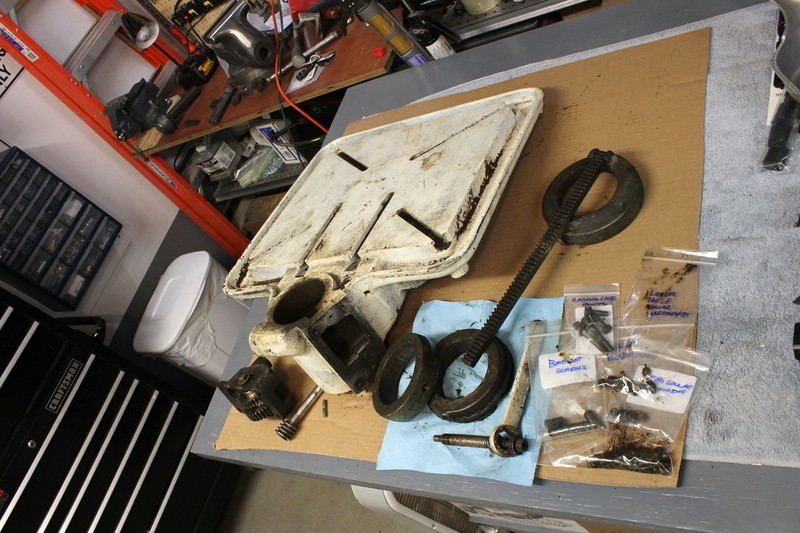
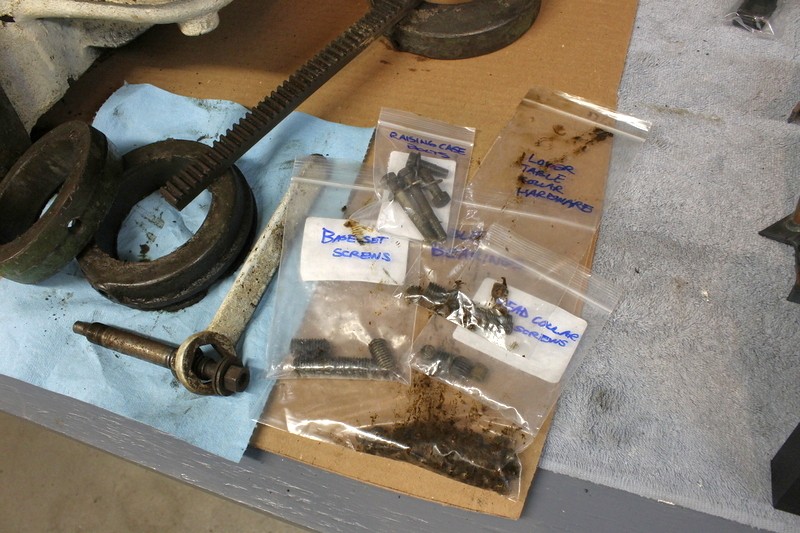
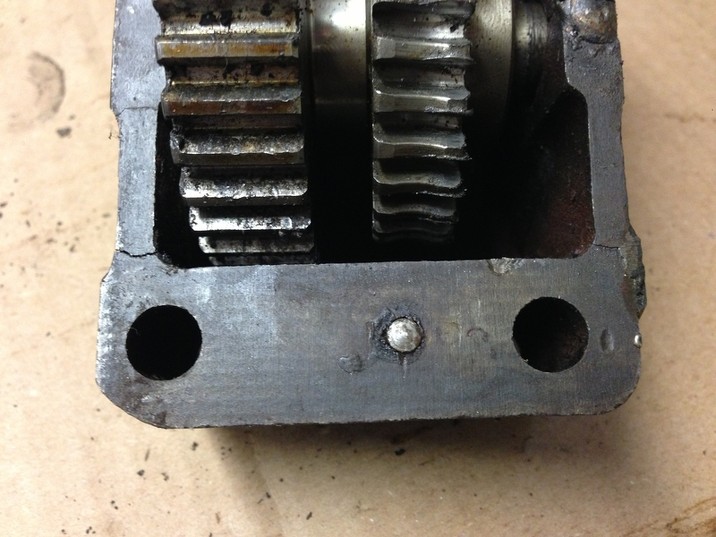
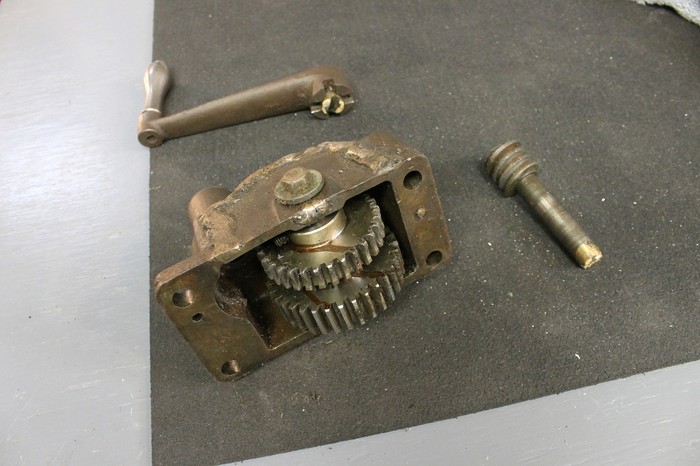
I unbolted the gearbox to see what I'm dealing with, the gears look to be in fantastic condition, although one shows a little wear from the worm gear of the handle shaft.

hn52.jpg


zzum.jpg


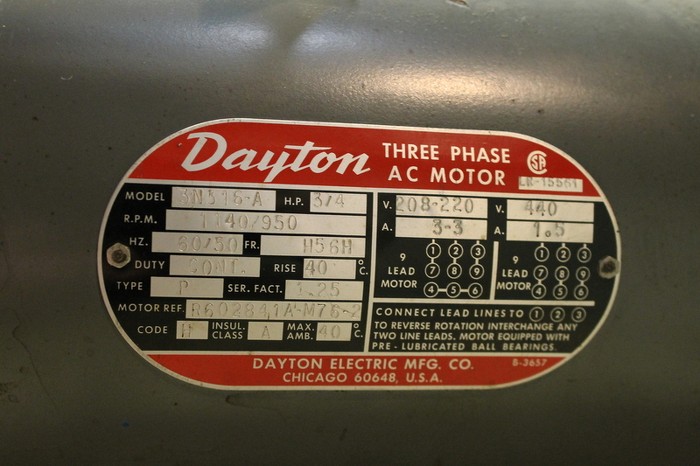
I decided to set that aside for another day and make the most of the time I had yesterday to work on eliminating the extra stuff hanging off the head of the drill press. As you can see, the original motor is no longer in place, but what currently lives in its place is a very nice dual speed 1140/950 rpm Dayton 3/4 hp motor that will suit me fine. I was told it was installed less than a year ago so it has plenty of life in it.

wkgo.jpg


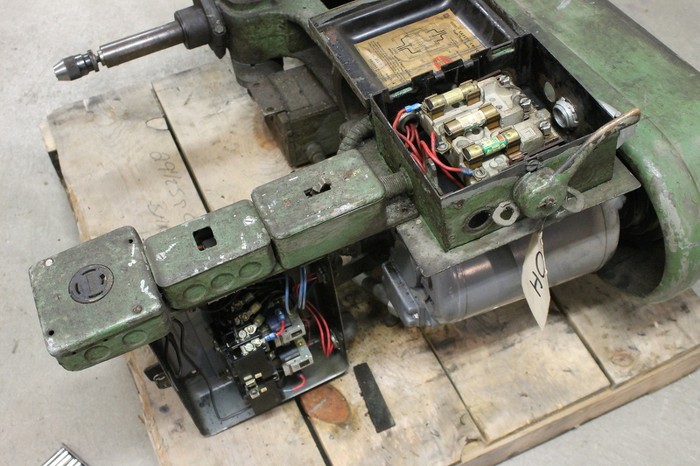
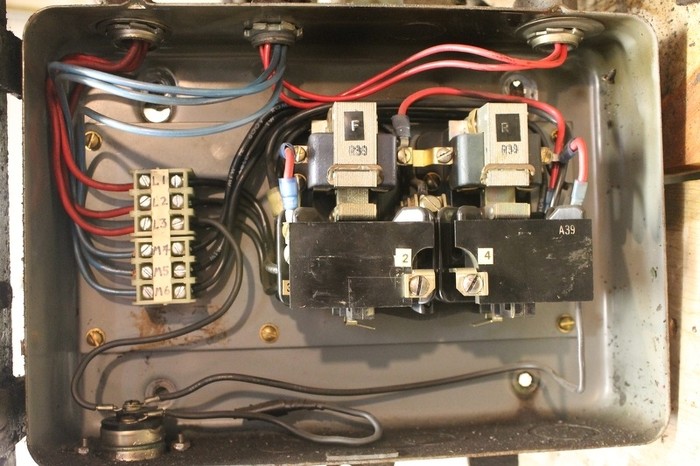
Took a couple shots of the wiring because I personally find stuff like this to be quite visually appealing. Like a window into the machine's former life as a work horse for the past 55+ years. :thumbup:

bdp6.jpg


hpy5.jpg


uh34.jpg


A shot of the spec tag on the motor:

vhdy.jpg


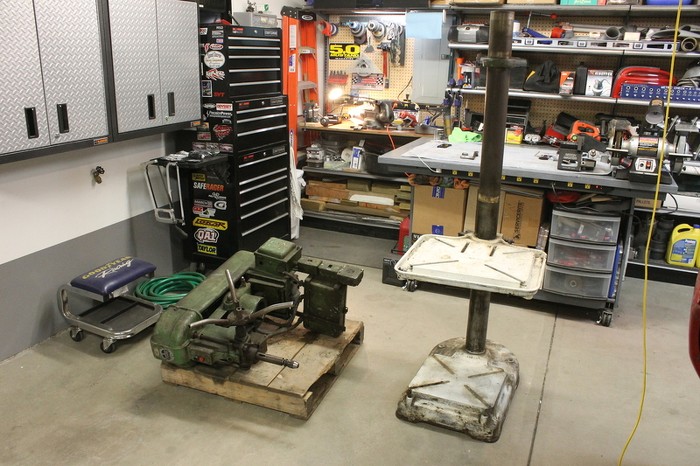
About an hour later, I had removed all of the unneeded stuff and the head of the press was looking much better after a little diet.

xhh5.jpg


t4y4.jpg


tsfy.jpg


That's all for now, I hope I wasn't too long-winded. I've been eagerly awaiting the opportunity to start my own thread like this while I was scouring auctions and online listings for the right machine. I'm very excited to finally be in the thick of it!

I'm going to continue dismantling it, then I'm planning to try out electrolysis on the more complex parts (like the main head casting, table and base) since I've read good things about this method on here. I still need to look into it a bit more before I try it, but the process seems rather straightforward. :thumbup:
 
To avoid these ads, REGISTER NOW!

Packard V8

Well-known member
Joined
Mar 16, 2009
Messages
7,380
Location
Spokane, WA
Congrats on finding a very nice machine.

1. How is the worm gear attached to the shaft? If it's just pinned, it's easier and stronger to just make another shaft than to try to repair a twice-broken piece.

2. Does the 20" WT use a splined spindle like the Atlas or the two-v-grooves like Delta or something else? A #3MT is overkill for most small shop drilling. If you can find another spindle which has a JT33 chuck, it will add some versatility.

jack vines
 

zkling

Well-known member
Joined
Jan 23, 2007
Messages
16,939
Very nice, that is going to be one heck of a drill press when cleaned up. :thumbup: Can you double check the serial number posted? I think it is one digit short.
 
OP
9

95riosnake

Well-known member
Joined
Oct 26, 2013
Messages
394
Location
Pittsburgh, PA
Congrats on finding a very nice machine.

1. How is the worm gear attached to the shaft? If it's just pinned, it's easier and stronger to just make another shaft than to try to repair a twice-broken piece.

2. Does the 20" WT use a splined spindle like the Atlas or the two-v-grooves like Delta or something else? A #3MT is overkill for most small shop drilling. If you can find another spindle which has a JT33 chuck, it will add some versatility.

jack vines

I'm not totally sure how the worm gear is attached to the shaft, I need to look a bit further into it. If it is as simple as removing it and replacing the shaft, I will most definitely go that route. We have a lot of solid bar scrap at work I could use, then just simply drill a hole for the handle pin.

As far as the spindle goes, that I am also unclear on. I will do some research on that though, I'd prefer versatility so the JT33 setup sounds like something I should pursue, thanks! :thumbup:

Very nice, that is going to be one heck of a drill press when cleaned up. :thumbup: Can you double check the serial number posted? I think it is one digit short.

I'll double check on the serial, that info was provided to me by the seller. Not sure where the serial # is located on the machine but I'll give it a once over and see what I can come up with.
 
OP
9

95riosnake

Well-known member
Joined
Oct 26, 2013
Messages
394
Location
Pittsburgh, PA
I guess it's pretty hard to miss the serial # since it's right on the WT plate staring me in the face, haha. Anyway here's a pic, it shows 52E2B2.

du74.jpg
 

Outlawmws

Well-known member
Joined
Aug 9, 2011
Messages
39,252
Location
The Badlands
Congrats on finding a very nice machine.

1. How is the worm gear attached to the shaft? If it's just pinned, it's easier and stronger to just make another shaft than to try to repair a twice-broken piece.

2. Does the 20" WT use a splined spindle like the Atlas or the two-v-grooves like Delta or something else? A #3MT is overkill for most small shop drilling. If you can find another spindle which has a JT33 chuck, it will add some versatility.

jack vines

:+1: on #1 suggestion!

For #2 you can get adapter from #3 to #2, and probably others as well, (the 18" Canedy-Otto I just bought Friday has one...)

Yes, the E tank is very straightforward. You will love it. however, it is winter and a byproduct is hydrogen, so make sure it is done where the explosive gasses can leave and there is no source of sparks...
 

zkling

Well-known member
Joined
Jan 23, 2007
Messages
16,939
I guess it's pretty hard to miss the serial # since it's right on the WT plate staring me in the face, haha. Anyway here's a pic, it shows 52E2B2.

That makes more sense, pretty sure that is a 1952 machine. :thumbup:
 
OP
9

95riosnake

Well-known member
Joined
Oct 26, 2013
Messages
394
Location
Pittsburgh, PA
:+1: on #1 suggestion!

For #2 you can get adapter from #3 to #2, and probably others as well, (the 18" Canedy-Otto I just bought Friday has one...)

Yes, the E tank is very straightforward. You will love it. however, it is winter and a byproduct is hydrogen, so make sure it is done where the explosive gasses can leave and there is no source of sparks...

This I did not know! I guess I'll look into doing it out on my deck then, maybe make some sort of cover to keep it out of the elements. My garage only has an access door into the house and the garage door (no windows or exterior access door), so getting ventilation without just leaving the garage door open won't be an option. Thank you for the heads up! I don't recall reading anywhere that hydrogen was a byproduct, but that is very important to know :thumbup:

That makes more sense, pretty sure that is a 1952 machine. :thumbup:

Thank you sir! Now if I can just get my thread title changed to 1952 rather than 50's I'll be in business, haha.
 

kc-steve

Well-known member
Joined
Jun 22, 2010
Messages
4,240
Location
Kansas City
Nice project and DP! I have one too. The label is one of the best ways to tell the age. That one was made when Kearney Trecker owned the company and therefore was built between 1948 and 1956, before Rockwell bought them. Probably before they built a new plant in 1952.

Steve
 

Attachments

  • 1957_plant_closing_1325-A.jpg
    1957_plant_closing_1325-A.jpg
    145.2 KB · Views: 57
  • Kearney_Tag_607-A.jpg
    Kearney_Tag_607-A.jpg
    51.1 KB · Views: 41
OP
9

95riosnake

Well-known member
Joined
Oct 26, 2013
Messages
394
Location
Pittsburgh, PA
I have one of thoes and they are a beast. That's a model 1100. You seem to have a very nice chuck (Albrecht?), I would keep the MT3 spindle. I'm not sure if they offered any alternatives.

I assume you know about http://owwm.org/. There is a good chance that you can find a replacement piece for your table raising mechanism.

And: http://vintagemachinery.org/mfgIndex/detail.aspx?id=808&tab=3

*mike

Are there any disadvantages to keeping the MT3? I know it's a quality piece, so if there aren't any real downsides to keeping it the obvious choice will be to leave it in place.

I have stumbled across OWWM a couple times while researching other machines, but haven't yet joined. I'll probably go ahead and sign up on there to hopefully source a couple new parts for the raising mechanism. I'd really like to find a new shaft/worm gear, handle and gear case. The handle is bent (probably from whatever caused the damage to the case) and the grip of it will not spin. I'm going to try to straighten it but I have a feeling it will break in the process. Thanks for the advice and the links! :thumbup:

Nice project and DP! I have one too. The label is one of the best ways to tell the age. That one was made when Kearney Trecker owned the company and therefore was built between 1948 and 1956, before Rockwell bought them. Probably before they built a new plant in 1952.

Steve

Thanks for the info! I didn't realize that WT was eventually absorbed by Rockwell, but now that you mention it I seem to remember seeing a few machines with plates on them that said both Rockwell and WT, maybe I'm wrong though. Thanks for a bit more history on this DP, it'll make it that much more interesting to work on :beer:
 

ckadams00

Well-known member
Joined
Sep 12, 2011
Messages
1,273
Location
Seattle, WA
Man, looks HEAVY. I have never restored anything quite that big. Congrats on finding something I am sure this is gonna be a great thread!
 

rsanter

Well-known member
Joined
Dec 22, 2007
Messages
18,515
Location
visalia ca
Are there any disadvantages to keeping the MT3? I know it's a quality piece, so if there aren't any real downsides to keeping it the obvious choice will be to leave it in place.

I have stumbled across OWWM a couple times while researching other machines, but haven't yet joined. I'll probably go ahead and sign up on there to hopefully source a couple new parts for the raising mechanism. I'd really like to find a new shaft/worm gear, handle and gear case. The handle is bent (probably from whatever caused the damage to the case) and the grip of it will not spin. I'm going to try to straighten it but I have a feeling it will break in the process. r:

Frankly I would leave it MT3 if it was mine
I like using MT drill bits for the larger holes and I have a bunch for my lathe.
You can easily get slip in adapters to go from MT3 to MT2 and from MT3 to MT1
I would also source a MT3 to j33 shank to mount a regular chuck


If the gear is part of the shaft you can cut the shaft off about an inch from the gear and drill the center out partly. Then make a shaft that will slip in and extend it to the original lenth. Cross drill and install a pin and then silver solder it and it will never come apart on you.
You could also drill it out and broach it and cut a keyway in the shaft. Then when you make the replacement shaft you can make it a press fit. Heat one side and cool the other to put them together and again they will never come apart on you

Bob
 

Packard V8

Well-known member
Joined
Mar 16, 2009
Messages
7,380
Location
Spokane, WA
I would keep the MT3 spindle. I'm not sure if they offered any alternatives.
Yes, actually W-T offered a JT33 spindle. The one with the JT33 taper has a knurled nut on the spindle you can use for either forcing off the Jacobs chuck, or retaining the milling tool adapter which W/T. They're one of the few DP manufacturers who encouraged milling in a DP.

Maybe, because it would eat up the special expensive lower spindle bearings and they could sell replacements. The bearings are special and are expensive - more than $100 a pair several years ago - they have about an inch long extension off the bearing shaft.

Some years ago, I came up with the contact information for a company called Walker Turner Serviced Machinery LLC. I sent them the pictures of the press and within 24 hours I received this response:

This is a classic Model 1100 20" drill press. We have a replacement parts (bearings etc) as needed to rebuild. We can also start you off with a full service instruction bulletin for this machine.

WT 1100 Drill Press Instruction Sheet package................................$12.00

We accept check, MO or Credit Card. If you would like to pay by Credit Card, we will send you an e-payment invoice via PayPal (PayPal account not required).

Walker Turner Serviced Machinery LLC
PO Box 666
Coventry, CT 06238

a subsequent email about the Instruction Sheet yielded the following:

The manual will contain parts breakdown, part numbers, everything you could possibly want to know about the machine. Vintage of your drill is 1940's. We have color perfect enamel paint - special bearings (new) etc. Many of our parts are reverse engineered new manufactured items. I came up with the contact information for a company called Walker Turner Serviced Machinery LLC. I sent them the pictures of the press and within 24 hours I received this response:

This is a classic Model 1100 20" drill press. The unit appears to have been set up as a production drill press with crank head and single table. We have a replacement return spring (new) avail, and some other parts (bearings etc) as needed to rebuild. We can also start you off with a full service instruction bulletin for this machine.

WT 1100 Drill Press Instruction Sheet package................................$12.00

We accept check, MO or Credit Card. If you would like to pay by Credit Card, we will send you an e-payment invoice via PayPal (PayPal account not required).

Walker Turner Serviced Machinery LLC
PO Box 666
Coventry, CT 06238

a subsequent email about the Instruction Sheet yielded the following:

The manual will contain parts breakdown, part numbers, everything you could possibly want to know about the machine. Vintage of your drill is 1940's. We have color perfect enamel paint - special bearings (new) etc. Many of our parts are reverse engineered new manufactured items.

As I said, this was some years ago, but maybe they're still in business for your needs.

jack vines
 
OP
9

95riosnake

Well-known member
Joined
Oct 26, 2013
Messages
394
Location
Pittsburgh, PA
Man, looks HEAVY. I have never restored anything quite that big. Congrats on finding something I am sure this is gonna be a great thread!

Thanks and yes, she's a hefty girl. I spent some time getting my wheel dollies positioned under the pallet and the base after taking the last picture so I can at least roll them around the garage without breaking my back so much!

Frankly I would leave it MT3 if it was mine
I like using MT drill bits for the larger holes and I have a bunch for my lathe.
You can easily get slip in adapters to go from MT3 to MT2 and from MT3 to MT1
I would also source a MT3 to j33 shank to mount a regular chuck


If the gear is part of the shaft you can cut the shaft off about an inch from the gear and drill the center out partly. Then make a shaft that will slip in and extend it to the original lenth. Cross drill and install a pin and then silver solder it and it will never come apart on you.
You could also drill it out and broach it and cut a keyway in the shaft. Then when you make the replacement shaft you can make it a press fit. Heat one side and cool the other to put them together and again they will never come apart on you

Bob

I think I'm going to go that route and source a MT3 to J33 shank because I do personally prefer a traditional keyed chuck. Great suggestions on repairing the shaft. I could easily lathe an extension to slip into a hole in the existing shaft cut off. I looked the shaft/worm gear over earlier and it looks like it may be pressed on.

Yes, actually W-T offered a JT33 spindle. The one with the JT33 taper has a knurled nut on the spindle you can use for either forcing off the Jacobs chuck, or retaining the milling tool adapter which W/T. They're one of the few DP manufacturers who encouraged milling in a DP.

Maybe, because it would eat up the special expensive lower spindle bearings and they could sell replacements. The bearings are special and are expensive - more than $100 a pair several years ago - they have about an inch long extension off the bearing shaft.

Some years ago, I came up with the contact information for a company called Walker Turner Serviced Machinery LLC. I sent them the pictures of the press and within 24 hours I received this response:


As I said, this was some years ago, but maybe they're still in business for your needs.

jack vines

Jack, thank you very much for the information! I think I'll try contacting them, maybe they have a raising mechanism case. I may end up doing the bearings while I'm at it, I tested the machine and it was pretty quiet, but it would be nice to have fresh bearings in place that will most likely outlive me when I'm done with the restoration, haha. It all depends how spendy the bearings are these days I suppose.

:thumbup: Nice find. You are going to get a workout restoring this one. I look forward to watching your progress.

very nice find, should be a great resto

I look forward to sharing the process with everyone here :thumbup:

I agree I'll be getting a workout! I was wrestling around getting the wheel dollies in place that night and it had the sweat rolling off my forehead by the time I was done. :D
 
To avoid these ads, REGISTER NOW!
OP
9

95riosnake

Well-known member
Joined
Oct 26, 2013
Messages
394
Location
Pittsburgh, PA
I've made a couple bits of progress, first is that I shot an email to Walker Turner Serviced Machinery LLC. to see if he is still around, and received an email back saying that he is and to let him know what parts I am looking for. I told him I'm looking for the raising mechanism case, worm gear shaft and handle...as well as a feeler on the bearings because if they're too pricey I won't bother since mine seemed to be in good shape when I tested the press. To which he replied just a few minutes ago:

"We have one in stock - however I will need to send you 2 photos later as your model may have the redesigned case - we have the older design. Will quote bearings as well.

Jeff @ WT"

I sent him a picture of my case in reply, so hopefully I'll hear back that he has something for me, although I'm apprehensive to get my hopes up because it seems there's a 50/50 chance that he has the right one.

Secondly, I was browsing around the internet during my lunch break yesterday for ideas of what color scheme I want to go with on this press, and stumbled across this absolutely beautiful 6 head gang drill press for sale on eBay (for $1850, whew! http://www.ebay.com/itm/Walker-Turn...5?pt=LH_DefaultDomain_0&hash=item1e8577ad9b):

1mak.jpg


2b79.jpg


I really love the cream/red/black color scheme, obviously it's still very early in the process but currently this color scheme is at the top of my list :thumbup:

Lastly I'm beginning to think this machine used to have a power down feed. Every machine I see pictures of that does not have the power down feed does not have the rectangular hole in the middle of the head casting that mine does. However, ones with power down feed do, see the picture below:

8763-F.jpg


This would also explain the unusually long shaft that my handle is mounted on, and the fact that the handle appears to be some oddball retrofitted piece.
 
Last edited:

dr_clyde

Well-known member
Joined
Jan 7, 2009
Messages
6,446
Location
Holland, MI
You can just get an adapter to put a keyed Jacobs chuck on a morse taper. We have them in the lathe. That way you can use big taper shank drills and reamers and the like.
 
OP
9

95riosnake

Well-known member
Joined
Oct 26, 2013
Messages
394
Location
Pittsburgh, PA
You can just get an adapter to put a keyed Jacobs chuck on a morse taper. We have them in the lathe. That way you can use big taper shank drills and reamers and the like.

Thanks for the info, I'm definitely going to get an adapter because I've always used keyed chucks and prefer them :thumbup:
 

CNGsaves

Well-known member
Joined
Sep 26, 2012
Messages
13,233
Location
KS and OK
Any problem with 2 pictures below the 4th paragraph that starts . . . "Secondly, I was ..... ??? :dunno:

I'm getting security alerts for those 2 pictures that don't show up (thus blocked by Internet Explorer), and say there are certificate errors ??

Please check out those 2 pictures for viruses.
 
OP
9

95riosnake

Well-known member
Joined
Oct 26, 2013
Messages
394
Location
Pittsburgh, PA
Any problem with 2 pictures below the 4th paragraph that starts . . . "Secondly, I was ..... ??? :dunno:

I'm getting security alerts for those 2 pictures that don't show up (thus blocked by Internet Explorer), and say there are certificate errors ??

Please check out those 2 pictures for viruses.

They're images hosted from my account on imageshack.us, same with all the other images I've posted in the thread.

No idea how to check a hosted image for a virus.

I'm using Firefox and they show up with no issues. Seems that IE has a lot of issues on forums, I run a mustang forum and our members that use IE have problems frequently with unusual things, Firefox and Chrome never seem to have the same issues.

There's a link to an eBay auction at the end of the paragraph, maybe that's the issue? Your guess is as good as mine.
 
Last edited:

geologist

Well-known member
Joined
Dec 14, 2011
Messages
5,326
I nearly won the Delta version of that drill at a government auction. I backed off after I realized how heavy the damned thing must be. Any ideas on weight?
 

kenburkholz

Well-known member
Joined
Sep 27, 2013
Messages
241
Feel lucky to have M.T. 3 spindle. I have that and I have adapters clear up to M. T. 5 and sleeves and shells for everything in between. One thing I found, is how inexpensive all these adapters are. When I buy a chuck, I order it with a spindle insert for M.T.3 to J.T. 33 or what ever is needed. Ken.
 
OP
9

95riosnake

Well-known member
Joined
Oct 26, 2013
Messages
394
Location
Pittsburgh, PA
I nearly won the Delta version of that drill at a government auction. I backed off after I realized how heavy the damned thing must be. Any ideas on weight?

I'm not totally sure on the weight, I don't have any way to get this thing on a scale but judging by the lower back-o-meter lugging around the two parts I have it divided into I would say high 300 lb-range? It is definitely a hulk to move around. When I finally have it back together I will most definitely need a couple helpers to get it stood up.

Feel lucky to have M.T. 3 spindle. I have that and I have adapters clear up to M. T. 5 and sleeves and shells for everything in between. One thing I found, is how inexpensive all these adapters are. When I buy a chuck, I order it with a spindle insert for M.T.3 to J.T. 33 or what ever is needed. Ken.

Judging by yours and a few others' replies I'm glad it does have the MT3. I'll just get an adapter to run a nice keyed chuck and rest easy knowing I have the potential to run just about any setup I want :thumbup:
 

tedsters

Well-known member
Joined
Oct 29, 2012
Messages
1,443
Location
Michigan
thats a heck of a DP and gonna be a good one to restore, that looks like an Albrecht chuck on it nice chuck also can't wait to see this one done you seem to be motivated to getter done
 
OP
9

95riosnake

Well-known member
Joined
Oct 26, 2013
Messages
394
Location
Pittsburgh, PA
I started out my Friday evening by repairing the worm gear shaft for the table raising crank, it's good to go now :thumbup:

dn1c.jpg


Next I got to work removing the table and collars from the column. Holy **** is this thing difficult to manhandle by yourself! I might have to edit my previous weight estimate, the table alone feels like it weighs about 80 lbs...

a4io.jpg


p969.jpg


ctbn.jpg


Everything off:

zwuk.jpg


Taking the time now to separate and label the hardware to save myself some head scratching later:

4hz1.jpg


Back to the table raising case, turns out Walker Turner Serviced Machine, LLC does not have one for me :( He said the one he has is the older version; mine is the revised case so I'm back to the drawing board on it. I've decided I'm not going to use this case. There are several cracks that look like they will be problematic in the future. I was pushing it with my OCD tendencies to overlook the ugliness of the repairs, but it is clear that they aren't adequate. There's already a crack in the braising near the gear shaft hole, a large crack on the outside of the housing, among two more at the corners that the braising didn't penetrate. Here's a few pictures:

k5iq.jpg


87y6.jpg


b8ji.jpg


pq8b.jpg


xgoy.jpg


I'm a patient man and metal fabrication is second nature to me, so I've decided to fabricate a new case if I can't find a replacement. The case is not overly complicated, so I'm confident I can build a new one. It certainly won't be a quick build, but it is what it is, haha.

I poked around trying to remove the shaft and gears from the case so I could start measuring to draft some parts for the replacement case, and I can't for the life of me figure out how to remove them! The two side bolts were removed rather easily, then the gears have a set screw for each that I backed off. The problem is there is a key way on the shaft with a key to keep the gears from spinning on the shaft. But the key keeps the shaft from sliding out of the case...you can't remove the gears to remove the key without removing the shaft from the case... ugh. This seems to be a rock and a hard place situation. Any guidance here is appreciated.

Here's what I ended up with before calling it a night at midnight:

chzo.jpg


Any ideas for removing the column from the base? I've removed the 4 set screws on the top and bottom of the base. Tried sliding the head support collar down close to the base and locking it in place with the set screws, then a large pry bar to try and slide the base off...no luck. Tried a dead blow composite hammer on the bottom of the column...didn't budge. Currently, I have liberal amounts of PB Blaster soaking into the base of the column hoping to loosen it up... If anyone has suggestions, I'm all ears.
 
OP
9

95riosnake

Well-known member
Joined
Oct 26, 2013
Messages
394
Location
Pittsburgh, PA
Oh I forgot to mention that Walker Turner Serviced Machine, LLC got back to me with price quotes on new bearings also. They're not cheap to say the least, but I'm still kicking this around in my head. My bearings seemed ok, but the machine did seem to have a slight bit of bearing noise. I might not ever have an issue, but on the other hand if I replace them while I'm restoring it, I'll never have to mess with them in my lifetime. The pricing is as follows:

"RFQ: Walker Turner 1100 Series 20" Drill Press new replacement bearings


P/N 70372 Double Row RBI Sealed - Special Bore Double Sealed.......$ 62.95 ea (1 rq'd)
P/N 80857 Spacer (required for above bearing).....................................$ 2.50 ea

P/N 70382 Single Row Nachi Sealed - Special Bore Double Sealed......$ 58.95 ea (2 rq'd)

P/N 6204-750EER Single Row RBI Double Sealed................................$ 14.50ea (1 rq'd)

S&H USA..............................................................................................$ 6.00"


^^ Total price: $203.85 ...whew :Twitch:
 
OP
9

95riosnake

Well-known member
Joined
Oct 26, 2013
Messages
394
Location
Pittsburgh, PA
I've been making some decent progress on this thing since the last update. I left off facing a challenge to remove the column from the base. I sprayed PB Blaster on it every night for a week, then on Saturday I went at it, determined to separate them. At first, it wouldn't budge. So out came the propane torch for about a half hour to heat the base around the column from both the top and bottom. I slid both the head support collar and table support collar down close to the base hoping that doubling them up would keep them from slipping then used a long pry bar between the collars and base. After a few tries, it started to move FINALLY! A few more minutes of prying and it slipped right out of the base.

b9mz.jpg

tr3u.jpg

With the column finally out, I could work on restoring it. Luckily, it only had moderate rust (no pitting) and a scratch or gouge here and there.

864l.jpg

I degreased it first, then hit it with some 120 grit hand sanding followed by 220 grit (also by hand) for an hour or so. It was looking pretty decent but needed to shine.

j674.jpg

I had planned to use a non-braided wire cup brush on my angle grinder, but couldn't find the cup brush so I improvised.

I set up two rollers in front of my bench grinder and removed the grinding stone to leave only the wire wheel. Then I just moved the column back and forth while slowly rotating it, the whole time putting mild pressure against the wire wheel.

Before:

n2ef.jpg


After round 1 of wire wheeling:

snh4.jpg

And after a second round:

knnr.jpg

x27g.jpg

Not bad for a few hours work on a 62 year old hunk of metal!

The next thing bothering me was a bit of damage to the lower half of the table support collar. It had some chunks missing that I was going to try to overlook, but I somehow lucked out and found both collar halves on eBay in MINT condition including a new set of ball bearings, problem solved. I was so excited to find these parts, since they were discontinued a very long time ago and are almost impossible to find, especially in good shape. The buy it now button was clicked and a couple days later, they showed up on my doorstep.

shgu.jpg

4jkb.jpg

The table raising knob was siezed, so it wouldn't rotate. I put it in the vise and started working it a bit with a strap wrench and some penetrating oil hoping to free it up.

egyj.jpg

In doing so, I discovered another bit of damage. The handle must have been cracked from some kind of impact (most likely the same one that broke the raising mechanism case) so when I tried turning the knob with the strap wrench, the top of the handle just broke off.

92si.jpg

So I was initially pretty upset, but then I realized it just meant I could fabricate a new handle that is overkill strong, lol.

Before I started fabbing the new handle, the knob needed a little restoration using a cordless drill, bolt, a few grits of sand paper and some polishing compound.

ows5.jpg

ppd4.jpg

Then I got started on the handle itself. I bought a spacer from McMaster Carr that had the correct inner diameter, then welded a steel tube around the spacer to make it the right outer diameter I needed. Ground it smooth after welding it obviously. I also bought a smaller diameter spacer for the other end where the knob attaches. I undersized the inner diameter so I can tap it for a bolt to attach the knob with, rather than a pressed-in pin like the original.

49xi.jpg

Next up I needed to recreate the slots that engage the pin on the worm gear shaft to turn the table raising mechanism, so I milled some 0.250" slots into it on the mill.

4979.jpg

4mar.jpg

zu32.jpg

A scrap piece of 1/2" steel plate was sourced from our scrap bin at work, then I cut two holes to match the outer diameters of the two spacers. Obviously I don't have a drill press yet and didn't feel like driving to work to use one, so I turned my JD Squared tubing notcher into a makeshift drill press.

ohee.jpg

i7o5.jpg

Cut the stock to length through the middle of the holes, then laid it out to show where I'm going with this.

kdox.jpg

I then thanked myself for about the 1000th time for buying the new band saw a few months back while using it in upright position to cut out the rough shape of the handle.

iujb.jpg

After a little bench grinding and some filing, it was looking pretty decent.

4oz6.jpg

Took it to work to do some more shaping with the belt grinder:

doib.jpg

phh5.jpg

lx9m.jpg

Ground a bevel into the circular notches in the handle where the spacers go so I could get good weld penetration, then cranked up the MIG and welded it up.

91qd.jpg

Followed by more belt grinder shaping, filing and sanding...

sw5u.jpg

Decided it still wasn't good enough so I filled in some of the nicks and low spots, then more belt grinding, filing, sanding...brought me to the final product. I need to pick up a stainless button head allen bolt and tap the small end of the handle for it, then I can call it finished. A lot of work to put into a handle I know, but I can't stop myself from putting a lot of work into the details, lol.

5plp.jpg

mpyv.jpg

Since I'll be working on dismantling the head casting next, I found a company called Ozark Woodworker that reproduces original machine manuals. He goes through and digitally corrects scans of the originals, then prints fresh, new copies. Fortunately for me, he had one for the 1952 Walker Turner 20" DP, my copy showed up yesterday:

eo0s.jpg

This page should save me a ton of head scratching:

rrkp.jpg

The manual also has several other exploded views of anything I could ever want to dismantle on the machine also, I'm very happy with my purchase of $20 with free shipping.

That's it for now, I'll keep plugging away at this old tank and keep you guys updated as I make more progress!
 

cnc-me

Well-known member
Joined
Jan 6, 2010
Messages
1,183
Location
MI
I'm not totally sure how the worm gear is
As far as the spindle goes, that I am also unclear on. I will do some research on that though, I'd prefer versatility so the JT33 setup sounds like something I should pursue, thanks! :thumbup:

Stick with the MT#3 it's a much heavier setup.
You can get an arbor for any Jacobs taper you want, and when it comes time to
run some big twist drills you will happy you have the #3.
I'm pretty sure yours was a power feed unit like this one.
A Walker Turner owner of a DP just like yours, since 1989. Pictures of it are on this site. They have one of the best table raising mechanisms on a DP that I have seen. These a definitely worth restoring, after 25 years I still enjoy using these drill presses.
Great job on the handle, you might as well as skipped putting in the second slot though IMHO.:eyecrazy:
I find that the handle is much nicer with it locked down solid, I made a blind bushing or "cup" to lock the handle down.
53469769.jpg
 
Last edited:

nine4gmc

Well-known member
Joined
Mar 24, 2012
Messages
14,357
Location
Dallas
Great job on the handle, if that is any indication of how the rest will go, I can't wait to see!! :drool:
 

oldldh

Well-known member
Joined
May 22, 2012
Messages
3,700
Location
Fairhope, AL
"Ya Dun Reeeel Gud With Tha' Handl', Bubba!!!

That's going to be a hole poker for the ages when you get finished!!!!
 

CoopVA

Well-known member
Joined
Jan 20, 2014
Messages
2,144
Location
Virginia
Nice work! I really like what you did for the handle.


Sent from my iPad using Tapatalk
 
OP
9

95riosnake

Well-known member
Joined
Oct 26, 2013
Messages
394
Location
Pittsburgh, PA
Stick with the MT#3 it's a much heavier setup.
You can get an arbor for any Jacobs taper you want, and when it comes time to
run some big twist drills you will happy you have the #3.
I'm pretty sure yours was a power feed unit like this one.
A Walker Turner owner of a DP just like yours, since 1989. Pictures of it are on this site. They have one of the best table raising mechanisms on a DP that I have seen. These a definitely worth restoring, after 25 years I still enjoy using these drill presses.
Great job on the handle, you might as well as skipped putting in the second slot though IMHO.:eyecrazy:
I find that the handle is much nicer with it locked down solid, I made a blind bushing or "cup" to lock the handle down.
53469769.jpg

Yea from looking at a lot of photos online I guarantee it had the power feed, which would explain the oddball handle on it. Since the handle was specific to the power feed unit, I'm guessing when something went wrong with the power feed, they pulled it and just found whatever they could get to work. I'm definitely keeping the MT3, just going to get an adapter for a nice Jabobs chuck :thumbup:

check out accurate bearings I bet they can get you some way cheaper.

Accuratebearing.com
Toll Free 800-323-6548 or 630-543-2100
Fax Toll Free 800-323-3116 or 630-543-2116
E-mail: [email protected]

Thanks I'll check them out!

Great job on the handle, if that is any indication of how the rest will go, I can't wait to see!! :drool:

"Ya Dun Reeeel Gud With Tha' Handl', Bubba!!!

That's going to be a hole poker for the ages when you get finished!!!!

Nice work! I really like what you did for the handle.


Sent from my iPad using Tapatalk

Thanks guys! I'm planning to keep up this level of quality on restoring this thing, it will likely take me a long time but it'll be worth it to have an incredibly nice drill press that will probably outlive me, lol.
 

stonesfan68

Well-known member
Joined
Apr 19, 2012
Messages
2,758
Location
Houston, TX
That's some awesome work, especially on that handle! :bowdown:

ccae364363fdd6bfc21905a00e26ca52.jpg

What are you going to do about the 3-phase motor? Do you have 3-phase in your shop, or will you buy a converter?
 
To avoid these ads, REGISTER NOW!
Top Bottom