To avoid these ads, REGISTER NOW!

Garage in a Garage Renovation

Superhawk2002

Active member
Joined
Jan 2, 2014
Messages
35
Location
Indianapolis, Indiana
Well, it's time to redo the garage. I have no idea what I am actually doing, but I have a good idea of what I want, kind of... I only know what my budget is -> shooting for under 15K total spend.

We have an odd garage -- more of a garage in a garage. The original garage was under the house. A much larger garage was added later on. I have lots of space, but no real vision of what to do. The outer garage was built to house an RV. I need tool storage & organization. I would like air lines to be ran in both garages in multiple points. A small closet of some sort to house the air compressor (and keep it quiet) would be nice. I need 220 ran in multiple locations.

The inner garage is climate controlled. I would like to make it a small shop and rec room/mancave area. One wall of the inner garage can go if possible. There is a useless hallway that would add some considerable room if I can yank that wall out. I plan on keeping the garage door for now as I plan on storing my Shelby in there this year. I would also like to be able to pull cars in there to work on them during the summer months. I need a decent sink/bar built into the back area. Finally, adding a window in here is a possibility. Pending some more thought, adding in some sort of safe room for the family is in my mind -- maybe even an underground or hidden room. I imagine cost will keep this from happening.

Our house is somewhat odd design. An elevator was in the house before we bought it, so the hallways are kind of weird (esp in the basement). It has been removed, but you can tell where it used to be.

Things I currently like -- very tall ceilings. Excellent lighting throughout. Heavy duty floor to ceiling shelves in multiple areas. The outer garage is half underground, so it stays cool. The inner garage more so than that. It stayed cool enough in the inner garage that we did not use the standalone AC system in there at all this summer.


Things were kind of a mess when I started. From the main doors looking in.

IMG_20121021_191222_271.jpg


IMG_20121021_191435_973.jpg


And looking out.

IMG_20121021_191318_211.jpg


Cleaned up some last weekend.

IMG_20121021_204728_420.jpg


Looking into inner garage. The door to the right is the hallway I mentioned above. I would like that wall removed and the whole inner garage opening in a different way into the basement -- just not sure much would need done to do that.

IMG_20121021_191301_320.jpg


Pics of the inner garage looking out.

IMG_20121021_204950_655.jpg


IMG_20121021_204938_052.jpg
 
To avoid these ads, REGISTER NOW!
OP
S

Superhawk2002

Active member
Joined
Jan 2, 2014
Messages
35
Location
Indianapolis, Indiana
Available space...

IMG_20140301_161500_1281_zps541fff0e.jpg


I finally broke down and bought the lift Friday. I went with the 10K pound lift, extra tall, extra wide with some nice accessories. I also bought a parts washer. Looking at some used big compressors now. It was a nightmare for two of us to get it out of the truck. Had to call a few friends over.


IMG_20140306_160024_098_zps5c5c61dd.jpg


IMG_20140307_135145_959_zpse3e25e9e.jpg


I went to Lowes with the intent of spending about 2500 on rail systems, cabinets, shelves, the works. Then this video changed my life. Now redoing everything this way. The kids are down in the garage with me and will be making their own tool boxes (see video). I always wondered how my Grandpa did this as a kid, finally putting it all together. I am doing the whole garage with tons of hooks for under 250 bux (including the stain I bought).


Custom Garage Storage


I will update as I go. I need to patch the walls, paint it Ford Service colors, figure out exactly where the lift goes, get the rail system up, then plumb the whole garage with air and hose reels. Leaving the floor as is for the time being.

We are getting a small powdercoating oven as well. The mancave idea is in the works, just not sure how to keep it a shop and a cool place to hang out.
 
Last edited:
OP
S

Superhawk2002

Active member
Joined
Jan 2, 2014
Messages
35
Location
Indianapolis, Indiana
French cleat system started. Running these along every wall 16 inches apart, going 6 feet up with the entire upper row being shelves and cabinets. I am actually more excited about getting this rail system up than the lift.

IMG_20140308_171329_187_zpsaf288737.jpg


Parts washer put together. I bought it from Greg Smith equipment. Had I not gotten a good deal on it for buying the lift at the same time, I would return it. It looks like someone played kickball with it. Every panel is dented, paint cracking throughout, and the corners of the lid are crunched in. I may still go get another one. I realize it's going to get used and beat up some, but would like it as nice as possible for as long as possible.

IMG_20140308_182941_625_zps0e02473c.jpg


And this will be pretty much exactly where the lift posts will be anchored.

IMG_20140308_183341_780_zps60cd4ab4.jpg


As I keep going along, I am running into the "Wish I had thought of this earlier" stuff. This is definitely a work in progress. I originally planned on having all this done by a contractor, and now doing it all alone. Running the 220 throughout the garage is giving me the biggest headache, mostly because I don't know what I am doing. I bought a book last week -- between it and youtube, I am slowly figuring it out.
 
Last edited:

mwbailey

Well-known member
Joined
Jun 30, 2012
Messages
821
Location
Rock Hill, SC
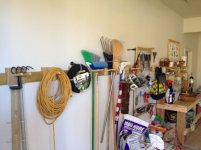
Hey, Superhawk, I think you'll like the "French cleat" system. I didn't go whole hog on it, but I installed something similar in The Wife's potting shed:
IMG_1146 (640x480).jpg
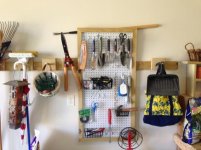
I didn't go with putting "factory made" hooks on the cleats; used 1" dowels instead. But I did include a framed pegboard for the hooks!
IMG_1147 (640x480).jpg
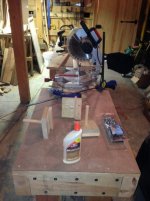
Instead of 3/4 inch plywood, I used some left over decking, 5/4 X 6". Figuring the potting shed would get some dampness, the treated lumber seemed to be appropriate. By making the cleat from the same material and cutting the "hangers" about 6" square, the support seemed to work pretty well.
IMG_1001 (480x640).jpg

I must admit that my idea for the cleat system was trying not to second guess The Wife. Just as soon as I put something up, she wants to move it. Now she can move things to her heart's content!

Good luck with your system; looks like you'll have a pretty well-equipped workshop.
 
OP
S

Superhawk2002

Active member
Joined
Jan 2, 2014
Messages
35
Location
Indianapolis, Indiana
That is a very unique and unusual 'garage'. Will you be keeping the inner roll up door? Seems terribly out of place. Maybe if it had all window sections top to bottom.


Inner garage door stays for the time being. I don't really ever intend to remove it, even if that space is totally converted into a req room. Currently, I like pulling the car in there to work on it as it's heated and cooled. I may change it to some sort of windowed door in the future, but it will most likely remain a garage door.


I didn't go with putting "factory made" hooks on the cleats; used 1" dowels instead. But I did include a framed pegboard for the hooks!

I must admit that my idea for the cleat system was trying not to second guess The Wife. Just as soon as I put something up, she wants to move it. Now she can move things to her heart's content!

Good luck with your system; looks like you'll have a pretty well-equipped workshop.


I am also using dowels for some of the cleats. Lowes had a selection of hooks on sale for half off, so I bought them all. I figure some of the hooks will be more useful than dowels. And I am thinking the same thing with the wife and kids.
 

Zeke

Well-known member
Joined
Aug 13, 2009
Messages
17,176
Location
Long Beach CA, the sewer by the sea.
Inner garage door stays for the time being. I don't really ever intend to remove it, even if that space is totally converted into a req room. Currently, I like pulling the car in there to work on it as it's heated and cooled. I may change it to some sort of windowed door in the future, but it will most likely remain a garage door.

Got it. I was thinking that it was useful, just not the best looking. A door within the larger building has a huge potential for creativity. Anything from a wrap installed that looked like a bank vault to a disco bar. Bi-fold carriage doors to casino doors. Slide back French doors.

Come on, man, live it up! :)

flat,550x550,075,f.jpg
 

rsanter

Well-known member
Joined
Dec 22, 2007
Messages
18,523
Location
visalia ca
Take that garage within a garage and build a bit steel safe room box in there.
If a big store comes then you put the Shelby in there and you and the family get in the Shelby.
You got to have somewhere to sit after all.....

Bob
 
OP
S

Superhawk2002

Active member
Joined
Jan 2, 2014
Messages
35
Location
Indianapolis, Indiana
Drywall totally patched and almost done painting. Decided on a blue stripe because we had some leftover paint from painting my son's room 2 yrs ago. Ended up spending more time picking chunks off the wall than painting. Never using old paint again.

The back walls are still in limbo -- trying to run the 220 to those walls and figure I may need to cut into them. I hope to figure it out by tomorrow, then get back to work on the wall organization.

New goal is to never have anything laying on the floor again. I couldn't believe just how much stuff I had laying around against all the walls.

Before:


IMG_20140310_122351_556_zps412c137c.jpg


IMG_20140314_213149_303_zps21559742.jpg


IMG_20140314_213108_101_zps3b5ce713.jpg


After:

IMG_20140316_022943_308_zpsa6c230f9.jpg


IMG_20140316_022906_621_zpsbf1d30fc.jpg


IMG_20140316_022911_894_zpsab83a253.jpg


IMG_20140316_024146_838_zps20aa0cff.jpg
 
Last edited:
OP
S

Superhawk2002

Active member
Joined
Jan 2, 2014
Messages
35
Location
Indianapolis, Indiana
The main line to run the subpanel in the garage is in. I went back and forth on running 30amp dedicated lines straight out of our main panels or a 100amp subpanel. Everyone I talked to said the subpanel is the right way to do it.

I am buying a nice desiccant filter to go along with my water separator and oiler. Trying to figure out how to run all this stuff now. Hopefully be done with everything by middle of next week. I am still on the fence on which compressor to buy.

Airampwater_zps9f9c58ed.jpg
 
OP
S

Superhawk2002

Active member
Joined
Jan 2, 2014
Messages
35
Location
Indianapolis, Indiana
Working on the french cleats and assembling all the stuff for the garage. HUGE thanks to our maintenance guys for hooking me up with so much stuff. Our plant is closing in 2 more weeks -- I am getting a lot of leftovers before either being thrown away or being shipped to Mexico. :(


I have cut a total of 480 board feet for the french cleats. I took the table saw outside to keep the dust and mess out of the house. My truck doubled as an outdoor paint station. This is the second set I have cut.

IMG_20140406_192412_040_zps39bc0c94.jpg


Stain color I am using. Probably overkill, but I am staining both sides for a more finished look. Can't believe how much stain the plywood soaks up. Cabot's Colonial Maple

IMG_20140406_192905_437_zps045e54ab.jpg


IMG_20140406_205947_443_zpsf12c98e4.jpg


All the supplies coming in. A few hundred feet of plumbing and supplies. With all the free time I have coming up, I should get the rest of the garage painted and the air supply line mounted. Not quite sure where the compressor is going yet. My goal is to have 5 air reels throughout the garage. Power cords will be beside each reel, along with several drop lights in each bay. 3 or 4 total fans mounted up high should move the air decently. The drain tender was a freebie and nice to keep water out of the tank.


IMG_20140331_211538_897_zpsd09156fe.jpg


IMG_20140331_211528_656_zpsdf6fc220.jpg


IMG_20140331_211548_621_zps784899fe.jpg


IMG_20140331_211520_892_zps5736c0e9.jpg


And here is the compressor I ordered -- thanks to another forum member for steering me in this direction. It should be ready in the next 2 to 3 weeks. They are close enough for me to just pick it up in person. Here is a link to it if anyone is interested. Still debating on which sand blast cabinet to buy.

Industrial 7.5HP V4 Single Phase 80 Gallon Vertical Air Compressor


Economy_10_H_V4_80_Gallon_zps085878be.jpg
 
Last edited:
OP
S

Superhawk2002

Active member
Joined
Jan 2, 2014
Messages
35
Location
Indianapolis, Indiana
French cleats going up. I tried to arrange the cleats in a way to not take away from my AWESOME paint job. :) I learned the hard way about paint lines and levels. I took all my measurements off the floor for the paint lines. Hanging the cleats with a level make it look crooked. I broke my level I have had for 10 years too -- that 4 foot level has slid off roofs, been dropped several times, even ran over with a 4 wheeler -- today a 3 foot fall off the edge of a cleat broke it. :(

Not sure if I should go another row higher or not. I thought having a nice shelf wrap all the way around the garage or a place to easily mount fans, reels, and air lines. (Maybe even a model train track someday -- my son loves trains). I left the space next to the lift post so I can easily walk around it.

I will complete the cleats and get them hung throughout the whole garage over the next few days. It's a real PITA doing it alone.


IMG_20140408_141532_295_zps575049be.jpg


IMG_20140408_141607_443_zps6e013595.jpg
 
OP
S

Superhawk2002

Active member
Joined
Jan 2, 2014
Messages
35
Location
Indianapolis, Indiana
Slowly but surely. I learned the hard way that Cabots discontinued their interior oil stain line due to regulations with VOC's. I has already stained one cabinet and most of the wall boards with stain that I bought over a year ago. You can still find it online at some places, so I ordered 2 more gallons. In the meantime, I had Sherwin Williams try to match the Cabots. It is not perfect, but pretty close.

All the cleats stained and starting to put on the hooks and other ****.

IMG_20140420_243339_385_zps1483f4eb.jpg


Line ran for the subpanel. This was a real PITA. My house is such a weird shape, it was a nightmare crawling through the attic. Not to mention that I discovered a TON of raccoon feces in the attic. Calling Monday to have it cleaned up and removed. It all looks fairly old, so praying the trapping and removal has worked. I reinforced the boarded up areas again. I wanted the line on a different wall, but I wasn't sure if I had enough line to make it. Plus I didnt want to hang out in the attic any longer than necessary -- breathing in and walking around all the **** (literally) makes me nervous.

IMG_20140420_243404_902_zps70168a41.jpg


And now for my electrical question. Will this 3 pole/3 phase 50 amp breaker work as a 50 amp single phase breaker? My google searches leave me more confused. I am going towards the no side, but figured I would ask.

IMG_20140420_243449_375_zpsabf469a3.jpg
 
OP
S

Superhawk2002

Active member
Joined
Jan 2, 2014
Messages
35
Location
Indianapolis, Indiana
Looking good, I want to do same color scheme in mine. Any pics of the GT500?


There is a build thread on SVTPerformance. I love the car -- full bolt ons, 3.73's, Moser axle shafts, lowered, usually sitting on drag radials. Getting ready to play with the exhaust some. While the Kooks headers and H-pipe sound pretty good with the factory mufflers, I am going to install a Stainless works system from the cats backs. I threw in a teaser pic. :beer:


French cleats are complete on one wall. Taking them all the way to the ceiling makes hanging air lines and the like much easier. I hung two of the bug lights I got as well. A third came in the box with the lights broken and pretty trashed -- they were free so I can't complain. Going to get another one from work. Doing this alone take a ton more time than it should and is a physical beating. I started putting up all the plumbing for the air lines as well. Minor issues getting it connected once it's on the wall.

IMG_20140420_213944_236_zps0335aac1.jpg


First fan up (3 more to go) and wired into an outlet we put into the little storage area. Took me quite a while to hang it solo -- damn near fell off the ladder. At least my 4 yr old son thought it was amusing.

IMG_20140420_213958_884_zpsf69cacd0.jpg


I will finish this wall tomorrow and continue getting the air plumbed in. Hopefully the compressor is ready in a week or so. I can't believe how many bugs "go to the light".

IMG_20140420_214042_456_zps208d6990.jpg
 
To avoid these ads, REGISTER NOW!

Kevin54

MEMBER EMERITUS
Joined
Jan 12, 2005
Messages
29,341
Location
Urbana, Ohio
I think things are starting to shape up real well. BTW....Welcome to Garage Journal!!!!! It's not that your house has a weird shape to it, just call it unique. And when you have "Unique" to deal with, then it can turn out to be really cool!!! :thumbup::thumbup:

If you wouldn't mind, could you put your State that you live in, into your profile? It helps a lot of people if a question pops up.

One other thing I forgot to mention.....Killer 'Stang :rocker:
 
OP
S

Superhawk2002

Active member
Joined
Jan 2, 2014
Messages
35
Location
Indianapolis, Indiana
I think things are starting to shape up real well. BTW....Welcome to Garage Journal!!!!! It's not that your house has a weird shape to it, just call it unique. And when you have "Unique" to deal with, then it can turn out to be really cool!!! :thumbup::thumbup:

If you wouldn't mind, could you put your State that you live in, into your profile? It helps a lot of people if a question pops up.

One other thing I forgot to mention.....Killer 'Stang :rocker:


Running wires above the garage is where you see "unique". :eyecrazy:


At a turtle's pace, it is coming along. It seems like hardly anything is getting done even though I am working all day on it. Doing this solo presents some interesting challenges. I also decided I wanted to run water lines to a nice garage sink (maybe even a bathroom) and a line out front.


The outside garage air lines are almost done. My measurements have come out pretty good. Without a way to thread the pipe here, I had to stop for the night. They are all just loosely put together. Unions and shut off valves going in.

IMG_20140421_214814_356_zpsa765b648.jpg


IMG_20140421_214736_786_zps0937eb39.jpg


IMG_20140421_214341_830_zps3a965496.jpg


IMG_20140421_214320_988_zps83987b26.jpg


Thanks to some other forum members, I took their advice and placed these ends going out from each door, and went straight down on the air fittings next to the entry door.


IMG_20140421_214356_787_zpsb606d58f.jpg


I got some Kimball Midwest trays full of goodies -- I am curious if the french cleats will hold a fully loaded box. :confused: It would be a mess if it fell.


IMG_20140421_214457_602_zpsc0d17973.jpg


And I unpacked a few paper towel dispensers. More freebies and they are something that are nice to have around.


IMG_20140421_214620_188_zps993f9dde.jpg
 

pitterpat

Well-known member
Joined
Jun 30, 2011
Messages
686
Location
Indianapolis
I will find out tomorrow. They came in a pretty unmarked box in bundles of 3. Work buys them in bulk (like a pallet full at a time) to line all the dock doors and such. With my location closing its doors for good, there are A LOT of leftovers.

1st, don't go back in the attic with the **** turds. **** turds carry worms, you could really get sick. I read up on them because I had raccoons in one of my window wells this winter under my deck; the little shitheads stayed in the window well all winter then after they stopped using it as a home they started using it as their toilet. So, I have to take the deck up this summer too to get rid of the **** turds and to screen it off. I put cinder blocks over the openings that they used to get under the deck and to the window well. I know what you mean about **** turds, not fun.

Superhawk2002, welcome to the forum. What part of Indy are you located, looks like near Eagle Creek or the west side. Wish I would have known sooner that you needed help, I would have volunteered. About a week ago a friend asked me to paint their vacant house so I've got that project going along with my VW Garage-2 and yard work. But if you really need some help send me a PM.

BTW, you can't/shouldn't use that 3 phase breaker in residential. Just go to Menards and get the correct 50 amp single phase breaker. I put one in my VW garage-2 for my spot welder. As long as you stay with the national brands Menards seems to have the best prices on building materials and the people are super nice.

Let me know if you need help.
Pat
 
OP
S

Superhawk2002

Active member
Joined
Jan 2, 2014
Messages
35
Location
Indianapolis, Indiana
1st, don't go back in the attic with the **** turds.

What part of Indy are you located, looks like near Eagle Creek or the west side.

BTW, you can't/shouldn't use that 3 phase breaker in residential. Just go to Menards and get the correct 50 amp single phase breaker.

Let me know if you need help.
Pat


May get a hazmat suit and do the attic myself. Not sure yet. The quote to "fix" it is in the thousands.

West side...

Single phase 50amp breaker purchased. :thumbup:

And thanks for the offer on the help. If you get some free time, I will swap lift privileges for some help. :bounce:


Wrapping the pipe around the garage -- going incredibly slow as I am now handcutting threads on my own. Kind of a learning curve to get it right.


I got a bunch of T's and other connectors, but the maintenance guys at work mentioned there being a difference between water line and air lines. Any truth to this? I have a bunch of light silver "water" connections and would like to use them if possible.


As it stands, pretty much finished up the other wall. I swapped all the reels out to quick connects and hoses. I tried hard lining it, then using soft lines.


IMG_20140424_202240_372_zps3f5eb97b.jpg


IMG_20140424_201519_510_zps608f842e.jpg


IMG_20140424_201556_442_zps59045582.jpg


I scored 3 more bug lights and 2 more hose reels. Not sure what I will do with more bug lights. They are not rated for outdoor use. They are the upgraded models to the ones I already hung. May swap them out...


IMG_20140424_201832_602_zps554e6c7d.jpg
 

pitterpat

Well-known member
Joined
Jun 30, 2011
Messages
686
Location
Indianapolis
May get a hazmat suit and do the attic myself. Not sure yet. The quote to "fix" it is in the thousands.

West side...

Single phase 50amp breaker purchased. :thumbup: /QUOTE]

And thanks for the offer on the help. If you get some free time, I will swap lift privileges for some help. :bounce:


**** turds, since it is in you attic you might want a professional to clean them out, they carry worms and you have to "flame" the area to get rid of them. Yes, burn the area , but I think there is another way. Here's a good description of why **** turds are toxic and how to clean it up.

http://www.cdph.ca.gov/healthinfo/discond/Documents/RaccoonRoundworms.pdf
 

pitterpat

Well-known member
Joined
Jun 30, 2011
Messages
686
Location
Indianapolis
May get a hazmat suit and do the attic myself. Not sure yet. The quote to "fix" it is in the thousands.

West side...

Single phase 50amp breaker purchased. :thumbup:

And thanks for the offer on the help. If you get some free time, I will swap lift privileges for some help. :bounce:

**** turds, since it is in you attic you might want a professional to clean them out, they carry worms and you have to "flame" the area to get rid of them. Yes, burn the area , but I think there is another way. Here's a good description of why **** turds are toxic and how to clean it up.

http://www.cdph.ca.gov/healthinfo/discond/Documents/RaccoonRoundworms.pdf
 

188slo50

Well-known member
Joined
Jul 26, 2009
Messages
643
Location
Virginia
I wouldn't put my quick connection for the soft hoses on the bottom due to any condensation in the line will run directly through your hose to your tools.
 
OP
S

Superhawk2002

Active member
Joined
Jan 2, 2014
Messages
35
Location
Indianapolis, Indiana
**** turds, since it is in you attic you might want a professional to clean them out, they carry worms and you have to "flame" the area to get rid of them. Yes, burn the area , but I think there is another way. Here's a good description of why **** turds are toxic and how to clean it up.

http://www.cdph.ca.gov/healthinfo/discond/Documents/RaccoonRoundworms.pdf


Thanks for the link - I am using a lot of info on there for my cleanup. Going in alone on it. Bought a full face respirator and chemical suit. Going to pick it all up and clean up about a 1 foot area around each pile of feces. The garage is 1400 square feet and the quotes I got are in the thousands. I live in the woods and this will most likely happen again. I am afraid it will just happen again. I will reinforce the area they got in. I am not too worried about insulation above my garage, so prob won't even put anything back after I take it out.


With the garage stuff...
Struggling with some electrical stuff, mostly cause I have no idea what I am doing.

In the meantime, continuing to work my way around the walls. Hung some fans and figuring out where the new toolboxes will go. I got in more threaded black pipe for the drops. I love the look of fresh threads. I am going to owe our maintenance guys a few lunches. Having them do it on the Rigid = any lunch they want.


IMG_20140427_190556_639_zpse6fdb335.jpg


IMG_20140427_190604_027_zps31433847.jpg


I picked up a few air nozzles. Going to place them in holders along the walls.


IMG_20140427_190500_843_zps35660c71.jpg


New HF tool box. These are really worthwhile considering the price. Getting 2 more, along with 2 middle boxes, and 2 cabinets. These will go along the wall with the window. And they double as a wagon for my 1 yr old son.


IMG_20140427_190659_896_zps37343d4c.jpg


IMG_20140428_140117_187_zpsb2eaeb9a.jpg


French cleats completed along the north wall and fans hung.


IMG_20140428_221752_550_zps1b35cac3.jpg


IMG_20140428_205947_490_zpsa6f70a40.jpg


This is about the only automotive work going on in the garage. I had a slight bend taken out of this wheel. I need to polish out the torch marks. Discount Tire scuffed up the front edge pretty bad as well. Doesn't really show up in pics, but still *****. They have always taken care of me, so not raising too much hell.


IMG_20140427_190634_256_zps878b1418.jpg
 
OP
S

Superhawk2002

Active member
Joined
Jan 2, 2014
Messages
35
Location
Indianapolis, Indiana
After a 7 hr drive, 2 stops at BW3's, and somehow the same amount of money to just drop ship it to my house -- we got the compressor home. It took 4 of us to pull it out of the truck and get it on the ground. Very awkward weight coming out of the back of a 1 ton 4x4. Not exactly sure how I will get it off the skid by myself, but will figure it out soon enough.


EDIT: Thanks to the garage journal member who posted about this compressor and POLAR AIR. Great people to work with.


IMG_20140501_223154_781_zpsbda2dfe4.jpg
 
OP
S

Superhawk2002

Active member
Joined
Jan 2, 2014
Messages
35
Location
Indianapolis, Indiana
I finally got the back walls of the garage painted. I wired up my first 220 outlet -- swapped in a 30amp 220 breaker and got the wires in. Starting to paint the inside garage walls now. The inner garage will be painted just like the outer garage with the exception of a yellow stripe in place of the blue. My daughter really wants some yellow somewhere.


IMG_20140504_220643_374_zps455fa636.jpg


I ran this 220 outlet for the inner garage off the existing subpanel in the basement. The new subpanel and wiring for the 4 remaining 220 lines will go in Wednesday.


IMG_20140504_223340_090_zps52eab0f8.jpg


IMG_20140504_223255_501_zpsf563a78d.jpg
 
OP
S

Superhawk2002

Active member
Joined
Jan 2, 2014
Messages
35
Location
Indianapolis, Indiana
Slowly but surely. I painted the inner garage and put all new trim in. I hope to tile this floor like I did the rest of the basement, so I left a gap tall enough to slide tiles right under. You can see the first 220 outlet wired in on the last pic. Overall pretty happy despite Lowes screwing up the paint color. It turned out a shade darker/bluer than the rest of the garage. Touching up the other walls led to a lot of extra painting.


IMG_20140510_173213_072_zps600fc378.jpg


IMG_20140513_012051_577_zps8c02ce30.jpg


IMG_20140513_012106_009_zps204b8af7.jpg


New subpanel in. Wired up 3 more 220 outlets throughout the garage and hard-wiring the compressor and lift in. One outlet will eventually be used just for the powder coating oven. Hoping the 100 amp panel will be enough. I cleaned out most of the attic -- quite a mess, but a truckload of garbage bags full of insulation and **** hauled out. Running the wiring throughout helped my weightloss program.


IMG_20140513_240036_407_zps23701028.jpg


IMG_20140513_240015_052_zps4d92da02.jpg


IMG_20140513_240042_139_zps0a98e9e8.jpg
 

jb3

Well-known member
Joined
May 2, 2014
Messages
14,979
Location
Rhode Island, USA
looking awesome!

so was that outer garage a wraparound addition to what was originally only the smaller inner garage? its such an unusual space, really cool

also on getting the compressor off the skid, if you have an engine hoist, you can use it as a mini crane by wrapping the end in a blanket or a shirt, then running the lift arm up under the motor platform of the compressor, then strapping to kingdom come so the compressor doesnt slide off when you start to lift. that way you can jack the compressor up off the skid with the top of the hoist arm, remove the skid, then drop it. i removed the hook from my hoist to do this with my compressor to get it off a uhaul trailer
 
OP
S

Superhawk2002

Active member
Joined
Jan 2, 2014
Messages
35
Location
Indianapolis, Indiana
looking awesome!

so was that outer garage a wraparound addition to what was originally only the smaller inner garage? its such an unusual space, really cool

also on getting the compressor off the skid, if you have an engine hoist, you can use it as a mini crane by wrapping the end in a blanket or a shirt, then running the lift arm up under the motor platform of the compressor


Fairly sure the outer garage was an addition. It had to be added on shortly after original construction. It was not on the house design/plans, but the headers, boards, and trusses are all the same type/manufacturer as the original house.

I have an engine hoist, but let a friend borrow it while all this is going on. I will either get it back and do exactly as you did, or have a few friends come over and help wrestle it into the corner. I am going to use HDT mud flaps to help with vibration.
 

akdiesel

Well-known member
Joined
Aug 8, 2008
Messages
2,617
Location
Wasilla, AK
Superhawk2002

Nice work on all parts. Looks like all these projects are taking place at once. Quite an undertaking.
 
To avoid these ads, REGISTER NOW!
Top Bottom