Hopalong604
Well-known member
- Joined
- Aug 3, 2013
- Messages
- 193
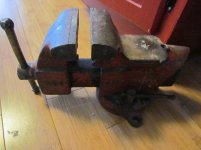
Finally had the time to mount my record vise to my wood block.


Hopalong: I like the sound of that and i'm not 100% sure what you are talking about.

Thanks! I'm married to an English rose myself. I'm planning on striping it down and re painting it. make it a little bit more presentable.


The Vise, or the "Rose" ????
I think if he made that suggestion to the Rose, she'd be the Rose he was once married to. He and Oldldh are both married to English women, and Hopalong's planning on refurbishing his vice. Pretty much the complete gist of it.
I'd be rose less if I try to refurbish my wife!


Couldn't resist painting the text... First it started out with just the 104, then the rest of the letters you see in black. Yesterday I saw a REED logo with the red text & white background so figured I would give it a try... First time doing that and it was not easy! Basically used a toothpick and had to paint the recessed area one drop at a time...
I'm not doing that again until I find my late model 108/208...
Jason: you may not want to do that again, but that is an eye popper and worth the effort. nice job overall on that Reed.
did you see that there is a broken 208 for sale in the US somewhere for $150? i heard a broken slide, but pictures were not shown. Filson mentioned buying it for a parts vise for his Green one. check back a day or two on the posts if you haven't already seen it.
Can anyone enlighten me on a handle straightening procedure for my ugly green beast? Not sure if i should cut it off and fabricate a new one or heat it with a torch? I don't want to put too much heat into the screw is my main concern and it will likely have a bit of a kink. If I choose to fabricate is there a specific material to get? Regular tool steel?
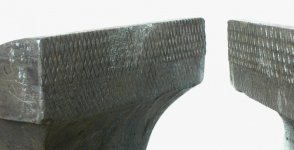
Got an older Reed 405 1/2 yesterday and while looking it over noticed something - it looks like the serrations were added to the jaws AFTER they were set into the jaw towers. So I went and checked out a couple of other Reeds and found the same thing.
I could really use a new center nut for holding the swivel base on, but other than that, mine's in really good condition, so wouldn't have much use for the parts really.
Looks great. I'm a big fan of the painted letter look. I tried with a toothpick and found that a $5 pack of hobby brushes works alot better.
Can anyone enlighten me on a handle straightening procedure for my ugly green beast? Not sure if i should cut it off and fabricate a new one or heat it with a torch? I don't want to put too much heat into the screw is my main concern and it will likely have a bit of a kink. If I choose to fabricate is there a specific material to get? Regular tool steel?
can you borrow the big press you used to pull your vise apart? some of the guys use their presses to straighten out the handles. there are several methods and even a little muscle with it in another vise might be an option.
Flyinglow, I just finished making a handle for my Wilton 600S Vise, if you have a lathe and a cutting torch for heat then it is not that hard to make one. I have a hour in this handle. If you want a drawing of how I made this one then PM me. I make mine very close to the original lengths and ends. and have made a dozen or so for my vises.
Handle Material: CRS 1144 find it Here Or Here.
Couldn't resist painting the text... First it started out with just the 104, then the rest of the letters you see in black. Yesterday I saw a REED logo with the red text & white background so figured I would give it a try... First time doing that and it was not easy! Basically used a toothpick and had to paint the recessed area one drop at a time...
I'm not doing that again until I find my late model 108/208...


I think you did a great job on the embellishments. Don't get discouraged. They have paint pens available to mark up the embellishments to make your restoration stand out. The last time I did the tooth pick and paint trick was on a Coke bottle opener, in the 70s…around the time dirt was invented.
I have one of those mounted on my bench too. 


Anyone see this CL ad?
vise collection all USA older - $10 (Homeworth/Alliance)
http://akroncanton.craigslist.org/tls/4376080284.html
Vise collection all older USA vises...
about 25 vises from 1 1/2" clamp on vises to 4 1/2" bench vises.
Wilton, Reed, Littelton, Scout, Craftsman, Columbian and many more.
Some from early 1900's others from 1960's. All in good working order.
Asking $10 to $80 each or all for ????
Though the deal is still kind of in the works, I went ahead and pulled the trigger on his Reed. It's a 103 1/2R and I couldn't find out much about it online at all ... that may be a really good or bad sign LOL but I figured it'll be a fun one to get my feet wet on. I'll be reading up as time permits (not much of it for personal projects this time of the year) and hope to do it serious justice. Any input in the meantime is appreciated -- it's the 'art deco' style and whether it should be customized or original is going to be up to you guys: you're the experts and I want to do it right. 
Hey Jason, thank you for posting this!