To avoid these ads, REGISTER NOW!

What's on your walls? Neat storage ideas!

LWW

Well-known member
Joined
Feb 8, 2008
Messages
322
Location
SF Bay
The only thing about this plan that ***** is that now every tool you have has a long tube on the bottom of it. Some things I just bolt/unbolt instead of keeping a permanent hitch which would be expensive and take up a lot of space. I also added two nuts to stabilize.

I definitely like your idea of using a nut and bolt to stabilize the vise mount in the receiver. That will eliminate the little play that could make detail work frustrating.

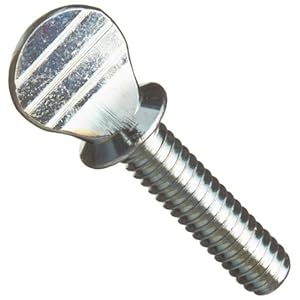
Like WhiteLightening, I was planning to weld nuts to the bottom of the vise plate so I would only need one vise plate and I could quickly bolt and unbolt each tool as needed. I definitely like the thumb screw idea. That will eliminate the need for tools.
 
To avoid these ads, REGISTER NOW!

WhiskyDevil

Well-known member
Joined
Nov 27, 2012
Messages
84
Though I love the organization, I would not put them all in the same spot. In fact, quite the opposite. I would attempt to put them in a few spots around the house so when it does go out, you'll be closer to finding some light instead of trying to get to the one spot. At least that's how I envision the situation.

Love the organization too, but for flashlights, I always keep several in each room for the same reason.. if the lights go out, i want a handy. Now specific lighting, e.g. task or tactical, it makes sense to keep them organized in one spot. But general purpose lights are so cheap and the quality is acceptable (even the free HF ones, although replace the batteries) it is just too easy to have them stashed everywhere.

I can never have enough flashlights, utility/work knives, and now... multimeters.
 
Last edited:

Willy81

Active member
Joined
Sep 20, 2013
Messages
30
Some of you may have seen my garage thread here. I'm kinda proud of my storage solution, so I thought I'd post it here.

One 2 bay garage with an extra 1.5m on the side, 2 daily cars, 1 kit car GT40 half-built, a pile of tools, GT40 parts, a home brew fridge, a workbench and camping gear. How am I gonna make it all fit?

Step 1: Put GT40 on go-jacks.
Step 2: I picked up some old pallet racking from a warehouse that was downsizing. Set it up to allow the 40" GT40 to slide underneath :)

IMG_1471.JPG


IMG_1524.jpg


Step 3: Add a home brew fridge :)

IMG_1526.jpg


Step 4: It's a fairly tight fit, but it works without too much hassle.

PC070037.JPG


IMG_1477.jpg
 

Tundra

Well-known member
Joined
Jun 3, 2006
Messages
135
Location
Lisle, Ontario Canada
Some of you may have seen my garage thread here. I'm kinda proud of my storage solution, so I thought I'd post it here.

One 2 bay garage with an extra 1.5m on the side, 2 daily cars, 1 kit car GT40 half-built, a pile of tools, GT40 parts, a home brew fridge, a workbench and camping gear. How am I gonna make it all fit?

Step 1: Put GT40 on go-jacks.
Step 2: I picked up some old pallet racking from a warehouse that was downsizing. Set it up to allow the 40" GT40 to slide underneath :)

IMG_1524.jpg


I'd love one of those. One of my favorite car designs.:bow:
 

mdbeck1

Well-known member
Joined
Mar 7, 2010
Messages
2,297
Location
Norman, OK
My heavy duty tools have started to take up a lot of space with each one on it's own stand and my vises taking up a huge part of my benchtop.

One of the previous posters inspired me to mount one of these ($26 from Amazon) to the bottom front of my bench:


Then get one of these from Harbor Freight for $23:


When it's all done I should be able to simply bolt my grinder, vise, etc. to the hitch adapter and slide it into my hitch receiver bolted to the bottom of my bench. The bench is obviously much more stable than the small stands I've been using up until now and my tools can be easily stored under a shelf and out of the way when not in use without having to re-arrange everything on my bench.

With the vise, it should also give me more access to the piece I'm working on since it will extend about 8"-10" past the front of my bench. Pictures will come when it's all put together!

Been there done that.


I agree with putting a bolt on the side/bottom to tighten. Note the bolt sticking out of the receiver on the vice (also note the wrench to turn it). I just drilled and tapped the receiver on the side and bottom. I used the one on the bottom to attach a piece of angle iron to the leg and hold the receiver up.

As an added bonus I've been known to throw the vice in the pickup and take it with me if I think I'm going to need it.
 

mdbeck1

Well-known member
Joined
Mar 7, 2010
Messages
2,297
Location
Norman, OK
^^^ I like your idea. For my bench extension I am building, I will be using tee-nuts to be able to bolt/unbolt various machines like my miter saw, grinder, etc.


22990.jpg


I'd get them in 1/4-20 or something and drill the bench top. The tee-nuts would be installed underneath so when you bolt from the top, it will tighten nicely. McMaster Carr has various collar widths for larger equipment.

I'd use some thumb screw to fasten the machines to the tee-nuts

41YzUBmDRRL._SL500_AA300_.jpg

I tried this with my reloading press. It works but when you get a cartridge that is REALLY stuck be careful. I cracked the 3/4" plywood on my bench top. I moved the bolts to go through the 2X3 around the edge of the workbench.
 

WhiteLightning

Well-known member
Joined
May 23, 2012
Messages
117
Location
Philadelphia, PA
I tried this with my reloading press. It works but when you get a cartridge that is REALLY stuck be careful. I cracked the 3/4" plywood on my bench top. I moved the bolts to go through the 2X3 around the edge of the workbench.

Good to know. I only plan to hold things like a miter saw, bench grinder, etc......nothing like a reloading press that I would be using a lot of force.
 

djturnz

Member
Joined
Feb 20, 2014
Messages
17
I was going to get some sort of Dangerious Chemical sign to post on the outside. Here is is from the front of the garage, it is not as obvious. I just moved in so I am still trying to get shelving to get things put away.
CAC54811-0467-4C11-A0F8-CBFF7B401FA4-548-0000009575A581AD.jpg

One way to make that cabinet inconspicuous would be to add some hooks and hang coats on it. Also maybe dirty that wood up. Its too clean. Lol

Sent from my GT-P3113 using Tapatalk 2
 

djturnz

Member
Joined
Feb 20, 2014
Messages
17
I posted this idea in another thread but thought it worth showing in this one. I took some of those white wire closet shelves and cut them down to fit between the studs. I like that they are not solid and will not collect dirt and other ****. I've still got a way to go and will eventually paint everything in gloss white.

I need to know more about this. How did you mount them to the wall studs? Are those a 15" deep shelf cut cross ways or what?

Sent from my GT-P3113 using Tapatalk 2
 

mrmeaner

Active member
Joined
Jan 28, 2013
Messages
27
Location
Lubbock, TX
Not really on the wall, but directly in front of it.

In scouring Craigslist I found an ad for 2 material carts for $75. I bought both of them for $50. Nice carts too. 26" wide x 6' long w/ removable side rails. They are made of 2x3x3/16" angle. Each cart weighs in around 75 lbs. I cut one of them down to 18" wide to fit in the nook beside the garage door in my smallish 14x20 attached garage. Then I welded tabs on the bottom of the cart to mount some drawer slides (scavenged from old office desks a couple years ago). Mounted these sheet metal drawers I pulled from a service truck at the local scrap yard to the slides (paid $2 a piece for them 5 years ago).

IMG_0828.jpg


IMG_0830.jpg


No more plywood falling on me while I try to get the sheet in the back. There is no more back of the wood pile! As an added bonus the drawers have slats in them perfect for separating my smaller scrap metal. I painted the whole thing blue with the same gallon of blue I painted the work bench and the vidmars.

They usually have these free out in front of home depot
 

peelman

Well-known member
Joined
Jan 13, 2011
Messages
198
Location
Seymour, Indiana
I think he was just trying to be funny (whether or not he succeeded is subjective). Nobody was implying theft on your part.
 

LifeLongWNYer

Well-known member
Joined
Oct 23, 2013
Messages
1,231
Location
South of Rochester, NY
I like the idea of mounting a trailer hitch receiver under a bench and then puttingt various tools on a peice of square tubing and sliding that into the receiver when you want to use it. But using trailer hitches for that square tuding is expensive. Can anyone siggest where to put up some tubing for less than buying the hitches at a Central Tractor, WalMart, etc.,etc?

I tried my local steel yard and they sold me some 2"x2" tubing but the outside corners are much more rounded that the trailer hitch stock, and they really rattle and roll when I'm using them.


.
 

LifeLongWNYer

Well-known member
Joined
Oct 23, 2013
Messages
1,231
Location
South of Rochester, NY
I have a good assortment of load binders and chain and was hanging them on nails driven into a 2x4 mounted high on an open wall. I got to be a pain when I wanted to hang up a chain and was trying to snag the hook onto an empty nail. My neighbor had a new garage door installed and they put the old track out for the trash man. I got there first!

I lagged some of it where the 2x4 was. Now I have a broomstick with a nail and to hang up a chain I use the broomstick to lift one end up and drop it over the bottom edge of the door track. Much easier than trying to hit a nail. Plus, they slide easily on the track, so I can slide the chains closer together or farther apart to either take up less space, or spread them out to see what I have.


.
 

stage20

Well-known member
Joined
Nov 5, 2013
Messages
3,722
Location
pcola FL
I like the idea of mounting a trailer hitch receiver under a bench and then puttingt various tools on a peice of square tubing and sliding that into the receiver when you want to use it. But using trailer hitches for that square tuding is expensive. Can anyone siggest where to put up some tubing for less than buying the hitches at a Central Tractor, WalMart, etc.,etc?

I tried my local steel yard and they sold me some 2"x2" tubing but the outside corners are much more rounded that the trailer hitch stock, and they really rattle and roll when I'm using them.


.
i havent pulled it down from the shelf yet, but ive got a piece of 1 1/2 square tube im going to use inside the actual receiver hitch itself. put it in the chop saw and cut off the ball portion and square it up. weld a flat plate to the 1 1/2 tubing similar to the hf picture above for my vise and grinder. ill use a farm pin for now to hold it all together. might weld a nut and use a set bolt. not sure yet. ive got to get some time to actually get out there and do it. but this way is cheap for me, and cheaper if you can score some tubing. old hitch was just laying here.
 
To avoid these ads, REGISTER NOW!

taumac

Well-known member
Joined
Aug 30, 2011
Messages
8,104
Location
Brooksville, Fl

taumac

Well-known member
Joined
Aug 30, 2011
Messages
8,104
Location
Brooksville, Fl

Wingnut65

Well-known member
Joined
Apr 21, 2010
Messages
3,170
Location
Tampa Bay, FL
This is not exactly ON my walls, since I was running a little short, here's how I turned Air into Storage! :headscrat Yes, that is correct...

Here's what I started with at the front of my garage - water heater on the left, ductwork in middle and AC unit on the right. All that wasted space in front of everything is just AIR! And it looks so cluttered. I came up with solutions to resolve both issues! :thumbup:


Here's the concept that I came up with


Three cabinet builds (and three vacations) later, I have this, more storage and less clutter!
attachment.php


Water Heater Cabinet storage on the left. (Build Info)
attachment.php


Spray Paint Cabinet in the middle in front of the ductwork. (Build Info)
attachment.php


and the AC Cabinet on the right. (Build Info)
attachment.php


And just think that all of this was air space sitting there waiting to be utilized!
attachment.php


I've gotten plenty of great ideas from this thread. I hope this can give some inspiration to others who need to find places to put all our stuff. :thumbup:
 
Last edited:

R6 Racer

Well-known member
Joined
Feb 21, 2010
Messages
1,632
Location
Northern Ontario Canada
Wingnut65 that looks great! What a way to utilize space. The only concern I might have is circulation. Do any of the units covered require a specified "clearance" around them for air circulation or anything like that?

Steve
 

Wingnut65

Well-known member
Joined
Apr 21, 2010
Messages
3,170
Location
Tampa Bay, FL
R6, No issues! I still have plenty of space in front of the AC unit and have a removable side panel whenever it needs to be replace. The water heater has about 18" in front of it to the door and plenty of air flow below and above the cabinet door.

Good question! Those were all considerations that I had to address when I planned these cabinets. Anyone else planning something similar should also look into ventilation around the units.
 

R6 Racer

Well-known member
Joined
Feb 21, 2010
Messages
1,632
Location
Northern Ontario Canada
I like the idea of mounting a trailer hitch receiver under a bench and then puttingt various tools on a peice of square tubing and sliding that into the receiver when you want to use it. But using trailer hitches for that square tuding is expensive. Can anyone siggest where to put up some tubing for less than buying the hitches at a Central Tractor, WalMart, etc.,etc?

I tried my local steel yard and they sold me some 2"x2" tubing but the outside corners are much more rounded that the trailer hitch stock, and they really rattle and roll when I'm using them.

I've noticed that thinner walled 2x2 SQ. has more "square" corners. Next time your at a steel place have a look at a piece of 2x2x1/4" & 2x2x1/8" side by side & you'll see what I mean. Might solve a bit of your rattle problem.

Steve
 

GCncsuHD

Well-known member
Joined
Aug 19, 2013
Messages
968
Location
Salisbury, NC
Hey Jim, nice '64 you have there!!!! :drool:

Thanks Tundra. I was just joining the FD when they bought it, and when they replaced it a few years ago, I won it in an auction. 2nd owner, it has 14,300 miles.
Very nice!! I saw that in your avatar, and thought, I bet that is an ex-fire truck, I see I was correct.

If you look at the 78 in my avatar, it was the first brush truck purchased by my fire department (my grandfather just happened to be a founding member in 78, just before he died). We retired it about 5 years ago, and I bought it at auction as well. A little more road time than yours though, 78k miles when I got it.
This is not exactly ON my walls, since I was running a little short, here's how I turned Air into Storage! :headscrat Yes, that is correct...
Wow! Great use of that space!
Wingnut65 that looks great! What a way to utilize space. The only concern I might have is circulation. Do any of the units covered require a specified "clearance" around them for air circulation or anything like that?

Steve

I too shared his concerns about clearances, though either can typically be located in closets anyway with small clearances, but I wonder if a vent for at least the WH for combustion air may be a good idea? But it's not like those doors would be sealed much at all anyway.
 

MarkG

Well-known member
Joined
May 23, 2012
Messages
1,219
Location
Elgin, IL
I don't think I could trust those clamps for overhead

+1. I agree completely. I've used these things for years, but wouldn't trust them for that purpose for a second. Their design doesn't let them tighten up with anywhere near the force of a normal threaded clamp (which I wouldn't use for this purpose either, but it would be a much better chance!)

Stand by for a crash----hopefully, not on someones head.
 

glueguy

Member
Joined
May 19, 2009
Messages
12
Location
Palm Harbor, FL
Wingnut65, that's an awesome use of space. Just check yourself for flammability concerns with the liquids. You're probably ok, but just double check what you are storing in there if anything has a pilot light.
 

Hpozzuoli

Well-known member
Joined
Dec 11, 2013
Messages
3,428
Location
Rhode Island
Not sure if I ever showed the walls. I have a mix of white cabinets I got from Grossmans and a bunch of steel cabinets I painted white. Basically if I had an open spot I stuck a cabinet there.
 

Attachments

  • image.jpg
    image.jpg
    87.9 KB · Views: 1,211

Wingnut65

Well-known member
Joined
Apr 21, 2010
Messages
3,170
Location
Tampa Bay, FL
Wingnut65, that's an awesome use of space. Just check yourself for flammability concerns with the liquids. You're probably ok, but just double check what you are storing in there if anything has a pilot light.

Thanks for the concern glueguy, but the water heater cabinet is where I have all my cleaning solutions. I have my petroleum based products that are fragrant stored in the sliding door cabinet on the left wall.

For ventilation on the water heater, there is several inches around the top and about two feet of clearance at the bottom. I made sure there was adequate ventilation before I started building.
 

jrace1001

Member
Joined
May 8, 2013
Messages
13
Location
Boston, MA
While I dont have a garage yet myself, I've been preparing myself for the day when I do by keeping up on this thread. One thing I'll add is that for guys looking for a clear container that is readily available would be to use peanut butter jars. My father has been using them for years. In certain iterations of his garage organization they were sitting on a shelf (without labels) so you can scan across quickly. I think his last version was to screw/glue the caps to the top of a shelf so that the jars screw in and hang down. He has enough lids left over that if he needs to take a jar with him he doesn't need to worry about leaving the one screwed into the shelf. We went through a lot of peanut butter when I was a kid so we kept him in ready supply with jars :)
 

HzEmall

Well-known member
Joined
Dec 24, 2005
Messages
80
Location
Surrey, BC Canada
As with most of what I do, this project employ's the "use what you got" philosophy. I had two commercial magazine racks that were just sitting around. After realizing that plastic parts bins hang perfectly on each divider, I thought: why not build a "fastener" cabinet around them? It's a monstrosity on wheels (huge and very heavy). And, since I seem to be addicted to lime green at the moment, that is the color I painted it. I think I'm gonna start calling my shop the Lime Green Garage. I made the doors out of 2x6's so I can add more bins there in the future, if necessary. For stability, I anchored the top of the racks to the top of the cabinet using roller bearings.

100_0106.jpg


100_0108.jpg


100_0110.jpg

Where did you get the green paint from and what is it called?
 

formek

Well-known member
Joined
Feb 1, 2011
Messages
519
Location
Wylie, TX
Hi
Im a newbie to the forum and would like to share some of my ideas. As I do a bit of everything I need to make my workshop as versatile as possible but still keep as much space as possible. Here is a panoramic picture of my 6m x 9m garage/workshop
4azyru4a.jpg


So firstly I picked up the table for the equivalent of US$5. Then I proceeded to make my cutoff saw fold away.
yhe4umur.jpg
a5apebas.jpg


This meant however that I lost some much needed work space so on to plan B. I decided to use the space between the doors. I made a rotating table to house my cutoff saw and my drill press.
u6udusud.jpg

Flipped
eqejusaj.jpg


I am not sure where my tools will suffer for this so any advise will be appreciated.

Cheers from Cape Town South Africa.

Alwie

This is very Cool
 

TheClaw

Well-known member
Joined
Dec 25, 2012
Messages
537
Location
Chicagoland
I did something similar to Willy with his GT40. When I moved in, there was a wall of shelves. However, there is a small step up that's about 2 feet wide at the edge of the garage. I sistered some 2x4 on the ceiling, and dropped the supports down and removed the bottom two shelves. From there I could park the bikes under there. Fit perfect.

The full length supports up see there now are for my chin up bar. Wouldn't want the whole thing come crashing down while I'm hanging there. They are only bolted in and I can remove them to get the bikes out in the spring (if it ever gets here).

13369178095_d9e7c7d9ef_c.jpg
[/IMG]


A long time ago I found these super heavy duty shipping or storage crates under the porch of a turn of the century house that was getting rehabbed. I grabbed the three of them. Two I flipped on their ends, put some casters and shelves in them and turned them into some very handy and sturdy tool stands. One for the drill press the other has the grinder on one side and the vies on the other.


13369323523_39c7ce6308_c.jpg


13369326563_1dfbc35a4e_c.jpg
 
Last edited:

stage20

Well-known member
Joined
Nov 5, 2013
Messages
3,722
Location
pcola FL
that rotisserie for the drill press and chop saw is awesome!
do you cover one or the other up during use? seems you would get shavings everywhere uncovered.
 
To avoid these ads, REGISTER NOW!
Top Bottom