excellent work. you've inspired me to so something similar.
Welcome to the thread, and the forum man.
Lots of good ideas in here.
Last edited:

excellent work. you've inspired me to so something similar.
For anybody that has added the sunex prybar holder do I have to modify the lid also I'm assuming I have to drill and bolt is that right( I have the holder already and will pick the cart this weekend)


No need to modify the lid of the cart. The holder will just tuck up under the side of the cart, after you saw the small diagonal edges off of the holder lip. I drilled 2 holes and used a file to square them so I could use a matching cartridge bolt.
The bottom I just ran a couple of self drilling machine screws, since they're not visible and make it easier to remove. There are two front holes on the holder that makes them easy to access.
Finished. Had to trim the lip off. Used tape and cardboard to protect the paint.

"weight will try to separate the two halves putting strain on the lower connecting bolts. The cart bottom shelf will become distorted from the pulling stress."
Does not seem to be a problem. If it does I will put a plate inside the cart on the bottom shelf.

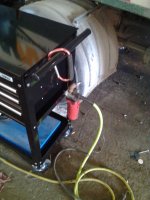
Looking now to put a vise on the cabinet. Will post better pictures when I can pull it outside.
Just used 5/16 grade 5 bolts, nothing fancy.
Have had a 5 drawer still sitting in its crate in my barn for about a month now!
I think I'll finally get a free day this week to assemble it, but now this forum thread has inspired me to go get the HF 7-drawer end cab first before I begin assembly.
I don't have a clue why it just recently dawned on me just how much time I waste running around for my tools, then going back because I grabbed the wrong size, or arrive at the back of my barn and can't remember why I went back in!? Lol, has been good exercise but what a waste of time on my part.
Now I'll just get this cart loaded up with all the main essentials and I'll be set to bang out some work!
I don't have much of any welding skill, but I may try to build a small frame for the casters and just bolt it in there and reinforce the best I can.
Also surprised I didn't see any photos of these carts with any vises on them.
I have a spare vice but it may honestly be way too big for this cart.
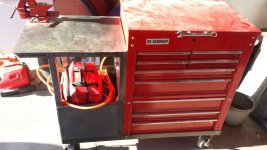
Here you go!
Two at the top through the lower factory holes and two at the bottom . The bottom two were through the factory holes in the side cabinet. A little under the weather right now but can post some picks later this weekend.
Very nice! Quite interesting how you seem to have built drawers to fill the open basket area in the cart, but then you ditch your 7-drawer to have an open basket area... kind of ironic, but I do love how it looks, appears VERY usable!
Oh, and I wussed out today and didn't pull the trigger on the 7-drawer like I had planned... not sure what to do now. I tried to wheel and deal the price down from $189 and they wouldn't budge one bit so I just didn't buy; couldn't get myself to pay more for the side cab than the cart just to store some cordless power tools.
On another note, anyone notice how many people are using higher end carts like the waterloo for example, with add-on side cabs but none of them bother relocating casters... noticed this in the Tool Cart pictures thread.

Very nice! Quite interesting how you seem to have built drawers to fill the open basket area in the cart, but then you ditch your 7-drawer to have an open basket area... kind of ironic, but I do love how it looks, appears VERY usable!

I never understood why people think they can haggle on price at a retail store? It's not a flea market
thanks! i just moved the 7 drawer to my new 44". I was using the cart as my main tool box, but it's so much nicer to have a cart with just the tools for the current job. and have it right there where you are working

I'd appreciate it, but no rush. Take your time and rest up. I just got over a harsh sinus infection myself about a week ago. One reason I joined this forum, had a lot of free time on my hands to browse the net for tool cart ideas!


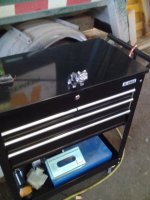
Replaced the handle with a wrench...
View media item 11608
Took all the chrome trim (actually extruded aluminum) off the drawers and removed the US General logo. (will eventually rivet on my own, custom logo, for The Aerodrome Studio)...
View media item 11208
Added the 7-drawer end cabinet...
View media item 12084
I usually leave most of the top area open for whatever tools and materials I am using for my current project. The drawers hold my frequently-used/most generalized tools, so I pretty much have tools to do just about anything within reach. All of my solid-rivet tools are on the cart somewhere. Specialized tools get stored somewhere else.
M_P

Thst looks good.
Any plans to paint it, at all?


how bout bolting 2 carts together for a 10 drawer setup. could always put end cabs on each side too.


Maybe just 5 carts bolted together in a pentagon around 60gal compressor and a gas generator with contractor lights on top, then I'll put a hitch on it and tow it around with my cub cadet.
Hell, throw an engine and steering on it and just drive it around the shop from job to job.

Speedholes;
Care to share who you're magnetic holders on the lid came from?
Thank you!
Hell, throw an engine and steering on it and just drive it around the shop from job to job.
Should be getting my Black 4 drawer this w/e ,3-29.Have a coupon for 109.99. Some good ideas on here.