To avoid these ads, REGISTER NOW!

The VISES of Garage Journal

KMScott

Well-known member
Joined
Feb 14, 2012
Messages
4,641
Location
Daufuskie Island, South Carolina
Carla
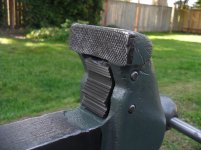
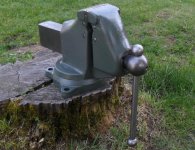
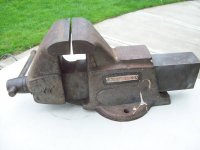
I agree with you on the smooth jaws, I sell 20 serrated jaws to one set of the smooth jaws and offer smooth jaws in all sizes. I do not like the serrated jaws on my vises, working in a machine shop we can not have bench vises with serrations. On a quality vise the smooth jaws hold work just fine. I can see in a blacksmith shop the serrations would be needed.

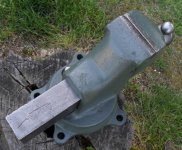
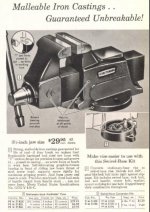
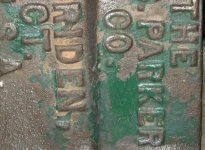
As for the nuts, I agree with you. The Chas Parker ones might be a little tougher to make since some of the smaller vises are a double lead thread, 5/8:3 double lead, making it look like a 5/8:6, they did this to move the Dynamic jaw quickly. If they were to be made I would agree using aluminum bronze material would be the best but the whole slider assembly would have to be made the Aluminum Bronze. In two years I have been asked maybe once for a nut for the larger Chas Parker vises, the smaller ones I've had replacements in stock. I wish I could make the nuts for all the spindle's in these vises but there is really nut much of a market. If anyone needs a square or acme nut then I would look HERE and purchase the shortest length and hand fab or weld on to your existing nut slider. Maybe I should purchase a few popular threaded blanks and offer them as a replacement, but they would be steel.

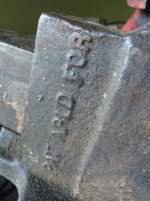
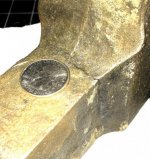
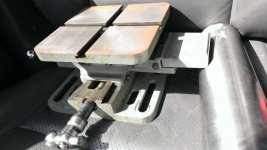
Grimly, some of the older vises like the Chas Parkers and Reeds did have the jaw faces hand filed but not very deep. Notice the Parker jaws are soft material and can still be hand filed if the owner wants serrations, I build my serrated jaws with a 1/6 deeper counter bore so down the road the owner can machine or surface grind the faces smooth.
 
To avoid these ads, REGISTER NOW!

CudaChick1968

Member Emeritus
Joined
Jul 1, 2011
Messages
1,800
Location
Northwest Tennessee (38230)
... Apparently, the jaw serrations became a 'custom' and were desirable for certain types of rough work, such as that done in welding and fabrication shops......but the folks who did a nicer quality of work had to either precision grind their vise jaws, or make copper jaw covers. The copper covers generally work alright, to be sure, but are an inconvenience for some work. ...

Amen to that! I haven't used my Reed barely at all yet but it's got nylon covers just for that reason. The last thing my custom multi-color work needs are vise marks. :D

And Carla, as before ......... :bowdown: :bowdown: :bowdown: thanks. You like so many others on this thread are nothing less than Gods of the Grabber and I can't bow enough to all of your expertise. I never ever expected to become an addict but it happened pretty quickly with all the peer pressure possibilities around here. I love you guys, and never fail to learn something here. < curtsey >
 

drivesitfar

Well-known member
Joined
Oct 23, 2013
Messages
36,013
Location
Pacific Northwest
Wrench: i don't think that vise you posted is an actual Wilton, but they did make a lot of vises for other companies and just put a sticker on them.

Kevin: more great vise ****. awesome looking vise and you might want to show the before because with your description I bet it didn't look anywhere near that nice. also i'm with you and Carla and Cuda that those grippers you make with the teeth have a use, but not for everything. as mentioned before i use my copper jaws with the wings that are made by Wilton that just set inside the smooth or rough jaws of my vises.

Carla: you may not post a lot, but when you do you sure usually have something great to say so looking forward to more.

Andrew: you'll have to start looking for half inch and thicker steel benches for those big vises you are bringing home. only 600 miles so maybe a few tanks of gas at $4 a gallon. sounds like a great way to spend a day picking up a huge vise and one for Tedsters too. i'm pretty sure i put on about the same amount of miles on my Honda on Saturday picking up a few vises and tools going into another state to visit another GJ member.

here's a little Wilton drill press vise i picked up and can easily be replaced by a double tier Craftsman DP vise made in the late 30's or early 40's.
 

Attachments

  • WP_20140418_046.jpg
    WP_20140418_046.jpg
    120.2 KB · Views: 39

Carla

MEMBER EMERITUS
Joined
Nov 27, 2010
Messages
672
Amen to that! I haven't used my Reed barely at all yet but it's got nylon covers just for that reason. The last thing my custom multi-color work needs are vise marks. :D

And Carla, as before ......... :bowdown: :bowdown: :bowdown: thanks. You like so many others on this thread are nothing less than Gods of the Grabber and I can't bow enough to all of your expertise. I never ever expected to become an addict but it happened pretty quickly with all the peer pressure possibilities around here. I love you guys, and never fail to learn something here. < curtsey >

Hi, Leanna,

Truth be told, I'm more impressed with your work, after seeing your web-site.
(particularly that 'dinner-bell'.... : )

I have a very little bit of background in paint work, just enough to convince me that I wanted to do something else. Back in the late 1960's, I served an 'informal' apprenticeship in the motor trade, and one of the things I did as a 'learning-curve project' was refinishing a '36 Ford pickup, bringing slightly rough fenders out with the old pick-file-shrink technique, and lead-loading any rough spots, then doing some large number of coats of lacquer, shoot and colour-sand, again and again, then rubbing-out. I got it done, eventually,but said 'never again, never again'.

By the mid-1980's, I was involved in a machine business, had a few spare $, and 'got a deal' on an otherwise nice 140 model Jaguar car, which had been given a half-dozen applications of truly wretched paint work in multiple colours. Totally forgetting just how much work that Ford was, I set myself to the task of carefully bringing that one down to factory primer, and doing the same endless shoot-and-colour-sand process. It did 'look pretty' if I do say so myself, and I ran it as my everyday-use car for about fifteen years, but so narrowly missed having it badly pranged by the suicide kame-kase 'drivers' on the freeways here, so many times, that I finally made the decision to sell it before one of those mobile psychotics on the roads here smashed it to bits for me.

Sorry about the long story, but I mean by it that the compliment on your excellent paint work is from someone who has 'been there-done that'....for me, really, truly 'never again'.

Back to vises for a moment.........I've seen the finish that can be done with the 'powder-paint' technology, and would be tempted to send you the parts from one of my smaller vises for refinishing. The question occurs to me, tho, is there any sort of filler which will withstand the heat of the process, or must one have the castings brought up to the level of surface finish desired in the metal?

cheers

Carla
 

bigcaddy

Well-known member
Joined
Jan 17, 2012
Messages
2,418
Location
Orange County/ San Fernando Valley
Thanks for that excellent post, Carla. As others have said, your posts are infrequent but are as profound and insightful as Autopts, KMScott or Outlaw. You have a knack for asking, and at the same time answering, our most thought provoking questions. The GJ would be a far worse place without you
 

CudaChick1968

Member Emeritus
Joined
Jul 1, 2011
Messages
1,800
Location
Northwest Tennessee (38230)
Hi, Leanna,

Truth be told, I'm more impressed with your work, after seeing your web-site.
(particularly that 'dinner-bell'.... : )

...

Back to vises for a moment.........I've seen the finish that can be done with the 'powder-paint' technology, and would be tempted to send you the parts from one of my smaller vises for refinishing. The question occurs to me, tho, is there any sort of filler which will withstand the heat of the process, or must one have the castings brought up to the level of surface finish desired in the metal?

cheers

Carla

< curtsey > I never expected this -- thank you! First off, I'll be the first one to tell you I'm no painter and never have been. Those old Krylon commercials about "runs, drips and errors" were about me I think. Though the end result is somewhat similar, the differences between paint and powder application are vast ... thankfully. :D

As far as a suitable metal filler goes, there's a few on the market specifically "for" powder coating such as Lab Metal and ThermoBond3 et al. In my opinion they ALL ****: They're expensive, hard to work with, take multiple coats to reach the desired thickness, blow out through the powder if there's an air bubble in them, etc. The only thing I've found that blows my skirt up is High Temp Metal Filler made by Permatex. Though originally formulated for exhaust leaks (and somewhat humorously I've heard it's lame for that), it's good to 2000 degrees, is a single compound with no mixing, is sandable, grindable, and sets up pretty quickly. The only drawback is the price, $12 for a one-ounce blister tube, but a little bit goes a LONG way. I live out in the boonies so I have to order mine from Caswell, adding $8 to the cost. But it blows doors on everything else I've tried over the years.

I used less than a half tube fixing all the problems in this pot metal center console insert. As you can see, most were pretty deep too.

001 - Copy.jpg

007 - Copy.jpg

017 - Copy.jpg

021 - Copy.jpg

010 - Copy.jpg

012 - Copy.jpg

040 (2) - Copy.jpg


With lots of practice JB Weld can also be used with some success but it's tough to replicate the bumpiness of cast iron with it -- it gets too smooth in my opinion, and it's easy to introduce too much air and cause blow outs when the part gets heated up to cure the powder.

I hope this helps! :D It does me for sure ... I get to be on The Giving End for a change around here. Hit me up if you have questions or want to go over details.
 
Last edited:

jpickar

Well-known member
Joined
May 21, 2010
Messages
964
< curtsey > I never expected this -- thank you! First off, I'll be the first one to tell you I'm no painter and never have been. Those old Krylon commercials about "runs, drips and errors" were about me I think. Though the end result is somewhat similar, the differences between paint and powder application are vast ... thankfully. :D

As far as a suitable metal filler goes, there's a few on the market specifically "for" powder coating such as Lab Metal and ThermoBond3 et al. In my opinion they ALL ****: They're expensive, hard to work with, take multiple coats to reach the desired thickness, blow out through the powder if there's an air bubble in them, etc. The only thing I've found that blows my skirt up is High Temp Metal Filler made by Permatex. Though originally formulated for exhaust leaks (and somewhat humorously I've heard it's lame for that), it's good to 2000 degrees, is a single compound with no mixing, is sandable, grindable, and sets up pretty quickly. The only drawback is the price, $12 for a one-ounce blister tube, but a little bit goes a LONG way. I live out in the boonies so I have to order mine from Caswell, adding $8 to the cost. But it blows doors on everything else I've tried over the years.

I used less than a half tube fixing all the problems in this pot metal center console insert. As you can see, most were pretty deep too.

001 - Copy.jpg

007 - Copy.jpg

017 - Copy.jpg

021 - Copy.jpg

010 - Copy.jpg

012 - Copy.jpg

040 (2) - Copy.jpg


With lots of practice JB Weld can also be used with some success but it's tough to replicate the bumpiness of cast iron with it -- it gets too smooth in my opinion, and it's easy to introduce too much air and cause blow outs when the part gets heated up to cure the powder.

I hope this helps! :D It does me for sure ... I get to be on The Giving End for a change around here. Hit me up if you have questions or want to go over details.

I really like the way the A body console top came out! You are getting me intriged with powder coating.

John
 

balane

Well-known member
Joined
May 4, 2011
Messages
2,996
Location
Pacific Northwest
Leanna, let me also take a moment to express my respect for your obvious fine quality of work and your web site. I love web sites with lots of photos and you're definitely not short in that department. I wish more web sites offered a large selection of photographs showing their output. It all looks really great so congrats on being excellent at what you do.

:beer:
 

skorpio

Well-known member
Joined
Aug 22, 2011
Messages
47
< curtsey > I never expected this -- thank you! First off, I'll be the first one to tell you I'm no painter and never have been. Those old Krylon commercials about "runs, drips and errors" were about me I think. Though the end result is somewhat similar, the differences between paint and powder application are vast ... thankfully. :D

As far as a suitable metal filler goes, there's a few on the market specifically "for" powder coating such as Lab Metal and ThermoBond3 et al. In my opinion they ALL ****: They're expensive, hard to work with, take multiple coats to reach the desired thickness, blow out through the powder if there's an air bubble in them, etc. The only thing I've found that blows my skirt up is High Temp Metal Filler made by Permatex. Though originally formulated for exhaust leaks (and somewhat humorously I've heard it's lame for that), it's good to 2000 degrees, is a single compound with no mixing, is sandable, grindable, and sets up pretty quickly. The only drawback is the price, $12 for a one-ounce blister tube, but a little bit goes a LONG way. I live out in the boonies so I have to order mine from Caswell, adding $8 to the cost. But it blows doors on everything else I've tried over the years.

I used less than a half tube fixing all the problems in this pot metal center console insert. As you can see, most were pretty deep too.

001 - Copy.jpg

007 - Copy.jpg

017 - Copy.jpg

021 - Copy.jpg

010 - Copy.jpg

012 - Copy.jpg

040 (2) - Copy.jpg


With lots of practice JB Weld can also be used with some success but it's tough to replicate the bumpiness of cast iron with it -- it gets too smooth in my opinion, and it's easy to introduce too much air and cause blow outs when the part gets heated up to cure the powder.

I hope this helps! :D It does me for sure ... I get to be on The Giving End for a change around here. Hit me up if you have questions or want to go over details.

What about Eastwoods hi temp leadless lead? I'm doing a project now where I want to powdercoat the entire body of a car I'm building and there is a few spots around the windshild frame where it has some Alpine Lace Swiss cheese action going on after the blasting that needs to be filled as well as I need a substitute for the factory body seam caulk.
 

dismayed

Member
Joined
Nov 26, 2013
Messages
6
Location
Seattle, WA
I picked up this Columbian 3 1/2" while getting a workbench. Says "Columbian Cleveland" where it'd normally have the No. on the right side and on the left "PT APLD FOR". Doesn't seem to look like most I've seen, thoughts? Works just fine though! I'm now up to 10 vises since joining GJ and seeing this thread...

Update: Found that it had a crack hidden under layers of gunk where the jaw meets the slide.

14179274971_bbcb83dddc.jpg
 

Attachments

  • columbian-3-1-2-pt-apld-for-right.jpg
    columbian-3-1-2-pt-apld-for-right.jpg
    109.9 KB · Views: 50
  • columbian-3-1-2-pt-apld-for-right-slide.jpg
    columbian-3-1-2-pt-apld-for-right-slide.jpg
    121.1 KB · Views: 55
  • columbian-3-1-2-pt-apld-for-left-close.jpg
    columbian-3-1-2-pt-apld-for-left-close.jpg
    121.6 KB · Views: 27
  • columbian-crack-quarter-enhanced.jpg
    columbian-crack-quarter-enhanced.jpg
    51.9 KB · Views: 17
Last edited:

CudaChick1968

Member Emeritus
Joined
Jul 1, 2011
Messages
1,800
Location
Northwest Tennessee (38230)
I really like the way the A body console top came out! You are getting me intriged with powder coating.

John

Thanks John! I've been at this for many, many years now and NEVER fail to get intrigued either. I guess that's what keeps me pushing the envelope and trying new things all the time. There are VERY few coaters who deal with multi-color work and even fewer who try to work with extremely unpredictable pot metal (and I like it that way heh hehhhhh). I have to seriously limit the number of trim projects I take on like that console because the main focus of my shop is and always will be powder coating. But sometimes a project takes a little bit more than just some powder to make it look its best, and that's where my high temp metal filler comes into play.


Leanna, let me also take a moment to express my respect for your obvious fine quality of work and your web site. I love web sites with lots of photos and you're definitely not short in that department. I wish more web sites offered a large selection of photographs showing their output. It all looks really great so congrats on being excellent at what you do.

:beer:

Thank you very much balane! :D I love my job and the only thing I'd change is adding a few clones so my turn around time wasn't so lame.


What about Eastwoods hi temp leadless lead? I'm doing a project now where I want to powdercoat the entire body of a car I'm building and there is a few spots around the windshild frame where it has some Alpine Lace Swiss cheese action going on after the blasting that needs to be filled as well as I need a substitute for the factory body seam caulk.

skorpio ... I have no idea and will never find out. I won't buy anything that company has to offer ever again. I was a very loyal Eastwood customer for over 19 YEARS and bought thousands of dollars' worth of products over my lifetime, including an expensive Baldor 1 3/4 hp buffer.

Several years ago I purchased one of their products that carried the typical one-year warranty ... and went through FOUR OF THEM within ten months of buying it. When I took advantage of the warranty exchange for the fifth time within the 12-month period, the office manager Kathy personally called to notify me that they would no longer honor their own warranty and I was being unceremoniously "hung out to dry" without notice and without the equipment I needed to carry on my business. Moreover, I was being fired as a customer and they would no longer work with me. My account on their powder coating forum was even closed (I assume so I wouldn't bad-mouth them on their own forum).

Simply put, I was the one being punished for my bad decision in buying a crappy product. It was apparently so bad in fact that they don't even sell the thing anymore.

Nowadays, I take GREAT PLEASURE in writing posts like this one to alert the world about their wonderful and completely self-serving business practices and never fail to take every chance to advise everybody I can that no matter what they sell you can find it under its own label somewhere else ... at a 30-40% savings.

So skorpio, do yourself a favor and do some research about that "high temp leadless lead" you mentioned. I can guarantee whomever manufactures it sells it too and you don't have to deal with a "restoration industry leader" who refuses to stand behind the products it sells.

Okay ... rant over. :D

Thanks to all for checking out some of my work and for the wonderful comments. Now back to our regularly scheduled vises .......
 
Last edited:

Tundra

Well-known member
Joined
Jun 3, 2006
Messages
135
Location
Lisle, Ontario Canada
Thanks John! I've been at this for many, many years now and NEVER fail to get intrigued either. I guess that's what keeps me pushing the envelope and trying new things all the time. There are VERY few coaters who deal with multi-color work and even fewer who try to work with extremely unpredictable pot metal (and I like it that way heh hehhhhh). I have to seriously limit the number of trim projects I take on like that console because the main focus of my shop is and always will be powder coating. But sometimes a project takes a little bit more than just some powder to make it look its best, and that's where my high temp metal filler comes into play.


Thank you very much balane! :D I love my job and the only thing I'd change is adding a few clones so my turn around time wasn't so lame.


skorpio ... I have no idea and will never find out. I won't buy anything that company has to offer ever again. I was a very loyal Eastwood customer for over 19 YEARS and bought thousands of dollars' worth of products over my lifetime, including an expensive Baldor 1 3/4 hp buffer.

Several years ago I purchased one of their products that carried the typical one-year warranty ... and went through FOUR OF THEM within ten months of buying it. When I took advantage of the warranty exchange for the fifth time within the 12-month period, the office manager Kathy personally called to notify me that they would no longer honor their own warranty and I was being unceremoniously "hung out to dry" without notice and without the equipment I needed to carry on my business. Moreover, I was being fired as a customer and they would no longer work with me. My account on their powder coating forum was even closed (I assume so I wouldn't bad-mouth them on their own forum).

Simply put, I was the one being punished for my bad decision in buying a crappy product. It was apparently so bad in fact that they don't even sell the thing anymore.

Nowadays, I take GREAT PLEASURE in writing posts like this one to alert the world about their wonderful and completely self-serving business practices and never fail to take every chance to advise everybody I can that no matter what they sell you can find it under its own label somewhere else ... at a 30-40% savings.

So skorpio, do yourself a favor and do some research about that "high temp leadless lead" you mentioned. I can guarantee whomever manufactures it sells it too and you don't have to deal with a "restoration industry leader" who refuses to stand behind the products it sells.

Okay ... rant over. :D

Thanks to all for checking out some of my work and for the wonderful comments. Now back to our regularly scheduled vises .......

Good to know.:scared:
 

GETRIDAONE

Well-known member
Joined
May 21, 2013
Messages
1,549
Location
Auburn, GA
I bought 4- cans of Under Hood Black from them and used one can and the other three sat for 2-3 months. I tried the next one and the second and the third, no propellant in any of the cans. They are all the same date code on the bottom of the can. Their answer was I had it to long and they would not replace it. I found Dupli Color satin black worked just as well and it is local and less money. Bye - Bye I'll go elsewhere.

Dismayed, I haven't seen a slide on a Columbian that looks like that one.
 

drivesitfar

Well-known member
Joined
Oct 23, 2013
Messages
36,013
Location
Pacific Northwest
Cuda: thanks for sharing the tips of your trade. If you want to practice on another Reed almost exactly like yours just say the word and i'll ship you mine in a flat rate USPS box. i wouldn't even care what color you picked and i'd keep the screw and vise nut to make it easier for you. PM me your address if you want to have some fun or let me know what the charge would be if you want to paint it "Arrest me Red". i think this one I'm attaching a picture of is close to the one you own?

Dismayed: looks like you are in my area and a new member to Garage Journal. only 10 vises before you joined? well i guess that's a good start and nice looking older Columbian. might as well start posting the rest of them so we can enjoy some more vise **** if you can. Welcome to the gang and you'll fit right in.
 

Attachments

  • WP_20140311_002.jpg
    WP_20140311_002.jpg
    151.2 KB · Views: 71
To avoid these ads, REGISTER NOW!

Carla

MEMBER EMERITUS
Joined
Nov 27, 2010
Messages
672
I picked up this Columbian 3 1/2" while getting a workbench. Says "Columbian Cleveland" where it'd normally have the No. on the right side and on the left "PT APLD FOR". Doesn't seem to look like most I've seen, thoughts? Works just fine though! I'm now up to 10 vises since joining GJ and seeing this thread...

Hi, dismayed,

I can't tell you any more than a very rough approximation of its vintage, but you do have a very early Columbian, possibly from the 1905-ish time-frame, or thereabouts.

(the reference material I have on the Columbian vises are Harry Seymour's 'scrap-books', which begin in the 1920's and run up to the early '60's.......most of the scrapbook items are late '20's to mid-'50's)

Somebody, somewhere, will have researched the publicly available documentation regarding the formation of the Columbian Vise and Tool Co., but I don't have that info myself. Its quite possible that yours is the earliest model of the Columbian make.

I would think that the start-up of that firm would have gotten mention in American Machinist magazine, but I don't have a collection of old copies to peruse.

Someone, somewhere, will have some 1900 to 1910 industrial supply house catalogues which should identify your vise.

The most obvious characteristic of the early production of your vise is the configuration of the back jaw casting, which, as you see, re-enforces the front jaw support area, but has to have a clearance notch cut in the bench.

This is typical of many makes of vises from the 1860's to the, generally, 1910-15-ish time-frame.

cheers

Carla
 

CudaChick1968

Member Emeritus
Joined
Jul 1, 2011
Messages
1,800
Location
Northwest Tennessee (38230)
Cuda: thanks for sharing the tips of your trade. If you want to practice on another Reed almost exactly like yours just say the word and i'll ship you mine in a flat rate USPS box. i wouldn't even care what color you picked and i'd keep the screw and vise nut to make it easier for you. PM me your address if you want to have some fun or let me know what the charge would be if you want to paint it "Arrest me Red". i think this one I'm attaching a picture of is close to the one you own? ...

Thanks for the vote of early confidence there drivesitfar, but one of the main reasons I practiced on my own stuff for 8 years before opening my shop in 2007 was to learn my trade inside and out and try to keep surprises on customers' parts to a minimum.

I've got a little no-name "warm up" here to play with first, the 1885 Phoenix jeweler's vise I just bought on ebay a couple nights ago, and then will most likely take on my own Reed 103 1/2R before embarking on a restoration for anyone else. Some of these beloved babies of ours are too rare to take chances on, and I'd hate to be responsible if something unforeseen would happen to one of our forum Vise **** stars here. Trust me, you guys will be the first ones to know when I'm ready. :D
 

balane

Well-known member
Joined
May 4, 2011
Messages
2,996
Location
Pacific Northwest
Here's an early model Reed 1C that needed help. It's a 3 1/2" combination vise which weighs over fifty pounds. The color is Satin Italian Olive, one of my favorites on old vises. It works much better than it looks, has definitely seen a life of work but the action on Reeds is nothing short of amazing. My favorite manufacturer without a doubt. It came to me without the original lock down nut for the swivel. Somebody had substituted in a stack of washers and a nut. The problem with this is that Reeds have conical recesses for a matching coned nut and the washers just weren't filling the bill properly. For a temporary fix I slid a conical lug nut over the shaft and then put a nice machined wing-nut as the fastener. It works OK but if I were keeping this long term I would definitely be keeping my eye out for the correct handled swivel-nut. Overall it's a very nice vise that isn't ashamed of how well it's held up to a lifetime of hard work.

.
 

Attachments

  • Sam_9374.jpg
    Sam_9374.jpg
    115.2 KB · Views: 47
  • Sam_9410.jpg
    Sam_9410.jpg
    106.6 KB · Views: 54
  • Sam_9398.jpg
    Sam_9398.jpg
    146.1 KB · Views: 47
  • Sam_9377.jpg
    Sam_9377.jpg
    148.9 KB · Views: 54
  • Sam_9396.jpg
    Sam_9396.jpg
    144.8 KB · Views: 52
  • Sam_9388.jpg
    Sam_9388.jpg
    146.9 KB · Views: 65
  • Sam_9384.jpg
    Sam_9384.jpg
    142.8 KB · Views: 68
Last edited:

ganymede

Well-known member
Joined
Nov 29, 2012
Messages
2,332
Location
New England
Nice combo^^^^
Interesting that it's got the bulb type hub and split nut retainer for the main screw.
I thought they had switched to the pancake style hub by then. Cool.
 

tedsters

Well-known member
Joined
Oct 29, 2012
Messages
1,443
Location
Michigan
Re: Craftsman 4 1/2 crown logo 51840

just bought this today now i need to go get it need some more things to grab on the way its in Hinckley, Ohio.
its actually in pretty good shape wish it had the swivel matches my 3 1/2 swivel

need some help here from some of you guys that knows this vise i need a swivel base for it, anyone have one or know what particular columbian will work, the pics did not post don't know why the vise i need a swivel for is this one 4 1/2 jaw
 

Attachments

  • 00m0m_aLDuoIcRmct_600x450.jpg
    00m0m_aLDuoIcRmct_600x450.jpg
    46.8 KB · Views: 14
  • 00505_gjB5JnhzrXb_600x450.jpg
    00505_gjB5JnhzrXb_600x450.jpg
    32.7 KB · Views: 21
Last edited:

balane

Well-known member
Joined
May 4, 2011
Messages
2,996
Location
Pacific Northwest
ganymede said:
Nice combo^^^^
Interesting that it's got the bulb type hub and split nut retainer for the main screw.
I thought they had switched to the pancake style hub by then. Cool.
You know, I hadn't given that much thought but you're right. This is the first bulb shaped hub Reed I've seen that had the split ring retainer. Must have been right around when they were changing over to the new style screws.
 

Outlawmws

Well-known member
Joined
Aug 9, 2011
Messages
39,226
Location
The Badlands
Leanna, A though occurred to me: Some old tools were "Japanned" which is a high gloss black lacquering process. I think they actually polished the finish after it was applied.

Can you get such a finish with powdercoat?
 

drivesitfar

Well-known member
Joined
Oct 23, 2013
Messages
36,013
Location
Pacific Northwest
Tedsters: my Craftsman that looks almost the same also doesn't have a swivel base on it. might be easier to make a nice stand for it and swivel it any way you wish. as has been said before how many times do you really use the swivel on a vise anyway?
 

Attachments

  • WP_20140122_023.jpg
    WP_20140122_023.jpg
    85.9 KB · Views: 29

ganymede

Well-known member
Joined
Nov 29, 2012
Messages
2,332
Location
New England
You know, I hadn't given that much thought but you're right. This is the first bulb shaped hub Reed I've seen that had the split ring retainer. Must have been right around when they were changing over to the new style screws.

I bet you're right. Could help in dating that vise much closer than a lot of other Reeds.
 
Last edited:

oldldh

Well-known member
Joined
May 22, 2012
Messages
3,700
Location
Fairhope, AL
Re: Craftsman 4 1/2 crown logo 51840

need some help here from some of you guys that knows this vise i need a swivel base for it, anyone have one or know what particular columbian will work, the pics did not post don't know why the vise i need a swivel for is this one 4 1/2 jaw


If your DeLorean flux-capacitor is up to it---:evil::evil::evil:


Charge down to Sears...:3gears:


(Sorry, I couldn't resist---)


You do have a Craftsman 5184...


Nice vise, that will work just fine bolted to your workbench...


The base you need is a 5184L...My best suggestion is watch Craigslist, keep an eye on Ebay, and search local garage/estate sales...


Thanks go to Outlaw for the catalog page...:bowdown::bowdown:
 

Attachments

  • 1960 Craftsman Catalog.jpg
    1960 Craftsman Catalog.jpg
    63.4 KB · Views: 37
Last edited:

oldldh

Well-known member
Joined
May 22, 2012
Messages
3,700
Location
Fairhope, AL
Leanna, A though occurred to me: Some old tools were "Japanned" which is a high gloss black lacquering process. I think they actually polished the finish after it was applied.

Can you get such a finish with powdercoat?


As a totally useless bit of trivia...


The Jaguar XK series 6 cylinder engines used a black coating (porcelain, I believe...) on the cast iron exhaust manifolds...


Over time (hundreds of heat cycles) they would accumulate a grey powdery looking coating...


I wonder if a Reed 209 would look good with a porcelain coating???:drool::drool::drool:


Now, all we have to do is find a 209...:sad::sad::sad:
 

tedsters

Well-known member
Joined
Oct 29, 2012
Messages
1,443
Location
Michigan
Tedsters: my Craftsman that looks almost the same also doesn't have a swivel base on it. might be easier to make a nice stand for it and swivel it any way you wish. as has been said before how many times do you really use the swivel on a vise anyway?

yea i know i don't really need a swivel to use the vise but i do have a 3-1/2 in just like it with a swivel was gonna mount one at each end of the bench it would just look more uniform its probally just more a me thing i guess
 

tedsters

Well-known member
Joined
Oct 29, 2012
Messages
1,443
Location
Michigan
Re: Craftsman 4 1/2 crown logo 51840

oldldh
i will just keep my eyes open hopefully i will stumble across one i know it will work just fine the way it is as i stated to DS i have the 3-1/2 with a swivel i just wanted to keep them looking the same on the bench thats all but all in all its still a nice old vise without it
 

jpickar

Well-known member
Joined
May 21, 2010
Messages
964
Re: Craftsman 4 1/2 crown logo 51840

need some help here from some of you guys that knows this vise i need a swivel base for it, anyone have one or know what particular columbian will work, the pics did not post don't know why the vise i need a swivel for is this one 4 1/2 jaw

I have that exact same vise I inherited from my FIL. He bought it new. There was no swivel on it either. I would like to have a swivel for it though.

JOhn
 

drivesitfar

Well-known member
Joined
Oct 23, 2013
Messages
36,013
Location
Pacific Northwest
I am looking for a nice older Craftsman double slide Drill Press vise and found this one that is close to what i want to eventually have on my Walker Turner or Cannedy-Otto Drill Presses.

it has a broken handle and some missing parts on top and wondering if i might be able to get those still from Sears or if anybody has a parts vise to sell me?

other than the broken handle this one is in mint condition IMHO.
 

Attachments

  • WP_20140512_006.jpg
    WP_20140512_006.jpg
    129.7 KB · Views: 21
  • WP_20140512_005.jpg
    WP_20140512_005.jpg
    141.5 KB · Views: 21
  • WP_20140512_004.jpg
    WP_20140512_004.jpg
    115.6 KB · Views: 24
  • WP_20140512_003.jpg
    WP_20140512_003.jpg
    103.7 KB · Views: 28
  • WP_20140510_011.jpg
    WP_20140510_011.jpg
    145.5 KB · Views: 21
  • WP_20140510_010.jpg
    WP_20140510_010.jpg
    144.2 KB · Views: 22

Egapgt

Active member
Joined
May 21, 2011
Messages
35
Location
Gulf Shores, AL
Parker 974 Restore

Picked a Parker 974 up 3 or 4 weeks ago. Like most old vises it was pretty ugly...several coats of paint, rusty, worked hard and long and somewhat abused. The only parts missing were the screw and detent that fit into the center of the spindle hub (the spring was still there). The handle is straight but shows that it was well beat on a routine basis. At some point in it's life there was enough tension or impulse on the spindle screw that the inertia weld to the hub failed; a hole was drilled and a 1/4" roll pin inserted. The jaws are fair to good with some metal between some of the grooves. There are a few spots of welding bead on the jaw frames. The slide was used as an anvil but not severely wounded. Both ears on the swivel base brake shoes were broken at one time and welded back. Someone did a good job on the welding. In retrospect , perhaps the vise was not just "pretty ugly" but "real ugly"!

Anyhow, its been disassembled, cleaned with a wire brush, primed, taped up, base coated and is now ready for the final topcoat of flatted paint. Looks like good weather this weekend so maybe that will happen.

There was green paint in several spots...enough for me to believe it was the original color.. The wrench was bent but has been straightened. One of the hub shims was found pretty well destroyed. The coiled steel jaw pins fit an unusual diameter (0.200 +/-) hole but I found some metric replacements that will work well (5 mm X 24 mm). I have not found a replacement for the little screw that fits into the center of the spindle hub. The hole for the screw has threads I've never run across; just very slightly larger than a 1/4" but neither a 1/4 x 20, nor a 1/4 x 28 or anything metric works. Does anyone have a clue?

Will post a couple more pics after the top coat and everything is put back together.

Tom
 

Attachments

  • Model Number.jpg
    Model Number.jpg
    146.8 KB · Views: 26
  • Parker Logo.jpg
    Parker Logo.jpg
    70.7 KB · Views: 25
  • Number 2 Vise Wrench.jpg
    Number 2 Vise Wrench.jpg
    145.9 KB · Views: 23
  • Spindle Hub Shim 3.jpg
    Spindle Hub Shim 3.jpg
    143.2 KB · Views: 24
  • Parts Ready For Top Coat.jpg
    Parts Ready For Top Coat.jpg
    135.4 KB · Views: 57
  • Parts Ready For Assembly.jpg
    Parts Ready For Assembly.jpg
    139.1 KB · Views: 33
Last edited:

ganymede

Well-known member
Joined
Nov 29, 2012
Messages
2,332
Location
New England
Re: Parker 974 Restore

...... At some point in it's life there was enough tension or impulse on the spindle screw that the inertia weld to the hub failed; a hole was drilled and a 1/4" roll pin inserted. ......

So the screw spindle and the handle hub are seperate pieces ?
They are on my Parker but it's kind of old.
 

drivesitfar

Well-known member
Joined
Oct 23, 2013
Messages
36,013
Location
Pacific Northwest
Egapgt: nice job prepping your Parker and getting it prepared to paint. did you cut the rounded pieces on the jaw side of the slide or how did you tape them?

sorry i'm not sure which screw you are having issues with so if you could post just those pictures maybe i can help or one of the gurus with way more talent than i can?

also what kind of wire are you using to hang the vise parts on and how what are you going to hang them on if you don't mind showing us?

for all the issues you mentioned with that vise it looks great now and best of luck with getting it all back together and using it.

Cuda: you couldn't hurt my Reed unless it got damaged in shipping so offer still stands if you need a little more practice before you try to paint your little phoenix or your own Reed. i'm thinking i might be able to ship in a medium USPS flat rate box without the screw involved. i just shipped 100 pounds of dumbbells in 2 boxes to the east coast via USPS and two days later my client had them at his doorstep. i did put some scrap plywood inside and used about a half a roll of tape.
 

Egapgt

Active member
Joined
May 21, 2011
Messages
35
Location
Gulf Shores, AL
Ganymede,

How were the spindle and hub connected on yours?

On mine I'm assuming that during the manufacturing process the Acme threaded spindle screw was spun and inserted into the hub, a process I call inertia welding. Evidence of this is the very shallow threads (almost like scratches) where the spindle goes into the hub and the not so straight hole that was drilled for the pin. After the tape is taken off the assembly I can post a pic if you want. My words seldom come out as good as a jpeg!

Tom
 
To avoid these ads, REGISTER NOW!
Top Bottom