To avoid these ads, REGISTER NOW!

Modifications to the HF 4 and 5 drawer service carts - what changes have you made?

LG63

Well-known member
Joined
Sep 7, 2012
Messages
1,003
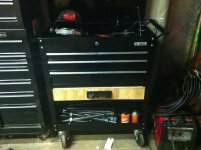
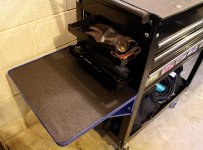
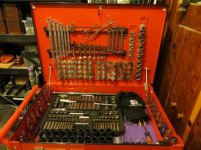
If you want to undo what you do... drill out those rivets and remove the springs rods and lock bars. You can re-rivet the covers back on but I didn't.

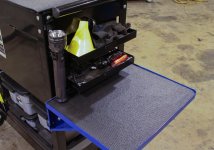
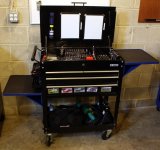
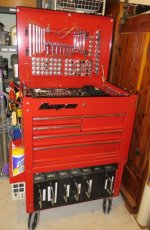
You can see my mods starting on page 52 of this thread. You will have to undo the lid shocks to pull the stuff up and out of the box. The lid angle will not allow you to pull it all out (if I remember correctly).

Thanks, you've got some great ideas there. I drilled out all 4 rivets on each side before realizing I would have only had to remove the 2 outboard rivets, but I'm glad I removed the spring brackets too as this leaves the back wall uninterrupted. Like you, I'll probably never put them back in.
 
To avoid these ads, REGISTER NOW!

CarsonConcepts

Well-known member
Joined
Jan 27, 2014
Messages
419
Location
North East, MD
Here is my 4-Drawer.

- Added a handle to the lid.

-The top mat is a heavy duty exercise mat the dogs chewed on. Had just enough salvageable to cover the top. It's held on with binder clips at the corners for now

- Two Kobalt Magnetic shelves on the left side under the handle

- Two folding shelves from the Kobalt Tool carts (ended up with an extra set from a damaged cart I returned). Trimmed the lip off the top edge and drilled in the shelf and cart to mount. Only ended up drilling 2 extra holes per side in the cart. The shelves do stick out the back about 1". I went with the left side shelf low because I wanted to keep the magnetic shelves as well. It's worked out great for setting cans and taller items on, or as a place to put small parts while working.

- The white slabs on the lid are cheap locker type dry erase boards from Walmart with the magnetic backs. Works out great for quick notes and sketches.

I'll eventually be getting a second cart to add drawers to the lower half. I plan on using the extra space created in the center for either outlets and air ports or possibly storage for some Plano type boxes. Most likely I'll decide as I'm building it.

Only other major project planned is to create a wooden top for the lid to replace the mat. Just picked up a biscuit jointer a couple weeks ago for another project, and it needs more wood to chew on. Still up in the air about what type of wood I want to use

~ Carson
 

Attachments

  • Black Cart 4.jpg
    Black Cart 4.jpg
    115.2 KB · Views: 798
  • Black Cart 1.jpg
    Black Cart 1.jpg
    111.9 KB · Views: 974
  • Black Cart 2.jpg
    Black Cart 2.jpg
    102.5 KB · Views: 992
  • Black Cart 3.jpg
    Black Cart 3.jpg
    90.1 KB · Views: 810
Last edited:

LG63

Well-known member
Joined
Sep 7, 2012
Messages
1,003
HF says the red cart is powder coated but I found out that xylene cuts right through the finish when I tried to remove the yellow sticker residue (which HF obviously meant to be permanent) from the top drawer. I had a very red paper towel after one swipe. Managed to recover by wiping it up quickly and polishing the dulled finish with some rubbing compound.
I actually started with mineral spirits which was working but got impatient and tried the xylene.
 

PelicanPines

ALLIANCE MEMBER
Joined
Apr 30, 2014
Messages
38,112
Location
New Jersey, USA, Earth, My own reality
HF says the red cart is powder coated but I found out that xylene cuts right through the finish when I tried to remove the yellow sticker residue (which HF obviously meant to be permanent) from the top drawer. I had a very red paper towel after one swipe. Managed to recover by wiping it up quickly and polishing the dulled finish with some rubbing compound.
I actually started with mineral spirits which was working but got impatient and tried the xylene.

I used a heat gun on low and pulled that sticker off in one try. :rocker:
 

LG63

Well-known member
Joined
Sep 7, 2012
Messages
1,003
I used a heat gun on low and pulled that sticker off in one try. :rocker:

I tried a hair dryer, guess it wasn't hot enough. The paper tore loose, leaving the adhesive intact. The US General badge on the other hand came off very easy and left very little residue.
 

PelicanPines

ALLIANCE MEMBER
Joined
Apr 30, 2014
Messages
38,112
Location
New Jersey, USA, Earth, My own reality
I tried a hair dryer, guess it wasn't hot enough. The paper tore loose, leaving the adhesive intact. The US General badge on the other hand came off very easy and left very little residue.

Ok, we had the ying/yang of carts. My badge needed a heat gun, dental floss and caused a blister on my finger from rubbing the glue off. I considered a solvent but tested it on a scrap piece I cut off the cart and saw how it altered the color so... I just kept rubbing the glue off. :dunno:
 

ihateminimumwage

Well-known member
Joined
Jan 26, 2012
Messages
3,960
Goo Gone. Used it for years working in a shop refurbishing appliances. Best thing on the market for getting layers of stickers off of refrigerators without leaving a mark on the paint.

Peeled my HF sticker off the back of my cart the best I could, poured some Goo Gone over it, let it soak, and rubbed it off with a paper towel.
 

PelicanPines

ALLIANCE MEMBER
Joined
Apr 30, 2014
Messages
38,112
Location
New Jersey, USA, Earth, My own reality
Small update: After using the cart for a few months now, I ran into a problem with one of my mods... The 20 inch magnetic rails on the lid were originally attached with only the 3m molding tape. It failed... I bent a few L brackets into Z clips and riveted them as support brackets. I painted the Z clips black.

My neighbor and a few friends kept asking me... who makes that cart? So I explained HF. One of them, anonymously purchased an Epiq Snap On Badge and left it for me to install on the cart.

So my update is... one failure fixed... and one Epiq Badge score.
 

alpinewhite

Well-known member
Joined
Aug 4, 2012
Messages
1,315
Location
Orange County, California, USA
Small update: After using the cart for a few months now, I ran into a problem with one of my mods... The 20 inch magnetic rails on the lid were originally attached with only the 3m molding tape. It failed... I bent a few L brackets into Z clips and riveted them as support brackets. I painted the Z clips black.

My neighbor and a few friends kept asking me... who makes that cart? So I explained HF. One of them, anonymously purchased an Epiq Snap On Badge and left it for me to install on the cart.

So my update is... one failure fixed... and one Epiq Badge score.
pics pls
 

NewEdgePerf

Well-known member
Joined
Nov 24, 2012
Messages
198
Small update: After using the cart for a few months now, I ran into a problem with one of my mods... The 20 inch magnetic rails on the lid were originally attached with only the 3m molding tape. It failed... I bent a few L brackets into Z clips and riveted them as support brackets. I painted the Z clips black.

My neighbor and a few friends kept asking me... who makes that cart? So I explained HF. One of them, anonymously purchased an Epiq Snap On Badge and left it for me to install on the cart.

So my update is... one failure fixed... and one Epiq Badge score.

I used nuts and bolts to attach the magnetic rails to the lid...using a "finishing washer" to help hold down the heavy duty tool box liner (made for in truck tool boxes..sold at Tractor Supply) that is also glued to the top of the lid.

Spray on 3M adhesive to hold the liner in place, then the dual purpose fasteners.

I hope this helps.

Tony D
 

PelicanPines

ALLIANCE MEMBER
Joined
Apr 30, 2014
Messages
38,112
Location
New Jersey, USA, Earth, My own reality

Pictures of update.

The z-Clips were made from L brackets and painted. Used 5/32 rivets to attach to lid.

Snap On Badge... So now my neighbor calls it... "Your Snap On Cart" :thumbup:
 

Attachments

  • Update4.jpg
    Update4.jpg
    78.5 KB · Views: 1,415
  • Update3.jpg
    Update3.jpg
    64 KB · Views: 1,639
  • Update2.jpg
    Update2.jpg
    62.5 KB · Views: 1,277
  • Update1.JPG
    Update1.JPG
    107.7 KB · Views: 1,156

stage20

Well-known member
Joined
Nov 5, 2013
Messages
3,722
Location
pcola FL
harbor freight made a 2 drawer cart? picked this up for 30 bucks this morning along with some screwdrivers inside. nice roller bearing like the rest of their stuff. seems to be pretty thick steel. has drawer liners.

im going to take the drawer sections out and put in my 4 drawer for more room.

hopefully i can sell the empty cart for 20 bucks and get some of my money back.
 

Attachments

  • !cid__2014-08-09_15-17-06_936_.jpg
    !cid__2014-08-09_15-17-06_936_.jpg
    135 KB · Views: 642

stage20

Well-known member
Joined
Nov 5, 2013
Messages
3,722
Location
pcola FL
not exactly what i wanted to do but i think this will work.
 

Attachments

  • !cid__2014-08-09_17-45-47_604_.jpg
    !cid__2014-08-09_17-45-47_604_.jpg
    132.4 KB · Views: 844

fiv216

Well-known member
Joined
Apr 13, 2014
Messages
69
Sorry if this has been answered but does anyone know a small 2-4 drawer box that fits in the space underneath? Space is tight for me at the monent /:
 

CarsonConcepts

Well-known member
Joined
Jan 27, 2014
Messages
419
Location
North East, MD
The Husky two drawer that is currently on clearance at HD fits well. You can also "double up" the cart as a couple people have done earlier in the thread. Essentially the drawer assembly from a second cart fits perfectly in the lower opening. With the $99 coupon it's a slick option, and what I'm planning on doing with mine. Double the capacity, same foot print.

~ Carson
 
Last edited:

cheechi

Well-known member
Joined
Feb 29, 2012
Messages
4,384
Location
Triad, NC
most of the 26" top boxes from the box stores would fit if you cut off the top and left the drawers, but of course no lock. Sears has 26" 2 drawer intermediates that I know would fit, but they are really ******.
 

PelicanPines

ALLIANCE MEMBER
Joined
Apr 30, 2014
Messages
38,112
Location
New Jersey, USA, Earth, My own reality
Sorry if this has been answered but does anyone know a small 2-4 drawer box that fits in the space underneath? Space is tight for me at the monent /:

In my opinion... if you want all drawers, checkout a roller instead of a cart. I love the mods I did to the cart, allowing me to maximize the space below by repurposing metal dewalt tool boxes.

There have been a few people that purchased 2 of the black 4 drawer carts and stacked the drawers in their fabrication. Pretty nifty but again... if i wanted all drawers... I would buy a roller.
 
Last edited:

fiv216

Well-known member
Joined
Apr 13, 2014
Messages
69
Thanks for all the advice! I'll probably start by scoping out fleamarkets & yard sales. I would've gone with a roller but the quality & price of the 5 drawer is hard to beat.
 

stage20

Well-known member
Joined
Nov 5, 2013
Messages
3,722
Location
pcola FL
Sorry if this has been answered but does anyone know a small 2-4 drawer box that fits in the space underneath? Space is tight for me at the monent /:
just above your original post is a pic of mine. had to build the bottom up so both drawers would open, but building a small frame out of angle wouldnt be too hard if you wanted to mount it higher.
 

CarsonConcepts

Well-known member
Joined
Jan 27, 2014
Messages
419
Location
North East, MD
Not quite "mods" but more of additions.

Wanted a place for a pencil, sharpie, and soapstone. Had a couple unused small magnetic hooks from the kitchen. Bent the hook out a little and now it's a pen holder. The soap stone holder is steel and just sticks to the magnet bases under the hooks.

I've been wanting to do something with the lower area to increase storage. I had planned on doing the double cart mod, but I'm seeing how this works for now. Totes are Rubbermaid Roughneck 3gal. (HD $5.27ea Sku:489596). 4 Fit perfectly with room for the Stanley organizer (Die Grinders & Accessories) and jack-stands. I'm storing specialty auto tools in two of them, and the other two are empty for now (it's strange having "extra" storage space)

~ Carson
 

Attachments

  • IMG_7212-RZ.jpg
    IMG_7212-RZ.jpg
    107.1 KB · Views: 819
  • IMG_7209-RZ.jpg
    IMG_7209-RZ.jpg
    104.8 KB · Views: 806
To avoid these ads, REGISTER NOW!

Aztecaloco707

Active member
Joined
Mar 30, 2013
Messages
42
Location
Arkansas
Sorry if this has been answered but does anyone know a small 2-4 drawer box that fits in the space underneath? Space is tight for me at the monent /:

I used one of those craftman 3 drawer heavy duty intermidiate boxes and was very pleased with the outcome. I actually bought it back when the box was listed in the hot deals section. I can post some pics after work if you'd like.
 

rarevair

Well-known member
Joined
Feb 28, 2010
Messages
62
Location
Valley Center, KS
Love those HF carts. Have two of each. The red 5 drawer seems to be better quality and I like the latches on the drawers. All are modified. Started out with the two red carts, one in the main shop and one in the secondary shop for by the lift. Cut down the one in the main shop so it would roll under my bench and the lid locks were disabled.

When I got my 1940's Mechanic's workbench restoration finished it was going in the secondary shop by the lift to replace the red cart there. Wanted to retain the drawer type tool storage so I butchered two of the black 4 drawer carts. One was bolted solid to the fixed shelf in the bottom of the cabinet while the other was revamped to roll in and out under the fixed shelf. The red box from the secondary shop was cut down to fit beside the other red cart in the main shop. Here are photos of the Mechanic's bench. Will look for some photos of the red carts in place.
AWB-Workbench-done-34.jpg

AWB-Center-doors-open-upper-drawers-open.jpg

AWB-Center-doors-open-lower-box-out.jpg

AWB-Center-doors-open.jpg
 

kool_BOY8323

Well-known member
Joined
Feb 23, 2013
Messages
280
Location
arizona
Love those HF carts. Have two of each. The red 5 drawer seems to be better quality and I like the latches on the drawers. All are modified. Started out with the two red carts, one in the main shop and one in the secondary shop for by the lift. Cut down the one in the main shop so it would roll under my bench and the lid locks were disabled.

When I got my 1940's Mechanic's workbench restoration finished it was going in the secondary shop by the lift to replace the red cart there. Wanted to retain the drawer type tool storage so I butchered two of the black 4 drawer carts. One was bolted solid to the fixed shelf in the bottom of the cabinet while the other was revamped to roll in and out under the fixed shelf. The red box from the secondary shop was cut down to fit beside the other red cart in the main shop. Here are photos of the Mechanic's bench. Will look for some photos of the red carts in place.
AWB-Workbench-done-34.jpg

AWB-Center-doors-open-upper-drawers-open.jpg

AWB-Center-doors-open-lower-box-out.jpg

AWB-Center-doors-open.jpg

i REALLY like what you did with that lowrider cart! such a cool idea.
 

CarsonConcepts

Well-known member
Joined
Jan 27, 2014
Messages
419
Location
North East, MD
Small add on today. Found an orphan Maglite Bracket and decided to mount a 2D LED Mag on the cart.

~ Carson

attachment.php


attachment.php


attachment.php
 

Attachments

  • IMG_2176-RZ.jpg
    IMG_2176-RZ.jpg
    119.5 KB · Views: 1,727
  • IMG_2174-RZ.jpg
    IMG_2174-RZ.jpg
    82.3 KB · Views: 1,744
  • IMG_2172-RZ.jpg
    IMG_2172-RZ.jpg
    140.6 KB · Views: 1,817

Angry welder

Well-known member
Joined
Sep 8, 2014
Messages
119
Location
Alabama
Hey guys. I like my music and since I tend to use my cart more for carrying my tools back and forth from a project and back to the main tool boxes more than I use it for tool storage, I decided to add a radio that plays MP3 to my cart.

How does it look???????
 

Attachments

  • IMG_0693.jpg
    IMG_0693.jpg
    146 KB · Views: 739
  • IMG_0692.jpg
    IMG_0692.jpg
    147.1 KB · Views: 573
  • IMG_0694.jpg
    IMG_0694.jpg
    134.9 KB · Views: 508
  • IMG_0695.jpg
    IMG_0695.jpg
    159.5 KB · Views: 487

CarsonConcepts

Well-known member
Joined
Jan 27, 2014
Messages
419
Location
North East, MD
never knew those brackets even existed. thanks for that. thatll save me some drawer space and they also make them for the 2 aa model. win!

Yep, actually have a couple sets of the AA brackets on order from Amazon, along with more D brackets.

I ordered the Accessory Pack for the D-Cell that has the brackets, 3 lenses (Red, Blue, Clear) and a rubber anti-roll device for the head. Only a couple buck more than just the brackets. Part Number: ASXX376

~ Carson
 

SASORacing

Well-known member
Joined
Jun 10, 2014
Messages
964
Location
Utah
One thing I did to my 5 drawer red (hf black version doesn't have these) was I drilled out all of the rivets holding the slide and lock feature on. I could not get used to having to slide that over each time I opened a drawer. Took about 5 minutes to remove them all.

I like to be able to touch anywhere on a tool box of mIne and effortless open a drawer with a pinky. These locking devices made it diifficult, and I'm sure over 20 years of opening g and closing I will probably save several minutes! Maybe?

The other thing I did was level my cart out where it's stored mostly, level it so that it slanted backwards slightly so the drawers naturally slide back o thier own. Obviously I still have the lock and a quick close of the lI'd all drawers lock as well. Any one else do t like those locks?

Overall for the money $190 after taxes this cart is very nice to have around, nice bright color, and I love the gas shocks! I put a Sunex red side shelf on it and it made it twice as useful!
 

90zcar

Well-known member
Joined
Nov 8, 2013
Messages
3,254
Hey guys. I like my music and since I tend to use my cart more for carrying my tools back and forth from a project and back to the main tool boxes more than I use it for tool storage, I decided to add a radio that plays MP3 to my cart.


How does it look???????


Looks good but I'd throw some black paint on the wood.
That's just me tho....I like custom jobs to looking they are "supposed to be there"

That's cool tho, how are u powering that setup?


Sent from my iPhone 5s using Tapatalk
 

Krician

Well-known member
Joined
Sep 14, 2014
Messages
84
Location
Union City, CA
Went to the locksmith, bought a cylindrical lock and tubular key and replaced the stock one. Direct fit! Only thing though, locksmith sold the lock and key for $27 when I found it on Amazon for $12 on prime =_= may I have the part number for a side tray? I have the Sunex one from my old box but noticed that there's a "lip" on the top of the mount that overlapped the side of my old box. Trying to fit it on my new 5 drawer, you can't close the lid... so I need the side tray that has the mount completely flat
My coworker has a 4 drawer BP cart with the side tray I am looking for but I can't get a item number...
 

Angry welder

Well-known member
Joined
Sep 8, 2014
Messages
119
Location
Alabama
I am using a computer power supply to power the set up. I have plans on painting it, I have been contiplating fiberglassing it and bondoing it so it will have that smooth high gloss metal look to it. I am getting ready to do a video on the build and installment when ever that gets done I will post it here.
 

kool_BOY8323

Well-known member
Joined
Feb 23, 2013
Messages
280
Location
arizona
Small add on today. Found an orphan Maglite Bracket and decided to mount a 2D LED Mag on the cart.

~ Carson

attachment.php


attachment.php


attachment.php

Hey guys. I like my music and since I tend to use my cart more for carrying my tools back and forth from a project and back to the main tool boxes more than I use it for tool storage, I decided to add a radio that plays MP3 to my cart.

How does it look???????

i've moved up to a streamlight, but i like that idea. perhaps the c-cell maglite brackets can fit my stinger..hmmm:headscrat

i like the MP3/radio addition too. get it painted up and it'll look awesome!:rocker:
 

mdbeck1

Well-known member
Joined
Mar 7, 2010
Messages
2,297
Location
Norman, OK
i've moved up to a streamlight, but i like that idea. perhaps the c-cell maglite brackets can fit my stinger..hmmm:headscrat

i like the MP3/radio addition too. get it painted up and it'll look awesome!:rocker:

So mount your streamlight charger on the cart.

Note that they make a "piggyback" charger that charges your flashlight AND an extra battery.
 

mrvm

Well-known member
Joined
Feb 12, 2014
Messages
3,839
Location
PA
I am using a computer power supply to power the set up. I have plans on painting it, I have been contiplating fiberglassing it and bondoing it so it will have that smooth high gloss metal look to it. I am getting ready to do a video on the build and installment when ever that gets done I will post it here.

Have you considered covering or possibly replacing the wood with some flat sheet metal thus avoiding any bondo? That would provide the surface for high gloss finish.
 

kool_BOY8323

Well-known member
Joined
Feb 23, 2013
Messages
280
Location
arizona
So mount your streamlight charger on the cart.

Note that they make a "piggyback" charger that charges your flashlight AND an extra battery.

i like the charger on the wall with the battery in it, rather not have it bumping around and banging on stuff on the cart. the stinger LED lasts nearly a week for me so no need to have the charger that ready. but having a convenient place to stash it in a hurry on the cart like he's done with his maglite is just cool.
 
To avoid these ads, REGISTER NOW!
Top Bottom