To avoid these ads, REGISTER NOW!

My "get away from it all" place...........

hutch4472

Active member
Joined
Dec 28, 2006
Messages
26
Location
Central CA. foothills
I have been lurking around this board for a few years, I have similar addictions, and have always loved the pictures.....so I figured it was time for me to put some up too.....
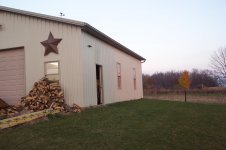
This is my 30X50 shop with a 14X50 lean-to. It is ALWAYS under construction/modification etc..and will be a work in progress for my entire able life. Next things are copper air supply runs and maybe a lift?
There is also a couple pictures of my 25X35 woodshop.
Sorry if this is too many pictures.
Anyway thanks for looking.......Hutch

IMG_3970.jpg


IMG_3973.jpg


IMG_3977.jpg


IMG_3975.jpg


IMG_3976.jpg


IMG_3979.jpg


IMG_3983.jpg


IMG_3985.jpg


IMG_3986.jpg


IMG_3997.jpg


IMG_3990.jpg


IMG_3988.jpg


IMG_3989.jpg


IMG_3991.jpg


IMG_3993.jpg


IMG_3995.jpg
 
To avoid these ads, REGISTER NOW!

e-tek

Well-known member
Joined
Dec 19, 2007
Messages
10,690
Location
Saskatoon, SK
Now YOU sir, have alot of tools!!! The Ultimate tool -man resides here!!!

Love the storage, the organization, the many toolboxes, and the details - like the compressor tank drain, filters, areas for electrical, welding, wood....

Nice work - hope you're enjoying!
 

Skyline

Well-known member
Joined
Nov 11, 2008
Messages
3,586
hutch;

How are the inside walls of the garage finished? Is there insulation? I see a lot of stuff hanging on the walls, and was wondering what it's all mounted to. Awesome garage btw.
 

brad d

Well-known member
Joined
Sep 2, 2007
Messages
361
Location
Winnipeg
So is that a little timer on the drain for the compressor? Nice setup looks like you could get a lot done in there
 

ovilla

Well-known member
Joined
Dec 18, 2005
Messages
2,342
Location
Plainfield, IL
Awesome shop! I like how you have it set up for different stations. Looks like a great place to get a lot of stuff done.
 

Stargeezer

Well-known member
Joined
Jan 12, 2009
Messages
347
Location
Central Nevada, USA
Real cool place.Thanks for posting. A place where yopu could walk inand say" I want to build a "_______" and just fill in the blank and start getting it built. That is a full service shop right there. Good post.

I used to live in Plymouth. Those foothills are very unique.
 
OP
H

hutch4472

Active member
Joined
Dec 28, 2006
Messages
26
Location
Central CA. foothills
hutch;

How are the inside walls of the garage finished? Is there insulation? I see a lot of stuff hanging on the walls, and was wondering what it's all mounted to. Awesome garage btw.


Yes the shop is insulated. Then I shot 2X4's to the floor the same distance out from the wall as the purlins. Then attached 5/8's plywood all the way around and painted it all white.
Thanks for looking..
Hutch
 
Last edited:
To avoid these ads, REGISTER NOW!
OP
H

hutch4472

Active member
Joined
Dec 28, 2006
Messages
26
Location
Central CA. foothills
So is that a little timer on the drain for the compressor? Nice setup looks like you could get a lot done in there


Yes it's a Ingersoll Rand EDV Drain Valve. It works GREAT. You can set how often it dumps (between 5 min and 1 hour if I recall) and how long it dumps (from .5 sec to 10 sec). I am going to post a link where I got it, hope that is ok because it is one of those "hard to find these days" GREAT deals on ebay. 79$ shipped. Retail they are $205 ish.
Here is the link

.....Crud, well he had 10 for sale and looks like they all sold sorry about that.

Found one....here is the link if interested....
http://cgi.ebay.com/ws/eBayISAPI.dl...rms=algo=SI&its=I&itu=UCI&otn=15&po=LVI&ps=54

Thanks for looking and the nice comments!
Hutch
 
Last edited:
OP
H

hutch4472

Active member
Joined
Dec 28, 2006
Messages
26
Location
Central CA. foothills
Thanks so much to all for the nice comments, means allot, yes I have a serious tool problem, which I'm sure is familiar to many here. The shop is my happy place and I put allot of time in to it and whatever money I can spare these days after the wife and kids are taken care of. Many of the ideas came from reading posts on this board. Been reading a ton on installing copper air lines, thats the next project.
Hutch
 

Yamaha74

Member
Joined
Oct 8, 2007
Messages
20
Location
Johnstown, OH
I like the lean too you have on the side of your barn. I would like to add one to my barn for my 28ft travel trailer camper. I am not sure what the best and cheapest way to do it is at this point. It looks like you used steal for your posts and rafters. I was planning on using treated lumber. The only thing I am not sure about yet was how to is fasten my rafters to the barn. I was thinking of just running a 2x12 all the way the length of the barn (40ft) at the very top and then mounting joice hangers to that. Then I would set my rafters in the joice hangers. Then the rafters would run out to the beams which would probably have a 2x12 running on each side of them. Hopefully this makes sense and any other suggestions would be great.

I have attached a picture of my barn. I am planning on putting the lean too on the right hand side. It will go the length of the barn (40ft) and probably come out 10 - 12 feet from the barn.
 

Attachments

  • House and Barn 015.jpg
    House and Barn 015.jpg
    139.5 KB · Views: 61

Iron-Iceberg

Well-known member
Joined
Feb 14, 2006
Messages
887
Location
A-town
Hutch, is that an instant hot water heater for your sink? If it is does it work good? How do you like it? What brand ect? I am thinking of doing the same as I dont use much hot water in the shop mainly just washing hands and such and I dont want to keep a water heater hot all the time.
 
OP
H

hutch4472

Active member
Joined
Dec 28, 2006
Messages
26
Location
Central CA. foothills
Hutch, is that an instant hot water heater for your sink? If it is does it work good? How do you like it? What brand ect? I am thinking of doing the same as I dont use much hot water in the shop mainly just washing hands and such and I dont want to keep a water heater hot all the time.


Yes it is a,
"Bosch GL4 Ariston 4-Gallon Point-of-Use Indoor Electric Mini-Tank Water Heater".
It works great for washing grease off hands, filling up a bucket of hot water for washing vehicles and what not. I really like it, seems very effecient (didnt even notice a rise in the power bill when I installed). It is not a tankless though so it does keep the water hot all the time when plugged in. I originally planned on unplugging it when I when to work and knew I would be away for awhile but I never do since it seems to use little power. What I really liked is the ease of installation; hang it on the wall, hook-up cold water in, hook-up hot water out, and plug it in.
Thanks for looking,
Hutch
 
OP
H

hutch4472

Active member
Joined
Dec 28, 2006
Messages
26
Location
Central CA. foothills
I like the lean too you have on the side of your barn. I would like to add one to my barn for my 28ft travel trailer camper. I am not sure what the best and cheapest way to do it is at this point. It looks like you used steal for your posts and rafters. I was planning on using treated lumber. The only thing I am not sure about yet was how to is fasten my rafters to the barn. I was thinking of just running a 2x12 all the way the length of the barn (40ft) at the very top and then mounting joice hangers to that. Then I would set my rafters in the joice hangers. Then the rafters would run out to the beams which would probably have a 2x12 running on each side of them. Hopefully this makes sense and any other suggestions would be great.

I have attached a picture of my barn. I am planning on putting the lean too on the right hand side. It will go the length of the barn (40ft) and probably come out 10 - 12 feet from the barn.

The lean-to is great, I ordered the shop with it so it was part of the build. There is usually another 5th wheel (33 ft Everest) in it where the Kubota is parked. It belongs to my folks and they are at spring training in Arizona for the month. When their trailer is here it sticks out of the front of the lean-to about 10 or 12 ft and it kinda drives the wife nuts (just looks kinda silly). They bought it after I ordered the shop so i had'nt planned for it. Now I am trying to figure out how to add another lean-to. I am going to look into the cost difference between ordering more red iron or using wood similar to what you described. I can take some more pictures of it if you would like and PM them to you. Maybe that would help you decide if you want to build it with iron instead of wood and how to attach it?
 

e-tek

Well-known member
Joined
Dec 19, 2007
Messages
10,690
Location
Saskatoon, SK
Well ME too!! I hadn't thought of the now obvious choice of a "lean to" beside the shop to store unfinsihed cars, etc out of the weather! It will work perfectly for me too. Every winter I wrap up one of the cars that I haven't started and leave it outside. But that's hard on them....In my shop I have 3 vehicles, one on a lift. Although I have room for 4 (5 with the lift!), I like to have room to work, so I end up leaving one outside. I'd love to have them all protected!
 
Last edited:
OP
H

hutch4472

Active member
Joined
Dec 28, 2006
Messages
26
Location
Central CA. foothills
Well ME too!! I hadn't thought of the now obvious choice of a "lean to" beside the shop to store unfinsihed cars, etc out of the weather! It will work perfectly for me too. Every winter I wrap up one of the cars that I haven't started and leave it outside. But that's hard on them....In my shop I have 3 vehicles, one on a lift. Although I have room for 4 (5 with the lift!), I like to have room to work, so I end up leaving one outside. I'd love to have them all protected!

OK I will take a bunch of pictures on Saturday and send them to you guys. The lean-too is great and I hope to add another one soon.
Hutch
 
OP
H

hutch4472

Active member
Joined
Dec 28, 2006
Messages
26
Location
Central CA. foothills
Looks good Hutch.
South of Placer county?
The country looks familiar, I am north of you I suspect. I'm in western Nev. co.

Thanks, yes Calaveras County. Nice country up there also, I see that area on a fairly regular basis during fire season.
Thanks for looking...
Hutch
 

BoydS

Well-known member
Joined
Apr 28, 2007
Messages
184
Location
South of Houston
Hutch, great shop and the organization is outstanding :thumbup:. I would like to ask a few questions on the plywood and conduit installation.

1. In your 4th pic where all of the tool chest are lined up, I notice the conduit (at the top of the plywood and just below the hose reel) appears to penetrate the steel column. Is this true or is it the camera angle the picture was taken..?

2. I see you have x bracing (typical for a steel building), and it appears that all of the plywood you installed is between this x bracing and the horizontal z girts. But when I look at the pic where your service panel is, I see x bracing to be behind the plywood. So you must have furred that area out a bit more than the other areas. Am I correct on this or am I not seeing the pic correctly..?

3. Your lighting looks great, what are the specs on those fixtures..?
 
OP
H

hutch4472

Active member
Joined
Dec 28, 2006
Messages
26
Location
Central CA. foothills
Hutch, great shop and the organization is outstanding :thumbup:. I would like to ask a few questions on the plywood and conduit installation.

1. In your 4th pic where all of the tool chest are lined up, I notice the conduit (at the top of the plywood and just below the hose reel) appears to penetrate the steel column. Is this true or is it the camera angle the picture was taken..?

2. I see you have x bracing (typical for a steel building), and it appears that all of the plywood you installed is between this x bracing and the horizontal z girts. But when I look at the pic where your service panel is, I see x bracing to be behind the plywood. So you must have furred that area out a bit more than the other areas. Am I correct on this or am I not seeing the pic correctly..?

3. Your lighting looks great, what are the specs on those fixtures..?


1. Yes it does go through the column;
IMG_4027.jpg


2. You are seeing it correctly, the X Bracing near the panel was tight against the girts. So I just went over it. The X Bracing by the shelving was quite a bit out from the girts so I had to go behind it with the plywood;
IMG_4030.jpg


IMG_4029.jpg


3. Thanks, I REALLY like the lighting. It is like "surface of the sun" light in the shop. I have two bulb T8 4 foot Fixtures over my work bench's (I let a guy talk me out of the same T5 fixtures for the work bench's, he said they would be too bright, my mistake) and I really cant tell ANY difference in "brightness" when I turn them on when the T5 lights are on. Also the T5's are VERY easy on power use. I dont recall the specifics except that they are T5's but here is was it says on the receipts
Fixtures: "WMM 551-SR448T5HO-120v High/Low"
Bulbs: "F54/841/HO T5 Flour Lamp
Main lights T5's
IMG_4025.jpg


Workbench T8's
IMG_4028.jpg


Thanks for the interest!
Hutch
 
OP
H

hutch4472

Active member
Joined
Dec 28, 2006
Messages
26
Location
Central CA. foothills
Here are some pictures of the lean-too and a few other things folks asked about.

IMG_4018.jpg


IMG_4019.jpg

50A for Parents 5er
IMG_4021.jpg

30A for our 5er
IMG_4022.jpg


IMG_4023.jpg


IMG_4024.jpg


IMG_4017.jpg


IMG_4015.jpg


IMG_4014.jpg


IMG_4013.jpg


Inside views of lean-to attachment
IMG_4036.jpg


IMG_4037.jpg


IMG_4038.jpg


IMG_4039.jpg


Water Heater
IMG_4032.jpg


Compressor House and Electric Tank Drain. After I directed the drain through the floor it made it MUCH MUCH more quiet. Doesnt scare me outta my boots when it goes phhsssss anymore.
IMG_4034.jpg


Vents
IMG_3990.jpg


IMG_4035.jpg


Thanks again for the interest!
Hutch
 

BoydS

Well-known member
Joined
Apr 28, 2007
Messages
184
Location
South of Houston
hutch ... I like the way you lined the interior with 5/8" plywood and I'm considering doing the same. I've thought about a interior steel liner (similar to the exterior siding), but you can't really hang anything of weight off of it. Is there anything you would like to share as a "lessons learned" from the installation of the plywood..? Something you might do over if you had the chance.

There was a question about insulation. I see that your shop is insulated throughout, but did you add any additional insulation behind the plywood..? If so, does that really do anything for you..? I'm also interested in how well the plywood meets up with the adjacent plywood panel. Did you just **** them up side by side or did you cut a lap or scarf joint along the sides..?

My shop is very similar as it is a steel building as well. http://www.garagejournal.com/forum/showthread.php?t=28512

Thanks..
 
OP
H

hutch4472

Active member
Joined
Dec 28, 2006
Messages
26
Location
Central CA. foothills
hutch ... I like the way you lined the interior with 5/8" plywood and I'm considering doing the same. I've thought about a interior steel liner (similar to the exterior siding), but you can't really hang anything of weight off of it. Is there anything you would like to share as a "lessons learned" from the installation of the plywood..? Something you might do over if you had the chance.

There was a question about insulation. I see that your shop is insulated throughout, but did you add any additional insulation behind the plywood..? If so, does that really do anything for you..? I'm also interested in how well the plywood meets up with the adjacent plywood panel. Did you just **** them up side by side or did you cut a lap or scarf joint along the sides..?

My shop is very similar as it is a steel building as well. http://www.garagejournal.com/forum/showthread.php?t=28512

Thanks..


The plywood works great and is pretty straight forward to install. Make sure the edge of the 2X4 you shoot to the floor is lined up with the purlin of course, so the plywood installs flush. I used 1-5/8 wood screws to secure the plywood to 2X4's on the bottom. Then 1-1/2 screws I found at Home Depot that are self tapping at the tip and have a wide (like 1/4 washer size) flush mount phillips head. These worked really good at securing the 5/8 plywood to the metal purlins. Also I installed the self tappers with a cordless electric impact with a 1/4 collet so I can put a #2 phillips head in it. The impacts work great because of their high rpm. Also painting the sheets white was important.

I did not install any additional insulation behind the plywood, just didnt think it would do any good.

The top of my 1st set of purlins is at about 7-1/2 feet. So I cut the plywood at that length so I could use the tops of the purlins as a shelf instead of having the sheets sticking up 6 inches above them. I then took these 6 inch cut-offs and used them on the seams of the plywood where they met horizontally, this worked out very well. Make sense?

Thanks for the look, now I am going to get some ideas from your shop.
Hutch
 
OP
H

hutch4472

Active member
Joined
Dec 28, 2006
Messages
26
Location
Central CA. foothills
That open spot has lift written all over it.

Man I know it, the main thing holding me back right now is I need to be able to back all of our trailers (enclosed snowmobile, flatbed gooseneck, boat, and mine and my folks fifth wheels) into the shop for maintenance, preferably without any assistance/guidance. I am just not sure if that will be very easy with posts in that bay. How wide is a 2 post 12k lb lift? And I think the smaller bay is just too narrow for a lift.
 
To avoid these ads, REGISTER NOW!
Top Bottom