To avoid these ads, REGISTER NOW!

Help me restore my Plomb box

bart1

Well-known member
Joined
Dec 14, 2010
Messages
1,697
Location
Alabama the Beautiful
(please)

I have been a bit obsessed with plomb for a while, but just recently started actively pursuing adding to the "collection" (I don't really like that word, I like to use all my stuff and the plan was to get Plomb for the rare occasion I need SAE).

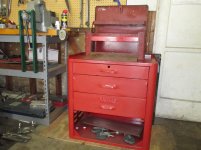
Anyway, I had added a few things recently and really wanted a Plomb box to put them in. I got this one from eBay and it's really in a little worse shape that I was expecting.

null_zps1ca1b9d1.jpg


I lightly scraped and vacuumed and got a little extra rust out of the bottom and also added some cork gasket material. It's usable, but still leaves a lot to be desired.

null_zps5d4a453a.jpg


I guess the first order of business is to get it straight. As you can see there are several bends/warps/dents in it. Advice on how to proceed with that?

Next thing to do would be to get it all operating smoothly. Currently works okay, but when I close it, the loaded tray kind of sags too far down and hangs on the front. Straightening eveything up and removing some of the play in the connections between this tray and the lid should help that. What is the best way to replace hinge pins and support connections?

After this is done, I can move toward refinishing. I guess my thought at this point is to leave the interior alone other than adding rust convertor to the rusty drawer bottoms and putting cork liners everywhere. The exterior, while it won't match anything in my garage, I was planning to go with Rustoleum dark green textured paint to most closely match the original. I might also consider repainting to a hammered texture finish.

After that, I am missing the removable tray that goes in front of the attached one.

I guess the other option would be to try to return or sell this one and look for another, though they are so hard to come by.

Thanks for any advice/guidance/threads you can offer to help out! :beer:
 
To avoid these ads, REGISTER NOW!

930dreamer

Super Moderator
Staff member
Joined
Oct 7, 2009
Messages
22,981
Location
Amarillo,TX and Stinnett,TX
Nice find on the Plvmb box, I wouldn't do anything that would remove the original PLVMB label. I found one like that at an antique store but didn't buy it because it didn't have the label ( I couldn't ID it):(
 
Last edited:

Cab037

Well-known member
Joined
Dec 24, 2013
Messages
184
That's a good looking box! It's similar in construction to a blackhawk box that i bought recently. I was able to drive the pins out of the hinges for the lid and front door so that I could do some straightening on the parts. I think It's worth trying to repair.
 

FJ 432

Well-known member
Joined
Aug 2, 2010
Messages
3,736
Location
Littleton Colorado
I like the box and my only advice would be all or nothing.

Personally, I would straighten and leave it be. I agree with 930 dreamer that the label along with the stamped lid makes the box.
 
OP
B

bart1

Well-known member
Joined
Dec 14, 2010
Messages
1,697
Location
Alabama the Beautiful
Here's my before and after.

You definitely want to remove the lid to straighten out the lid and tray. IIRC the lid hinge pin is peened on. You'll need to drill/grind the end to remove it. The inside tray pins were easy to remove from the lid.

Because your tray is missing, you may want to make something to support the cantilever tray when the lid is closed.

...

I imagine I will need replacement hinge pins then, what should I use?

Can you measure LxWxH of your tray for me? Would a 1/2" drive Plomb box set work in there? I think the dimensions seem about right. If you close yours without the removable tray in there, des the lid tray sag down too far and kind of stick?
 

stratman977

Well-known member
Joined
Jan 26, 2012
Messages
633
Location
Belle Vernon, PA
I have the little brother to this box. I got mine off ebay from someone in southern california and they had the same box as you for sale as well. Might have been the same seller though I cant remember the name. I keep it in the back seat of my truck as a road box.

If you want to match the original finish buy the VHT Wrinkle Finish paint. Then once that paint dries paint over that with the olive green. I used the red wrinkle paint and left it at that because I liked how it looked over the green.

The wrinkle paint is a pain to use and with the multiple shelves and angles you will get runs on any vertical surfaces. I painted mine panel by panel, IE, I painted the back horizontally, let it dry, painted the bottom horizontally, let it dry and so forth. Took forever but it turned out nice. I used a heat gun to cure the wrinkle paint.
 
Last edited:
OP
B

bart1

Well-known member
Joined
Dec 14, 2010
Messages
1,697
Location
Alabama the Beautiful
I have the little brother to this box. I got mine off ebay from someone in southern california and they had the same box as you for sale as well. Might have been the same seller though I cant remember the name. I keep it in the back seat of my truck as a road box.

If you want to match the original finish buy the VHT Wrinkle Finish paint. Then once that paint dries paint over that with the olive green. I used the red wrinkle paint and left it at that because I liked how it looked over the green.

The wrinkle paint is a pain to use and with the multiple shelves and angles you will get runs on any vertical surfaces. I painted mine panel by panel, IE, I painted the back horizontally, let it dry, painted the bottom horizontally, let it dry and so forth. Took forever but it turned out nice. I used a heat gun to cure the wrinkle paint.

I think the Rustoleum textured is supposed to have a similar finish. Unfortunately the VHT only comes in red or black, but as you said, it could be painted over.

I found a much better condition smaller box, but it was more than twice the amount I paid for this one, so I just stuck with this.

And do I even have to ask for pictures!?
 

johnnybentwrench

Well-known member
Joined
Aug 16, 2010
Messages
1,737
Location
Los Angeles
Bart, I have had about 1/2 a dozen trays made for tool boxes. I copied the old snap on style. I just made two for my plomb tool mobile. Take the 1/2 inch drive out of the top its for 3/8 or 1/4 1/2 is to heavy and the lid does not close. Get some wiss seamer pliers
I will post pictures of the trays later if I can just pack it down for know. I also have a new PLVMB sticker but want to make more before I use it:)
 

Attachments

  • IMG_0770.jpg
    IMG_0770.jpg
    137.2 KB · Views: 37

johnnybentwrench

Well-known member
Joined
Aug 16, 2010
Messages
1,737
Location
Los Angeles
Could you place me on your list of interested in purchasing some of these if you make them? Especially if it's the one with the blacksmith in the background. Thanks.

That is the one. I need to find a place to make them
I am up for a group type thing?? John Los Angeles, CA (HOME OF PLVMB TOOLS)
 
To avoid these ads, REGISTER NOW!
OP
B

bart1

Well-known member
Joined
Dec 14, 2010
Messages
1,697
Location
Alabama the Beautiful
Bart, I have had about 1/2 a dozen trays made for tool boxes. I copied the old snap on style. I just made two for my plomb tool mobile. Take the 1/2 inch drive out of the top its for 3/8 or 1/4 1/2 is to heavy and the lid does not close. Get some wiss seamer pliers
I will post pictures of the trays later if I can just pack it down for know. I also have a new PLVMB sticker but want to make more before I use it:)

I'll move the 1/2 stuff. Please do post a pic of the trays you made. I have some Wiss snips and can give this a try (er, tray) with some pliers.

I'd be interested in a sticker as well, I would prefer the naked lady, but would be interested.
 

johnnybentwrench

Well-known member
Joined
Aug 16, 2010
Messages
1,737
Location
Los Angeles
Mine came with the tray it measures 4" X 19" 1/4 no lip any sheet metal shop can knock one out. John Los Angeles, CA
 

Attachments

  • IMG_0790.jpg
    IMG_0790.jpg
    141.3 KB · Views: 39

Smokeshow69

Well-known member
Joined
Dec 7, 2012
Messages
8,393
Location
Pacific Northwest
Man, this thread is rad! All I learned from it is I need a sweet Plvmb tool box! Those trays are really rad and I would also be in for a new sticker!
 
OP
B

bart1

Well-known member
Joined
Dec 14, 2010
Messages
1,697
Location
Alabama the Beautiful
A little progress...

I got everything lined with cork, am working on straightening it more, and have the big stuff moved out of the top. I had some angle iron sitting around that appears to be the right height to frame a tray out of. Making the tray is the next step.

null_zps8b99fe4e.jpg


null_zpsa68379e7.jpg
 

johnnybentwrench

Well-known member
Joined
Aug 16, 2010
Messages
1,737
Location
Los Angeles
Looking good bart1 The box looks nice filled with your plomb stuff. John Los Angeles, CA


always looking and buying for PLVMB Los Angeles marked tools:)
 

WWIIjeep

Well-known member
Joined
May 30, 2012
Messages
1,240
Location
Arizona
Nice find, Bart.

+1 on leaving the inside of the lid alone and saving what remains of the decal.

I'd also suggest treating the rust in the bottom with some kind of rust converter, like Evaporust, which will remove the majority of the rust without harming the remaining paint.
 

Smokeshow69

Well-known member
Joined
Dec 7, 2012
Messages
8,393
Location
Pacific Northwest
Yes, evapo rust is good but sometimes it is too good and will remove the paint. I was thinking maybe soak a rag down with some rust penatrant (pb?) and rub down the effected areas until clean. Then you could either paint them with a brush using a close match on the paint or you could wax them??
 
OP
B

bart1

Well-known member
Joined
Dec 14, 2010
Messages
1,697
Location
Alabama the Beautiful
I added an old plomb socket case in place of the tray that was missing - dimensions were pretty close, but I had to make a sheet metal trat to put under it and sit on the factory side supports.

Made a booboo, though!! I was working on straightening everything and popped the hinge that holds the top tray off the lid. How should I attach it back? I sidn't want to try and weld it, so I attempted a couple repairs with epoxy and super glue, but it does not appear to want to hold.

 
To avoid these ads, REGISTER NOW!
Top Bottom