To avoid these ads, REGISTER NOW!

22' x 12' Single Car/Double Bike Garage Rebuild and comfortization

runt262

Well-known member
Joined
May 22, 2013
Messages
84
Location
Georgetown, ON
Hey Folks,

My name is TJ. My Wife and I bought a house in Georgetown, Ontario back in May. The house was built in 1946. A basic post-war time era house with a whopping 936 square feet with a pretty nice yard. House and garage are detached and the garage is set back and behind the house. Garage is 22' x 12' and is perfect for what I want.

I am going to be transforming this neglected hut into a workable and comfortable workshop. I am not too concerned on getting either of my two car's in there, as the driveway is more flat than the garage. More on that later. I currently have two motorcycle which neither are in riding condition. One is a 1968 Triumph Bonneville and the other is a 1982 Yamaha Seca. Bonneville is completely torn apart, and the Yamaha is together and not running. I will need workspace to get the Yamaha running, and the Bonneville back together and restored.

Along with working bikes(bicycles too), there is always something to do on a house built in 1946. So it will be a basic woodshop.

The most important function, a place to farm chest hair and grunt without causing every town's-woman to come running.

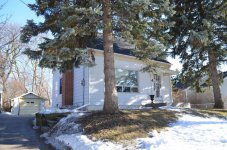
The picture attached is of our quaint little abode, with the garage in the back. I'll be posting down below more of what has been done so far.

Welcome to my money pit.
 

Attachments
  • DSC_0187 - Copy.jpg
    DSC_0187 - Copy.jpg
    156.5 KB · Views: 514
Last edited:
To avoid these ads, REGISTER NOW!
OP
R

runt262

Well-known member
Joined
May 22, 2013
Messages
84
Location
Georgetown, ON
So the building had been a little neglected. It was really just a storage shed for the previous owners. They really didn't have any rhyme or reason, or care with the building. Some shots of what we had to clean up first to even see what we were dealing with. Just a warning, some pictures are awful.


Check the gutters...


After cleaning up, next thing on the list was to take care of the actual structure and drainage. During some of the first few rains in the house, there was a ton of water and dirt that kept seeping through the back of the garage. Water had been coming in the backside of the structure for ages. So much so, that the back 12' had completely rotten sill plates.


I started by tearing off the gross and moldy OSB that was on the walls. And as luck would have it, I found mouse nests, live electrical plugs and a window covered up by the old For Sale sign. Neato.


Once I had the OSB off, I found out how bad the sill plates were. They were toast


So then I got to replacing the sill plates. The plan was to replace the back 12 feet on the sides, then the back wall which is also another 12 feet. So I lifted the walls one at time, then replaced the sills. I replaced the back wall, then the left side wall. I waited for the right side until I got all my supplies to do everything in a weekend.


I will also note, that the pad is absolute garbage. I will eventually be chopping it up a pouring a new pad. Basically, the bottom 4 inches of the garage is rotten or broken. The rest is in good enough condition.

I dropped in a new 2x6 for the sill plates, the paired up the 2x4's with new 2x4's to carry the weight. The old 2x4's were so rotted in some places that there wasn't a struggle to sneak the sill in. Nothing there at all.
 
Last edited:
OP
R

runt262

Well-known member
Joined
May 22, 2013
Messages
84
Location
Georgetown, ON
Re: 22' x 12' Single Car/Double Bike Garage Rebuild - No56k

Next issue to tackle was the drainage. It seems that the PO knew that there was an issue with water and tried to solve the issue, but did it completely wrong.

Grade was actually 4-6 inches above the sill plates. So there was gravel and dirt sitting on the side of the structure. It was helping the rot quick.
Back side

You can sort of see the wet spot on the fencing, where the grade used to be


Dug down as deep as possible. I got down about 10 inches and left about 1-2 inches below the footings. There are a couple of large maples behind the garage and their roots are intrusive. Would have liked to go deeper.


I re-used the O-pipe and laid it down. I am trying to reduce costs on the garage. Only spending money where I absolutely need it. The garage isn't as big of a focus as the house is, so drainage supplies were not high on the list. So instead of digging up gravel and dirt, throwing it away and getting new gravel, I reused what I had.

Made a sifter, then got to work.
 
Last edited:

paranoid56

Well-known member
Joined
Dec 18, 2008
Messages
1,596
Location
San Diego, Ca
Re: 22' x 12' Single Car/Double Bike Garage Rebuild - No56k

um, who has 56k anymore? dont think you need to add that anymore :D :lol: hell, even my phone is 10000000x faster then that :lol:
 
OP
R

runt262

Well-known member
Joined
May 22, 2013
Messages
84
Location
Georgetown, ON
Re: 22' x 12' Single Car/Double Bike Garage Rebuild - No56k

um, who has 56k anymore? dont think you need to add that anymore :D :lol: hell, even my phone is 10000000x faster then that :lol:

Haha, good point. I felt guilty about the size of the pictures. So now they're clickable thumbs.

Continuing on so far. I picked up some cheap, double hung, Pella windows and a door for a man door. From installing the windows, I learned that the back half of the footings have actually sunk a bit. From the outside, the garage does not look like its slumping, but the inside you can see. The distance from bottom of window to top of footing changes by about 1.5" between the two windows. You can see it in the picture. Not an illusion.


Slowly, I am replacing outer wood. I am reusing the OSB from the inside. I am cutting the moldy sections, then sectioning them into where the current outside OSB is falling apart.


And a shot from outside with the windows in. The green tarp in my neighbours garage. Same age, two story, doesn't care as much about his.


So this leads me to where I am now. Currently I am working on getting everything organized. I have garage stuff in the basement, and a garage full of stuff with no place to go. So I have been lucky enough to score some awesome outdoor 9/16" plywood from a friend that will work perfect for making cupboards. I have cupboards galore and a workbench in the works.


I am having a hard time trying to figure out how I am going to be making my workbench. I have an excessive amount of 4x4 beams that I used for lifting the walls. So they will be the main structure. It is going to have full, closed cupboards down below as well.
Tonight I was trying to figure out my capabilities with my tools. Couldn't repeat a good enough seat over and over with cut-offs, so new design it is.
 
Last edited:

Mr. 360

Well-known member
Joined
Nov 23, 2012
Messages
662
Location
Bowmanville, Ontario
Man, so much about this is a clone of my place. I have a 12'x22' detached garage, house is built in the 40's (900sqft too), the sill was buried 4-6" under the grade... my neighbours garage is even old and decrepit with a tarp over the roof. Georgetown is nice too, I like the countryside around that area.

Looks like you're good at re-purposing and reclaiming stuff, and it's nice to see you aren't afraid of tackling some of the 'ugly' sides of the structure.

I noticed you picked up a man door for the structure, huge plus! i know having one makes it so much easier going in and out than rolling the door. Do you have plans for heating? perhaps a woodstove or something?

Looking good so far, it's nice when people give their one car garages a good sorting out, they can end up being as enjoyable to work in as larger shops.

I'll be checking back on this one to see the progress, good work!
 
OP
R

runt262

Well-known member
Joined
May 22, 2013
Messages
84
Location
Georgetown, ON
You're doing a great job. Old places like this can really be terrific. Keep us posted.

Thanks Ed! I'm a big fan of it character. My parents have a nice clean new garage which is nice, but its hard to buy patina like this.

Man, so much about this is a clone of my place. I have a 12'x22' detached garage, house is built in the 40's (900sqft too), the sill was buried 4-6" under the grade... my neighbours garage is even old and decrepit with a tarp over the roof. Georgetown is nice too, I like the countryside around that area.

Looks like you're good at re-purposing and reclaiming stuff, and it's nice to see you aren't afraid of tackling some of the 'ugly' sides of the structure.

I noticed you picked up a man door for the structure, huge plus! i know having one makes it so much easier going in and out than rolling the door. Do you have plans for heating? perhaps a woodstove or something?

Looking good so far, it's nice when people give their one car garages a good sorting out, they can end up being as enjoyable to work in as larger shops.

I'll be checking back on this one to see the progress, good work!

Funny you say that...I was actually talking to my wife a couple weeks back when your garage was top story on the front page. Our places are really similar! Your's looks like its in a lot better condition compared to mine, or at least the concrete pad is.

That man door, my in-laws actually picked it up on the side of the road! Glass is in good condition and everything. A little sanding and fresh paint and the thing should be mint. I love big old heavy wooden doors. Will look real good on the garage. As for heating, I just picked this up from a friend for a grand total of $0. My real-estate agent is a childhood friend and he has been amazing. He has given me about 15 sheets of outdoor 9/16 plywood, plus this Reginald stove for free. Great guy and has a great family.

Anyone know much about these Reginald stoves?
 
OP
R

runt262

Well-known member
Joined
May 22, 2013
Messages
84
Location
Georgetown, ON
Progress has been slow for the past little while. Lot's going on and the garage usually gets put on the back burner. But, my friend who gave me the plywood and the stove found lots of stove piping. Saved me about $300 in insulated chimney pipes. It's about 12 feet of triple insulated piping, plus about 6 more feet of the old single walled pipe.

Today was a bit of a marathon and spent the afternoon in the garage. End up getting the large standing cabinet basically finished, and put in place. I also ended up getting the overhead cabinets cut and assembled. Tomorrow, I am going to pull that old window out and re-frame. The plywood on the outside is flimsy. The midpoint of the window is actually a joint of where 3 sheets of plywood meet. It needs some more support.


Once that is reframed, then the cabinets will get put up. Probably after that, I'll make up some basic doors for the upper cabinets and the large cabinet on the left. But, then organize, organize, organize. I have been kicking things over, moving things around, and hiding things for too long. Having some storage is going to be welcomed. Look at this damn mess...

Also note, I still don't really have anything wired in the garage. I'm working with shop lamps. So once it starts getting organized, everything in the garage will either get rewired.

Hopefully tomorrow I'll be able to get things cleaned up enough to get my toolbox sorted, parts and chemicals put away, and the stove hooked up. Tonight was just a tad chilly, and its only going to get colder.

Also, my company was at a trade show this week, and I was able to get some free stuff. Posters galore. Got the F40, and a bunch others. Most likely going to mount them on MDF and find a home for them in the garage.
 
Last edited:
OP
R

runt262

Well-known member
Joined
May 22, 2013
Messages
84
Location
Georgetown, ON
What a difference a day can make. I had today off of work, so I got some waffles in me a spent a good part of the day in the garage. Although, first I went around town looking to price chimney flashing and cheap hinges. Went to the re-use store in town and they had nothing. Home Hardware and Canadian Tire both had nothing as well. Bummer. Tomorrow I'll be heading to ReStore or Home Depot to see what I can find on my lunch break.

Once I got to the garage, I took a hammer to that crappy back window frame, took the wood out, cut some ply, and a single 2x4. Quick couple screws in top and bottom, expanding foam and voila; a patch.


Window out, then the cabinets up. Took a few times to get it up, since I didn't have an extra set of hands. I ended up using a car jack and jacking up, bracing it. Then lowering and adding 2x4's to get height. Did that until I had the correct height. Threw in a bunch of screws and the cabinet was up.

Spent the entire rest of the afternoon, organizing, throwing out and stuffing on shelves. It is not even close to organized, but at least I have floor space. That was my biggest concern. I was tired of running into things. Anyway, here are a few shots:


Feels like I have an old library from a work area.


Feels good to get this amount of progress done.


To do list:
Exterior - Have to do the bottom boards (1x6's) that have rotted along the bottom. Plus, cut new OSB for the exterior.
Paint exterior white
Trim on the corner's on the back
Cabinet doors
Cabinet Hinges
Make more cabinets for the left side wall
Organize more
Install the stove piping
Peg Board at workbench
Paint for the seizure inducing plywood


Question 1: I have planned for the stove to be placed as the pictures show. Right between the windows. I am also planning on a single sheet of concrete board and then tile half way up the wall to take the heat. What distance from the wall should the stove be? Also what side do you think would be best? I want to do a straight up pipe and go through the roof. The side is an option, but it would look pretty goofy in my yard. Thoughts?

Question 2: I am going to be looking for some paint soon and not sure what colour I should be leaning to. I am cheap, so white is an easy answer. But I am also going to be spending a lot of time in here, so I would like it to be easy to look at. What colour, other than white, should the interior and exterior of my cabinets be? I was leaning towards the same colour Jack Olsen has in his garage. I have some rich, dark wood colour(somewhat) and the green might look good. Thoughts?
finishednocar.jpg


Goodnight Garage
 
Last edited:

Thruxton

Well-known member
Joined
Dec 30, 2010
Messages
767
Location
Virginia
You're making great progress, and have really reclaimed that structure! And underneath the bench, is that a K70 I see on the wheel on the left? I haven't seen one of those rim protectors in a looong time...
 
OP
R

runt262

Well-known member
Joined
May 22, 2013
Messages
84
Location
Georgetown, ON
You're making great progress, and have really reclaimed that structure! And underneath the bench, is that a K70 I see on the wheel on the left? I haven't seen one of those rim protectors in a looong time...

Thanks! Man, do you ever have a good eye. K70 on that one rim. I have a 68 Bonneville and that is the tire that was on it when I bought it. Hard as a rock and in terrible condition. I have a set of Firestone Deluxe Champion Blackwall's sitting under the bench as well. Just not sure if I want to put a square tire on that bike. We'll see.
 

OldMedic

Member
Joined
Sep 6, 2011
Messages
11
Location
Alberta, Canada
Of all the Seca's the 650 is one of my favourites. And is on my list... I prefer the grey but if I had to would take a red.. :) Do you need side panels? I found a set awhile ago, the guy may still have them...

Good job on the refurb of the garage... I am in the midst of my own build... tough to work on bikes and the garage at the same time...
 
OP
R

runt262

Well-known member
Joined
May 22, 2013
Messages
84
Location
Georgetown, ON
Of all the Seca's the 650 is one of my favourites. And is on my list... I prefer the grey but if I had to would take a red.. :) Do you need side panels? I found a set awhile ago, the guy may still have them...

Good job on the refurb of the garage... I am in the midst of my own build... tough to work on bikes and the garage at the same time...

These Seca's are my favourite too. Just enough body paneling. The 750's look too cladded. I don't actually have the side panels, but I'm not going to bother with them. The bike is going to a look a lot different by the time I am done with it.

Thanks for the kind words though! The two bikes have been put aside in the midst of the garage work. No room to even work on the bikes. That will change in the coming weeks though.
 

Thruxton

Well-known member
Joined
Dec 30, 2010
Messages
767
Location
Virginia
Thanks! Man, do you ever have a good eye. K70 on that one rim. I have a 68 Bonneville and that is the tire that was on it when I bought it. Hard as a rock and in terrible condition. I have a set of Firestone Deluxe Champion Blackwall's sitting under the bench as well. Just not sure if I want to put a square tire on that bike. We'll see.

They were hard as rocks when they were new, can't imagine how many cases of road rash they were responsible for. Maybe you can find an old Avon- much better tire, contemporary, and looks great. I agree about the square tires, they look they they are made only to go in a straight line, definitely not suitable for a Bonny!
 
OP
R

runt262

Well-known member
Joined
May 22, 2013
Messages
84
Location
Georgetown, ON
It's been slow progress since my last update. That is for a couple of reasons. Busy with work, and life, but also getting past a milestone(some cabinets) makes you think you have accomplished something big, so now you can coast. That was has happened, but certainly not the case.

I have been trying to consider what to attack next in the garage, but slowly made some doors for my cabinets. Which I am really happy about. Makes it look a lot more finished. But there is still lots to do for me to consider it to be finished.

Another reason for slow progress, is changing your mind. I made cabinet doors, that looked like this:


Didn't like how dimensionless they looked then changed them to this:


It's a bit hard to spot the difference, but the first doors sat in flush with the cabinet dividers. The new ones sit on top of the dividers.
Since putting the cabinets up, I have put in my stereo. Now I have some tunes while working, but not worth taking pictures.

Next step is to wire behind the bench. I'll need power for the CPU and stereo, then 2 outlets for bench lighting and tools. Peg Board will then go up between cabinets and bench. I have also decided on a colour for my cabinets!


Also, decent deal at Princess Auto today! 10 bucks for this rack of 30 bins. So I got two!


Things to do:

Use garage space to install trailer hitch to my VW Golf
Make cabinets for the left wall
Paint all cabinets
Finding flashing and storm guard for chimney
Install concrete board and tiles on wall in prep for wood stove
Install chimney
Finish outside woodwork(1x6's and outer OSB on all sides)
Frame in the Man Door
Cut opening for door and hang new door
Sand and paint new Man Door
 
Last edited:
OP
R

runt262

Well-known member
Joined
May 22, 2013
Messages
84
Location
Georgetown, ON
I had a productive night last night. Made up my last set of cabinets for the time being. I had all those sheets of plywood from my friend that were the perfect size for making a decent, slim, set of cabinets. They measure 3' x 8' x 1' deep. They're pretty long, but they don't have much support from the roof. I'll have to change that and build something to tie into the rafters. Next step is to make some doors.

My brother works for Fastenal and I got a big box of screws from him. Turns out I had the perfect amount for making a work bench and cabinets for the garage. I have 3 left over. Nice calculation.


Cabinets


Once I got them up and things organized, I sat on my bike and thought for a while. I've built everything in the garage so far, by myself. The cabinets, i have measured, cut, assembled, screwed and lifted on my own. My wife has helped out once to lift a big item, but I have been finding ways to jack it up off the floor and hang them myself. It has been really satisfying to see a garage that was once considered a garbage hole, to my workshop. I sat on my crappy old Yamaha and relished in the fact that I finally have a man cave and its something I can call my absolute own.
 

J-man67

Well-known member
Joined
Aug 10, 2012
Messages
218
Location
Delaware
Thats all that matters man! Good to see you fixing it up and using it! Enjoy!

Sent from my SAMSUNG-SGH-I747 using Tapatalk
 
OP
R

runt262

Well-known member
Joined
May 22, 2013
Messages
84
Location
Georgetown, ON
The Christmas season has proven to be a large time consumer. Not much garage time. Had to travel to Montreal a few times for work, along with Christmas trips out of town to see family.

Not to mention, the massive ice storm we just received in Toronto, that went all along Ontario to the East Coast. We have a few Manitoba Maple trees behind the garage that got coated in about an inch worth of ice.


Lots of fallen trees. The neighbours garage took the brunt of the damage, so I luckily got off without damage. Just lots and lots to clean up. Been spending the past two days cleaning up the front and back yard. We're lucky to have such beautiful old growth trees, but unlucky that we have such beautiful old growth trees. They seem to cause the most damage.

So 3 days without power, we decided to head stateside a day early for Christmas with my family. Came back to the damage and clean up.


Progress with the garage:
Started wiring everything back up again! Adding more plugs and lighting. It is still the original 15 amp service to the garage, so I will have to be careful about what I am using. I forsee a lot of popped breakers. I am just looking forward to actual lighting. I've been using the shop lamps for too long.

Found some lights that the previous owners left behind, so I put them above the workbench. I have no idea what I was thinking when I put them so close together though...They will have to move once more.


My Dad made a few gifts for the grandkids, and made a mistake. Hooray! New material to make some drawer organizers with! I forget what kind of wood it is, but it's plywood and too rich for my blood if I had to buy it myself. Already cut, so I just need to trim...and make drawers for these to go into.
 
OP
R

runt262

Well-known member
Joined
May 22, 2013
Messages
84
Location
Georgetown, ON
Been a while since I have updated my thread, and progress has been slower than I'd like, but always more important things that the little garage out back.

Since last update, I ended up finishing the wiring behind my work bench, and got some peg board up and loaded it all up. This was the first and last time that my workbench was this clean.


Soon after the peg board was put up, my turbo in my little TDI ended up failing, so I finally got to use my garage for fun stuff.

While I was working on it, I took the engine out and did some upgrades. Turbo, injectors, clutch, timing belt. All the fun stuff. But holy hell, was it ever a tight fit in the garage.


After the car was fixed, I ended up tackling one side of the garage and finishing up the rest of the sill plates, and I replaced some siding along the side. Pulled off some awfully rotten 2x4's. Sistered up the bad 2x4's with good ones. Lifted the garage wall with a 4x4 and rested the structure on some more 4x4's. I think I have the system pretty well perfected, and only have a small section to replace on the other side of the garage.


So, the walls of the garage are 1x8's, with OSB as my siding. I don't have pictures, but I ended up using some 1x6's to replace the rotten 1x8's, then refitted some decent OSB over top. Still have to paint it, but its getting close.
 
To avoid these ads, REGISTER NOW!
OP
R

runt262

Well-known member
Joined
May 22, 2013
Messages
84
Location
Georgetown, ON
Next project was to jerry rig a lean to at the back of the garage. I wanted to hang bikes and store some yard tools and the like in the back. So I just made the roof out of some spare 2x4's and 2x6's I had lying around. I used the fence as the other wall. I am definitely happy with the function, just not impressed with my build quality on it.


Eventually, I am going to close it completely between my garage and my neighbours. But I just need to correct my fence a little bit.

My wife painted the garage door white while I got my Seca running! Got a much better tank for the Yamaha and am changing it to a Honda tank.


The only thing I don't like about my garage, is the terrible lighting. Some of these pictures are just awful.
Then at one point, I had 4 VW Golf`s in my driveway. I am back down to 2 Golf`s now.

 
OP
R

runt262

Well-known member
Joined
May 22, 2013
Messages
84
Location
Georgetown, ON
Then the latest thing I have done is try to finally stop the rain from flowing inside the garage. Every time it rains, water pours through the front door. Just awful. So I decided to do a temp fix on the threshold. There used to be wood, asphalt and concrete pipes fitted as a dam. None of it worked and looked awful. So I cleaned it up.


I pulled a couple of layers back, and started pulling some gravel and worked on sloping it down so the bricks would be under the footings.


Once sloped, I put the bricks back, but took out a half layer so I could put larger gravel along the footings. I have an perf o-pipe going along the side to the back. So water flows left and goes behind the garage.


White garage door! And the tree stump is gone from the side.


So accomplishments:
Between the garages, the ground is now below the footings.
In front, now below the footings. Major water issues have been, for the most part, fixed.

Need to accomplish:
Man door going out to the yard.
Fix the rotten wood on the yard side of the garage, and paint paint paint.
Fixed the roof. I think I am going to use metal roofing and just go over top.
 

HSpencer

ALLIANCE MEMBER
Joined
Nov 28, 2010
Messages
2,854
Location
South Central US
Just read your thread so far. You have done a great job on that building. The shop is very cozy and inviting, and while you have to a lot of work on it, it is a huge payback. Yours is coming along great. I think your water problem on the door will be solved now. I like all you have done to save this building. It is a pleasure to see the improvements you have done.

Great Job

Best Regards
Herb Spencer
 
OP
R

runt262

Well-known member
Joined
May 22, 2013
Messages
84
Location
Georgetown, ON
Just read your thread so far. You have done a great job on that building. The shop is very cozy and inviting, and while you have to a lot of work on it, it is a huge payback. Yours is coming along great. I think your water problem on the door will be solved now. I like all you have done to save this building. It is a pleasure to see the improvements you have done.

Great Job

Best Regards
Herb Spencer

It has definitely been very satisfying. I can't count how many times people have told me to just rip it down and start fresh. I just can't do that to a build like this. I can't buy character in a new garage. Not to mention, all the lumber and improvements that I have been have been on a shoestring budget. My total bills right now are in the hundreds. A new garage would be in the thousands. Half the fun is tracking down the free/cheap good stuff.


Great work on the garage! I have a really old house as well, and i am curious to see more pics of the house?

Thanks for the kind words!
House was built in 1946. 1 and a half story house. 1 bath and its pretty small. Just a small house all around, but its perfect for my wife and I. Interior was renovated about 5 years ago, so everything has been updated on the main floor. I don't have any interior shots right now, but its been completely opened up


We have some big plans for the house next year. We are currently working out designs for the front yard for some landscaping. We have a terraced front yard, and the house is up and back from the road. We're trying to figure out the best balance between not overwhelming the small house, but making it still look like we did something from street level.

The back yard as well is going to have a bit of work as well. We're going to build up our back deck and make some outdoor living space. It should look pretty nice and we're looking forward to it.
 
Last edited:

sean Buick 76

Well-known member
Joined
May 7, 2013
Messages
3,221
Location
Edmonton Alberta
Very cool! My little house was built in 1925 and it needs some help... I need to build a proper foundation, etc but like yours it has character so I am fixing it up... I have a few pics of the house in page 2 or 3 in my garage build...
 

dubber

Well-known member
Joined
Dec 31, 2012
Messages
5,326
Location
Canada's Capital
Love seeing a single garage getting used to its maximum capacity. Especially one that contains GOLF content. The black one is identical to one of my last dubs; 2010 Golf 2.5 Comfortline 4 dr, black with tint.
 

captain14

Well-known member
Joined
Dec 19, 2012
Messages
7,067
Location
Near College Park Maryland 20740
Nice looking project going on. Do you have any photos of the stove installation process?

The recycled plywood for the cabinets are old signs of some sort?

Where is the man door being installed at? Keep us posted. Even the front and back yard upgrades. It might inspire someone else.
 
OP
R

runt262

Well-known member
Joined
May 22, 2013
Messages
84
Location
Georgetown, ON
Love seeing a single garage getting used to its maximum capacity. Especially one that contains GOLF content. The black one is identical to one of my last dubs; 2010 Golf 2.5 Comfortline 4 dr, black with tint.

Exactly the same car. Such a sweet little thing that we got rid of our 2 MK4 golfs and got two MK6 Golf. One is a wagon though.

Nice looking project going on. Do you have any photos of the stove installation process?

The recycled plywood for the cabinets are old signs of some sort?

Where is the man door being installed at? Keep us posted. Even the front and back yard upgrades. It might inspire someone else.

Stove install wasn't really all that in depth. I just cut a hole in the roof and stacked the pipes on top of themselves. There isn't any bracing or anything. You looking for something specific? It's not really to code, and pretty well to a hack job.

The plywood is actually the old signs from new neighborhood developments in the area. I have a friends Dad who installs and takes them down. They have piles and piles and piles of this wood. I really have a never ending supply of this wood, which is amazing.

Speaking of the door. It went right here:


It's still yet to be finished. I needed to just get it hung so the door could close for the night and day. I have just don't have the bracing above the door, but I also have trim on the outside of the building to do. Before that though, I need to replace the OSB and repaint it.
 

Bookworm

Well-known member
Joined
Dec 13, 2010
Messages
149
Location
Where the wind comes sweeping down the plain
Just saw this thread, I must have missed it last year. I really like watching singles get made over, gives me idea for mine. Eventually I'll post some pics of what I've done to clean up my trashpile.
Keep up the work. I had a small house very similar to yours; built 1946-ish, tract home for the returning GI'S. My garage was attached, but I never did anything with it. Too busy drinking beer and chasing the warm & semi-willings....moved to this place, another single garage.
Just don't seem to learn....
 
OP
R

runt262

Well-known member
Joined
May 22, 2013
Messages
84
Location
Georgetown, ON
Well, worth a report because I hit a milestone this week. Since I finished all of the Sill Plates, I still had the rotten 1 x 6's to take care of, then replace all of the outer OSB on the building. I have finally finished that task. The OSB is new, but not painted, and all of the rotten wood is gone.

Check out the outside. I also added an awesome lamp. Little bit on that later.


Patching process and rotten wood replacement


(ignore that stupid purple door. That's in the burn pile now...)

Keep in mind a couple of things. The water marks on the wood are from way earlier. All of the OSB has been pulled from the inside of the garage. Rotten sections have been cut off and good parts have used. I have kept the wood in a dry place, and the stains are just that. Stains. No more rot, and will get sealed if we have a decent day to throw some crappy temporary paint on before serious snow flies.
Also, I have pretty well ripped off most trim on the garage. That was of course for replacing the 1 x 6's and outer OSB, so once I get the chance, the trim will go back on the garage and give it a more finished look. I will be also plastering the hell out of the sides. All of the joints between OSB will be plastered, then painted over. Siding is out of the question for now...more on that later as well.

The lamp shade has been sitting in my parents basement for years now. They picked it up at a flea market and honestly sat in the basement untouched for 10 years. I mentioned that I wanted an old ceramic, factory lamp shade, and voila. Birthday present for TJ. I got around to hanging it and used some of the parts from the existing flood lamp to make the mount.


I ended up making the arm from conduit, and bend the tubing using a wheel I have from one of my old cars. I pinched one end of the conduit, filled it with crushed glass, crimped the other end, then bent it around the wheel. Cut the excess off, added some fittings, and now I have a beauty of a lamp!


OP
R

runt262

Well-known member
Joined
May 22, 2013
Messages
84
Location
Georgetown, ON
Deviating from the garage for a moment. My wife and I tackled another issue before the winter came.

This retaining wall and the sloping of the yard gave us a bunch of trouble last winter. Because of the grading of the front yard, and the retaining wall, we had to rip the carpet up last winter. We had that massive ice storm, then a massive thaw at the end of February. During that thaw, our eves were plugged and all of the melt water dropped in the garden and sat against the foundation. Not to mention, then retaining wall just held a lot of snow, that ended up melting as well. It had to go, and we had to fix the grading.

Before:
You can see here the height of ground level compared to the bottom of the siding.


Note here the condition of the retaining wall


Before jumping to the after photo's, I need to make note of how amazing free wood is. I have found an endless supply of wood around the corner from my office in the form of pallets. These pallets are 3' x 10 or 12' and held together with staples. All of the wood is in great condition. Take a look at my Jetta Sport 'Truck'. I have grown very fond of this wagon I have.


After about 2 hours, I had close to 700 linear feet of awesome wood.

So what did we do? Well, we moved soil to the front to fix the grading.


The closer to winter we get, the earlier nighttime gets. Those trees on the right of the picture used to be the high spot. All of the water caught between those trees and the house, ended up against the house. Not anymore!


Then out of the free wood, I made this:


OP
R

runt262

Well-known member
Joined
May 22, 2013
Messages
84
Location
Georgetown, ON
It has been a busy couple of weeks on the garage and I have a lot of progress, which I have been happy about. I have the garage sealed up for winter. I have water issues taken care of. During the winter water shouldn't be a problem, as well we during spring thaw is shouldn't be a problem.

I have the grading on the house and the retaining wall taken care of. Cross our fingers that we don't have any more water in the basement.

Next year is going to be big and we are going to get a lot done. The retaining wall and grading is temporary and more of an experiment. We just want to make sure we have the water problem cornered, then invest in landscaping. We are going to be doing a lot along the driveway and on the front yard. Expect updates from that next summer.

From here on in, its going to be a lot of finishing work. I am going to pull a lot of the trim pieces from the edge of the roofing off, pull inside to the heated garage, paint, repair/replace, and mount back on.
All of the trim on the garage is going to get the same treatment.

And as well! If I can continuously get an endless supply of that 1 x 6 that was in the trunk of my car, I am going to make some clapboard siding for the garage. It should match the house pretty good, so I might give that a shot!

This winters projects are also going to be focused on motorcycle projects. Hooray!

I should also note that I am open to a lot of feedback. Anything that you want to suggest regarding the yard landscaping, wrongdoings on my repairs of the garage or house, point it out! It's the only way to learn.

Hope you're enjoying reading it as much as I am working on it.
 
OP
R

runt262

Well-known member
Joined
May 22, 2013
Messages
84
Location
Georgetown, ON
Another long period of time and another set a projects sorted out. It has been a while since I have posted, but there has been a lot that my wife and I have taken care of. Mind you, not everything has been related to my garage. But all has been fun.

Our biggest project really, has been this little girl.


We got her last August. Very long story, but the short of it is, that she ran away for 5 months and it took us that long to get the girl back. Got her back in January. Imagine walking a dog that has very little trust of humans, tail between the legs and every noise makes her scared. Body harness and a collar with 2 leashes, and her pulling in any direction that could be an escape.

Fast forward to today. Lazy dog, lying in the yard. No leash and no care in the world. I am tossing lumber around, chop saw, circular saw, table saw, planer. Dog doesn't care. She understands the good life now. Honestly she has been the biggest project we have taken on. And it has been amazing. Couldn't see life without this mutt now. We're all buds now.


Last we left off on the house an garage was that my wife and I made the retaining wall. Spring came, and summer sprouted. Now we have a garden. We had a few quotes for landscaping and we were looking at about $10,000 for what we wanted done. So we chuckled, and decided to make this ourselves:


Beside the house, where we have that planter made out of pallet wood, we have it leveled out, dark mulch and 4 small globe cedars. I just don't have pictures at the moment.
We are still planning on limestone screening and making the walkway flush with the ground. The biggest improvement is that we don't have water in the basement. Mission: Accomplished.

Aside from that, this picture:


has turned into multiple trips and I have been using this wood for multiple projects. I built new shelves for easy access kind of stuff. Then of course built some wood storage for the wood.


In the picture above, you'll also notice that I tried making some crappy trim for around the garage door. I had full intentions of painting the gaps and trying to pass it off as something that looked nice.
It looked like ****, so I gave up 2/3's through and left it like that for bit. Until, I bought a planer.

Sidenote: How awesome is it buying second hand tools? I bought this Planer off of Kijiji from an guy in his 70's. I love the Baltimore Orioles and I always wear a hat. So that hat struck up a conversation. He lived in Baltimore and loved the city. I used to live there. We ended up talking about where we have been and our lives. An hour passed and we finally remember that there is a tool that brought us here. We exchange the money agreed over the phone, he says "I have bunch of spares. Let me get them for you." Now I have a knife sharpening kit and 4 extra planer blades for it.
Best part was: He bought the planer so he could take the old wood from his dock at the cottage, and plane it, to make furniture for home and workshop. He had the planer set up on the workbench he made from the dock wood. It's always the details that get me.

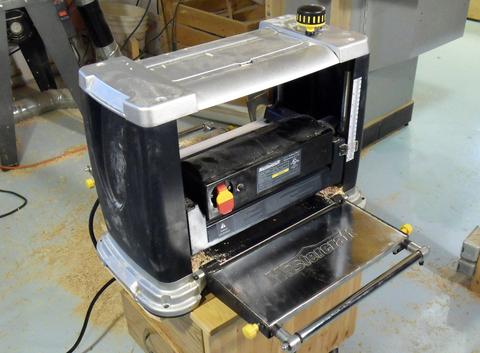
Not my picture, but the exact same planer:

mastercraft_planer.jpg
 
OP
R

runt262

Well-known member
Joined
May 22, 2013
Messages
84
Location
Georgetown, ON
I guess there is enough meat for a new post on the next part.

Then from there, I had all intentions of making siding for my garage. Then I started a production line. The production line took some time because of course, its summer. And relaxation needs to be mixed in.
My Wife with the mutt, taking a break after a lot of cutting, and removal of staples.


So then I began planing all of the wood and making an absolute mess in the garage:


You'll notice I have some framing lumber in there as well. The framing lumber was made into my trim. I started with 2" x 12" x 10'. The trim around the door got planed down to 1.25" from 1.5". Around the door, I cut the trim to be 4.5" wide. The corner pieces and around the man door are 3" wide and 1.25" thick.

Lesson Learned: When planing, make sure to cut both sides down. If you end up cutting down one side, you're going to put a curve in that wood quick. Kind of like dragging scissors along ribbons to make it all curly.

Once planed, I stained a few panels white, then cut them down for overlapping.


Then it was a bit of clockwork after that. It went from this:


To this:


To this:


Then finally:


Long day. Then at the end of the day, speaking with my neighbour, he just gives me this trailer:


Thankful as all hell, but now another project. Definitely not complaining though. This trailer is now going to be a mobile camping kitchen!

So right now, I only have the front of the garage covered in siding. The long term project going into the fall is to cover the entire garage excluding the backside that is covered by the lean-to. No sense in sinking time into the face that won't be seem.
Fall will also come with a new roof on the house and on the garage(finally). The people we bought from put a new roof on the house, about 5 years ago. But they did such a poor job that it has already had sections slide off. I had to go on in the spring and patch it to get us through the summer. This means no more leaks in the garage! This also means that I will likely redo the lean-to in the back and do a proper structure and get that covered properly.

We also had to do some reno's inside the house which involved completely removing the floor and the stairs in the back entrance. Drywall included in this. This started as a simple tiling job, but I still have yet to get rid of all of the garbage accumulated with that.

Biggest thing I am looking forward to: Using all of the wood that I have been hoarding, on the side of the garage and freeing up a lot of space inside and behind the garage. Long long update, but thats where I am now.
 
OP
R

runt262

Well-known member
Joined
May 22, 2013
Messages
84
Location
Georgetown, ON
Picked up an awesome vice for $Free.99 from a family friend. It's one heavy *******, but holy is it ever great. Surface rust/grub all over it, but it still moves so smooth. It has a quick release, so I don't have to crank it out all the way. Head's up for some awesome shots
Does anyone have any information on these vice's? I don't know anything about them


Follow up on that trailer. Spent a couple of weekends at the race track and this thing has been amazing. Carried a bunch of wood and tarps so we could make a shelter, but then it was turned into this. Such a great little find.


And then, I got another project. 1974 Peterborough Grum 150. 15' Fiberglass boat. Currently has a 65hp Mercury on it. Although, I bought it with a spare 75hp Mercury as well. I will be cleaning up the 75 and putting it on the boat and sell the 65.

Bought it like this:


Found a brand new windshield on Kijiji


Gratuitous Hauler Shot
 
Last edited:
OP
R

runt262

Well-known member
Joined
May 22, 2013
Messages
84
Location
Georgetown, ON
More siding progress. Starting to look a lot better now.

Free wood!


Cleaned Free Wood!


Progress, with a dog inspection


Siding finish a la sauna, no paint


Siding Finished and stained


Next step, I am going to be working on one of two things. Roof or carriage doors. I haven't decided yet which I am going to focus on. Likely the roof just because the singles are an absolute mess. Even though I tried my damnedest to make sure the siding was level and straight, the roof makes it look like a wasted effort.

Plus the roof keeps all of my mess inside nice and dry. So! On to the shingle hunt!
 
Last edited:
To avoid these ads, REGISTER NOW!
Top Bottom