Fretters
Well-known member
Be interesting to see how it pans out. Be nice if there was a simple way to get a Japanned finish.

")


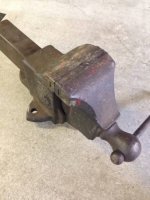
 and getting what appears to be a pretty tough period correct finish, then give this some serious thought. I hope to have the rest of the vise finished up in the next few weeks and will do a full write up then.
I'm very interested in final results. I considering doing this to my 19.
5 Stitches Garage
http://www.garagejournal.com/forum/showthread.php?t=211899
Florida GJ Group
http://www.garagejournal.com/forum/group.php?groupid=117

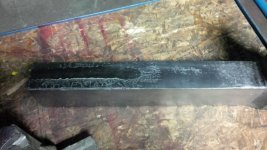
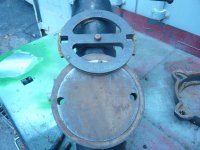
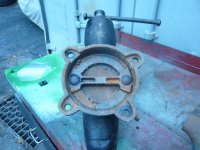
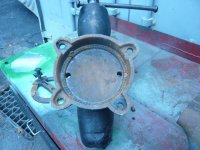
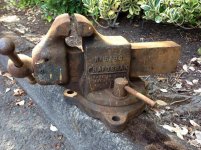
Time for a Japanning update with my Prentiss No. 19. I'll post a whole write up later, but I wanted to get something up here today as I am really happy with the results so far.
Here is where I started:
Which described what I was looking for - the Ford F-102 Spec finish for 1920's Model T's. Perfect!
I started with buying this pre-mixed Gilsonite:
http://www.dickblick.com/products/asphaltum-liquid/#description
The MSDS reads that this is 50% Asphaltum and 50% Mineral Spirits.
I got close enough to the Ford spec by doing a 4:1 ratio of Gilsonite to Linseed oil (I used Boiled Linseed Oil) which, according to my math, gave me a 40% Asphaltum, 40% Mineral Spirits, 20% Boiled Linseed Oil mixture.
So, if you feel like "varnishing your vise with driveway sealer"
McB: Happy to see you are getting great results and also that it is you doing this treatment (Japanning) because you are so thorough and your posts have lots of pictures. best of luck with the rest of the work on your nice Prentiss and i'm pretty sure they didn't paint the lettering. if i were you i'd paint the letters a silver or white or whatever dang color you like, but if it was me i'd probably paint them.
Jeremy: awesome job on those 2 Reeds. looking forward to seeing your Holland's 15 that you are restoring mounted to that awesome bench you built.
Verg: now you are teaching me about swivels for a C3 and a 1780 and making me wish i owned either one or both of those vises. keep up the great work and if you decide to restore one or both of them please post plenty of pictures with the process on this thread if you can.
All: a member PM'd me to add the following. "I would add permatex to the lubricant section. I found a couple guys here use it and tried it with good success." in the future you surely can PM me, but i do check this thread pretty often so please post your suggestions and vise restorations, tips or other thoughts to the thread for all to see and maybe ask questions. thanks


I've straightened several vice handles using my shop press. If you have access to one it would be worth a try.... I bent it back as straight as I could with a torch ...
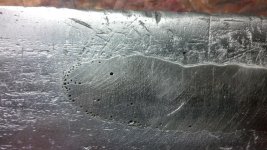
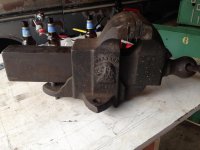
All: I had a GJ member and friend pick up this Monarch 223 vise for me and he has younger eyes and has restored a few vises and still didn't notice this crack on the back top of slide of the dynamic jaw. now it was an honest mistake and this vise will probably work great for another 100 years and just wanted to show what we all see in various degrees of damage.
a lot of the old guys using these old vises used the back of the dynamic's slides as an anvil and hammered on them. maybe just broke off and others have cracks way worse than mine.
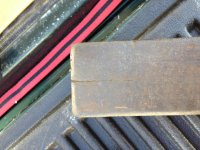
so when i learn to braze or have one of my friends help me repair this i'm wondering if that is the best fix and what would be the best method to do the fix.
i'm thinking that drilling a hole at the end of the crack as i have seen Fretters and others do that will stop the crack from continuing. then maybe taking an angle grinder and cutting a V shaped slot where the crack is now to fill in with a braze weld? then grind, sand or even mill the fix perfectly flat?
any input would be helpful for not only me, but also others that might have a nice vise with the same issue.
by the way this Monarch 223 is a 6 inch wide jaw and weighs over 100 pounds so well worth saving and i do like the lion's head on these old Prentiss made vises.
WOW Carla, as always thanks for all the details. That is amazing.
Carla, many here and else where have stated drilling a small hole at the end of the crack helps prevent spreading as well. Is there a reason you chose not to do this in your repair?
Cheers,
Jeremy
Carla nice explanation, ole fashion brazing lesson, your way of communicating is so enjoyable to read.
I wanted to mention that drilling a hole to stop the crack is good practice. But I also wanted to mention that the crack we see so often is not really a crack but a knit line. When they fill the cavity the molten material meets at that top area, usually the center of the square slider. The knit line is colder material that is already solidifying and does not create a good bond or a good mix. You see this in plastic parts. The knit line is a weak area and must be engineered such that it is in a area that does not see stress. You control this by where the plastic in injected in the cavity, the gate area. I hope this makes sense.
Drivesitfar,
I wonder if a compromise between stitching and brazing could be done. Drill and plug 1 hole at the end of the crack (stops the crack) and braze the remainder? The level of machining i learned at the automotive machine shop was well beneath the experience Carla has shared. What ever you decide i cant wait to see the pictures!.