To avoid these ads, REGISTER NOW!

12x16 Shed build

JimNut

Active member
Joined
Apr 16, 2012
Messages
29
Location
North of Detroit
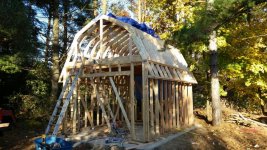
I have been a lurker on here for a long time and recently decided to join and post my latest project. A 12'x16' shed with a Gambrel roof. I have done smaller projects including some house remodeling and building walls & closets in the basement but nothing quite to this scale. I am duplicating a shed that is at my Dad's place with a minor change. His ceiling is only 6' high and I cant even stand up without hitting my head. My shed will have an 8.5' high ceiling. One of the main reasons why I am going as tall as I am is I plan on having a mini "loft" in the back that's roughly 5-6' deep that I will store my quads on when they are not being used. The loft will be a free standing structure so no additional loads will be placed on the shed.

Here is a picture of his shed that I will be duplicating:
FathersShed_zpse6545390.jpg


I live about 40miles north of Detroit and with winter fast approaching, I will need to move quickly so I have time to get a few good coats of paint on it before the weather starts getting to bad. Last weekend I poured the concrete pad and here is a picture shortly after I ran the broom over it.

Concrete2_zps0bbd2438.png


This past Saturday I started laying out the treated base plates (not exactly sure of the official name of them but sounds good enough to me) and anchored them down. Then I framed the rear wall and stood it up. And yes I realize my cut line is no where near straight. The cutter fell off the pole and I honestly just didn't feel like re-floating the pad and finishing it again. It is what it is. :lol:

BackWall2_zps18d8f0e6.png


I got one of the sides up on Saturday and decided to call it a day. Sunday the weather was much nicer and I continued with the other wall. Didn't realize my garage buddy (Chaz) made the photo until just now :lol:

SideWalls2_zps8f5da250.png


And then the front wall
FrontWall2_zps171685e0.png


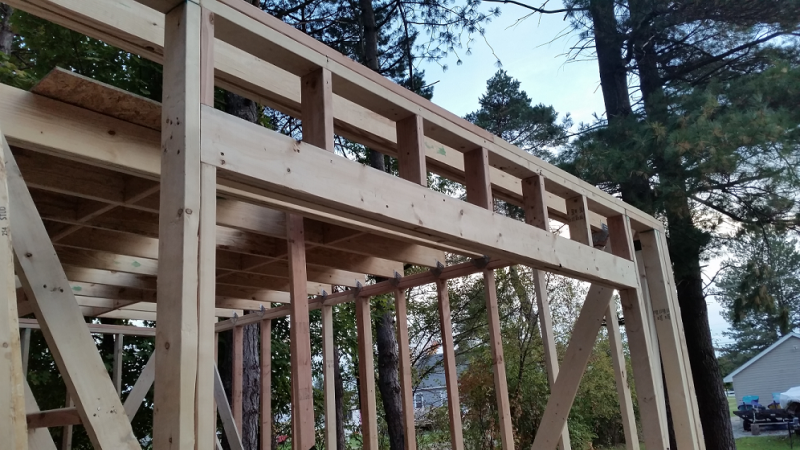
And most of the ceiling Joists
CeilingJoists2_zps4d00b4dd.png


And that's where I stopped Sunday evening. Not to bad for a couple days worth of work. I have been making a few mistakes here and there but overall its going together pretty smooth so far.

Today's goal is to finish anchoring in the ceiling joists and put the bridging in. Also want to put some more diagonal boards on the interior of the walls to help stiffen everything up a bit more.

I know there a lot of very knowledgeable members on here so advice is always welcome!
 
Last edited:
To avoid these ads, REGISTER NOW!

Vegaman_Dan

Well-known member
Joined
Jun 1, 2012
Messages
2,453
Location
Pacific, WA
Did you slope the concrete pad away from the base of the walls? Without it, you might find water pooling up against your walls and leaking inside. I see the ground is lower, so that should help. Gutters will be a necessity for this build.

Why did you go with rafters the entire distance? The primary advantage of a gambrel roof on a 12x16 shed is the option to do truss setup to leave the area open and clear. With a roof peak of 12-13', you have ample space above to put in a partial or full loft and nearly double your storage space.

http://suretraffic.net/ioncube/gambrel-roof-truss
 

bczygan

Well-known member
Joined
Nov 4, 2009
Messages
22,002
Location
DETROIT! Arsenal of Scrappers
Nice size, and a few things you are doing right:

Sill seal (Caulk the outside joint too).

Studs at 16"o.c.

Double top plate.

Treated sill plate.


Questionable

Slab bigger than framing without step down.

Too small header.

Broom finish slab inside.

Pieced together header.

No anchor bolts through sill plate, into slab at 4'0"o.c.

Joint in lower top plate at opening.


Questions:

What foundation?

What wall height?

What ceiling joist size?

What site prep?

What reinforcing in the slab?

What height and size does zoning allow?

Permits?

Where in MI?

How big a lot.

What does house and site look like?

More photos?......We LOVE photos!

Bill in Detroit
 
OP
J

JimNut

Active member
Joined
Apr 16, 2012
Messages
29
Location
North of Detroit
Responses below in red.

Nice size, and a few things you are doing right:

Sill seal (Caulk the outside joint too).

Studs at 16"o.c.

Double top plate.

Treated sill plate.


Questionable

Slab bigger than framing without step down.
The entire slab has approximately a 1.5" drop from back to front. I learned after I finished the concrete that I should have had the slab the same size as the shed. Live and learn I guess

Too small header.
I was thinking that the front header really wouldn't be supporting much weight other than some of the siding since the weight of the roof would be transferred the side walls. If I need to make this bigger I can. I wasn't excited about splicing the boards together either but figured it would be okay. I will definitely look into this further

Broom finish slab inside.
Reasoning behind this? Cosmetic or function?
Pieced together header.

No anchor bolts through sill plate, into slab at 4'0"o.c.
I did use a Ramset to anchor the treated sill plates down into the slab. Not all of them were in at the time of the photos when the walls were going up as I was doing that in sections as it needed to be done

Joint in lower top plate at opening.
Should this have been a single 2x4 spanning the width? I do have both ends of the joint being supported by the double vertical 2x4's where the door opening will be.

Questions:

What foundation?
4" fill sand compacted with 4" gravel on top of that. around the edges of the slab where the shed rests I dug down roughly 30" and filled with crushed concrete to act as a pseudo rat wall.

What wall height?

Overall 8' 6" with the double bottom and top plates.


What ceiling joist size?
2x8x12's 16"OC. Each joist lands on a wall stud.

What site prep?
See above

What reinforcing in the slab?
wire mesh. 3500PSI concrete

What height and size does zoning allow?
Anything under 200sqft and lower than the main structure does not required a permit. Just needs to be 20' off any property line.

Permits?
See above

Where in MI?
Northern Oakland County

How big a lot.
2.5 acres

What does house and site look like?


More photos?......We LOVE photos!

Bill in Detroit
 

bczygan

Well-known member
Joined
Nov 4, 2009
Messages
22,002
Location
DETROIT! Arsenal of Scrappers
Responses below in red.

You're doing some more good things, as indicated by your responses.

A couple of things.

A broom finish is to provide traction on exterior concrete, especially in snow or rain. And it can be too rough and cause ice to stick to it. I like tooled control joints for outside. I like the inside concrete to have a hard, hand troweled finish with saw cut joints.

For the front wall, there are forces acting on it in two main directions. You have considered, and taken into account, the vertical forces (After the header is changed out). But think of horizontal forces against the face of that wall. The top plates act as a beam in the horizontal direction, resisting that force. You have a hinge point in the middle of the upper top plate and 2 hinge points in the bottom top plate. It would be better to have them both full width. And the header should be a couple of 2x8's with 1/2" plywood spacer between.

Don't know what to advise about the structure build with the slab extending past the wall, except using a good quality sealant at the joint, and I would also worry about the wood siding with end grain sitting on the slab. I would hold it up 1/2", and seal and paint. Snow will still pile up against it. You could also install deep overhangs (Easy to do on the front and rear) to keep rain from hitting the walls and flowing down them to the joint. If you use a ridge beam, you could extend it out the front, and install a winch on it to lift things into the attic space. Be sure to transfer the load around the opening in the front of the gambrel attic with a header. Another thing to consider is a shed roof on each side to cover the concrete apron there. Gutters and downspouts with kick outs will also help.

Slab sounds OK. For a floating slab, here in MI, I like to thicken the edge to 8" and run a #4 rebar through it, but I like a little overkill.

Site prep for a slab has always been a problem for me. There is a balance to strike. You want to slope surrounding grade down and away for positive drainage You want to get the slab above the highest abutting surrounding grade, for positive drainage and to keep wood material away from the ground. But at the same time, you don't want the top of slab sitting so high, that a steep ramp is needed to access it from the drive.You want to remove all organic matter under the slab. So what do we fill the excavated space with? If you fill it with porous material, like crushed concrete or sand, then you have a french drain, a perfect place for water to seep into, and then expand when it freezes, and crack the slab. I have decided that sand and crushed concrete, or any material that leaves voids after compacting, is less than ideal. The best material to me, is a crushed limestone with fines, that when compacted, creates a dense, almost concrete like pad. I like to put landscape fabric under this, so the stone doesn't migrate into the soil. I like a continuous and uniform support. Cracking is caused by differential or uneven support. Another reason I dislike sand as a bed, is that if you raise the level above surrounding grade, it tends to flow out from under the edges of the slab, assuming it's angle of repose, and leaving voids under the edge of the slab, where you need it the most. Even 2" compacted sand bases under brick paving, need edging to keep it in place.
Another weak point in foundations is where a footing and slab connect. I like a floating slab inside and unconnected to the footing. Either that, or adequate steel reinforcing to make them one monolithic unit.

BTW, 8'6" is a nice high wall, but how will you sheathe it? Are you getting 9' or 10' sheets? Otherwise you need some continuous horizontal blocking for nailing, and then you end with a joint that needs some Z flashing. A more typical way to build a wall is to use precut 92 5/8" studs, not 8 footers, with a single sill plate and double top plate, for a total wall height of 97 1/8". This works well for interiors finished with a drywall ceiling, but not perfect for a shed with 8' sheathing, although it will do in most cases. If the outside face of the slab lined up with the outside face of the stud wall, you could drop the wall sheathing 1/4" or 3/8", lapping over the side of the slab, to shed water, and then the top would fall in the middle of the upper top plate.

Ramset is nice, but I would be tempted to drill a couple of holes through the sill plates, and into the slab, along each wall, and epoxy some anchor bolts with washers and nuts.

But these are all just those little bit extra things, to make doubly sure the structure is long lasting and serviceable.
It's all in the details.

Bill
 
Last edited:
OP
J

JimNut

Active member
Joined
Apr 16, 2012
Messages
29
Location
North of Detroit
Am I right in thinking you are installing a door in the gable end of the shed, so your quads can go in the attic?
I truly appreciate all of the advice you have given. Like I mentioned in my first post this is by far the largest building project I have tackled so I'm sure I will be making lots of mistakes along the way. Hopefully not to big of one's though!

No quads in the attic. All I'm going to be doing is building a free standing shelf roughly 48" high that I will put the quads on when they are not being used which will be mainly in the winter. This will give me a bit more depth for the garden tractor in the winter when it has the front blade on and weight box hanging off the 3pt hitch.

The loft opening is going to be from the inside with a pull down ladder. In the location for the ladder i skipped a ceiling joist to make enough room. I doubled the joists on either side of the opening.
 

bczygan

Well-known member
Joined
Nov 4, 2009
Messages
22,002
Location
DETROIT! Arsenal of Scrappers
I truly appreciate all of the advice you have given. Like I mentioned in my first post this is by far the largest building project I have tackled so I'm sure I will be making lots of mistakes along the way. Hopefully not to big of one's though!

No quads in the attic. All I'm going to be doing is building a free standing shelf roughly 48" high that I will put the quads on when they are not being used which will be mainly in the winter. This will give me a bit more depth for the garden tractor in the winter when it has the front blade on and weight box hanging off the 3pt hitch.

The loft opening is going to be from the inside with a pull down ladder. In the location for the ladder i skipped a ceiling joist to make enough room. I doubled the joists on either side of the opening.

I like what you did with the 2x8 ceiling joists at 16"o.c., and locating over the studs and doubling at the opening for the loft. I used 2x6's for my 8' span. Framed out a 4'x4' opening into the loft. I also installed an exterior door into the loft, from the gable end, to put long things like lumber up there, from outside. But I just have a 12/12 pitch roof, not a gambrel.

Another reason to put a door in the gable end is to get natural light into there when you are looking for things up there. Or you could install a skylight or transparent panel in the roof......or 120V electrical or battery powered lighting.
 
OP
J

JimNut

Active member
Joined
Apr 16, 2012
Messages
29
Location
North of Detroit
Very small update for today. The weather was less than cooperative yesterday evening so I wasn't able to get much done. I just started getting a rhythm going nailing in the bridging for the ceiling joists when it started to rain. Decided to call it a day and pack everything up

JoistBridging_zps4c0a6c86.png


The weather looks like its going to be much nicer today so hopefully I can make some actual progress after work.
 
OP
J

JimNut

Active member
Joined
Apr 16, 2012
Messages
29
Location
North of Detroit
Well unfortunately progress has been much slower than I had hoped for. Between the weather and other commitments it has left very little time for me to work on the shed. The good news is that moving forward I should have lots of time to get this thing done.

The main consumer of my time this past week has been assisting my dad with pouring a 12' wide x 80' concrete driveway back to his pole barn. It turned out really nice.

DadsDriveway2_zps0c23b1be.png


Now for the minimal progress I have made on the shed. First off is a new header for the door opening. It is now 2x6's with 1/2 plywood between glued and screwed. Definitely a huge improvement in strength.

NewHeader2_zpsef7ee98c.png


I also have all of the gussets cut out for the 2x6 gambrel trusses. This took much longer than I thought it was going to take (doesn't everything? haha). Since I needed to make 78 of them (13 trusses with 6 of them per truss) and I don't own a table saw I loaded up my truck and went to my dads house to use his. Even with the table saw it still took a couple hours to rip everything down. Very happy that is over with now!

here is about 2/3 of the total amount that I cut down
Gussets2_zps345a5e53.png


Today I am hoping to cut all of the 2x6's to length/angle and then start getting a jig put together so I can start assembling the trusses. My goal is to have all of the trusses up on the shed by the end of this weekend.
 

Vegaman_Dan

Well-known member
Joined
Jun 1, 2012
Messages
2,453
Location
Pacific, WA
Watching your shed build with interest.

I just pulled the trigger to have a shed built on my property. I would like to build it myself, but the weather conditions and time are conspiring against me, so having it just DONE is worth the extra for me.

For comparison of what you're doing and what I'm having done will make you appreciate the savings you can get when you invest your own labor and time.

Location: King County, WA State
Size: 12x16 / 192 sq ft
Sidewall: 8 ft
Peak: 14 ft
Roof Type: gambrel / barn style
Roof Truss: Open truss, no cross beams for open space
Floor: 3/4" tongue and groove plywood, 12" centers
8' x 12' loft on one side
Fully finished, seams sealed, 30 year roofing, primed, ready for color coat.

Total: $3600. With Tax: $4000

I decided to go with an upgrade on the sidewall from 7' to 8' because that extra bit of height means I could put in one more shelf around the perimeter, and equates to around 55 linear feet of extra shelving for $200. That is a bargain in my mind. Should help keep the clutter down.

Sheds are fantastic storage solutions. If you have to move to a new property, sometimes you can even get them moved to your new location and that's fantastic. If not, then it just adds to the resale value of your home. I know I plan to attach some plastic pipe to the outside wall away from view with caps to store angle iron and flat stock in 10' lengths that I can seal away from the weather.
 

Vegaman_Dan

Well-known member
Joined
Jun 1, 2012
Messages
2,453
Location
Pacific, WA
Today I am hoping to cut all of the 2x6's to length/angle and then start getting a jig put together so I can start assembling the trusses. My goal is to have all of the trusses up on the shed by the end of this weekend.

You can assemble one loose with clamps and a few quick nails to test fit the truss on your walls and make adjustments as needed. When you are confident it is the right size and works, then lay that on the ground and build new ones on top of it so that all your trusses match what actually works on the shed versus what the plans have. Measurements have a tendency to creep otherwise.
 

zoominomad

Active member
Joined
Sep 10, 2014
Messages
42
Subbed. This is the same size I'm looking at building. Do you have any guess as to how much you are saving vs having someone build? I'm trying to decide between buying a portable and building on a slab. I'll have plenty of time to build myself if it saves enough money.

Also, how many quads are you planning to store in your building? I have 4 and a riding mower that I'd like to store in the same size building, but I'm out of the country and can't measure any of the quads right now. lol.
 
OP
J

JimNut

Active member
Joined
Apr 16, 2012
Messages
29
Location
North of Detroit
Watching your shed build with interest.

I just pulled the trigger to have a shed built on my property. I would like to build it myself, but the weather conditions and time are conspiring against me, so having it just DONE is worth the extra for me.

For comparison of what you're doing and what I'm having done will make you appreciate the savings you can get when you invest your own labor and time.

Location: King County, WA State
Size: 12x16 / 192 sq ft
Sidewall: 8 ft
Peak: 14 ft
Roof Type: gambrel / barn style
Roof Truss: Open truss, no cross beams for open space
Floor: 3/4" tongue and groove plywood, 12" centers
8' x 12' loft on one side
Fully finished, seams sealed, 30 year roofing, primed, ready for color coat.

Total: $3600. With Tax: $4000

I decided to go with an upgrade on the sidewall from 7' to 8' because that extra bit of height means I could put in one more shelf around the perimeter, and equates to around 55 linear feet of extra shelving for $200. That is a bargain in my mind. Should help keep the clutter down.

Sheds are fantastic storage solutions. If you have to move to a new property, sometimes you can even get them moved to your new location and that's fantastic. If not, then it just adds to the resale value of your home. I know I plan to attach some plastic pipe to the outside wall away from view with caps to store angle iron and flat stock in 10' lengths that I can seal away from the weather.

Thank you for the comparison of what it would cost to have something similar built. Currently it looks like I'm going to be around $2,500 for everything all said and done and that is including the concrete pad.

I really cannot wait to get this finished so I can start clearing out some of the garage. Currently taking up floor space in my 20x20 garage is my Camaro, 2 quads, garden tractor, 3 tool boxes, work bench, fridge, roll around cart, 48" shelving unit, air compressor, and a generator. That doesn't include everything in the attic and the other raised shelves I have built. I have done a very good job of organizing everything to get the most useable space but the garage is just simply not big enough. It definitely is not because I have to much stuff either! haha
 
OP
J

JimNut

Active member
Joined
Apr 16, 2012
Messages
29
Location
North of Detroit
Subbed. This is the same size I'm looking at building. Do you have any guess as to how much you are saving vs having someone build? I'm trying to decide between buying a portable and building on a slab. I'll have plenty of time to build myself if it saves enough money.

Also, how many quads are you planning to store in your building? I have 4 and a riding mower that I'd like to store in the same size building, but I'm out of the country and can't measure any of the quads right now. lol.

That's hard for me to say since I did not gather any quotes. Looking at the breakdown Vegaman_Dan gave it looks like I am saving around $1,500 - $2,000k or so building it myself.

I am only planning on (2) quads into my shed. Not sure what type of quads you have but mine measure about 45" wide and a little shy of 5' long. In theory you could put (3) along the back wall and still have room for the 4th quad and tractor up front.
 
OP
J

JimNut

Active member
Joined
Apr 16, 2012
Messages
29
Location
North of Detroit
Last night I pulled the car out of the garage and got a jig setup to help with building the trusses on the floor of the garage.

RoofJoist2_zps79d2342d.png


After I was satisfied with how the boards were fitting together I cut the rest of the 2x6's down to match.

The plan for this evening is to start assembling the trusses. Not sure if I'll get all 13 made with the limited room in the garage and the weather being crappy but we'll see what happens.
 

Vegaman_Dan

Well-known member
Joined
Jun 1, 2012
Messages
2,453
Location
Pacific, WA
You're making good progress now.

Planning on insulating this shed? I've heard pros and cons to this- if it's not heated, don't bother as it will cause moisture issues, but I've heard the opposite as well, so I don't know what is true.
 

zoominomad

Active member
Joined
Sep 10, 2014
Messages
42
That's hard for me to say since I did not gather any quotes. Looking at the breakdown Vegaman_Dan gave it looks like I am saving around $1,500 - $2,000k or so building it myself.

I am only planning on (2) quads into my shed. Not sure what type of quads you have but mine measure about 45" wide and a little shy of 5' long. In theory you could put (3) along the back wall and still have room for the 4th quad and tractor up front.

Thanks! I was hoping for something in that cost range. I've been looking at having one made, and $3500-$4000 is just more than I care to spend on a shed since I'm also planning to start another garage in the spring.

Also, thank you for the measurements! That should be close to mine as well. The only exception is my 400ex with a wide rear axle. The others have stock width rearends.

I love your jig by the way, looks like it will work out great for ya! I'm not much of a construction guru, so I'm curious what the black lines on the osb sheets are for? Did you put those there, or do they come on it? I see them in a lot of peoples pics and have never asked. Thanks again!
 

uncletater

Well-known member
Joined
Oct 6, 2011
Messages
500
Location
China Grove, NC
Looking good. At the end of the day you need to tell yourself it is a shed and it is your first major build. Pat yourself on the back drink a beer or 3 and look at your progress each day.

Excellent work.

Oh and ramsets will be fine to hold things down.:)
 
To avoid these ads, REGISTER NOW!
OP
J

JimNut

Active member
Joined
Apr 16, 2012
Messages
29
Location
North of Detroit
Thanks! I was hoping for something in that cost range. I've been looking at having one made, and $3500-$4000 is just more than I care to spend on a shed since I'm also planning to start another garage in the spring.

Also, thank you for the measurements! That should be close to mine as well. The only exception is my 400ex with a wide rear axle. The others have stock width rearends.

I love your jig by the way, looks like it will work out great for ya! I'm not much of a construction guru, so I'm curious what the black lines on the osb sheets are for? Did you put those there, or do they come on it? I see them in a lot of peoples pics and have never asked. Thanks again!

Not a problem at all! I took those measurements off of my Banshee and YFZ450. Might vary a bit for you but should be in the ballpark for sure. The Jig has been working pretty good. The OSB comes with the lines already painted on. I used them to verify the sheets were correctly located so I could move the sheets if I needed to and be able to put everything back in the same spot. So far it is working great.

Looking good. At the end of the day you need to tell yourself it is a shed and it is your first major build. Pat yourself on the back drink a beer or 3 and look at your progress each day.

Excellent work.

Oh and ramsets will be fine to hold things down.:)

I really appreciate the kind words. Since this is my first real build I have been doing a lot of reading and research trying to find the correct way to do things. The only problem with that is it seems there is 100 different ways to accomplish the same thing and with all of the conflicting information information out there it gets a bit difficult at times to decide which is the right way to go. But like you said, its just a shed.
 
OP
J

JimNut

Active member
Joined
Apr 16, 2012
Messages
29
Location
North of Detroit
So yesterday after work I went out to the garage and planned on assembling all of the trusses. If I've learned anything so far it is how badly I underestimate just how long it takes to do some things. After I got a system going I was able to build a complete truss in about 25 minutes. First I would lay the 2x6's into the jig and then lay the plywood gusset on top to trace out the area that I needed to apply the glue. Then I drilled (4) pilot holes into the gusset (2 per board). After applying the glue I would set the gusset in place and put (4) screws to hold it tightly against the boards so I wouldn't have to clamp it. Then I would drive in 12 nails in each gusset (6 per board).

I didn't realize/think about just how many nails I would have to put in. Since I didn't think about this, of coarse I didn't have an air nailer which would have made everything much easier. Each truss has (6) plywood gussets and each gusset gets 12 nails which makes each truss require 72 nails. Multiple that by 13 and you get 936 nails just for the trusses :eyecrazy:

Yesterday I got 8 of them built and ran out of nails. I should be able to finish the other 5 this evening and I will be so happy when they are finished. This has been by far the part of the build I have disliked the most. Everything else has been pretty enjoyable so far.

Trusses_zps2f50879b.png
 

zoominomad

Active member
Joined
Sep 10, 2014
Messages
42
Good looking trusses! Sounds pretty time consuming. I'm currently flip-flopping between Gambrel and Saltbox, but haven't decided which way I want to go.
 
OP
J

JimNut

Active member
Joined
Apr 16, 2012
Messages
29
Location
North of Detroit
Well it was a very productive weekend for me. Friday night I finished assembling the remaining 5 trusses. Saturday I didn't get a chance to work in the shed but I more than made up for it on Sunday. First thing I did Sunday was was to put down the OSB I'm using for a floor in the loft. After that was done I started hoisting up the trusses and setting them in place. Overall that was much easier and went quicker than I thought it would go.

5a4e1700aaeb9eabda7012380a1c897f.jpg


After I had all 13 trusses up I started planning my overhangs. The overhangs are going to accomplish a couple things for me. First they will extend past the concrete pad so less water will pool on the cement from the roof. Secondly they allow me to get by with 8ft side paneling without the need for multiple sheets and z channel. Thirdly I think they give a nice finished look to the structure.

The current plan is to finish framing the overhangs this week and if all goes well, lay down the roof panels and tar paper this weekend. Seeing the trusses up and the shed starting to take shape is very motivating. I know there is still a lot of work left but I feel like I passed a pretty significant milestone.
 
Last edited:
OP
J

JimNut

Active member
Joined
Apr 16, 2012
Messages
29
Location
North of Detroit
Figured I would post a picture showing where I am at. The overhangs are finished and small is really have left to do before I can start putting the sheeting on is frame the gable ends so there is something to nail the siding to. That should be finished tonight.


One question I do have is what thickness OSB I should use for the roof? I realize plywood is better but due to costs I'm going to go the cheaper route and use OSB. With that being said since I'm on 16" centers what would be the best to use? Thanks
 

Attachments

  • uploadfromtaptalk1414100144232.jpg
    uploadfromtaptalk1414100144232.jpg
    156.4 KB · Views: 88

brass89

Well-known member
Joined
Sep 15, 2014
Messages
240
Looks good so far. I'm guessing you're doing a shingle roof. Being near detroit I'm going to assume you get a fair amount of snow. At 16" centers on the trusses, I'd think 1/2" osb would work if you're going with osb. Some use the 7/16" and it's rated for roof sheathing but the 1/2" is only a dollar more a sheet in my area. Given the 16" centers and the gambrel roof, doubt it'll have to support much snow. Especially with a decent pitch on the uppers and almost no build up likely on the lowers (since they're almost vertical). I deal with snow in the midwest, though not as much as you.

If someone with conditions closer to yours says you need thicker, they're probably right. I'm all for cost savings, but it's no good having a sagging roof. I feel your pain, just about to start framing my (smaller) shed..no air nailer here either lol.
 
OP
J

JimNut

Active member
Joined
Apr 16, 2012
Messages
29
Location
North of Detroit
Well the shed now has a roof. I ended up using 1/2" OSB with H clips and everything feels rock solid. I'm happy I didn't try to use 7/16".

This afternoon I'm picking up some scaffolding to make paneling the gable ends easier. Hoping to have all of the paneling up by the end of tomorrow. Then maybe start putting the shingles up. The weather is going to be great this weekend so I want to get as much done as I can.
 

zoominomad

Active member
Joined
Sep 10, 2014
Messages
42
Lookin' good! I meant to say what width did you go with for your overhang. I was thinking of doing a similar overhang, but I plan on having a side door, and was afraid the overhang would be in the way of the door.
 

Kevin54

MEMBER EMERITUS
Joined
Jan 12, 2005
Messages
29,341
Location
Urbana, Ohio
Glad to see that you changed the header. Much better now.

One thing you did wrong, and it was already pointed out, your slab is bigger than the shed. This will allow snow, ice, water to lay against the outside, and also against the siding which will eventually rot it out, unless you go with a weatherproof board of some sort at the bottom.

If you can, cut a saw slot around the outside, using your bottom plate as a guide, then flash the wall before you side the building. You can bend up the flashing, drop one edge into the saw slot, "Z" bend it, and run it up the wall. This will keep any water from wicking underneath the bottom plate, plus it will keep your bottom plate dry. I can give you a drawing if you don't understand what I am talking about. But with the way the slab and building is, you are going to have some problems.

Normally, your slab is supposed to be the same size as the dimensions of your framing footprint. Then when you add your siding, it overhangs the slab and prevents water from reaching any of the framing. What you have, can be repaired, but it will involve cutting your slab some. You can try to caulk it, but that is only a temporary fix, as with the wood and concrete, plus extended periods of moisture, the caulk will soon give out.

Other than that, killer job for sure.
 
OP
J

JimNut

Active member
Joined
Apr 16, 2012
Messages
29
Location
North of Detroit
Lookin' good! I meant to say what width did you go with for your overhang. I was thinking of doing a similar overhang, but I plan on having a side door, and was afraid the overhang would be in the way of the door.
The overhang is 12". From the bottom of the overhang to the slab it is about 7' tall.
 
OP
J

JimNut

Active member
Joined
Apr 16, 2012
Messages
29
Location
North of Detroit
Well I got the siding up on the two side walls. Going with the LP SmartPanel from Home Depot. I will have trim on all of the edges so the little gaps won't affect anything.

42fbdcd8137b10df4874cb3b46efe63e.jpg
 

zoominomad

Active member
Joined
Sep 10, 2014
Messages
42
You're doing an awesome job! I hope that I can make progress as quick as you are once I get started!! What made you decide to go with 12x16? I'm driving myself crazy trying to get locked in on a size to go with.
 
OP
J

JimNut

Active member
Joined
Apr 16, 2012
Messages
29
Location
North of Detroit
You're doing an awesome job! I hope that I can make progress as quick as you are once I get started!! What made you decide to go with 12x16? I'm driving myself crazy trying to get locked in on a size to go with.
There are two reasons why I decided to go with the size I did. First my township does not require a permit for anything less than 200 Sq ft so I wanted to build as large as I could without having to deal with inspections slowing me down. Second is my dad has almost the same shed that I am duplicating. Since this is the first time I've done this it is nice to have another shed to look at and copy. Only real change I made was making it 2ft taller and upsizing some of the lumber.
 
OP
J

JimNut

Active member
Joined
Apr 16, 2012
Messages
29
Location
North of Detroit
Well it has been a very productive weekend. All the siding is up, roof sheathing is fully screwed on, sofit vents installed, drip edge is on and half the roof is tar papered. Ran out of daylight to get the other side papered and didn't feel like doing it with the halogen work lights. I'll post some more pictures tomorrow. For now all I have is one when I finished the front siding.

c5cc7b037ae0ec12cd5364ed9e6812d4.jpg


Tomorrow i need to get the rest of the tar paper up since we are supposed to get some rain early this week. I'm most likely going to hold off on putting the shingles up until next weekend since i dont have much daylight after work. This week im going to start tackling the trim and maybe work on building the doors.
 
To avoid these ads, REGISTER NOW!
Top Bottom