You are using an out of date browser. It may not display this or other websites correctly.
You should upgrade or use an alternative browser.
You should upgrade or use an alternative browser.
Rod's garage - laying the porcelain
- Thread starter Rod N
- Start date


Acuratechva
Well-known member
Looks like a looooot of work  the good kind. Have you selected exact tile to be used yet?
the good kind. Have you selected exact tile to be used yet?
Shea
Well-known member
Rod N, there is a lot of good advice on this forum regarding porcelain tile if you do some searching and it may make you aware of other things you may not have considered.
As far as laying it out, I wouldn't recommend starting in the corner like that. Rooms are rarely square and as you build out from there it can start causing all sorts of problems.
It's generally best to start your first row all the way across the front at the garage threshold and build out from there. That way any discrepancies in the room not being square are taken care of at the sides where you will cut the tile to fit. It also helps tremendously to lay a few chalk lines to keep things running straight.
It's usually best to measure it out side to side not forgetting to include your grout width before you start. The tiles that are cut to fit on either end look much better when cut to fit in larger pieces. By doing this you don't run the risk of one side of the garage not running true when trying to use a full tile without cutting.
This will also allow you to find the center tile row in order to lay a chalk line to help keep things running straight.
If you haven't found it already, read Dakota's thread here on his garage tile build. He does tile as a living and gives good pointers. I believe he did his garage one half at a time.
I'm sure there will be others glad to help you out as well.
As far as laying it out, I wouldn't recommend starting in the corner like that. Rooms are rarely square and as you build out from there it can start causing all sorts of problems.
It's generally best to start your first row all the way across the front at the garage threshold and build out from there. That way any discrepancies in the room not being square are taken care of at the sides where you will cut the tile to fit. It also helps tremendously to lay a few chalk lines to keep things running straight.
It's usually best to measure it out side to side not forgetting to include your grout width before you start. The tiles that are cut to fit on either end look much better when cut to fit in larger pieces. By doing this you don't run the risk of one side of the garage not running true when trying to use a full tile without cutting.
This will also allow you to find the center tile row in order to lay a chalk line to help keep things running straight.
If you haven't found it already, read Dakota's thread here on his garage tile build. He does tile as a living and gives good pointers. I believe he did his garage one half at a time.
I'm sure there will be others glad to help you out as well.
Acuratechva
Well-known member
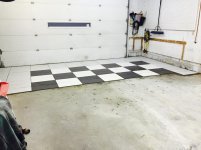
Starting in the corner.
Any advice is appreciated.
When doing my garage i found out that my walls weren't parallel to each other. Depending on how picky you are you may want to go off the two sides that are most visible. Looking in to how perpendicular or parallel sides really are is a good idea. By the time you get to the other side of the garage a simple molding may not be enough to cover the gap
Thanks for the tips gents.
I have spent many hours researching here and have done 2 floors elsewhere so this isn't my first go.
Did 8 tiles on the side so I would get my feel back for doing tiles.
Now I will turn my attention the entrance and work back into the room.
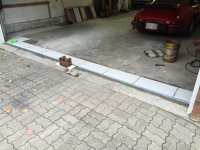
Next is the entrance which I admit I have never done. How hard can it be? Lol
I have spent many hours researching here and have done 2 floors elsewhere so this isn't my first go.
Did 8 tiles on the side so I would get my feel back for doing tiles.
Now I will turn my attention the entrance and work back into the room.
Next is the entrance which I admit I have never done. How hard can it be? Lol
Attachments

motofool33
Well-known member
subscribed

Kevin54
MEMBER EMERITUS
Rod......although too late now, most floors getting tiles....you start on the middle and work left and tight of the center row, front to back of the center row. You do this for the fact that you want the same tile size against each wall. Starting in a corner, you may end up with a 1" sliver against the opposite wall.
Same way when putting in grids for ceiling tiles, you snap your line through the middle of the room, side to side, front to back, and work both ways off of that.
Same way when putting in grids for ceiling tiles, you snap your line through the middle of the room, side to side, front to back, and work both ways off of that.
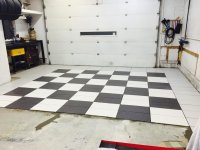
^^^ I agree, but the wall that I started with is the one you will see.
The opposite wall has stairs, doors etc so it will be zig zagging all over the place.
I did measure it and it is parallel for the most part so can adjust as I ge started.
3 hours in I'm pretty happy with my progress.
The opposite wall has stairs, doors etc so it will be zig zagging all over the place.
I did measure it and it is parallel for the most part so can adjust as I ge started.
3 hours in I'm pretty happy with my progress.
Attachments

Dakota00
Well-known member
Rod,
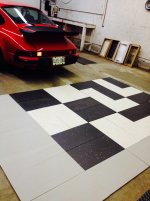
Did you dry lay your checker pattern to see how the grout joints will work with the white tiles going a different direction than the rest of the tiles?
Did you dry lay your checker pattern to see how the grout joints will work with the white tiles going a different direction than the rest of the tiles?
OJ Bartley
Well-known member
Next is the entrance which I admit I have never done. How hard can it be? Lol
Your transition looks great. I love seeing more detail and more ramps used, it proves I'm not crazy for adding one myself. I wish I had thought to leave a nice big weight to keep the ramp straight like you did, I had a little movement on mine before it set. Not enough to be a problem, I don't think, just enough for me to know it isn't perfect and bother me.
Good work so far, and I'll follow along to see how you do! I definitely won't challenge you to a tile race, even with your larger area because I'm taking the tortoise approach to mine.
Edit: how do you find working with the large tiles? Are they tough to handle and to keep level? Back buttering them must be a bit of a pain, based on my experience with 13 x 13 tiles.
I bought the tiles last fall from a supplier that had extra after an industrial job,
so I had many hours of laying out tiles (and beers) to figure out what pattern I wanted.
All tiles will run in the same direction as different grout widths would have messed with my head too much.
The larger tiles are no problem working with, but you go through thin set very fast.
so I had many hours of laying out tiles (and beers) to figure out what pattern I wanted.
All tiles will run in the same direction as different grout widths would have messed with my head too much.
The larger tiles are no problem working with, but you go through thin set very fast.
Attachments
Acuratechva
Well-known member
Loving it! You dont have a brand or model name for black and snow white tiles do you? Some close ups would be great if you find yourself taking more pictures.
James-W
Well-known member
I like the way the tiles look. How much prep work did you need to do to the floor before you started laying the tiles?

gerryw
Well-known member
Its one thing to have a few beers while tiling, but a whole pail of wine???
Maybe change the thread to "lying in the porcelain"
Looks fantastic!!!!
Gerry (oshawa)
Maybe change the thread to "lying in the porcelain"
Looks fantastic!!!!
Gerry (oshawa)
Last edited:
Acuratechva
Well-known member
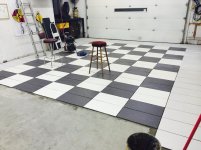
Al approves!

James-W
Well-known member
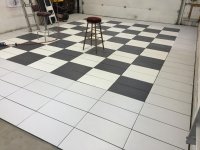
Looking REALLY nice! You will have the nicest looking garage floor for many miles around when you get it done.
I wouldn't mind having porcelain tile in my garage, but if I did I would have to hire it done. Between the arthritis in my hands and my bad knees and my bad back, it would never get done if I had to do it. Plus, I would never get the tile flat and straight.
I wouldn't mind having porcelain tile in my garage, but if I did I would have to hire it done. Between the arthritis in my hands and my bad knees and my bad back, it would never get done if I had to do it. Plus, I would never get the tile flat and straight.
Scottishross
Well-known member
- Joined
- Apr 2, 2012
- Messages
- 621
Looks great mate
motofool33
Well-known member
Are you having any issues with the tile lipping and not being consistant?
From the pics it looks great
From the pics it looks great
Are you having any issues with the tile lipping and not being consistant?
From the pics it looks great
Very little, but there are some spots that might be a couple of mm's out.
Not enough that my jack will start chipping tiles or anything.
If any of my buds point it out they can bring their own beer!
And thanks!

motofool33
Well-known member
lookin good man
OJ Bartley
Well-known member
Rod, I thought I had subscribed to your thread, but I guess not, because I haven't been getting updates. It looks fantastic! You sure earned that massage... 600 sq ft!? I can't even imagine the pain. You must be going through all the stages of inspiration, regret, pain, depression, urgency, panic, desperation, and then inspiration again that I am.
Rod, I thought I had subscribed to your thread, but I guess not, because I haven't been getting updates. It looks fantastic! You sure earned that massage... 600 sq ft!? I can't even imagine the pain. You must be going through all the stages of inspiration, regret, pain, depression, urgency, panic, desperation, and then inspiration again that I am.
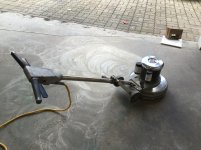
It's been a long haul OJ. 2 days grinding the floor. 6 days to lay the 400 square ft of tile you see above. It takes about 2 hours to grout 90 sq. ft. or so and I have been doing one shot each night this week.
I still have to move the benches and do under them.
Then the walls I will go up one foot.
I don't think I'm 1/2 way yet