
You are using an out of date browser. It may not display this or other websites correctly.
You should upgrade or use an alternative browser.
You should upgrade or use an alternative browser.
VISE REPAIR 101 all vise repairs, lubricants, sources for parts and the tricks to fix
- Thread starter drivesitfar
- Start date
OP
drivesitfar
Well-known member
Gunpowder: once you attach you have to load them with another button before you post them. keep trying and you'll figure it out or ask for help if you are still stuck.
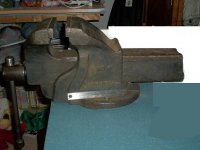
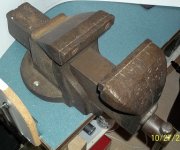 Steps 4 and 5 do not appear on my computer when I attempt to upload pictures... I have reduced pixels to 620 wide x 280 high.
Where is the "Current Attachments"? All I see is 'Upload File from URL'... nothing below that.
I would so like stop those flashing smilies...!
Should be 4 pictures here... managed to attach 2 of 4 pics in previous post somehow. The small upside down pyramid beside the paperclip brought up something different than what I see now.
No attachments in preview... I give up for tonight.
I have attempted to follow the example http://www.garagejournal.com/forum/attachment.php?attachmentid=194042&stc=1&d=1340912646 > a half dozen times... steps 4 and 5 are missing entirely from my screen.
No attachments in preview... I give up for tonight.
I have attempted to follow the example http://www.garagejournal.com/forum/attachment.php?attachmentid=194042&stc=1&d=1340912646 > a half dozen times... steps 4 and 5 are missing entirely from my screen.
Outlawmws
Well-known member
That vise has a very "Record" or "Paramo" look to it. Not surprising, since those are English made.
Outlawmws
Well-known member
Where is the "Current Attachments"? All I see is 'Upload File from URL'... nothing below that.
I would so like stop those flashing smilies...!
Step 4 is a right click 5 is click on the copy link, and then the unlisted step six was in my text, about using the post card then pasting.
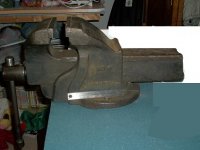
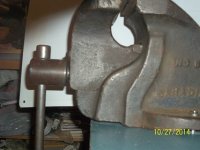
Ok... it seems when I cropped two of the pictures in Office 2010, then opened them in paint to reduce the pixels, I did something wrong... I think I have things right now... let us not drop the vise on one's foot... All 4 pictures should be there now... the vise is 6" wide at the jaw. Side View with Rule is a 6 inch ruler. 20 inch long by 9" high. Opens to 9 inches.
Attachments


Fretters
Well-known member
That's a nice vice.  Regarding your little problem with it, you should likely have a spring, washer and pin on the leadscrew. The spring may be damaged or the retaining pin may have dropped out. Unscrew the leadscrew so that you can remove the front jaw, and then you can turn it over and inspect it properly. There are photo's somewhere in this thread showing the spring setup on the English style vices.
That's what I thought too. One notable difference is that extra metal to the front of the uprights on the rear jaw assembly. Not seen that particular styling on anything else which I can recall.
Regarding your little problem with it, you should likely have a spring, washer and pin on the leadscrew. The spring may be damaged or the retaining pin may have dropped out. Unscrew the leadscrew so that you can remove the front jaw, and then you can turn it over and inspect it properly. There are photo's somewhere in this thread showing the spring setup on the English style vices.That vise has a very "Record" or "Paramo" look to it. Not surprising, since those are English made.
That's what I thought too. One notable difference is that extra metal to the front of the uprights on the rear jaw assembly. Not seen that particular styling on anything else which I can recall.
Last edited:
Further inspection revealed a very short coil spring (appr. 1") on the ACME screw just behind the live jaw. Retained by a "U" shaped piece of wire. The air gap between the front of the live jaw and handle boss the varies from 1/4" nearly closed to 3/8" fully open. The jaws will open to 9". Going any further allows the ACME screw to drop out.
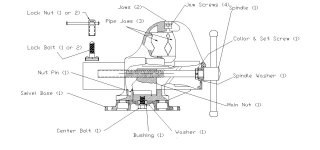
Would help if I had a line drawing with the proper nomenclature of various parts, and especially any bearing surfaces. The live jaw is part of a slide; the slide has a raised wear pad running its' full length on both sides.
Would help if I had a line drawing with the proper nomenclature of various parts, and especially any bearing surfaces. The live jaw is part of a slide; the slide has a raised wear pad running its' full length on both sides.
OP
drivesitfar
Well-known member
Gunpowder: i think you have the pictures figured out and congrats for hanging in there and learning the process. your vise has all the appearance of an old Record and Paramo vice so you might want to search this forum for those vice restorations to see if you see what your issue might be.
also if you can take a few more pictures of the underside where the problem probably is that would help the experts on this thread that have those vices.
good luck and your vice looks like a keeper and should great once you get it sorted out and fixed.
also if you can take a few more pictures of the underside where the problem probably is that would help the experts on this thread that have those vices.
good luck and your vice looks like a keeper and should great once you get it sorted out and fixed.
Fretters
Well-known member
The jaws will open to 9". Going any further allows the ACME screw to drop out.
Once the screw disengages from the nut, you should be able to slide the front jaw assembly clear of the rear jaw assembly/housing. The screw & spring setup will likely be something like this.

This is what it looks like when fitted.

The build of a vice is fairly straight forward. The parts will look something like this, so as you can see, they're fairly simple and straight forward to disassemble.


Yours will have minor cosmetic differences, but the basics will be the same.
Last edited:
jakemac
Well-known member
Would help if I had a line drawing with the proper nomenclature of various parts, and especially any bearing surfaces. The live jaw is part of a slide; the slide has a raised wear pad running its' full length on both sides.
Here's one of an american made vise from the main page at Viseparts.com. Other manufacturers may have variations in the parts used.
Attachments
Last edited:
Fretters
Well-known member
Just for future reference, I finally found out who the manufacturer is of that unnamed grey vice I posted photo's of above, today. It's a Parkinson Handy vice. Dropped across a photo of a smaller model, but with the same RD number on the side, and the remnants of a decal/sticker on the front jaw.
OP
drivesitfar
Well-known member
Fretters: are you talking about Gunpowder's vise being a Parkinson?
ALL: doing a little search for a nice vise i came across this little guy that looks like it has a bent piece of rebar for a handle. anybody seen a Franklin vise before because it's not on our list?
Edit: i just noticed VA has Franklin on his new list on post #424 that i need to add to post #2. nice work VA!!!!
ALL: doing a little search for a nice vise i came across this little guy that looks like it has a bent piece of rebar for a handle. anybody seen a Franklin vise before because it's not on our list?
Edit: i just noticed VA has Franklin on his new list on post #424 that i need to add to post #2. nice work VA!!!!
Attachments

Last edited:
Fretters
Well-known member
Fretters: are you talking about Gunpowder's vise being a Parkinson?
Nope. That originally grey one above of mine, which I posted the photo's of to show him the various parts. That's the one which we thought might be a Paramo, if you recall. The only identifier on it is that RD689821 number on the cast, with no manufacturers mark. This one:

It's taken a few months, but finally solved the mystery of whom the manufacturer of those was.
Nope. That originally grey one above of mine, which I posted the photo's of to show him the various parts. That's the one which we thought might be a Paramo, if you recall. The only identifier on it is that RD689821 number on the cast, with no manufacturers mark. This one:
It's taken a few months, but finally solved the mystery of whom the manufacturer of those was.
Do you buy that color (sorry colour) paint by the bucket (liter of course)
?Looks good. The handle seemed to have quite a bit of pitting compared to the rest of the vise, no vice?
Fretters
Well-known member
Do you buy that color (sorry colour) paint by the bucket (liter of course)
I can make a litre go a long way.
Looks good. The handle seemed to have quite a bit of pitting compared to the rest of the vise, no vice?
Both vise and vice are correct with that one.
Parkinson used the American spelling, for some reason.The pitting on that one is unusual. Never figured out how anyone could manage to get such perfectly localised corrosion. Not a single part on the rest of the vice has suffered notable corrosion, yet the ball end of the leadscrew and the handle look like they've been immersed in water for yonks, barring one little spot on the handle which has been protected by being inside the ball part of the screw. One of lifes little mysteries is that one.
Three points:
The Lead Screw has a short Coil Spring (1 1/2") held in place by a "U" shaped wire. I suspect this is a repair expedient and not from the manufacturer. There was no Washer between the retaining pin and spring, which I find odd. Lost during a field repair?
There appears to be no form of "Reversing Nut" present.
The lead Screw disengaged easily. The "Nut" the lead screw engages is a separate block of metal. Held loosely against an internal shoulder in the main body of the vise by a small pin inserted from the bottom mounting plate.
This "Retaining Block" has perhaps 0.50 - 0.75" free play.
The insides of the slide are quite dirty and it may be a while before I get further pictures up. Very much clearer relationship of parts when seen visually.
The Lead Screw has a short Coil Spring (1 1/2") held in place by a "U" shaped wire. I suspect this is a repair expedient and not from the manufacturer. There was no Washer between the retaining pin and spring, which I find odd. Lost during a field repair?
There appears to be no form of "Reversing Nut" present.
The lead Screw disengaged easily. The "Nut" the lead screw engages is a separate block of metal. Held loosely against an internal shoulder in the main body of the vise by a small pin inserted from the bottom mounting plate.
This "Retaining Block" has perhaps 0.50 - 0.75" free play.
The insides of the slide are quite dirty and it may be a while before I get further pictures up. Very much clearer relationship of parts when seen visually.
jreb10
Well-known member
I am finishing up my Parker 436. I have a question about the hardware Parker used to allow the handle to be "fixed" within the slide. See the photo.

I have cleaned up the handle and inside the threaded hole I did find the brass disc that rides against the handle, but the rest of the hardware is missing. Is the disc held just by a set screw, or is it more complicated, such as with a spring? A picture of the hardware would be great so I can replicate it. Thanks for any help
I have cleaned up the handle and inside the threaded hole I did find the brass disc that rides against the handle, but the rest of the hardware is missing. Is the disc held just by a set screw, or is it more complicated, such as with a spring? A picture of the hardware would be great so I can replicate it. Thanks for any help
OP
drivesitfar
Well-known member
Gunpowder: can you post more pictures of the parts you are talking about that may have been an old owner's remodel so we might be able to help you if you need some?
JReb: i'm guessing it's just a screw that holds the handle in the middle for speedier turning. my Morgan 88 which is exactly like a Parker vise has a bolt just holding the handle in the middle so try one and see if it also will on yours. also Ritzblitz has made a lot of handles for Parker vises so he might have the answer if he sees your post or PM him for information or a new handle if you want a really nice one.
Fretters: so that one is a Parkinson. gotta love the research involved in hunting down the mysteries of our vises. also i'm not sure i've seen that one painted in your trademark Burgandy colour. very nice.
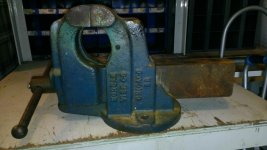
Fretters, Ex and All: we've been talking about taking a piece of pipe or conduit or dowel to push the main nut's spring back while removing the holding pin to take the main screw out of the dynamic jaw. any pictures to share of that so others can see how to make life a bit easier removing those pins from Athol, Record and other vises that have those springs?
JReb: i'm guessing it's just a screw that holds the handle in the middle for speedier turning. my Morgan 88 which is exactly like a Parker vise has a bolt just holding the handle in the middle so try one and see if it also will on yours. also Ritzblitz has made a lot of handles for Parker vises so he might have the answer if he sees your post or PM him for information or a new handle if you want a really nice one.
Fretters: so that one is a Parkinson. gotta love the research involved in hunting down the mysteries of our vises. also i'm not sure i've seen that one painted in your trademark Burgandy colour. very nice.
Fretters, Ex and All: we've been talking about taking a piece of pipe or conduit or dowel to push the main nut's spring back while removing the holding pin to take the main screw out of the dynamic jaw. any pictures to share of that so others can see how to make life a bit easier removing those pins from Athol, Record and other vises that have those springs?
Attachments

Last edited:
jakemac
Well-known member
I am finishing up my Parker 436. I have a question about the hardware Parker used to allow the handle to be "fixed" within the slide. See the photo.
I have cleaned up the handle and inside the threaded hole I did find the brass disc that rides against the handle, but the rest of the hardware is missing. Is the disc held just by a set screw, or is it more complicated, such as with a spring? A picture of the hardware would be great so I can replicate it. Thanks for any help
The same parts were missing on my Parker 955.
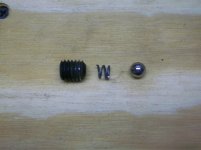
The first picture is of someone else's parts. (I don't remember who's)
The second picture is of my solution for replacing them.
I used a set screw that fit, cut down a spring, and threw in a ball bearing.
Attachments

Last edited:
EOC_Jason
Well-known member
In my 974.5B it has a set screw, spring, then small piece of steel. I replaced the steel with brass, figured it would be easier on the bar. I've seen others use a BB or ball bearing.
I am finishing up my Parker 436. I have a question about the hardware Parker used to allow the handle to be "fixed" within the slide. See the photo.
I have cleaned up the handle and inside the threaded hole I did find the brass disc that rides against the handle, but the rest of the hardware is missing. Is the disc held just by a set screw, or is it more complicated, such as with a spring? A picture of the hardware would be great so I can replicate it. Thanks for any help
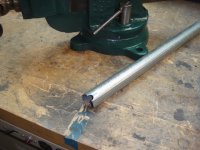
Fretters, Ex and All: we've been talking about taking a piece of pipe or conduit or dowel to push the main nut's spring back while removing the holding pin to take the main screw out of the dynamic jaw. any pictures to share of that so others can see how to make life a bit easier removing those pins from Athol, Record and other vises that have those springs?
I had posted some months ago, but here they are again.
BTW, the cotter pin was so tough to remove from my Paramo 6 that I revised it. I opened up the hole to accept a piece of drill rod, and added flats to the ends of the rod. Once installed, the flats are engaged by the spring/washer and it cannot slip out. But it can easily be removed for maintenance with the push tube thingy.
Attachments

Last edited:
In my 974.5B it has a set screw, spring, then small piece of steel. I replaced the steel with brass, figured it would be easier on the bar. I've seen others use a BB or ball bearing.
Brass or bronze is ideal, as long as it is soft relative to the bar. I would not use a ball bearing as it could leave a mark, and is not really a good clamp in any case.
OP
drivesitfar
Well-known member
Ex: if you posted that before on this thread i'm sorry i didn't remember it and really thank you for posting it again. great idea and i bet the guys that tried to keep that spring out of the way with a screwdriver or some other tool are cussing now seeing how easy your tool works to do the same job. 
Jake: thanks for your quick post to the question. whether it is making small marks or wear on your handle is for you to tell us, but i bet it is making less of a mark than the bolt my prior owner did to my Morgan 88 when he put that in to hold this handle.
Jake: thanks for your quick post to the question. whether it is making small marks or wear on your handle is for you to tell us, but i bet it is making less of a mark than the bolt my prior owner did to my Morgan 88 when he put that in to hold this handle.
McBrownie
Well-known member
In my 974.5B it has a set screw, spring, then small piece of steel. I replaced the steel with brass, figured it would be easier on the bar. I've seen others use a BB or ball bearing.
I went a step further and used a piece of thick oiled leather to replace the metal piece. Still kept the spring and set screw. Just an idea.
jreb10
Well-known member
I am finishing up my Parker 436. I have a question about the hardware Parker used to allow the handle to be "fixed" within the slide. See the photo.
I want to thank everyone for the detailed replies. They are very helpful. I have ordered the set screws since the 7/16 - 14 thread required by the handle is not common and was not stocked at the hardware store. I'll match it up to a spring and reuse the brass disc.
I'll post pictures of the completed vise in a few days on the "Vises..." thread.
I have ordered the set screws since the 7/16 - 14 thread required by the handle is not common and was not stocked at the hardware store.
I think the reason 7/16 hardware is hard to find is that Delta/Rockwell bought them all----I swear that's all you find on those vintage machines.
meatsis
Well-known member
hey fellow vise collectors I have a question. I know this question has been asked many times before but im trying to figure out the best way to remove the pin in my swivel jaw parker. its a # 277 parker with the swivel base and swivel jaw. I remember somebody posting a picture of a bolt they used to create a "jack" to push the pin out from the inside of the vise body. do any of you remember which picture im talking about or do you still have the picture. im pretty sure I saw it in the vise thread but im not about to look through 1100 pages to find it lol.thanks in advanced
jakemac
Well-known member
It's a simple build. Go to the hardware store and by a coupler for threaded rod (fine threads would be better). Then pick up 2 bolts that match the threads. Screw them all together. Ta-Da.
OP
drivesitfar
Well-known member
Meatsis: feel free to post pictures of your vise(s) when you ask any questions because we always like to see what the members own and are working on. also some vises just are not as common and might have a different method.
have you sprayed Kroil, PB blaster or even WD 40 in and around your swivel jaws pin and let it sit for a couple hours if it's stuck? i've gotton a few pins out by removing the dynamic jaw, then the vise nut to have an open area under the pin for access. then finding a bolt just a hair smaller the the hole below the pin. put the bolt in and push up and if you are lucky it will pop out. a gentile tap on the bottom of the bolt helps too.
before you grab the parts that Jake mentioned to make your little make shift press you might want to make sure the pin isn't threaded. some are and that's why posting pictures of your vise helps us. i haven't run into any threaded and don't know all the models that have them, but i've seen more than a few in pictures. also a prior owner could have tapped and threaded a pin on their own.
have you sprayed Kroil, PB blaster or even WD 40 in and around your swivel jaws pin and let it sit for a couple hours if it's stuck? i've gotton a few pins out by removing the dynamic jaw, then the vise nut to have an open area under the pin for access. then finding a bolt just a hair smaller the the hole below the pin. put the bolt in and push up and if you are lucky it will pop out. a gentile tap on the bottom of the bolt helps too.
before you grab the parts that Jake mentioned to make your little make shift press you might want to make sure the pin isn't threaded. some are and that's why posting pictures of your vise helps us. i haven't run into any threaded and don't know all the models that have them, but i've seen more than a few in pictures. also a prior owner could have tapped and threaded a pin on their own.
jreb10
Well-known member
I want to thank everyone for the detailed replies. They are very helpful. I have ordered the set screws since the 7/16 - 14 thread required by the handle is not common and was not stocked at the hardware store. I'll match it up to a spring and reuse the brass disc.
Well I was bored today so I used a piece of 7/16-14 threaded rod to fabricate a set screw and found a spring about the right size.
It seems to work OK, so problem solved.


jakemac
Well-known member
Nice fix ! [slaps forehead] I wish I had thought of that, I would have saved myself a lot of time running around looking for a set screw at all the local hardware stores.
KMScott
Well-known member
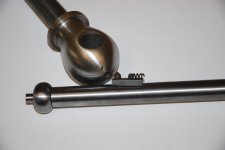
I am working on a Parker 23X, I finally pulled out the set screw and it is a odd ball thread. 9/32:18, never seen this size of thread but did find a tap but no luck on a die, replacement set screws would have to be single pointed on a lathe of re-tapping to a 5/16 thread.
I also wanted to note that the Spindle end piece is soft cast, you can see in the picture that it shows a different color of the round end. I never knew that friction welding can attach the spindle thread to the cast end. No sign of a pin. This handle hole shows wear from the handle sliding over years of use, like a round groove was cut on the opposite side of the handle hole where the pressure of the set screw pushes the handle to the back side. The handle shown is a 1/6 larger so I can remove most of the groove.
http://www.discount-tools.com/catalogs/gen/102.pdf
I also wanted to note that the Spindle end piece is soft cast, you can see in the picture that it shows a different color of the round end. I never knew that friction welding can attach the spindle thread to the cast end. No sign of a pin. This handle hole shows wear from the handle sliding over years of use, like a round groove was cut on the opposite side of the handle hole where the pressure of the set screw pushes the handle to the back side. The handle shown is a 1/6 larger so I can remove most of the groove.
http://www.discount-tools.com/catalogs/gen/102.pdf
Attachments
KMScott
Well-known member
Here is another repair that I will fix, I am working with the owner on options, I am leaning to cutting a pocket and fit a piece of steel and pinning it down then re-machining the face. I do not want to weld if I can get away from it. I need material there to re-pin the new jaws. Any other suggestions?
Attachments


EOC_Jason
Well-known member
Here is another repair that I will fix, I am working with the owner on options, I am leaning to cutting a pocket and fit a piece of steel and pinning it down then re-machining the face. I do not want to weld if I can get away from it. I need material there to re-pin the new jaws. Any other suggestions?
Braze on a piece of metal? It will be under compression so anything solid should be good.
More thoughts on the No. 6 Canadian (Record/Paramo)
Absence of REVERSING COLLAR
Missing: COIL SPRING PRESSURE WASHER
Correct RETAINER PIN for Pressure Washer (ROLL PIN)
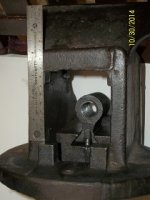
The Leed Screw is retained by a floating Retainer Block, dovetailed into the Static Jaw and pinned in place.
The Retainer Block must be jockeyed into position into the dovetail while the Live Jaw is slid far enough to the back to allow finger access through an access hole in the bottom of the Static Jaw. Then the Retaining pin
is pushed in from the bottom.
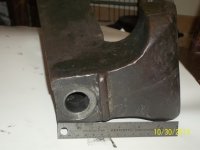
Machined Wear Pads top and bottom inside Static Jaw.
The Coil Spring appears to be the correct length (1.250") but is far too soft.
No evidence of a Pressure Washer for Coil Spring, and Retainer Pin appears to be nothing more than a bent nail.
Original color of Vise was Blue, with lettering outlined in gold.
Estimated manufacture date circa 1932.
Absence of REVERSING COLLAR
Missing: COIL SPRING PRESSURE WASHER
Correct RETAINER PIN for Pressure Washer (ROLL PIN)
The Leed Screw is retained by a floating Retainer Block, dovetailed into the Static Jaw and pinned in place.
The Retainer Block must be jockeyed into position into the dovetail while the Live Jaw is slid far enough to the back to allow finger access through an access hole in the bottom of the Static Jaw. Then the Retaining pin
is pushed in from the bottom.
Machined Wear Pads top and bottom inside Static Jaw.
The Coil Spring appears to be the correct length (1.250") but is far too soft.
No evidence of a Pressure Washer for Coil Spring, and Retainer Pin appears to be nothing more than a bent nail.
Original color of Vise was Blue, with lettering outlined in gold.
Estimated manufacture date circa 1932.
Attachments
-
 Bottom Access showing access for fitting Retainer Block Dovetail - Reduced.jpg143.6 KB · Views: 40
 -
 Bottom of Slide Detail - Reduced.jpg137.5 KB · Views: 47
 -
 Bottom of Slide Mis-aligned Spring Retainer - Reduced.jpg136.2 KB · Views: 46
 -
 Dovetail Slot and Retainer Block w Stop Pin - Reduced.jpg115.9 KB · Views: 42
 -
 DYNAMIC JAW Front Detail 1 - Reduced.jpg105.4 KB · Views: 38
 -
 Lead Scr. Retainer Block Detail - Reduced.jpg102.5 KB · Views: 43