To avoid these ads, REGISTER NOW!

Beauty Ring Disassembly for Dent Removal

dnroe

Well-known member
Joined
Nov 4, 2010
Messages
113
Location
Easley, SC
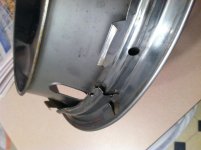
I have a set of trim rings for a factory GM SS wheel (69 Camaro, chevelle, Nova wheels) which are very low mile wheels with good rings and caps except a few dings on the outer face of the trim ring. I have no problem removing dings from stainless trim that I have access to the backside, however this area is a double layer because of the inner ring. I have popped loose the spot welds on the inner ring to allow it to collapse in on itself but the outer hem where the stainless is folded back on itself is still holding it in place. Has anyone ever tried to take a trim ring apart to fix dings? The hard part will be opening up the outer fold enough to allow the inner ring to come out but not damaging the outer. With the fold being such a tight bend the stainless is somewhat work hardened and tight enough that I haven't really been able to get anything behind it. If I could get one spot opened enough I thought of making a vice grip tool similar to MP&C's door skin removal tool to work around the perimeter. Anyone have any thoughts or advice? I can try to get some pics later if that would help.
 
To avoid these ads, REGISTER NOW!

pop pop

Well-known member
Joined
Apr 1, 2010
Messages
2,859
Location
Virginia
I have the same need. Subscribed. You know there are folks that restore these, right?
 
OP
D

dnroe

Well-known member
Joined
Nov 4, 2010
Messages
113
Location
Easley, SC
I will try to get pics tonight to make it a little clearer. I do know there are places that restore them so I know it is possible. I personally like to do everything I can myself especially something as simple as stainless restoration. I also fall into the group with more time than money so DIY always good. Removing and reinstalling the inner ring is the only real challenge here.
 
OP
D

dnroe

Well-known member
Joined
Nov 4, 2010
Messages
113
Location
Easley, SC
Okay here are a few pics I took that might help out a bit. I have one pic showing the typical ding, one showing a close up of the inside ring and one showing how the outer piece folds over the inner. The hem is really tight and looks like it was roll formed by the factory. You can see I have spot welds of the inner removed. If I can get the hem opened up just a little the inner ring can be collapsed into a smaller circle and will come out. These ring are original to a 70 chevelle and have continuous clips unlike the 4 clip ones on earlier rings.
 

Attachments

  • image.jpg
    image.jpg
    163.7 KB · Views: 81
To avoid these ads, REGISTER NOW!

rsanter

Well-known member
Joined
Dec 22, 2007
Messages
18,506
Location
visalia ca
Sometimes you don't take them apart.
You drill a hole in the piece on the back side
You then use a punch to knock the dent out
This may leave some light damage to the surface that shows
You then use a file to knock down any marks and the polish surface

Bob
 

y'sguy

Well-known member
Joined
May 1, 2010
Messages
1,314
Location
Tulsa, Oklahoma
^^what he said.
Also I use wooden dowels of different shapes and sizes as punches. good luck, always tough trying to get a mirror finish-flat-so no one will notice.
 
OP
D

dnroe

Well-known member
Joined
Nov 4, 2010
Messages
113
Location
Easley, SC
If all else fails I could try drilling a hole in the back piece but would rather not. I would much rather try the first approach so the rings appear as new from both sides. Seems like the risk of drilling through the front would be really high around the outer edges where the two pieces are touching or nearly touching. Thanks for the input and I will keep this updated if I have any luck opening up the outer hem any.
 

toplessHO

Well-known member
Joined
Oct 20, 2014
Messages
14,025
Location
central florida
I have the same dilemma on the 65-9 rings that use the 4 clip attachment.
Ive thought of making a hardened tool somewhat like a spoon that can be tapped
in place
Ive had alot of success with hot lead used to fix minor dings but I dont think it will work here. I would be glad to trade any good 4 clip ones you have for the multiclip ones I have.
on a side note if anyone has replaced the 4 clip attachment rings I would be very interested.
I have used heat thru buffing in a circular motion to raise the dent also
 

Rookie2

Well-known member
Joined
Feb 27, 2013
Messages
1,925
Location
Western Pa.
I have the same dilemma on the 65-9 rings that use the 4 clip attachment.
Ive thought of making a hardened tool somewhat like a spoon that can be tapped
in place
Ive had alot of success with hot lead used to fix minor dings but I dont think it will work here. I would be glad to trade any good 4 clip ones you have for the multiclip ones I have.
on a side note if anyone has replaced the 4 clip attachment rings I would be very interested.
I have used heat thru buffing in a circular motion to raise the dent also

Man there is a demand for someone to repair chrome (SS) mouldings out here ! Aftermarket is just **** !
 

pop pop

Well-known member
Joined
Apr 1, 2010
Messages
2,859
Location
Virginia
If all else fails I could try drilling a hole in the back piece but would rather not. I would much rather try the first approach so the rings appear as new from both sides. Seems like the risk of drilling through the front would be really high around the outer edges where the two pieces are touching or nearly touching. Thanks for the input and I will keep this updated if I have any luck opening up the outer hem any.

OK. Finally got up the nerve to try repairs on a 64 Corvette hubcap. It's made the same way with the inner ring made of mild steel painted. I used a small screwdriver and a paint can opener to slightly lift the inner fold of the crimp around the edge. I kept working slowly around and around moving the metal just a small amount. When I got almost 90* bend out, the inner ring came loose. I did not remove the spot weld. Repaired all the dents, sanded/filed and buffed. Replaced the inner ring (after cleaning and painting in my case) then slowly using a flat punch rolled the crimp back in place. Oh, added some silicon glue to keep the inner ring from rotating in service. If you move the metal slowly it will not show on the front side and 99% will not be able to tell on the back side. Move too fast and you get ripples on the back, but the front doesn't show. Not sure it's worth the investment of time, but hubcap looks like new.
 
To avoid these ads, REGISTER NOW!
Top Bottom