
dr_clyde
Well-known member
Hey Guys,
When I started doing sanitary TIG welding, there weren't very many resources available to get me started. It's frustrating knowing the end result but not knowing how to get there.
Eventually I pieced enough clues together to get going, and finally was able to get consistent quality results. I consulted with a qualified welding engineer and inspector and that helped a ton. So I decided to make this little guide to get folks pointed in the right direction, if you're into this kind of thing.
Right now at work I'm making a flowplate for the brewery and had to make a jillion of these little ferruled elbows, so I photographed the process.
Here's what we start with, a long **** weld triclamp ferrule and a short tangent 90° elbow. These need to be **** welded together, and the weld has to be sanitary. These are 304 stainless steel and are 16GA wall thickness.

What is a sanitary weld, you ask? It's a weld that is 100% penetrated, and has a smooth face where it will contact product. This ensures easy and reliable cleaning and no crevices or oxidation to harbor bacteria and crud. This weld joint is very common in the food and beverage, pharmaceutical and dairy industries.
This is how I do these joints. There are other ways, and this is by no means the end all be all.
The first thing I do is set up my purge spool. This is just a piece of tube with two triclamp ferrules on the ends. This lets me manipulate the weldment while its being purged. I attach the argon hose to the cool end with a common compressed air fitting I've attached to a triclamp cap. There is a rubber gasket between the cap and the ferrule, held by a split clamp.
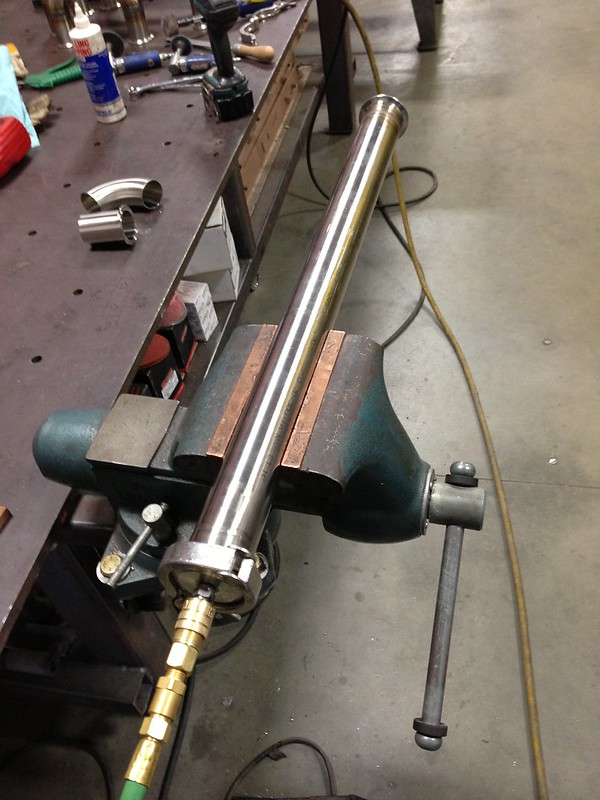

On the hot end, I attach the ferrule to the spool with one of these home made hot gaskets. Its just a piece of 1/8" stainless welding wire that I rolled into a loop. It takes the place of the rubber gasket but won't melt.


Next I tack on the elbow. How this is done is very important, because it will determine how easily and cleanly the joint welds. I hold the elbow perfectly flush, allowing no root gap, and as well lined up as I can get it. Any misalignment causes flow impediment and any root gap causes both potential air leaks in the purge and more finished part distortion.

I place 4 tacks approx. 90° from one another. These are run at the same amperage as the weld, but are done quickly, as to not penetrate into the pipe, because there is no purge yet. They are about .5" long and you need strong tacks otherwise they will break during welding.

Next I set up my purge dam. There are many ways to do this, and the fastest is just using painter's masking tape. However, this dam is too close to the weld, and the tape's adhesive will melt and make a mess if I go that route. Instead, I use aluminum foil held in place with a couple wraps of aircraft safety wire.

Argon purging requires a vent, so there is a place to exhaust the oxygen and other active gases from the pipe. The size of the vent is determined by the size of pipe, purge gas flow, pipe layout, and number of vents. We want a small enough vent to create a slight amount of positive pressure, but not so much pressure that the molten weld pool blows out. (been there, done that, it ain't pretty). The positive pressure ensures that atmospheric air doesn't creep in through any gaps, and it provides a cushion for the weld pool so it doesn't crater and collapse.
For something this small, an 1/8" hole is plenty. I just use a tungsten to poke a hole.

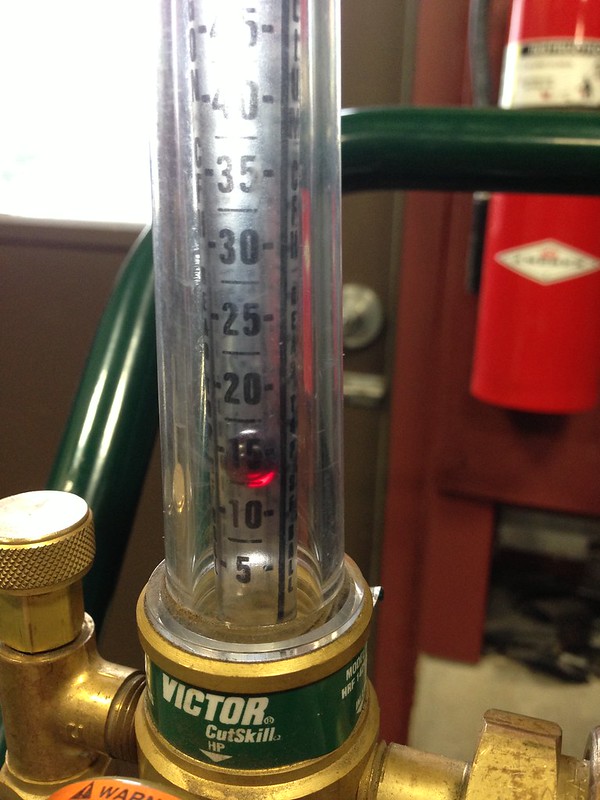
I set my flowmeter on my purge tank to about 15 CFH and let the pipe purge for as long as it takes. In this case, it only needs a few minutes, since it's so small. Longer and larger pipes can purge anywhere from a half hour to overnight.
I set the pipe on an angle. Argon is heavier than air, and we want the argon to push out any other gases. Put the supply at the lowest point and the vent(s) at the high points and you will get a good clean purge.

While the pipe is purging, I set up my torch. I run a #9 aircooled WeldTec torch with a 70° angle. I have it set up with a gas lens, a #6 cup, 1/8" ceriated tungsten and a medium length back cap. I like 1/8" tungsten for this becasue its more durable for the lift arc, and lasts longer in the field. Smaller diameters work just as well, its just a personal preference. I like the air cooled torch for this kind of work because it is very light and easy to manipulate. This is pretty low amperage stuff, so it stays relatively cool anyway. Plus they are cheap and easy to replace is they get broken in the field.

I like to use this CBN (cubic boron nitride) wheel to dress my electrodes. Its a wheel designed to sharpen tungsten carbide cutters, and makes a super clean point without generating excess heat on the tip, so no burned fingertips. Its by no means necessary, I used a buddy's and liked it so much I bought one. A standard grinding wheel or belt will do fine.

I grind both ends of my tungsten. I only keep ceriated around, so I don't need to fuss with color bands, and its the pits when you are in a tank or on a lift and need to sharpen tungsten. It pays to have as many points on you when you go in to make a position weld. I seldom contaminate so badly that it won't slide back into the collet. If it do, it just acts like a single point anyway, so I've got nothing to lose by grinding both ends.

I like to recess the tungsten into the cup quite a ways. This allows my torch angle to keep closer to optimal ensuring good penetration.

So, actually doing the weld is tough to photograph. I'll do my best to describe it though. In these kind of joints, it is preferred to walk the cup. This means you rest the ceramic cup right on the pipe and wiggle it back and forth and "walk" it along the weld. This enables you to get a consistent travel speed, arc length, and you can weld out of position without a prop. It takes some getting used to, but it works really well.
For these welds I take the spool out of the vise and close the vise jaws a couple turns. Then I rest the pipe in the gap between the jaws and rotate it with my left hand while welding with my right. This means I can do the whole joint in one go, and I can keep a consistent uphill welding position. The weld is autogenous, meaning no filler wire. This keeps introduced contaminants to a minimum, and since its 100% penetrated, the additional metal isn't required for strength.
Here's my machine panel for this weld. 36 amps with the lift arc enabled, no foot pedal or other remote. One of the trickiest things to learn is how to snap out of a weld without leaving a crater on the inside. The key is to increase speed and arc length at the same time and quickly walk out of penetration. Once out and there is no puddle, you can snap out of the arc without leaving a crater. In case you couldn't tell, I'm running a Miller Dynasty 200DX.

When I started doing sanitary TIG welding, there weren't very many resources available to get me started. It's frustrating knowing the end result but not knowing how to get there.
Eventually I pieced enough clues together to get going, and finally was able to get consistent quality results. I consulted with a qualified welding engineer and inspector and that helped a ton. So I decided to make this little guide to get folks pointed in the right direction, if you're into this kind of thing.
Right now at work I'm making a flowplate for the brewery and had to make a jillion of these little ferruled elbows, so I photographed the process.
Here's what we start with, a long **** weld triclamp ferrule and a short tangent 90° elbow. These need to be **** welded together, and the weld has to be sanitary. These are 304 stainless steel and are 16GA wall thickness.
What is a sanitary weld, you ask? It's a weld that is 100% penetrated, and has a smooth face where it will contact product. This ensures easy and reliable cleaning and no crevices or oxidation to harbor bacteria and crud. This weld joint is very common in the food and beverage, pharmaceutical and dairy industries.
This is how I do these joints. There are other ways, and this is by no means the end all be all.
The first thing I do is set up my purge spool. This is just a piece of tube with two triclamp ferrules on the ends. This lets me manipulate the weldment while its being purged. I attach the argon hose to the cool end with a common compressed air fitting I've attached to a triclamp cap. There is a rubber gasket between the cap and the ferrule, held by a split clamp.
On the hot end, I attach the ferrule to the spool with one of these home made hot gaskets. Its just a piece of 1/8" stainless welding wire that I rolled into a loop. It takes the place of the rubber gasket but won't melt.
Next I tack on the elbow. How this is done is very important, because it will determine how easily and cleanly the joint welds. I hold the elbow perfectly flush, allowing no root gap, and as well lined up as I can get it. Any misalignment causes flow impediment and any root gap causes both potential air leaks in the purge and more finished part distortion.
I place 4 tacks approx. 90° from one another. These are run at the same amperage as the weld, but are done quickly, as to not penetrate into the pipe, because there is no purge yet. They are about .5" long and you need strong tacks otherwise they will break during welding.
Next I set up my purge dam. There are many ways to do this, and the fastest is just using painter's masking tape. However, this dam is too close to the weld, and the tape's adhesive will melt and make a mess if I go that route. Instead, I use aluminum foil held in place with a couple wraps of aircraft safety wire.
Argon purging requires a vent, so there is a place to exhaust the oxygen and other active gases from the pipe. The size of the vent is determined by the size of pipe, purge gas flow, pipe layout, and number of vents. We want a small enough vent to create a slight amount of positive pressure, but not so much pressure that the molten weld pool blows out. (been there, done that, it ain't pretty). The positive pressure ensures that atmospheric air doesn't creep in through any gaps, and it provides a cushion for the weld pool so it doesn't crater and collapse.
For something this small, an 1/8" hole is plenty. I just use a tungsten to poke a hole.
I set my flowmeter on my purge tank to about 15 CFH and let the pipe purge for as long as it takes. In this case, it only needs a few minutes, since it's so small. Longer and larger pipes can purge anywhere from a half hour to overnight.
I set the pipe on an angle. Argon is heavier than air, and we want the argon to push out any other gases. Put the supply at the lowest point and the vent(s) at the high points and you will get a good clean purge.
While the pipe is purging, I set up my torch. I run a #9 aircooled WeldTec torch with a 70° angle. I have it set up with a gas lens, a #6 cup, 1/8" ceriated tungsten and a medium length back cap. I like 1/8" tungsten for this becasue its more durable for the lift arc, and lasts longer in the field. Smaller diameters work just as well, its just a personal preference. I like the air cooled torch for this kind of work because it is very light and easy to manipulate. This is pretty low amperage stuff, so it stays relatively cool anyway. Plus they are cheap and easy to replace is they get broken in the field.
I like to use this CBN (cubic boron nitride) wheel to dress my electrodes. Its a wheel designed to sharpen tungsten carbide cutters, and makes a super clean point without generating excess heat on the tip, so no burned fingertips. Its by no means necessary, I used a buddy's and liked it so much I bought one. A standard grinding wheel or belt will do fine.
I grind both ends of my tungsten. I only keep ceriated around, so I don't need to fuss with color bands, and its the pits when you are in a tank or on a lift and need to sharpen tungsten. It pays to have as many points on you when you go in to make a position weld. I seldom contaminate so badly that it won't slide back into the collet. If it do, it just acts like a single point anyway, so I've got nothing to lose by grinding both ends.
I like to recess the tungsten into the cup quite a ways. This allows my torch angle to keep closer to optimal ensuring good penetration.
So, actually doing the weld is tough to photograph. I'll do my best to describe it though. In these kind of joints, it is preferred to walk the cup. This means you rest the ceramic cup right on the pipe and wiggle it back and forth and "walk" it along the weld. This enables you to get a consistent travel speed, arc length, and you can weld out of position without a prop. It takes some getting used to, but it works really well.
For these welds I take the spool out of the vise and close the vise jaws a couple turns. Then I rest the pipe in the gap between the jaws and rotate it with my left hand while welding with my right. This means I can do the whole joint in one go, and I can keep a consistent uphill welding position. The weld is autogenous, meaning no filler wire. This keeps introduced contaminants to a minimum, and since its 100% penetrated, the additional metal isn't required for strength.
Here's my machine panel for this weld. 36 amps with the lift arc enabled, no foot pedal or other remote. One of the trickiest things to learn is how to snap out of a weld without leaving a crater on the inside. The key is to increase speed and arc length at the same time and quickly walk out of penetration. Once out and there is no puddle, you can snap out of the arc without leaving a crater. In case you couldn't tell, I'm running a Miller Dynasty 200DX.
Last edited:


 Beer yes I have had a lot of free Kegs to the point I don't drink anymore.

