To avoid these ads, REGISTER NOW!

My Frankenstein Drill Press Cart

jsharpphoto

Well-known member
Joined
Jan 1, 2014
Messages
450
Location
Dallas, TX
I needed a new drill press cart. I have a delta 12" bench top model, made in Taiwan from the late 90's (i think). I started designing the cart around tools that I use in conjunction with the drill press. Things like my bench sander, bench grinder, and polisher, because I generally use those items in succession when building one-off motorcycle parts or fabricating custom photography rigging. I made kind of a wish list of things this rolling workbench needed and things I wanted to incorporate. My budget was very little, so I had to wait and find things at the right time. I don't think I paid retail for anything, minus the plywood.

1. Shallow drawer for drill press exclusive tools. Drill bits, step-up bits, chuck key, hole saws, things like that.

2. Small hardware storage.

3. Somewhat expandable/modular to be able to use certain tools occasionally, but not have them out all the time. I was reading through Stevo's bench build and saw his trailer hitch mount, and just copied that.

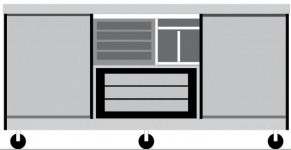
4. A really deep drawer to hold my Fortsner bit set and my spade bit set, both of which have special cases.

I designed the entire thing at full size using Adobe Illustrator. I know a lot of guys use sketch up, but I already have illustrator and use it enough that it's second nature. Here's a screen shot of the design.
 

Attachments

  • Screen Shot 2015-02-04 at 1.32.48 PM.jpg
    Screen Shot 2015-02-04 at 1.32.48 PM.jpg
    15.1 KB · Views: 296
To avoid these ads, REGISTER NOW!
OP
J

jsharpphoto

Well-known member
Joined
Jan 1, 2014
Messages
450
Location
Dallas, TX
Here is the completed cart. I'll fill in the gaps between design to completion shortly.
IMG_9422.jpeg
 

Vinci

Well-known member
Joined
Oct 30, 2012
Messages
136
Looks like the doors from the Seville Classics cabinets I have.
 
OP
J

jsharpphoto

Well-known member
Joined
Jan 1, 2014
Messages
450
Location
Dallas, TX
The Build
This was my first project to use my kreg jig. The carpentry part went smoothly. Here it is dry fitting the two end cabinets and fabing up the middle section.

IMG_5889.jpeg


IMG_5895.jpeg


I'll take it piece by piece.

Tool Chest Drawers
I was walking through home depot a few months back and saw a heavily damaged 26" Husky top chest. It was in a shopping cart with a few trash bags literally ready to be thrown away. It had been a display model that had fallen off the bottom and middle chest, and landed upside down on the lid. The lid was jammed closed, which meant the drawers couldn't be opened. So I asked if I could buy it for $10. I guess i could have just waited for them to throw it away, but $10 is a good price to pay for not swimming in a dumpster. When i got home, I used my monster craftsman pry bar to get the lid open, then I riveted the locking bar in place and cut the lid off with an angle grinder.

Small Hardware Storage
I had been trolling craigslist and ebay for the right cabinet for about 6 months, but never found one cheap enough and local. Then I found the durham cabinet systems on amazon and started building one in my shopping cart. In reading the reviews one person mentioned that you could buy this as a kit from olympia for cheaper than a la cart, and it came with some mid-grade hardware. I found the cheapest place online that carried it was walmart.com for $109. I had some store credit from some returned christmas gifts, so I pulled the trigger.

IMG_6016.jpeg


Stainless Steel Doors
I have 2 36x72 rolling cabinets made by SevilleClassics, sold by Sams Club. They have been excellent and I was looking at buying some of the smaller wall cabinets to use in the drill press cart so they would match the bigger cabinets. I'm kind of **** like that. So i was at Sams looking at the wall cabinets and noticed two extra doors laying against the rear of the display. Apparently they had been ordered as replacements for a floor model that had doors damaged, but the display model was sold "as-is" while the doors were in transit. I made the associate an offer, to renew my membership on the spot if I could have the doors. He took me up. Free stainless steel doors.

Deep Drawer
I needed the deep drawer for some specialty bits that had proprietary cases, and I also needed to fill a hole created by the difference in widths between the husky drawers and the durham parts storage. This solved both equations. It also created a location for me to mount the base of the drill press below the workbench top, to bring it down to my preferred working height.

IMG_6018.jpeg

IMG_6017.jpeg


Trailer Hitch Setup
The bumper step hitch I used is from northern tool. Harbor freight has one as well, but at the time it was cheaper from northern tool. The vise hitch mount arms are from harbor freight. I have one for each my grinder and my polisher.

Just the Hitch, which is mounted on the interior of the cabinet. It has a lip that just happened to be the exact same thickness as the plywood. I couldn't have gotten more lucky.
IMG_6019.jpeg


With one of the mounts...
IMG_6020.jpeg


And here it is sitting next the the incomplete, and now rather pathetic looking table saw cart.
IMG_6021.jpeg


If anyone has any questions I'd be happy to answer. I know none of this is rocket surgery, but I wanted to show what could be done for about $250, and some patience.
 
OP
J

jsharpphoto

Well-known member
Joined
Jan 1, 2014
Messages
450
Location
Dallas, TX
you guys are fast. Yes, they are from Seville Classics. I have two of their large rolling cabinets, as well as 2 of the wall cabinets. I painted them all black prior to assembly, because I'm a bit obsessed.
 

kbs2244

Well-known member
Joined
Nov 11, 2006
Messages
14,065
So you made a bench drill press out of a floor model?
Can you pull the press out and still use it as a floor model?

Very good workmanship by the way.
 
OP
J

jsharpphoto

Well-known member
Joined
Jan 1, 2014
Messages
450
Location
Dallas, TX
So you made a bench drill press out of a floor model?
Can you pull the press out and still use it as a floor model?

Very good workmanship by the way.

No, it's a bench top model. It's only about 36" tall. Yes, it can unbolt and slide out of the back, but I don't know why i'd ever need to.
 
OP
J

jsharpphoto

Well-known member
Joined
Jan 1, 2014
Messages
450
Location
Dallas, TX
It is quite large. I realize calling it a "drill press cart" is a bit misleading. Currently the drill press is the only thing on it. Soon, my bench sander and some other small metal working tools. It's kind a mini rolling machine shop.
 

Surreal001

Well-known member
Joined
Feb 25, 2014
Messages
105
Very creative. I may have to consider implementing some of those ideas in my own future drill press setup.
 
To avoid these ads, REGISTER NOW!
OP
J

jsharpphoto

Well-known member
Joined
Jan 1, 2014
Messages
450
Location
Dallas, TX
Very nice. What is the top made out of?

I have three workbenches all with the same top. 1.5 inches of either plywood or MDF or a mix of the two, depending on what I have laying around or what the purpose of that bench is going to be used for. Regardless, on top of that 1.5 inches is a 3/16 sheet of tempered hardboard (masonite). Then I skirt the edges with whatever scrap wood I have laying around to bring the total apparent thickness to 2.5 inches, then I epoxy the 1/8 x 2-1/2 inch aluminum flat bar trim to the skirt. So all of my benches have that aluminum trim. Like i said, i'm kind of obsessive.
 

soj

Well-known member
Joined
Dec 3, 2007
Messages
729
Location
North Georgia
Good design and well executed construction. I am a big fan of pocket hole construction.

How about some details on the Olympia hardware kit. Are there grade markings on the bolts? What are some of the other (non bolt and nut) items in the kit?

I found the best price on Wal-Mart.com as well, but it is up to $119.00 now.
Thanks, jp
 
OP
J

jsharpphoto

Well-known member
Joined
Jan 1, 2014
Messages
450
Location
Dallas, TX
Good design and well executed construction. I am a big fan of pocket hole construction.


How about some details on the Olympia hardware kit. Are there grade markings on the bolts? What are some of the other (non bolt and nut) items in the kit?


I found the best price on Wal-Mart.com as well, but it is up to $119.00 now.

Thanks, jp


$119 is still cheaper than buying the drawers and the rack separately. Although, not by a ton. If you were to buy them individually, you could buy drawers that were configured differently if that better met your needs.

I will double check for grade markings when I get home. I want to say they are grade 6? Even if they were stamped grade 8, I don't know that I would trust them on anything important. I will be phasing that hardware out and replacing it with proper grade 8 stuff, and all metric.

Currently, one drawer is metric bolts and nuts, standard stuff. Some socket cap varieties too. Same with the SAE drawer. There is one drawer of misc. screws, suitable for household jobs. There is a drawer of random (yet organized) wire nuts, spade connectors and cotter pins.

It's kind of a set that would make a good housewarming present, a little bit of everything.

The only thing about the Olympia set that bothered me, was the cabinet doesn't have ball bearing drawers, just friction glides. I then realized that the way it comes from the factory, fully loaded, is likely the heaviest load it will ever hold, and the drawers slide fine. My "need" for bearing drawers is probably just paranoia mixed with idealistic standards.
 
Last edited:

kansei

Well-known member
Joined
Mar 8, 2011
Messages
141
Location
Greenville, Michigan
As already stated many times, it looks great, and was well thought out.

I'm curious- if you have had a chance to use the press with larger stock, how much vibration is being translated into shaking of the cart, or is there none? I would imagine any you may have could be (somewhat) reduced or eliminated by changing casters out (phenolic, rubber, pneumatic, etc.)... ?


Neal.
 

soj

Well-known member
Joined
Dec 3, 2007
Messages
729
Location
North Georgia
How easy are the Kreg joints to do?
I bought a kit and intend to do a bar and office center for my basement

Easy as pie. Piece of cake. Get some scraps of wood and try it out. The hardest part is setting the depth collar on the drill bit, and that is easy.

Compared to dovetails, miters, biscuits, rabbits, dados or just about any other form of wood joint, it requires less set-up and tooling. Also, you don't have to allow for any dimension adjustments that some of the other joints require. For example, if you want to add a shelf between two uprights, just cut the shelf to fit between the uprights. If you put the shelf in dadoes, you have to add the depth of the two dadoes. Also, for a simple corner joint with two square cut pieces, the pocket hole screw goes cross grain, a stronger hold than if the threads are driven into end grain.
-jp
 
OP
J

jsharpphoto

Well-known member
Joined
Jan 1, 2014
Messages
450
Location
Dallas, TX
As already stated many times, it looks great, and was well thought out.


I'm curious- if you have had a chance to use the press with larger stock, how much vibration is being translated into shaking of the cart, or is there none? I would imagine any you may have could be (somewhat) reduced or eliminated by changing casters out (phenolic, rubber, pneumatic, etc.)... ?


Neal.


I have only used the drill press a bit in the new cart. But I don't anticipate a problem since the old cart had the same casters and was fine.
 

kansei

Well-known member
Joined
Mar 8, 2011
Messages
141
Location
Greenville, Michigan
Great, thanks for the reply. That was my only curiosity, as a build similar to this has been on the back burner here for a bit...


Neal.
 
OP
J

jsharpphoto

Well-known member
Joined
Jan 1, 2014
Messages
450
Location
Dallas, TX
My guess is vibration would also vary depending on how nice you DP is. I bet the ones from harbor frieght are going to vibrate a lot more than a delta, regardless of suspension
 
To avoid these ads, REGISTER NOW!
Top Bottom