jbdaya
Well-known member
do not believe the people who say that take absolutely a 40 000$ paint booth to do a beautiful job.... and good job !!


For ones that doesn't know or think that they can get by without the proper PPE and not get isocyanate poisoning, I have a young cousin who worked in a bodyshop as a painter but also worked at home on the side. His painting days are over. As soon as he gets around fresh paint, he will break out in an ungodly rash that itches, red blotches all over, and starts having a hard time breathing. He's been in the hospital a few times because of it.
My dad was the same way. I ended up having to paint everything because if he got close to fresh paint, he would get super sick and had a hell of a time breathing. A few packs of smokes a day didn't help though either. One time we weren't quite sure he was going to make it as he was shooting Imron without the proper PPE. Imron is terrible. And like they said above......it's not just breathing it in, but it is absorbing it in through the pores of your skin and getting it into your blood system. I don't take chances anymore. Even if using a rattle can or two, I will wear a respirator.
A few years back I was cutting some MDF, and when done (it was early summer) I swept the floor and blew the garage out with a leaf blower. I ended up with a cough. I went through almost 6 months of test after test after test. X-Rays, PET Test, CT Scans, and was told I was going to lose a third of my lung because of a large cancerous tumor and a possible rib or two. This was from not wearing a respirator. I used 6 weeks vacation off and on and had to go on FMLA periodically for doctors visits. Luckily it was a lung infection or basically pneumonia from the MDF dust. So that is bad, but paint vapors stick. Without a respirator it will stick to your nose hairs, a lot gets past the hairs, and if you have a short sleeve shirt or shorts, the paint chemicals are being absorbed through the pores of your exposed bare parts.
Don't take a chance. Hell years back, I used to shoot without a respirator because the respirator seemed like a hindrance. There is no way to prove it, but that may be why I'm ate up with arthritis and have the problems I do today. So any more, I wear a respirator, safety glasses, and I have a box or two of rubber gloves around just so I don't absorb chemicals in through my hands, get something in my eyes, or breathe something in that is hazardous. I'm getting too old to take those risk any more.


")
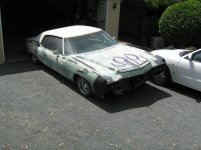
As much as Im a sucker for old mustangs,Im an even bigger sucker for old vettes.
So whats the details on the red one parked next to it?Looks like a 62 from what I can see of it.


Okay after looking through this entire thread I have some questions.
Why is it some people paint the fenders and doors hood off of the vehicle and then attach them after?
Other people paint the vehicle as a complete unit?
What is the advantage one over the other, or is it just a personal preference?
Seems to me that there is a likelyhood of damaging on re-assembly.
Also by painting off the vehicle, and at different times there might be a mismatch of color.


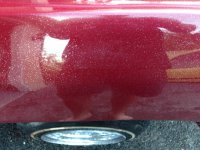
In spraying metallics, gravity plays a part in how the mica particles "lay" when sprayed. So if you spray a car with doors installed but fender laying flat, you have a better chance than not that it will show once assembled. If the loose parts are held in the same position as on the car, it will be less of an issue, but all of the other factors, such as paint gun setup, fan overlap, etc. will need to be duplicated. Just as in what I've said elsewhere in panel fitment and welding processes, you need to develop an almost OCD repeatability in your processes. So for metallics, spraying the car together will give the best match, but perhaps subpar results in finishing door jams, etc, and is why many spray things apart, as explained in the post above^^^^. For a solid color like the Viper Red I showed above, they are much more forgiving. The car body was sprayed about a month or so after the loose parts, with no visible difference. But as red is a semi-translucent color, you'll have to insure the sealer is all the same color (no sand throughs) as any differences there will indeed be seen in the finish coat.
This is a great thread and it's awesome to see the talents of "non professionals".
Looking back, I've done quite a few and try to improve on everyone. I have a full time desk job so my car hobby is only part time.
First real project was a '73 Blazer back in '84 when I was 19. New body panels from the factory. Did all the work outside and painted in my neighbors garage. It turned out OK, but didn't have any gloss. Who knew I'd be ahead of the curve with a a satin finish?
Then life got in the way for the next 20 years (but at least now I had my own garage) then built a T bucket. Learned alot with this project about body work and painting. Didn't have much money so I kept it simple with no chrome but spruced it up with flames. Really enjoyed doing the flames. Color is Mustang Screaming Yellow
Then I did a '70 mustang coupe that was total rust bucket (but I knew that when I bought it). Had to rebuild everything on this car, engine, trans, floors were gone, trunk, fenders , door skins, heavy surface rust on roof and hood, etc. Color is Ford Performance Red
Then I did a '55 TBird for a friend. This car was very bad, need floors, rockers, every panels had major rust or damage, door jambs rebuilt, etc. Color is Thunderbird Blue
Then I built my Factory Five hot rod:
Color is PPG Vibrance Sterling Silver
Painted my son's WRX Color is stock silver
Then did a Factory Five Cobra for a local car builder. Color is Corvette Atomic Orange with clear pearl stripes.
Then a '65 Chevelle SS for another local car guy. color is Ford Sterling Grey Metallic
Now I'm in the middle of a '69 Cutlass convertible for another friend - hopefully I'll be painting in another month or two. Color is ?????

Todd, sharp looking car. Did you spray all of the KBC at once? I'm looking at using the KBC Organic Green on the 55 wagon and just don't see all the parts fitting in the booth at once.... wondering how forgiving it is for separate sprays...