To avoid these ads, REGISTER NOW!

Between 485 & 705 SQ/FT Mid-Century Moto Mecca Makeover

Workspaces between 485 and 705 squarefeet.

Mr Mushman

Well-known member
Joined
Jul 7, 2009
Messages
113
Stumbled upon your thread and WOW ! Your house built is very very impressive, your attention to details is quite amazing and the KTM AWD is out of this world. The tank looks great and reminds me of the good ol' days watching the early days of the Dakar Rally. Great vintage bikes too !

Judging by your wrist pictures it looks like you could give a few pointers to your doctor in terms of finish work he might not have the right tools or something, you might want to suggest him to use Festool he might get better results … YOU would have done a much much better job !

Thank you for sharing ! Glad to see another ADV Inmate on garage journal !

BTW if you are ever down in the L.A area let me know, we could share garage andy bike stories !
 
Last edited:
To avoid these ads, REGISTER NOW!
OP
S

sakurama

Well-known member
Joined
Oct 10, 2010
Messages
1,458
Location
Portland - the cool one.
Gregor, can you share with us where you source all of this amazing plywood? The big box stores near me never seem to want to carry anything more than a five ply maple.

I am assuming that you found a lumberyard. Do they carry everything that you need, or do you have to special order some of these cool plywoods?

I've been sort of astonished at the way that plywood from Home Depot or Lowes has gone from worse to abysmal. Just in the time I've been working on the house but even more so historically over time.

Here's two examples.

This is the last sheet of plywood I picked up from Home Depot (and the last) for some quick shelves:

i-T5W67hQ-XL.jpg


That's the russian birch or baltic birch on the left - no voids, consistent thickness veneer core plywood. Compared to the sheets from Home Depot one a year older than the other. You can see the cores are made up of particle board and that they're even less compressed now.

i-xcmpgQc-X2.jpg


This is one of my walnut veneer plywoods like I used in the kitchen compared with a plywood closet door that is original to the house - so about 60 years old. Plywood was used on midcentury homes for it's inexpensiveness and it's ease. No fancy frames or details - just a sheet of wood in all it's simplicity. Check out how thick the cores and the faces are. No risk of sanding through that but it's a real worry with the veneer plywoods today. I'd guess the thickness of the walnut veneer to be about .5mm and that's the "good" quality domestic stuff. Imports from China are paper thin - about .1mm.

To answer your question though - yes, a lumber yard. I have been going to CrossCut Hardwoods. They have the russian birch in the standard euro sized 5'x5' sheets and the americanized 4'x8' sheets. 5x5 is the better deal generally but you buy the size you need for the project.

There are online places to buy it (Woodcrafters, Rockler) but I'm guessing shipping would be expensive. Try your local lumber yard or wood dealer. Carpenters use the baltic birch (russian/baltic are sort of interchangable but there's probably a difference) because it makes such good jigs.

Once you use it you'll be sold.


OK, those hammers are wicked cool. Now I need to come up with some project to make out of nice plywood so that I'll have scraps left over to make hammers out of.

You seem like the kind of guy who doesn't hate nice tools - check out these air hose quick disconnects: http://www.mcmaster.com/#6534k26/=w5w4um

Thanks. I don't know that I can change now though. Years ago when we had a group shop we had all sorts of different fittings and it made us nuts. We eventually switched to the garage standard style and now I have a bunch of them. If they'll fit the standard that I have I'll certainly try them but I'm in too deep to change styles.

Amazing thread.

Andy

Andy! my favorite Stratos-owning and most-impeccable-and-lust-worthy-garage-on-all-of-garagejournal person! Thanks for stopping in. You're thread is an inspiration and one I love to go back to (congrats on the yellow Ferrari by the way).

If you haven't read Andy's thread you owe it to yourself to check it out. Stunning.

Stumbled upon your thread and WOW ! Your house built is very very impressive, your attention to details is quite amazing and the KTM AWD is out of this world.

Thank you for sharing ! Glad to see another ADV Inmate on garage journal !

BTW if you are ever down in the L.A area let me know, we could share garage andy bike stories !

I spend less time over there at ADV than I do here. And less here than on the house. A sick kid is hampering my progress this week but it's nice to have her home and helping on small projects.

I'm desperate to get the closet finished. Once I started on it I fully gave up on putting my clothes away... well, there was no away. In a neat pile? It's chaos. I need to finish this thing fast.

Gregor
 

MotoDave

Well-known member
Joined
Jul 1, 2009
Messages
505
Location
Ventura, CA
Yup they use the 'industrial' fitting ends, so they'll interchange.

Totally agree on the big box store plywood issue. I just finished a built in shelving unit, and about 1/4 of the way through I was kicking myself for not finding a better source for plywood. I used the best stuff they had at Lowes, even looked OK on the edges but had all sorts of voids in the middle.
 

Terranova

Well-known member
Joined
May 12, 2008
Messages
854
Location
Grove City, OH
Gregor,
I've found a difference in quality or so it seems between stores regionally. Between shopping at my local HD and the one by my parents (an hour away) I'm always impressed with the plywood by my parents.
I'm currently trying to be trick and do dovetails with the crappy wood I have. Completely disappointing. I know if I had quality European birch, it would be fine, but when I showed my wife the 70$(?) sheet at wood rafters, she balked. Grr.
 

rice rocket

Well-known member
Joined
Mar 24, 2011
Messages
3,175
I had better luck at Lowe's than HD (surprisingly), I thought Lowe's was always a step down and more homeowner focused.

The plies on the HD sheet were particle board like on yours, but not on the sheet from Lowe's.
 

wasfast

Well-known member
Joined
Apr 10, 2014
Messages
874
Location
San Diego CA
An excellent, US-made alternative is Apple Ply. No, it's not made with apple tree wood. Originally, it was alder layers with various exterior appearance options (oak, birch, maple etc).

http://www.appleply.com/

States Industries use to make it in Eugene but that was years ago.
 

gasgas17

Well-known member
Joined
Nov 7, 2009
Messages
443
Location
Nova Scotia, Canada
That original plywood door was the good stuff. True 7 ply with thick veneers on the out side. It could be cut with far less chipping or blow out and the sheets were supper stable for flatness, mostly due to how tight the grain was. Just compare the grain of the old and the new. Six or so growth rings to one. They just don't let the trees grow long enough anymore. I do like the Baltic birch, it's not bad to work with.
 
OP
S

sakurama

Well-known member
Joined
Oct 10, 2010
Messages
1,458
Location
Portland - the cool one.
An excellent, US-made alternative is Apple Ply. No, it's not made with apple tree wood. Originally, it was alder layers with various exterior appearance options (oak, birch, maple etc).

http://www.appleply.com/

States Industries use to make it in Eugene but that was years ago.

I forgot about appleply - I shouldn't, as a photographer we use "apple boxes" all the time in the studio. They're just simple boxes that you use to stack props and it wasn't until I found apple ply in the plywood section that I put two and two together to realize they're named after the type of wood they're made of.

Closet progress report:

I'm beginning to wonder if it wouldn't have been easier to just build them from scratch. Sure it would have taken much longer but...

i-Pq6cnMq-X2.jpg


That's the pile of chips you get when you plane 1/2" maple boards down to 8mm. I chose maple because it came in 1/2" already and I wasn't about to plane 3/4 to 8mm and because I figured it's hardness would work well and the color would also match.

i-rWFGs4L-X2.jpg


i-Qfv6mgT-X2.jpg


Test fitting a scrap shows that the dimension is correct and from there I rip widths to cover all the faces.

i-hDwH9Ww-X2.jpg


To fully build in the closet I rip 2x boards to fit the sides and then screw them into the studs and use cabinet screws through the closet to screw into the 2x to further reinforce the assembly.

i-LrsFscX-X2.jpg


As a small detail, and because I just like my chamfer bit, I give all the maple facing a small chamfer before glueing and nailing the trim into place. Now the closet is fully faced and the next step, and probably the most difficult and important, is to cut the plywood for the doors and drill them to accept the euro cups. I'm positioning the hinges at the same measurements from top and bottom so that the doors will be symmetrical and the drilling simplified.

---------- And now a machine tool intermission ----------

Restoring the notcher went well and the stand for it had room for another tool on the back side but I wasn't sure what that would be. I bought a Greenerd No.2 press ages ago for $20 and always considered it a stop gap until I could get a No.3 which I considered more useful. Perhaps because I only paid $20 I never took it seriously but over the years it's proven to be very useful for small jobs so I figured I'd show it some love and give it a home.

i-qCKBhd7-X2.jpg


It, like most old tools, had been repainted numerous times and was cream colored - another reason I didn't care for it. Tools are gray in my world. Just are.

i-CmwRTDw-X2.jpg


While working on the drawers for the closet I painted it with stripper and kept scraping off the old layers.

i-F39sjHf-X2.jpg


The last coat of old paint came off with the pressure washer and as soon as it dried I gave it a coat of Rustoleum primer. The casting it rough and very well suited to the heavy leveling of a brush applied enamel.

i-PzGLrpS-X2.jpg


My daughter was home sick for a few days and very much wanted to help daddy in the shop. I bought her some small gloves and
turned her loose. She's pretty good about "staying in the lines" and this isn't exactly a very detailed job.

From there I took the moving parts and chucked them up in the lathe and used some scotchbrite to remove the rust patina and then replaced the old washers with some custom turned spacers of stainless.

i-NmzKbfL-X2.jpg

i-s59PTjN-X2.jpg

i-LQ7ZXrc-X2.jpg

i-pj7NvKt-X2.jpg


Since I can only find Rustoleum in smoke gray I mixed it 50/50 with white to get a lighter gray. That will be my default color mix from now on as I like two different grays on machines. I think because I have a few Rockwells and they traditionally use a light and dark gray and I like the way that it separates the parts.

i-Xx26fVV-X2.jpg


Fixing up the tools in the shop is like taking baby steps toward the idea of a "completed" shop. When I first found this site it was through Jacks garage and then I found Andy's meticulous and minimal garage. More amazing to me than their attention detail is that they achieved something that seems inconceivable (you keep using that word, I do not think it means what you think it means) and that is that they finished. They finished their garages and all that was left for them to do is to enjoy and work in them.

Some day, some very distant day, that might be me. For now I'm taking small steps, eating the elephant one bite at a time.

Gregor
 
OP
S

sakurama

Well-known member
Joined
Oct 10, 2010
Messages
1,458
Location
Portland - the cool one.
With the facing done I moved onto the doors of the closet. I found a piece of ply and used my Festool jig to test drill the hinge pockets.

i-Qdn8nRp-X2.jpg


Sorry for the very obvious watermark - Apple has dropped support for Aperture so I'm attempting to convert to Lightroom and it's going to take a little bit before I am settled into the new digs. I'll be toning that down.

Unfortunately I haven't been building cabinets in a few months and forgot the golden rule of the 32mm euro cabinets - everything must be divisible by 32mm. Since I plowed ahead and had cut my doors to simply be the interior dimension of the cabinets plus a full 18mm overlay they were not evenly divisible by 32mm and so the lower pockets, when I flipped the jig and referenced off the bottom, were not in the right place.

Time to make a fix...

i-MVXHjSd-X2.jpg


i-BHrFZ3g-X2.jpg


Sorry lathe - I promise to clean you really well...

i-c5C2C9Q-X2.jpg


i-3ZQZ8P7-X2.jpg


So I made some plugs, glued them in and and then, in order to get around the issue, drilled a couple of holes in an extra rail that I paired with my 32mm jig rail.

i-TSdh4HM-X2.jpg


i-KCfX2QR-X2.jpg


With a pair of doors cut I test fit them to the cabinet. So far so good.

i-T5s88BX-X2.jpg


Until I try them on the cabinets that will have the drawer boxes in them that I already made, and bought the slides for. I tested measured it out but didn't account for the middle part of the slide extending out and it hits the door...

i-5vSsW69-X2.jpg


I suppose I have a few options but none that are all that appealing. I'm going to just plow forward on the doors and think about what will be the easiest way to fix that. I could notch the inside of the doors to allow for the slides, I could route a channel into the drawer on one side and then space out the slide or I could look for some undermount slides that would hopefully work with the boxes I already have. Or remake the boxes... Like I said, nothing appealing.

i-WjzKmDg-X2.jpg


Since the weather has been good I wanted to get the doors edge banded and coated with their first coat of poly before the rain today.

i-gzNsbz5-X2.jpg


I really didn't have any idea what the sapelle would look like when it was poly'd so I have to say that I was more than pleasantly surprised at how nice the grain and color looked when I put the polyurethane down.

I also have no explanation for my Dr. Suesse outfit. I think my kids dressed me that day and I don't spend much time looking in a mirror.

Gregor
 

atxgsa

Active member
Joined
Jul 21, 2010
Messages
33
I know some snowboard / ski kids that would mug you for that hat. damn good choice I would say.
 

TimRaleigh

Active member
Joined
Nov 27, 2013
Messages
27
They're turning into a big pain in the ***. Mostly due to Ikea not following the rules. Bastards.

...Ikea made their first set of 32mm holes set back at around 28mm instead of the traditional 37mm.
Sorry, I know the feeling. I did try to let you know...

I suppose I have a few options but none that are all that appealing.

You could use a zero protrusion hinge with a horizontal mounting plate vs. a cruciform plate.
A little more expensive than the standard hinge but it should save a bunch of work and time.
I really didn't have any idea what the sapelle would look like when it was poly'd so I have to say that I was more than pleasantly surprised at how nice the grain and color looked when I put the polyurethane down.

Yup that grain looks great!
Tim
 
OP
S

sakurama

Well-known member
Joined
Oct 10, 2010
Messages
1,458
Location
Portland - the cool one.
Thanks!

Yeah, my assistants wear their hats like that. Not sure how it ended up like that - I blame my daughter. At least my pants aren't hanging mid-thigh. Every time I'm in NYC and see one of the kids with their pants like that I just roll my eyes.

Yes, Tim, I was warned. I did try to find a hinge that would swing out more. I stumbled onto it once and it was referred to as a "refrigerator" hinge for cabinets that held a small refrigerator. Oddly enough I didn't bookmark it and then could never find it again. I looked for weeks too. None of my hardware suppliers knew of it either so I gave in and when for the standard. Those Blum's would get the door out of the way but then the hinge would be the issue.

I'm going to just let it roll around for a bit and work on something else and see if anything comes to me. That's what I did on the drawer pulls and I'm actually making progress on them right now...

Gregor
 

JasonJ

Well-known member
Joined
Aug 4, 2006
Messages
424
Location
Las Vegas
I have enjoyed this thread tremendously. I love all the different tangents it takes. And being a motorcycle guy, I love the bikes... but I love this picture. After following this thread for so long it finally shows a "flaw" or maybe a short "'F' IT, it's good enough." thought. Maybe its your daughters painting, maybe it's your lathe work, but I absolutely love the globbed up, brushed on paint against the the finely detailed machine work of the metal.
i-pj7NvKt-X2.jpg
 
Last edited:
To avoid these ads, REGISTER NOW!
OP
S

sakurama

Well-known member
Joined
Oct 10, 2010
Messages
1,458
Location
Portland - the cool one.
I have enjoyed this thread tremendously. I love all the different tangents it takes. And being a motorcycle guy, I love the bikes... but I love this picture. After following this thread for so long it finally shows a "flaw" or maybe a short "'F' IT, it's good enough." thought. Maybe its your daughters painting, maybe it's your lathe work, but I absolutely love the globbed up, brushed on paint against the the finely detailed machine work of the metal...

Yeah, it's a **** it moment. Stripping the casting down to bare metal really reveals the roughness of the casting. I considered pulling out the flap wheel and dressing up some of the casting flaws and then I thought, "It's a press! It's just a press!" And I let it slide.

It can be hard to restrain myself sometimes from being too tweaky about certain things and at other times I have to walk away in order to come back with the energy to do something the right way. Or worse, to do something over. Always searching for that balance. Always searching...

Gregor
 

coma13

Well-known member
Joined
Nov 5, 2012
Messages
247
Gregor, thank you for documenting this. You make me feel like a sane person, or maybe just a little less crazy. I share some of your tweakish tendencies but lack the woodworking skills you do, so it's actually inspiring that maybe my desire to do everything right will make the woodworking stuff come easily when the time for me to embark on that medium arrives.

I actually just bought a house in Portland a few months ago and will be building a garage over the next couple months before moving in, then renovating the house a bit at a time. This thread has stoked the flame for sure.

Thanks again!

-Eric
 

Modern Jess

Well-known member
Joined
Jan 2, 2011
Messages
1,362
Location
Bay Area, California
It can be hard to restrain myself sometimes from being too tweaky about certain things and at other times I have to walk away in order to come back with the energy to do something the right way. Or worse, to do something over. Always searching for that balance. Always searching...

This is something I struggle with daily. Truly.
 
OP
S

sakurama

Well-known member
Joined
Oct 10, 2010
Messages
1,458
Location
Portland - the cool one.
Gregor, thank you for documenting this. You make me feel like a sane person, or maybe just a little less crazy. I share some of your tweakish tendencies but lack the woodworking skills you do, so it's actually inspiring that maybe my desire to do everything right will make the woodworking stuff come easily when the time for me to embark on that medium arrives.

I actually just bought a house in Portland a few months ago and will be building a garage over the next couple months before moving in, then renovating the house a bit at a time. This thread has stoked the flame for sure.

Thanks again!

-Eric

Hi neighbor!

I think the thing for me has been to try to treat wood more like metal. I used to think of wood as being very "loose tolerance" compared to metal but it really requires the same mindset of precision. Or it should.

It's something I still struggle with as my mind tends to think in percentages so something 8 or 12' long can be a few mm out right? Not really. It's also tricky as the two worlds use different measuring devices. DRO's and digital calipers for metal and a tape measure for wood. I find myself using the calipers all the time for dados, rabbets and the like and prefer mm over inches for the greater granularity it offers.

One thing that has helped is marking over measuring. Check out the tips from here: http://www.familyhandyman.com/carpentry/the-best-carpentry-tips-and-advice/view-all

I seem to find more useful stuff from those guys than I can keep track of.

Good luck and let's meet up for a ride as the weather improves.

Gregor
 
OP
S

sakurama

Well-known member
Joined
Oct 10, 2010
Messages
1,458
Location
Portland - the cool one.
With a couple of days of nice weather I managed to both finish the doors and take a day off to go for a ride. It was actually a struggle to convince myself that I should take a day off from the house as I've been making decent progress but after a few hours of procrastination I hopped on the Duc and headed for the coast.

Here's a shot of the final coat of poly on the Sapelle. I have used three coats before but I didn't want to bury the grain so I went with two coats, sanding with 150 grit after the first coat completely dried.

i-HNFD3Fp-XL.jpg


It's really beautiful grain. Makes me completely regret the choice of stained walnut for the kitchen. Almost to the point of wanting to do it over. One of the big things I learned along the way is that staining is a horrible thing that I will never ever do again. It's just way too sensitive. Any sanding after the stain, even if you've put down a coat of poly, stands a very good chance of sanding through the stain and that ends up creating a lighter area that is next to impossible to restain to match. Besides it kills the color. I'm not saying I'm going to redo the kitchen I'm just saying the thought crossed my mind.

Which lead to the next part of the puzzle - drawer pulls.

I quit on them as I was getting frustrated with the difficulty of making what in many ways could be more easily bought... mostly. I didn't like most of the designs but couldn't find anything that I did like and I really wanted something that would stretch the whole drawer.

One of J's critiques is that she doesn't want things to look "homemade" which in her mind the "unfinished" welds on the bathroom towel bar look like. I see really nice heat control and good stacks of bead and well, she doesn't. Women.

i-ZgXjNTB-XL.jpg


So I experimented with options for joining the rod. The two outer ones are fairly common but the miter didn't seem to be as I found almost none and certainly none that were very long. The more I considered it the more I liked it as it was simple, clean and wouldn't catch your clothing as you walked by. It was also a pain to fabricate but much easier to weld and then finish.

i-9fHM783-XL.jpg


I rigged up a stop on the cold saw and started lopping off sections of stainless.

i-dLnLLst-XL.jpg


Then each piece was measured, trimmed to exactly 60mm, faced and the edge chamfered in the lathe.

i-WqMJTS2-XL.jpg


From here it was back to the cold saw and a few sacrificial cuts to be able to set a stop exactly midway between the ends accounting for blade width and then cut them in half at 45° which worked out surprisingly well.

i-nnwFcRP-XL.jpg


And then back to the lathe.

i-sMDRq99-XL.jpg


i-NkJJpSk-XL.jpg


That funny round thing with the chuck is a tailstock turret attachment. It's not the most precise way of boring holes but for a "production run" of drawer pulls it allow you to center drill, drill and then tap just by spinning the turret. It's helping the process.

i-jHbNxrv-XL.jpg


I'm about halfway through the drilling and tapping and these are just the short ends. Each drawer will have to have the long part cut to length and then one side welded to aid in the alignment of the other side's cut. It seems like a lot of work for drawer pulls... and it kinda is actually. Certainly this goes into the category of probably not worth the time I've invested.

So I doubled down by making enough for the closet doors too! :lol_hitti

Gregor
 

Sonace

New member
Joined
Feb 12, 2015
Messages
1
I've been a lurker for quite some time and found this thread a year ago or something. I've been baffled and amazed at the amount of detail in your work.

I'm about half a year away of owning a 60m2 garage myself which will be converted into a bike garage and partly a woodworking shop. I'll be having a go at those beautiful cabinets as well! Got the shopping list for the green kool-aid ready too.. needed to persuade the wife for spending that much money on tools... promised to build her a kitchen in the future haha.

This will be my go to stop if I need to know something about just about anything. You've really inspired me (and it's safe to say alot of other people) to Do Work :). Loved your BMW build and everything else.

Keep up the good work and know that I'll be stealing some ideas in the future hehe. (If that's alright ofc.)

Greetings from The Netherlands,
Arjen
 

slik560

Well-known member
Joined
Oct 5, 2009
Messages
787
Location
Kansas, USA
I think IKEA needs to see the most recent sections of this thread and revisit their quality control and vendor selection procedures. ;)
 

rvieceli

Well-known member
Joined
Nov 3, 2013
Messages
779
Location
Illinois
Gregor - You never cease to amaze me!!! And I mean that in a good way, I think. ;-)

However, I really believe you need to all in on these and make quite a few extras while you have the set up going. You know you'll want them somewhere else in the future.

Ron
 
Last edited:
OP
S

sakurama

Well-known member
Joined
Oct 10, 2010
Messages
1,458
Location
Portland - the cool one.
I've been a lurker for quite some time...

Keep up the good work and know that I'll be stealing some ideas in the future hehe. (If that's alright ofc.)

Greetings from The Netherlands,
Arjen

Thanks Arjen. I love the Netherlands. I've been a few times, once on a pilgrimage to visit Rudi Ottenhauf BMW and Bakker Framebouw and to visit a few coffee bars. So many brilliant and amazing creatives there.

I think IKEA needs to see the most recent sections of this thread and revisit their quality control and vendor selection procedures. ;)

I think they'd agree that their cost saving measures were effective. :dunno:

Gregor - You never cease to amaze me!!! And I mean that in a good way, I think. ;-)

However, I really believe you need to all in on these and make quite a few extras while you have the set up going. You know you'll want them somewhere else in the future.

Ron

Thanks Ron. You're probably right but I broke down the miter set up so I could make a tool holder for the tailstock turret. I broke a tap in one of them and so wanted to make a tap holder with a second drill chuck that would allow the tap to slip instead of break.

I did make enough for about 2-3 extras but that was more to account for mistakes.

Those look really nice. How did you chamfer the 45° end?

Hey Jess. I just did it on the belt/disc sander with a quick spin. It's one of those tools that gets used about every day and I'm glad I held out for a good one. Actually I bought a beat up one that could never keep the belt tracking and replaced it with this one - another lesson in buying good tools.

Gregor
 
OP
S

sakurama

Well-known member
Joined
Oct 10, 2010
Messages
1,458
Location
Portland - the cool one.
Of course you have a turret for your lathe.

Great work, as always. Looking forward to seeing the fixture you make to align these for welding.

You know how this goes Sean: a simple part requires jigs and fixtures and before you know it you have way more time into the preparing-to-make than the making. I'm really considering some 8020 off eBay to make "wings" for the cold saw as making two miter cuts on the long part, that are perfectly square, will be the biggest trick. 8020 has a lot of uses but you have to get into the game first...

Gregor

PS for those of you who've never heard of 8020, I apologize for the time you're about to lose...
 
OP
S

sakurama

Well-known member
Joined
Oct 10, 2010
Messages
1,458
Location
Portland - the cool one.
Quick question: did you make one, then clear it with J before embarking on this task? hope she still likes the choice when you are done.

Here's a little secret if you want to avoid design by committee: take several years to complete a project and you'll soon discover that the question isn't over "what" drawer pull but becomes any drawer pull. :)

I know her taste pretty well so i know she'll like the design but at this point she's just hopeful to have to "a" pull...

Gregor
 

rabies

Well-known member
Joined
Jan 14, 2015
Messages
81
___________________________​

i-Mj76QCs-X2.jpg

i-D7vs2m3-X2.jpg

Gregor

ma ma meear ehh ay mm:drool::drool:

i enjoyed spying the elderly guy randomly in shots.
was curious as to why you didnt put all that "scrap" materail you junked on craigslist for free. people like me would have been more than happy to come haul away loads of scrap you tore out. :)
i see that the woodworking bug has nabbed you...or not really. seems as though you have been a master of it before..
 
Last edited:

coma13

Well-known member
Joined
Nov 5, 2012
Messages
247
Hi neighbor!

I think the thing for me has been to try to treat wood more like metal. I used to think of wood as being very "loose tolerance" compared to metal but it really requires the same mindset of precision. Or it should.

It's something I still struggle with as my mind tends to think in percentages so something 8 or 12' long can be a few mm out right? Not really. It's also tricky as the two worlds use different measuring devices. DRO's and digital calipers for metal and a tape measure for wood. I find myself using the calipers all the time for dados, rabbets and the like and prefer mm over inches for the greater granularity it offers.

One thing that has helped is marking over measuring. Check out the tips from here: http://www.familyhandyman.com/carpentry/the-best-carpentry-tips-and-advice/view-all

I seem to find more useful stuff from those guys than I can keep track of.

Good luck and let's meet up for a ride as the weather improves.

Gregor


Thanks for the heads up. I actually came across family handyman from a previous post in this thread and have already found it to be an invaluable resource.

I will drop you a line when I'm settled in and can get out to explore some of the gorgeous roads that part of Oregon has to offer.
 

Modern Jess

Well-known member
Joined
Jan 2, 2011
Messages
1,362
Location
Bay Area, California
Hey Jess. I just did it on the belt/disc sander with a quick spin. It's one of those tools that gets used about every day and I'm glad I held out for a good one. Actually I bought a beat up one that could never keep the belt tracking and replaced it with this one - another lesson in buying good tools.

Ah. Makes sense. And yeah, I definitely get the point of a really good tool. As I would like to try my hand at making pocket knives, I am holding out for one of the really good knifemaker's belt sanders.

PS for those of you who've never heard of 8020, I apologize for the time you're about to lose...

Heh. I'm familiar with it, and have been wanting to make something with it for a while. Like unistrut, but much more precise.
 
OP
S

sakurama

Well-known member
Joined
Oct 10, 2010
Messages
1,458
Location
Portland - the cool one.
Was curious as to why you didnt put all that "scrap" materail you junked on craigslist for free. people like me would have been more than happy to come haul away loads of scrap you tore out...

Actually I recycled most everything that I tore out of the house. I was surprised at how much I got for all the wiring - like $5-600 for the copper. The doors and other things I did put on Craigslist for free. That or on the curb with a FREE sign. Someone even took my FREE sign too. :headscrat

Ah. Makes sense. And yeah, I definitely get the point of a really good tool. As I would like to try my hand at making pocket knives, I am holding out for one of the really good knifemaker's belt sanders.

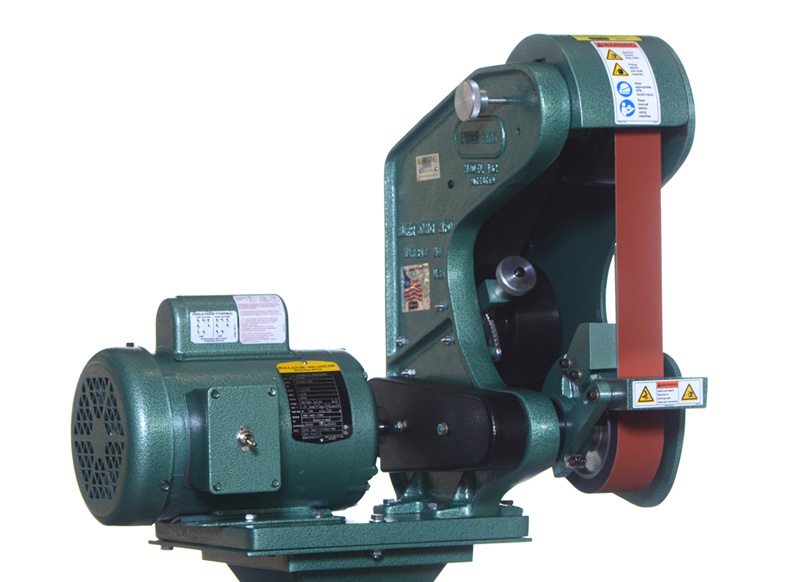
Two inch Burr King! My friend Chris scored two on Ebay - a two inch and a one inch and I used the 2 inch one a lot when we were finishing the Revit bike. It is the bomb. Belt changes take seconds, it's solid as a rock and is the standard in the industry. I would love to find one down the road.

And don't even get me started on pocket knives. Oregon allows automatics so before I moved here I was very infatuated with them (what kid didn't want a switchblade?) and have now settled on on a Benchmade Emissary 3.5 as my EDC pocket knife. Of course my main instigator, Ben, got one and I was hooked. Nicest knife I've owned.

I've always loved the Chris Reeve's Sebenza's but the price has always kept me from getting one. I love the idea of making knives but it's something I'm going to aggressively resist as I need another interest like I need another project.

But anyway... Burr King 2x48.

4822013.jpg


Maybe serious knife makers use something else but man this thing was amazing and I wanted one so bad after using it for a weekend.

Gregor
 

Modern Jess

Well-known member
Joined
Jan 2, 2011
Messages
1,362
Location
Bay Area, California
Two inch Burr King! My friend Chris scored two on Ebay - a two inch and a one inch and I used the 2 inch one a lot when we were finishing the Revit bike. It is the bomb. Belt changes take seconds, it's solid as a rock and is the standard in the industry. I would love to find one down the road.

And don't even get me started on pocket knives. Oregon allows automatics so before I moved here I was very infatuated with them (what kid didn't want a switchblade?) and have now settled on on a Benchmade Emissary 3.5 as my EDC pocket knife. Of course my main instigator, Ben, got one and I was hooked. Nicest knife I've owned.

I've always loved the Chris Reeve's Sebenza's but the price has always kept me from getting one. I love the idea of making knives but it's something I'm going to aggressively resist as I need another interest like I need another project.

But anyway... Burr King 2x48.

4822013.jpg


Maybe serious knife makers use something else but man this thing was amazing and I wanted one so bad after using it for a weekend.

The Burr King is on my short list. But so is the Beaumont Metal Works KMG model (in either of these two configurations):

attachment.php


attachment.php


And as it happens, a small Sebenza is my EDC. Just this once, maybe, I can out-Gregor Gregor. :D

IMG_4296.jpg
 

Attachments

  • kmg-1.jpg
    kmg-1.jpg
    83 KB · Views: 3,836
  • kmg-2.jpg
    kmg-2.jpg
    101.6 KB · Views: 3,831
To avoid these ads, REGISTER NOW!
Top Bottom