To avoid these ads, REGISTER NOW!

CM pre-Block Grinder 115.19500 restore

torqueman2002

Well-known member
Joined
Jun 3, 2009
Messages
6,138
Location
SE Michigan
Feb. 06, 2018 - Because of PhotoBucket's change in 3-rd party hosting, this thread has been edited to post pictures directly. Therefore, the first post has been split and continued begning in post #36, below.

This is a continuation of post #1291 from the "let's see your craftsman block grinders" thread. http://www.garagejournal.com/forum/showthread.php?p=3887111#post3887111

CL ad.
attachment.php


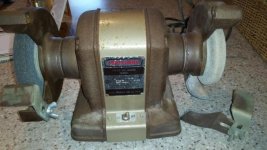
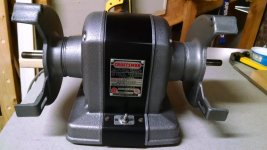
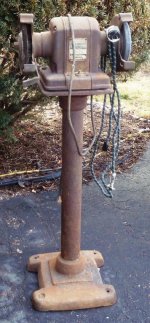
Brought it home for $20.
attachment.php


Close up of tag/label. I make it out to be a 1/4 not 3/4 HP. Looks like 1 61 on lower RH, manufacture date probably.
attachment.php


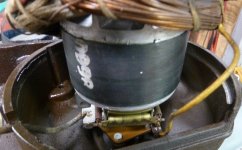
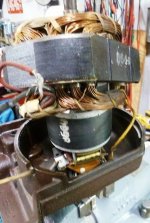
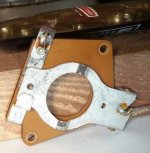
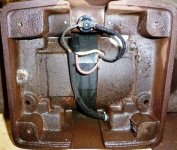
No date stamp on bottom cover, no capacitor or start-up relay; but 3-wires leading towards windings. Probably it uses a start-up switch to enable/power the start-up winding. {Later pictures reveal the 'white' wire does lead to a start-up winding switch.' A second 'white' wire [not visible] runs from the other side of the switch to the start-up winding.}
attachment.php


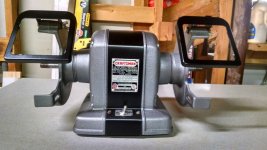
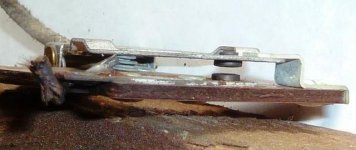
I removed the RH grinding stone, performed a visual inspection - no cracks. Performed a 'ring-test' - failed. I broke the wheel apard before disposing of it in the trash. Still no signs of a crack, but it did have a semi-hard arbor bushing. I wonder if that is why it failed the 'ring-test'? It sure as hejj 'rang' when it was hit with the hammer before it broke apart.

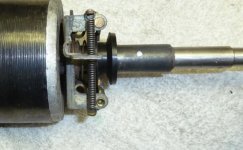
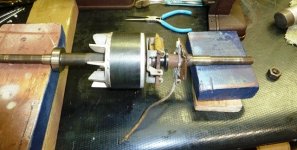
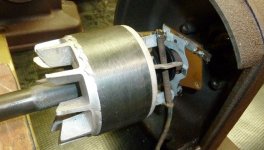
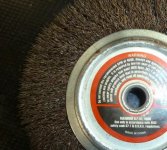
LH wire wheel removed. Note: the inner flange was on backwards, and a brass fitting was used as a spacer. Also the wire wheel's crimped flange was loose. :wtf:
attachment.php


attachment.php


attachment.php


Continued in post #36, below.

Thanks for looking. :)

Comments and suggestions are encouraged.
 

Attachments

  • CM025HP11519500Akronforinternet.jpg
    CM025HP11519500Akronforinternet.jpg
    12.8 KB · Views: 359
  • P1040025.jpg
    P1040025.jpg
    69.6 KB · Views: 342
  • P1040029.jpg
    P1040029.jpg
    89.7 KB · Views: 342
  • P1040042.jpg
    P1040042.jpg
    117.5 KB · Views: 332
  • 025HPAkronforinternetP1040104.jpg
    025HPAkronforinternetP1040104.jpg
    50.2 KB · Views: 325
  • 025HPAkronforinternetP1040106.jpg
    025HPAkronforinternetP1040106.jpg
    134.4 KB · Views: 319
  • 025HPAkronforinternetP1040107.jpg
    025HPAkronforinternetP1040107.jpg
    53.5 KB · Views: 323
Last edited:
To avoid these ads, REGISTER NOW!

drivesitfar

Well-known member
Joined
Oct 23, 2013
Messages
36,004
Location
Pacific Northwest
Mee too!! good luck and looks like you are well on your way.

also just wondering if you make the smaller blocks you own the other team colors that are opponents of Michigan? that way since Michigan is a 1 HP beast with the double wire wheels it never loses?

Since this one is so close to the same size maybe a Green Bay Packer's color theme?
 
OP
T

torqueman2002

Well-known member
Joined
Jun 3, 2009
Messages
6,138
Location
SE Michigan
Mee too!! good luck and looks like you are well on your way.

also just wondering if you make the smaller blocks you own the other team colors that are opponents of Michigan? that way since Michigan is a 1 HP beast with the double wire wheels it never loses?

Since this one is so close to the same size maybe a Green Bay Packer's color theme?
Good idea!

I do have a bit of a dilema on my hand though.

I promised my youngest the 'next' grinder would be in MSU's colors - Green and White. That's her alma mater, and rival of her brother's alma mater - U of M, and which Go-Blue! was dedicated.

So, how can I make MSU's grinder less than 1 HP? :willy_nil

Maybe I need to paint the Baldor MSU's colors?

Looks like a duel restore. :3gears:
 

drivesitfar

Well-known member
Joined
Oct 23, 2013
Messages
36,004
Location
Pacific Northwest
well a promise is a promise or you can tell her you are waiting for a 1HP like her brothers. that might be pretty spendy though if Balane is selling smaller ones for $250 plus shipping.

whatever you decide should be great and feel free to bounce off ideas to the thread because as you know the "block" guys are a pretty good group.

best of luck and looks great so far
 

832subway88

New member
Joined
Mar 9, 2015
Messages
2
Location
Houston, TX
Im in need of some help, and hoping you might be the one here to help me. I was passed down this same bench grinder 115.19500.
My problem is, there was no power plug at all. im having trouble finding out how to wire this thing up. I have 1red 1black and 1white wire coming off the motor and the start up switch wasnt connected either.
im thinking the white wire coming off the start up switch goes to the white wire off motor.
I think the red wire is grounded and the black is the other hot wire.
If that is correct, how would I wire it to a new plug that has white, black and green wires?
Any help would be greatly appreciated! Thanks
 
OP
T

torqueman2002

Well-known member
Joined
Jun 3, 2009
Messages
6,138
Location
SE Michigan
I'll do my best. See my comments in Blue.
Im in need of some help, and hoping you might be the one here to help me. I was passed down this same bench grinder 115.19500.
My problem is, there was no power plug at all. im having trouble finding out how to wire this thing up. I have 1red
{
1 - the red wire goes to the neutral/white wire of the power cord, it is also in the wire nut with the white wire from the start-up switch}
1black {2 - the black wire goes to the power switch, the other side of the switch connects to the hot/black wire of the power cord} and
1white wire coming off the motor {3 - the white wire from the coils goes to the start-up switch}
and the start up switch wasnt connected either.
im thinking the white wire coming off the start up switch goes to the white wire off motor.
I think the red wire is grounded
{4 - The red wire from the coil is tied with the white wire from the start-up switch and the white/neutral wire from the power cord.}
and the black is the other hot wire.
If that is correct, how would I wire it to a new plug that has
white, {see 3, above}
black {see 2, above} and
green wires? {5 - The green wire in the power cord goes to the case. The original grinders did not have a grounded power cord, you will need to add this.}
Any help would be greatly appreciated! Thanks
I hope this helps.

Feel free to get back with me, if you have any questions. PM is more reliable, because the 'New Posts' search button doesn't always return every new post, for some reason. :dunno:
 
Last edited:
OP
T

torqueman2002

Well-known member
Joined
Jun 3, 2009
Messages
6,138
Location
SE Michigan
3/4hp, a rare grinder, but those stands are even more rare!!
Yes, the rt 3/4-HP Blocks are far and few between. The 1 in my sig. line, was listed for $350 for months. I called the seller and we met. I was happy he sold it for $90 with the stand.

But, imagine my thrill when I spotted this CL ad in the local CL!
Capture%20a1.jpg


Then, I looked closer. :lol_hitti
Capture%20a2.jpg


In my excitement, I skipped over the keyword - WANTED.

Don't we all, don't we all! :lol:

BTW, it turns out I know the seller er... buyer/lister?

The stands regularly sell for $80 + on eBay; sometime more than a nice grinder.

The base with quench/cooling tray and tool rests are rare too.
 

tjhaas2

New member
Joined
Jul 28, 2015
Messages
1
Working on my own 115.19500 now, rescued from a garage where it was eventually doomed to the garbage can! It runs ok, perhaps slows down a little too fast, but since I have it apart to paint anyway, I'd like to replace the bearings. Any recommendations on where to get the bearings, maybe even made in USA? (yeah right)
 
OP
T

torqueman2002

Well-known member
Joined
Jun 3, 2009
Messages
6,138
Location
SE Michigan
Working on my own 115.19500 now, rescued from a garage where it was eventually doomed to the garbage can! It runs ok, perhaps slows down a little too fast, but since I have it apart to paint anyway, I'd like to replace the bearings. Any recommendations on where to get the bearings, maybe even made in USA? (yeah right)

Sorry for the late reply, I didn't catch your question on my daily look at the threads kicked out by hitting the 'New Posts' button!

If it's not too late, take a look at this thread for several ideas, including bearings.
http://wiki.vintagemachinery.org/PartSources.ashx?NoRedirect=1#Bearings_3
 

Ponchoguy

Banned
Joined
Jul 27, 2014
Messages
3,399
I got bearings for my router from a local power transmission shop. I brought in the old one and he handed me a new one and said "10 bucks". I think it was an SKF bearing and made in the USA.
 

pendragon1998

Well-known member
Joined
Mar 24, 2012
Messages
3,733
Location
NE Georgia
Working on my own 115.19500 now, rescued from a garage where it was eventually doomed to the garbage can! It runs ok, perhaps slows down a little too fast, but since I have it apart to paint anyway, I'd like to replace the bearings. Any recommendations on where to get the bearings, maybe even made in USA? (yeah right)

I got some Japanese bearings for mine. See link in my sig below.
 

paulm12

Well-known member
Joined
Apr 29, 2015
Messages
584
Location
NW Chicago 'burbs
My initial post here. Thanks to all the members for the info on this site, I was able to restore my first power tool, an older Craftsman grinder. Nothing fantastic, but a decent start I think. It started with just replacing the power cord. Then when I saw this site, I decided to do a bit more. I forgot to take a before pic, but it was in ok shape, a little rust and a little wear on the bearings. Before condition and paint scheme was similar to this pic (another restore job from this site) Afterwards, with paint, new power cord, and new bearings. Still need to repaint the shields.


Thanks again for the help.
 

Attachments

  • similar grinder before restore.jpg
    similar grinder before restore.jpg
    37.1 KB · Views: 118
  • IMG_20150813_163923159.jpg
    IMG_20150813_163923159.jpg
    144.6 KB · Views: 135

harleybuilder

Well-known member
Joined
Apr 4, 2014
Messages
287
Location
Southern IL
My initial post here. Thanks to all the members for the info on this site, I was able to restore my first power tool, an older Craftsman grinder. Nothing fantastic, but a decent start I think. It started with just replacing the power cord. Then when I saw this site, I decided to do a bit more. I forgot to take a before pic, but it was in ok shape, a little rust and a little wear on the bearings. Before condition and paint scheme was similar to this pic (another restore job from this site) Afterwards, with paint, new power cord, and new bearings. Still need to repaint the shields.


Thanks again for the help.
Great job. . Really like that color combination. .....
Paint brands and colors?
 

paulm12

Well-known member
Joined
Apr 29, 2015
Messages
584
Location
NW Chicago 'burbs
is just Rustoleum paint, hammered gray for the castings and satin black for the trim piece. I really like how the hammered paint looks on the cast pieces, that surprised me.

Just need to figure out how to remove the glass from the shields so I can sand and paint them. Will be black to match the trim piece.

Thanks for looking.
 

harleybuilder

Well-known member
Joined
Apr 4, 2014
Messages
287
Location
Southern IL
is just Rustoleum paint, hammered gray for the castings and satin black for the trim piece. I really like how the hammered paint looks on the cast pieces, that surprised me.

Just need to figure out how to remove the glass from the shields so I can sand and paint them. Will be black to match the trim piece.

Thanks for looking.
Unfortunately, more than likely when you go to remove the glass or place it back in, the little tabs will break off. If/when they do just use silicone to hold the glass in.
 
To avoid these ads, REGISTER NOW!

pendragon1998

Well-known member
Joined
Mar 24, 2012
Messages
3,733
Location
NE Georgia
Yes, the rt 3/4-HP Blocks are far and few between. The 1 in my sig. line, was listed for $350 for months. I called the seller and we met. I was happy he sold it for $90 with the stand.

But, imagine my thrill when I spotted this CL ad in the local CL!
Capture%20a1.jpg


Then, I looked closer. :lol_hitti
Capture%20a2.jpg


In my excitement, I skipped over the keyword - WANTED.

Don't we all, don't we all! :lol:

BTW, it turns out I know the seller er... buyer/lister?

The stands regularly sell for $80 + on eBay; sometime more than a nice grinder.

The base with quench/cooling tray and tool rests are rare too.

Ha ha ha - I just realized that the photo you have here is of MY block grinder. I was thinking, 'Damn, that looks familiar.' It's the craigslist seller's photo that I included in my restoration writeup.
 

pendragon1998

Well-known member
Joined
Mar 24, 2012
Messages
3,733
Location
NE Georgia
Unfortunately, more than likely when you go to remove the glass or place it back in, the little tabs will break off. If/when they do just use silicone to hold the glass in.

If the glass is intact, you're better off masking it. The tabs will break off in a heartbeat.
 

paulm12

Well-known member
Joined
Apr 29, 2015
Messages
584
Location
NW Chicago 'burbs
Yeah, I read here the cautions about those tabs, and was able to carefully bend up, no problem. Wondering if you have any hints for releasing the glass from the metal. The current adhesive is still quite strong.
 

pendragon1998

Well-known member
Joined
Mar 24, 2012
Messages
3,733
Location
NE Georgia
It was the original seller's photo, and I am pretty sure you're safe. He wouldn't even know it was called a block grinder.

I just carefully worked a razor blade through the adhesive to release the glass.
 

harleybuilder

Well-known member
Joined
Apr 4, 2014
Messages
287
Location
Southern IL
Yeah, I read here the cautions about those tabs, and was able to carefully bend up, no problem. Wondering if you have any hints for releasing the glass from the metal. The current adhesive is still quite strong.
I used a plastic putty knife and slowly worked it around the glass as I applied pressure on the glass. .. the tabs will break trying to bend them back over.
 

paulm12

Well-known member
Joined
Apr 29, 2015
Messages
584
Location
NW Chicago 'burbs
Finally got back to the grinder. I removed the glass slowly with a putty knife, that 50 year old adhesive was tough. I finished painting the shield frames, let them dry a week. What glue/adhesive is best for adhering the glass back to the shield frames?
 

harleybuilder

Well-known member
Joined
Apr 4, 2014
Messages
287
Location
Southern IL
Finally got back to the grinder. I removed the glass slowly with a putty knife, that 50 year old adhesive was tough. I finished painting the shield frames, let them dry a week. What glue/adhesive is best for adhering the glass back to the shield frames?
I used clear silicone on mine.
 

paulm12

Well-known member
Joined
Apr 29, 2015
Messages
584
Location
NW Chicago 'burbs
thanks Harley, some clear silicone worked just fine. And no broken tabs !!! (though I did not re-bend all the way back to tight on the glass).

Final picture below, and thanks again to all for your guidance on my first restore. Except now I think maybe I need to make a decent base .....
 

Attachments

  • grinder finished.jpg
    grinder finished.jpg
    146.8 KB · Views: 102
OP
T

torqueman2002

Well-known member
Joined
Jun 3, 2009
Messages
6,138
Location
SE Michigan
Continued from post #1, above.

The low quality wire wheel joined it's partner.
attachment.php


Next, the LH wheel guard was removed. Note spacer and spring washer orientation with 'fingers' facing towards the bearing.
attachment.php


This view shows the second 'white' wire was routed between the band and winding core without apparent issues.
attachment.php


RH wheel guard removed, spacer - but no spring/finger washer.
attachment.php


I removed the LH casting first, because the bearings sometimes stay on the arbor/shaft. Not an issue if there is nothing holding the bearing back. See RH casting removal for more information.
attachment.php


Lifting the winding/core assembly reveals the second 'white' wire runs from the start-up winding to the start-up winding switch. The switch is held to the RH casting with two 1/4" hex-head bolts. If the RH casting is removed without disconnecting the second 'white' wire, or the arbor/shaft is removed and the RH bearing or nut is on the shaft - the fiber backed switch will not survive.
attachment.php


This is a closer view of the switch assembly. I cut the second 'white' wire as close to the switch as possible and removed the winding/core assembly.
attachment.php


Continued on next post, below.
 

Attachments

  • 025HPAkronforinternetP1040118.jpg
    025HPAkronforinternetP1040118.jpg
    132.5 KB · Views: 218
  • 025HPAkronforinternetP1040117.jpg
    025HPAkronforinternetP1040117.jpg
    48.8 KB · Views: 218
  • 025HPAkronforinternetP1040116.jpg
    025HPAkronforinternetP1040116.jpg
    58.6 KB · Views: 216
  • 025HPAkronforinternetP1040115.jpg
    025HPAkronforinternetP1040115.jpg
    73.9 KB · Views: 215
  • 025HPAkronforinternetP1040114.jpg
    025HPAkronforinternetP1040114.jpg
    58.5 KB · Views: 219
  • 025HPAkronforinternetP1040112.jpg
    025HPAkronforinternetP1040112.jpg
    122.4 KB · Views: 218
  • 025HPAkronforinternetP1040108.jpg
    025HPAkronforinternetP1040108.jpg
    95.9 KB · Views: 219
Last edited:
OP
T

torqueman2002

Well-known member
Joined
Jun 3, 2009
Messages
6,138
Location
SE Michigan
Continued from previous post, above.

Picture of switch screws removed and second 'white' wire cut at the switch, to allow removal of winding/core assembly.
attachment.php


Rotor, centrifugal weights, and start-up switch after RH casting was removed. LH bearing is still on arbor/shaft, RH bearing has been removed from arbor/shaft.
attachment.php


View of arbor/shaft, LH & RH bearings, start-up switch, mounting screws, and CM ignition wrenches.
attachment.php


Start-up switch detail. Second 'white' wire was connected at top terminal, some wire and solder is still visible.
attachment.php


Side view of start-up switch, showing contacts/points in the 'Open' position, which de-energizes the start-up winding at about 3/4 of operating RPM. Normally, at rest/start-up, the contact/points are 'Closed', which energizes the start-up winding.
attachment.php


Detail of centrifugal weight assembly that opens the start-up switch.

At rest the black plastic bushing is extended, note inner spring. The bushing presses on the start-up switch, closing it's contacts (just like breaker points) which electrically connects the field winding (white wire) to the power cord neutral wire.

As the rotor spins-up, the weights swing out against the force of the small diameter springs (1 on each side). At approximately 3/4 of the machine RPM, the bushing is pulled away from the start-up switch, opening the contacts, opening the start-up winding circuit, and de-enrgizing the start-up winding.

Note: this picture is of the rotor assembly from a 1/3 HP CM Model 115.7566 Manufacture Date: 2 59.
attachment.php


Continued on next post, below.
 

Attachments

  • ed85d76b-b141-4a14-b56e-36bdcff8786e.jpg
    ed85d76b-b141-4a14-b56e-36bdcff8786e.jpg
    45.5 KB · Views: 209
  • 025HPAkronforinternetP1040137.jpg
    025HPAkronforinternetP1040137.jpg
    26.2 KB · Views: 208
  • 025HPAkronforinternetP1040138.jpg
    025HPAkronforinternetP1040138.jpg
    39.1 KB · Views: 209
  • 025HPAkronforinternetP1040128.jpg
    025HPAkronforinternetP1040128.jpg
    45.5 KB · Views: 209
  • 025HPAkronforinternetP1040121.jpg
    025HPAkronforinternetP1040121.jpg
    128.8 KB · Views: 218
  • 025HPAkronforinternetP1040119.jpg
    025HPAkronforinternetP1040119.jpg
    124.3 KB · Views: 215
OP
T

torqueman2002

Well-known member
Joined
Jun 3, 2009
Messages
6,138
Location
SE Michigan
Continued from previous post, above.

Bearings - outer face.
attachment.php


Bearing detail [inner face] showing numbers. Outer number is Z97502. Inner number is N D 3202.
attachment.php


OD = 35mm
attachment.php


ID = 15mm
attachment.php


Width = 11mm
attachment.php
 

Attachments

  • 025HPAkronforinternetP1040133.jpg
    025HPAkronforinternetP1040133.jpg
    129 KB · Views: 204
  • 025HPAkronforinternetP1040136.jpg
    025HPAkronforinternetP1040136.jpg
    143.6 KB · Views: 203
  • 025HPAkronforinternetP1040140.jpg
    025HPAkronforinternetP1040140.jpg
    75.3 KB · Views: 203
  • 025HPAkronforinternetP1040142.jpg
    025HPAkronforinternetP1040142.jpg
    42.6 KB · Views: 202
  • 025HPAkronforinternetP1040141.jpg
    025HPAkronforinternetP1040141.jpg
    77.3 KB · Views: 203
To avoid these ads, REGISTER NOW!
Top Bottom