flingwing1969
Well-known member
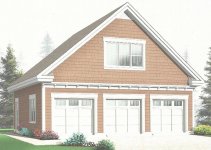
I will be pouring my new shop floor/footings next week. It will look somewhat like the drawing attached, but with a "hay-loft" door above the garage doors and no returns on the eave tails.
The shop will be 32 x 50, post and beam, single story but with attic trusses 2' oc. The trusses effectively provide a 10 x 50 second story space for storage and/or additional shop space. I will install shelving between the trusses both sides from end to end, except for a couple of spaces with doors so that long items can be slid into the spaces there.
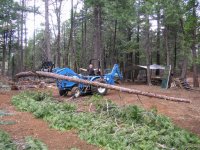
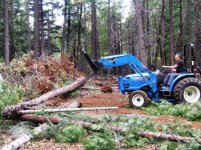
My 38 hp tractor/loader/backhoe/forklift/snow blower will provide the grunt to lift the heavy 6 x 10 beams onto the 4 x 6 posts 8' oc.
Ceiling height will be 10'. Three 8' garage doors will provide primary access to the front and a single 16' garage door will permit drive-through to the rest of my back property - I have 2.5 acres. and a fair amount of equipment to store. I plan on building an 8' shed-roofed porch in front to provide covered outside parking/work area - and a larger outside parking cover in back, over the rear garage door.
I will be putting purlins between the trusses to add stiffness and to provide nailers for the roofing - simple 2x4 studs cut to length (cheap). The roof will be 5-rib 29 ga Energy Star rated metal, 7 1/2:12 pitch. This will shed the snow very well, goes up very quickly, is very light compared to a composite roofing package (the total metal roof system is less than half the weight of the 5/8" sheathing alone), and is exceptionally cost effective since it requires no sheathing (the total materials cost of the metal roof is about the same as the cost of 5/8" sheathing alone).
Each panel is only 19' long so there are no horizontal joints. Each section weighs only 42.2#. Each panel covers 3' of linear roof. The panels can be screwed down without climbing the roof, using plywood walkways placed between the truss webbing - about half the panel can be screwed while standing on the walkway and the other half from a 10' step ladder placed between the trusses. The vented ridge cap can be installed as you go and the next panel slipped under the ridge cap that is held off the end by a piece of 1x scrap. The only high work will be for the final two panels on the gable end.
Electrical service will be 200 amp underground. There will be a 100 amp sub panel in my welding/metal working corner.
I plan on taking photos as work progresses and will be posted here. Wish me luck and speed.
The shop will be 32 x 50, post and beam, single story but with attic trusses 2' oc. The trusses effectively provide a 10 x 50 second story space for storage and/or additional shop space. I will install shelving between the trusses both sides from end to end, except for a couple of spaces with doors so that long items can be slid into the spaces there.
My 38 hp tractor/loader/backhoe/forklift/snow blower will provide the grunt to lift the heavy 6 x 10 beams onto the 4 x 6 posts 8' oc.
Ceiling height will be 10'. Three 8' garage doors will provide primary access to the front and a single 16' garage door will permit drive-through to the rest of my back property - I have 2.5 acres. and a fair amount of equipment to store. I plan on building an 8' shed-roofed porch in front to provide covered outside parking/work area - and a larger outside parking cover in back, over the rear garage door.
I will be putting purlins between the trusses to add stiffness and to provide nailers for the roofing - simple 2x4 studs cut to length (cheap). The roof will be 5-rib 29 ga Energy Star rated metal, 7 1/2:12 pitch. This will shed the snow very well, goes up very quickly, is very light compared to a composite roofing package (the total metal roof system is less than half the weight of the 5/8" sheathing alone), and is exceptionally cost effective since it requires no sheathing (the total materials cost of the metal roof is about the same as the cost of 5/8" sheathing alone).
Each panel is only 19' long so there are no horizontal joints. Each section weighs only 42.2#. Each panel covers 3' of linear roof. The panels can be screwed down without climbing the roof, using plywood walkways placed between the truss webbing - about half the panel can be screwed while standing on the walkway and the other half from a 10' step ladder placed between the trusses. The vented ridge cap can be installed as you go and the next panel slipped under the ridge cap that is held off the end by a piece of 1x scrap. The only high work will be for the final two panels on the gable end.
Electrical service will be 200 amp underground. There will be a 100 amp sub panel in my welding/metal working corner.
I plan on taking photos as work progresses and will be posted here. Wish me luck and speed.
 Anyway, I couldn't use the Jeep's 9.5k winch as a persuader until I got a new battery with dual posts - I didn't want to rewire the winch/starter system - so I used my Warn 6k winch in a receiver mount and my wife's pickup, a couple of straps, some clevises, and a ******-block, and down they went in just the right spot.