To avoid these ads, REGISTER NOW!

VISE REPAIR 101 all vise repairs, lubricants, sources for parts and the tricks to fix

jakemac

Well-known member
Joined
May 21, 2013
Messages
9,035
Location
New England
With care, that should be able to be welded back together. Make sure you find someone who understands welding cast pieces and can pre-heat it and can cool it slowly (with gradual declining heat).

Then it's just a matter of filing the weld so that the dovetail fits back into the housing.

Good luck, and welcome to the forum. :thumbup:
 
To avoid these ads, REGISTER NOW!

bigd451

Member
Joined
Apr 29, 2015
Messages
6
With care, that should be able to be welded back together. Make sure you find someone who understands welding cast pieces and can pre-heat it and can cool it slowly (with gradual declining heat).

Then it's just a matter of filing the weld so that the dovetail fits back into the housing.

Good luck, and welcome to the forum. :thumbup:

Thank you!
Do you think that will be strong enough?
 

CwazyWabbit

Well-known member
Joined
Jan 9, 2015
Messages
1,189
Location
Surrey, UK
Thank you!
Do you think that will be strong enough?

There's one way to find out ...... ;)

It all depends on the skills of the person welding it, go to a greybeard that knows what he is doing, nothing worse than trying to fix someones mess after they tried and failed. This is an area that takes a lot of force so needs to be done properly.
 
OP
D

drivesitfar

Well-known member
Joined
Oct 23, 2013
Messages
36,047
Location
Pacific Northwest
BigD: Irwin now makes Record vices so you might check and see if you can just buy a new part. I have my doubts a braze weld will work unless you do happen to know an expert. A lot of preheating and slow cooling I involved besides the skills to prep and weld. Where are you located?
 

CwazyWabbit

Well-known member
Joined
Jan 9, 2015
Messages
1,189
Location
Surrey, UK
I've only seen one of that style of quick release record vice in the UK, with it's special nut and turning the handle one turn to engage/disengage the nut. I don't know how common they are on your side of the pond.
 

bigd451

Member
Joined
Apr 29, 2015
Messages
6
BigD: Irwin now makes Record vices so you might check and see if you can just buy a new part. I have my doubts a braze weld will work unless you do happen to know an expert. A lot of preheating and slow cooling I involved besides the skills to prep and weld. Where are you located?

Long Island, NY. I'm having no luck finding the part from Irwin. I would rather replace the part with a new one, but if I cant' find it and I have to get it welded to save the vice, I'll give it a shot.

Thanks to everyone for the quick responses:beer:
 

bigd451

Member
Joined
Apr 29, 2015
Messages
6
How does that style of QR nut actually work?

I'm not sure how it mechanically works but I know it worked great while it lasted. When you loosen the handle a little you can then pull the jaws open or push the jaws in to the desired width, then when you start to tighten the handle, it locks back up and gets tighter. Works great for big objects, saves time from having to manually open the jaws all the way. The only reason it broke was because I was trying to straighten a snow plow bracket and I cranked down on the handle with a pipe a little too much:( If I didn't use the pipe, I probably wouldn't be here looking for help. lol
 
Last edited:

danstead

Well-known member
Joined
Jan 14, 2015
Messages
181
Location
Western, Pa
3" Prentiss Bulldog,

Picked up my first Prentiss vice today and would like to replace the jaws--not in great shape. Anyone make / sell 3" jaws for the 512 /522 bulldog?

Also, 1 of the holes in the Dynamic jaw is stripped out--has anyone ever drilled out screw hole and installed a helicoil?

Thanks
 

Attachments

  • P1030267.jpg
    P1030267.jpg
    142.7 KB · Views: 36
  • P1030269.jpg
    P1030269.jpg
    132.8 KB · Views: 35
  • P1030271.jpg
    P1030271.jpg
    146.7 KB · Views: 39

Fretters

Well-known member
Joined
Jan 25, 2014
Messages
4,217
Location
South Yorkshire, England
Works great for big objects, saves time from having to manually open the jaws all the way.

It's always surprised me no end that QR setups never took off over your side of the pond to any degree. The difference between using a QR vice and a standard one is like night and day when working on large, varied size or multiple things. QR really does become like a best friend after only a short while.

We've always been spoilt rotten in that regard over here. Whereas you chaps are spoilt with the truly large vices over there, we have the QR over here. :D Pretty much anything above homeowner or basic grade vices from the main manufacturers would incorporate the Parkinson style quick release system.


The only reason it broke was because I was trying to straighten a snow plow bracket and I cranked down on the handle with a pipe a little too much:( If I didn't use the pipe, I probably wouldn't be here looking for help. lol

I'm quite sure it's a lesson you'll remember though. :D If you're ever contemplating slipping a pipe over a vice handle, it's too much. I'm quite sure there are plenty of us who either have, or even occasionally still do, use a vice to straighten something, but they have definite limits in that regard. Pressing, bending, shaping etc. are all processes which are far better served by other means.

Have you any other, better photo's of that nut? Hard to make out from that one angle how it's designed and what might constitute a possible repair. Getting one of those as a replacement part will be like looking for hens teeth.

If you're in one of the places where the older Record vices were far more common, you might be better off just looking for a proper QR vice and then just using that existing vice as a light weight use one or standard vice, depending on if or how you can repair than nut assembly. The proper, old style QR setup should be far stronger, (judging by the looks of that nut assembly and ACME? thread leadscrew on yours), than the setup used on yours.
 
Last edited:

bigd451

Member
Joined
Apr 29, 2015
Messages
6
Yeah I don't understand why the QR didn't take off over here, I love it and don't think I can use any other (I am very spoiled lol) that's why I want to so badly fix this one. I'll take some more pictures and post them. Hopefully someone can come up with a possible fix. Thanks for the response.:beer:
 

zkling

Well-known member
Joined
Jan 23, 2007
Messages
16,939
Thank you!
Do you think that will be strong enough?

I'd search for a new part first, then if you can't find one; attach it via mechanical support screws then weld or braze it. There is a lot of bending stress going into that small base. Unless it was 100% fracture with no bending distortion before hand, alignment is going to be a factor getting it back together.
 

trijeff

Well-known member
Joined
Jan 21, 2015
Messages
1,359
Location
Northern Cali
Picked up my first Prentiss vice today and would like to replace the jaws--not in great shape. Anyone make / sell 3" jaws ...?

I would suggest PM'ing the Rev KMScott - when I got my 98 that was the first msg I sent ;). That said, depending on his work load, this is also something that could be done fairly easily by a decent machine shop or friend the appropriate setup, these are nowhere near as complex as the Parker jaws of which he is seriously the world-wide master :bowdown:
 

danstead

Well-known member
Joined
Jan 14, 2015
Messages
181
Location
Western, Pa
Trijeff and Vintage nut: Thanks for the info and the offer to make jaws! I have contacted KMS

For now I plan to clean up the vise to see if any major issues. I do know 1 of the jaw screw holes is stripped out, has anyone ever repair with a helicoil?

Also, to remove the spindle shaft. Looks like the nut has 2 tangs that need bent upwards-- is this correct? First image

Not sure how old vise is but I do see a C12 on the base of the housing.

Thanks all! Will be in NYC for a few days- chat later
 

Attachments

  • P1030279.jpg
    P1030279.jpg
    136.6 KB · Views: 36
  • P1030277.jpg
    P1030277.jpg
    132.7 KB · Views: 33
  • P1030302.jpg
    P1030302.jpg
    138 KB · Views: 37
  • P1030275.jpg
    P1030275.jpg
    133.3 KB · Views: 38
  • P1030291.jpg
    P1030291.jpg
    139.4 KB · Views: 34

BFBOB

Well-known member
Joined
Sep 20, 2011
Messages
5,073
is it possible to drill tap Deeper with same thread size, and use longer bolt?

^^^This first.
Helicoils are very easy to use, but the kit you'll need will cost around $20. It includes a special sized tap and drill bit along with several inserts. You just drill out the hole to the proper size,using a drill press preferably to keep it parallel to the leadscrew, tap it with the Helicoil tap, and screw the insert in with the installation tool. I'd sure try going deeper first- practically no cost there!
 

trijeff

Well-known member
Joined
Jan 21, 2015
Messages
1,359
Location
Northern Cali
Also, to remove the spindle shaft. Looks like the nut has 2 tangs that need bent upwards-- is this correct?

Danstead: that is the crown, or castellated, type collar. My understanding is to remove you can try to heat and carefully bend out, but they will most likely break anyways. That's why there are more prongs. HOWEVER, I suggest using a Dremel or cutoff tool of some sort and just getting rid of that POS and just putting on a normal collar with set-screw ... doing this to my P98 now. You will thank yourself down the road when you need to service.
 

GETRIDAONE

Well-known member
Joined
May 21, 2013
Messages
1,549
Location
Auburn, GA
Jeff & danstead. I just removed the collar on my Prentiss 98 by using a small
Chisel and about 3 or 4 wacks and the tangs came off clean even with collar. The two indents
lined up with the handle each way. Jeff a 1 1/2" collar might be to thick to clear the
Inside ? I noticed you have not removed the nut on yours, mine is stuck so tight I am
Scared I'll break it trying to get it to move.
 
To avoid these ads, REGISTER NOW!

trijeff

Well-known member
Joined
Jan 21, 2015
Messages
1,359
Location
Northern Cali
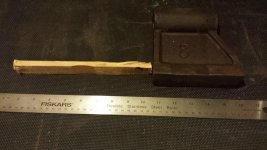
GRAO: I have actually removed the nut. Here's a photo of the nut and the piece of wood I used to bang it out with a 4# sledge - the wood is actually pictured in the approximate position I used while banging (i.e., keep it as low on the unit as you can). To loosen before banging I just used some WD-40 and let it sit overnight, sprayed it liberally all around the base of the nut. I'm assuming that you have already successfully removed the nut pin?

Prentiss 98 Nut.jpg

As for the shaft collar, my measurements came up with 1.505” for the lead screw and 2.598” as the total available width … seems as though something like this would work just fine? Or am I smoking the good stuff? :pimpflash
 

GETRIDAONE

Well-known member
Joined
May 21, 2013
Messages
1,549
Location
Auburn, GA
I have been soaking it in acetone/trans fluid. The pin came out just fine. That collar might fit OK, I just thought the bigger collar would be thicker and could be an issue. Kevin said he sold you the jaws off his 58. He said when he worked on some more he would let me know. The one I got didn't have any jaws at all.
 

Fretters

Well-known member
Joined
Jan 25, 2014
Messages
4,217
Location
South Yorkshire, England
There's fairly little stress places on the threads for the insert screws, as they're literally just holding the inserts in position when the unit isn't clamped up. One thing I'd try first, bearing that in mind, is just fitting the insert and holding it in place with the other screw, and then dip the threads of the screw going into the stripped hole into epoxy resin, to coat the threads liberally, then push the screw into the hole and leave it for the epoxy to set. Make sure you clean the hole out thoroughly first, to remove any debris and oil and grease. Once the epoxy sets, you should be able to unscrew the screw and the epoxy will have formed into threads.

Any epoxy which has stuck to the insert can easily be removed from the insert by dropping the insert into hot/boiling water. That'll make it brittle and easier to remove. An epoxy thread may well be plenty strong enough for the purpose, but it's not hard enough to affect the drilling or tapping process if not.
 

danstead

Well-known member
Joined
Jan 14, 2015
Messages
181
Location
Western, Pa
Fretters,
I use a product called Armstrong A-12 to bond stainless and Alum to torlon, vespal and other metals. Same thing occurs, after hardening threaded parts can be unscrewed. Although I some times need to heat parts to 100C for about 1hr. I thought about filling stripped hole with A12, inserting screw and closing jaws

Thanks for the idea!
 

bigd451

Member
Joined
Apr 29, 2015
Messages
6
It's always surprised me no end that QR setups never took off over your side of the pond to any degree. The difference between using a QR vice and a standard one is like night and day when working on large, varied size or multiple things. QR really does become like a best friend after only a short while.

We've always been spoilt rotten in that regard over here. Whereas you chaps are spoilt with the truly large vices over there, we have the QR over here. :D Pretty much anything above homeowner or basic grade vices from the main manufacturers would incorporate the Parkinson style quick release system.


I'm quite sure it's a lesson you'll remember though. :D If you're ever contemplating slipping a pipe over a vice handle, it's too much. I'm quite sure there are plenty of us who either have, or even occasionally still do, use a vice to straighten something, but they have definite limits in that regard. Pressing, bending, shaping etc. are all processes which are far better served by other means.

Have you any other, better photo's of that nut? Hard to make out from that one angle how it's designed and what might constitute a possible repair. Getting one of those as a replacement part will be like looking for hens teeth.

If you're in one of the places where the older Record vices were far more common, you might be better off just looking for a proper QR vice and then just using that existing vice as a light weight use one or standard vice, depending on if or how you can repair than nut assembly. The proper, old style QR setup should be far stronger, (judging by the looks of that nut assembly and ACME? thread leadscrew on yours), than the setup used on yours.

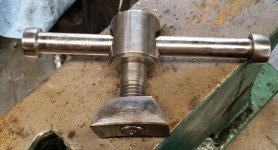
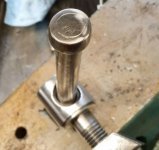
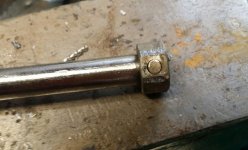
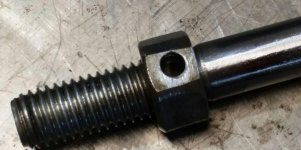
Here's more photos of the part that I need for my old Record QR Vice

What it should look like:


What it looks like now:

Also notice the pin is broken too, I guess I would need that too.

Another angle:
 

joe.striper

Well-known member
Joined
Sep 13, 2013
Messages
2,251
Location
agawam, ma
For the guy who doesn't have a machine shop I wanted to show you how I make swivel clamp handles fast and easy. The one shown here took me 1/2 hour. It was made for my early Parker 26X.

You will need a bench grinder, wire wheel and some way to finish it. I use my Hitachi 4" grinder and I buy the $15 Harbor Freight 5 piece wheel set, with wheels going from 40-600. I also have another grinder with a deburring wheel.

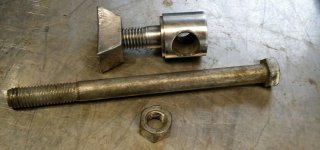
For this one I used a 5/8ths inch bolt. First I run the head through the ginder, removing the points then I roll the head of the grinder wheel until I get a nice round head. Next I attach the nut, cinch it tight and drill it out to accept a pin. I then thread it though the clamp body, tighten it again and pound the pin through.

I repeat the process I used for the head, grinding off the points of the nut, then rotating it through the grinding wheel until it is round and the same size as the other end.

I clamp it in the vise and work it with the grinding wheel and then finally the deburring wheel.

I know this isn't perfect but it works and I know it matches the original on this old, old Parker (pre-wrench) vise. This one was designed to be inset with the clamp body so it would clear the static vise. I used a grade 5 bolt I had laying around.
 

Attachments

  • 20150503_104821_resized.jpg
    20150503_104821_resized.jpg
    148.9 KB · Views: 63
  • 20150503_104848_resized.jpg
    20150503_104848_resized.jpg
    132.1 KB · Views: 54
  • 20150503_104830_resized.jpg
    20150503_104830_resized.jpg
    92.2 KB · Views: 55
  • 20150503_103057_resized.jpg
    20150503_103057_resized.jpg
    124.5 KB · Views: 57
  • 20150503_102149_resized.jpg
    20150503_102149_resized.jpg
    129.4 KB · Views: 56
  • 20150503_100249_resized.jpg
    20150503_100249_resized.jpg
    135.2 KB · Views: 55
  • 20150503_094906_resized.jpg
    20150503_094906_resized.jpg
    133.7 KB · Views: 59

GarageNoob

Member
Joined
Apr 20, 2015
Messages
19
Location
Derbyshire, UK
Hi guys, who knows about Paramo vices?

Ive just gotten one there but there was no model number - or even a "Made in "??? So im guessing it is very old/one of their first models?

101_3107.jpg


TO

101_3173.jpg


Main thread here: http://www.garagejournal.com/forum/showthread.php?p=4846222#post4846222
 

jreb10

Well-known member
Joined
Oct 18, 2014
Messages
329
Location
Westby, WI
When painting vises, what parts do you guys keep unpainted?

I think it is the general opinion that that slide and at least the handles of the lead screw/swivel lock should be bare metal. After that, it is a matter of preference.

I prefer to keep the entire leadscrew and the entire swivel lock in the bare metal look. I also like the top/bottom and sides of the jaw inserts in bare metal, as well as the machined sides of the jaws themselves. But that is just my preference.

There are exceptions for specific vises, such as the end cap on a Wilton bullet may be bare metal for contrast. Other styles may have specific style elements that could be bare metal or lend themselves to a two-toned paint job. It is all a matter of artistic taste and creativity.
 

bagged89s10

Well-known member
Joined
Mar 13, 2005
Messages
4,607
Location
CT
I think it is the general opinion that that slide and at least the handles of the lead screw/swivel lock should be bare metal. After that, it is a matter of preference.


I prefer to keep the entire leadscrew and the entire swivel lock in the bare metal look. I also like the top/bottom and sides of the jaw inserts in bare metal, as well as the machined sides of the jaws themselves. But that is just my preference.


There are exceptions for specific vises, such as the end cap on a Wilton bullet may be bare metal for contrast. Other styles may have specific style elements that could be bare metal or lend themselves to a two-toned paint job. It is all a matter of artistic taste and creativity.


Do you prefer the entire bottom of the slide bare? How about the bottom on the static side of the vise where the slide sits? On my Reed that I'm painting, I painted the bottom as you can see in this picture. I will probably scrape the paint off where the slide slide sits. I'm just trying to decide if I should paint the portion on the bottom of the slide where it doesn't contact anything. I had the dynamic side of the vise painted but had to strip it. I botched it when a bug got in the paint and I tried to fix it. So I'm repainting that half of the vise.

ImageUploadedByTapatalk1431382619.100549.jpg
 
OP
D

drivesitfar

Well-known member
Joined
Oct 23, 2013
Messages
36,047
Location
Pacific Northwest
Bagged: JReb said it pretty good. to answer your questions i'd not paint the inside of the static where the vise will rub or sit on and just put some light grease or oil on those areas. don't paint the back portion of the dynamic slide unless it doesn't rub at all going in and out. also BLO or Johnson paste wax on the bare metal to keep it from rusting or fluid film or a few more products.

you did a nice job on the side of the Reed's jaws and that's how i would leave them. some leave the top of the jaws bare too and personal preference.

GarageNoob (GN): your Paramo is most likely pre WWII and probably more like the early 30's, but i'll defer to the English and Canadian members that own and see these vices a lot. also i think i remember your nice Paramo having a piece of the static jaw broken off under where the regular jaws are. can you post a few pictures of that broken area. do you have the original jaws or do you need a few suggestions to get some made or told how to make some? nice looking vise and since it was i think FREE you REALLY didn't overpay for it. cheers
 

vintage nut

Well-known member
Joined
Mar 17, 2015
Messages
1,272
Location
west coast of canada
As far as paint on the slide goes, my Morgan 160 had the entire dynamic slide painted, and yes it did rub off, you can see little bits of it left though, and it's definitely original. Normally I never paint machined surfaces, but I'll make an exception this one time, because they originally were, and it will help tighten up the little bit of play in the dynamic.
My rock island on the other hand is very tight, and I'll instead polish the dynamic slide.

you can never have too many tools
 

Outlawmws

Well-known member
Joined
Aug 9, 2011
Messages
39,310
Location
The Badlands
Mating metal to metal surfaces, (Swivels, etc.) no paint IMO. I also don't paint the jaws, esp if removable. Slides generically not; exception for most exposed screw vices.

Handles as mentioned. The heads the handles go through optional.
 

Lu-Max

Well-known member
Joined
Jan 8, 2014
Messages
745
I finally have some time to start cleaning up some of my vises, I'm starting with the Aussie.

First soaked it in citrus degreaser overnight followed by blasting it with my power washer today. Now it's enjoying a bubble bath.

electrolysis-1_zpsirxkr5em.jpg


fizzzzzzzzzz

electrolysis-2_zpsh7jxnmfp.jpg
 
Last edited:

bagged89s10

Well-known member
Joined
Mar 13, 2005
Messages
4,607
Location
CT
VISE REPAIR 101 all vise repairs, lubricants, sources for parts and the trick...

Bagged: JReb said it pretty good. to answer your questions i'd not paint the inside of the static where the vise will rub or sit on and just put some light grease or oil on those areas. don't paint the back portion of the dynamic slide unless it doesn't rub at all going in and out. also BLO or Johnson paste wax on the bare metal to keep it from rusting or fluid film or a few more products.


you did a nice job on the side of the Reed's jaws and that's how i would leave them. some leave the top of the jaws bare too and personal preference.


GarageNoob (GN): your Paramo is most likely pre WWII and probably more like the early 30's, but i'll defer to the English and Canadian members that own and see these vices a lot. also i think i remember your nice Paramo having a piece of the static jaw broken off under where the regular jaws are. can you post a few pictures of that broken area. do you have the original jaws or do you need a few suggestions to get some made or told how to make some? nice looking vise and since it was i think FREE you REALLY didn't overpay for it. cheers


Thanks for that info. Here is the top. I have to clean up the paint/unpainted line a bit, but I'll wait to it cures some more. I did bake it and it comes out so smooth after an hour baking then cooling. I made an aluminum foil baking oven to put on the bbq grill so I could leave the lid open. I wanted the paint fumes to be able to escape and the top shelf in the grill doesn't allow me to close the lid anyway.

ImageUploadedByTapatalk1431386566.180717.jpg


When you say back portion of the dynamic slide, do you mean this portion that I left unpainted? Or do you mean the bottom underneath of the dynamic slide?
ImageUploadedByTapatalk1431387032.916653.jpg
 
OP
D

drivesitfar

Well-known member
Joined
Oct 23, 2013
Messages
36,047
Location
Pacific Northwest
Lu: love to see a good vise cooking. i really like that offset Dawn vise. i have a big 6 inch Dawn and it isn't a little thing. good luck and post up plenty of pictures with your thoughts and maybe reserve 3 or more posts in a row after 10 or 11pm when no members are posting. thanks for posting and good luck


Bagged: i don't paint the bottom rails of the slide, but i do try to blast some inside the dynamic jaw with the screw out of it. also up inside the static can get some paint or primer too to keep the rust at bay.
 

bagged89s10

Well-known member
Joined
Mar 13, 2005
Messages
4,607
Location
CT
VISE REPAIR 101 all vise repairs, lubricants, sources for parts and the trick...

Lu: love to see a good vise cooking. i really like that offset Dawn vise. i have a big 6 inch Dawn and it isn't a little thing. good luck and post up plenty of pictures with your thoughts and maybe reserve 3 or more posts in a row after 10 or 11pm when no members are posting. thanks for posting and good luck


Bagged: i don't paint the bottom rails of the slide, but i do try to blast some inside the dynamic jaw with the screw out of it. also up inside the static can get some paint or primer too to keep the rust at bay.


Thanks drives.
That's what I'm thinking. The inside and back are painted.
ImageUploadedByTapatalk1431391380.991804.jpg
I'll leave the bottom and side of the slide raw. Maybe scotchbrite or very fine sandpaper them .
 
Last edited:
OP
D

drivesitfar

Well-known member
Joined
Oct 23, 2013
Messages
36,047
Location
Pacific Northwest
Bagged: some of us clean off the rear of the dynamic for a cleaner look with the bare steel sort of like you did with the side of the jaw. not always seen or necessary, but thought you might like to know.

nice work so far
 
To avoid these ads, REGISTER NOW!
Top Bottom