To avoid these ads, REGISTER NOW!

Above 1200 Sq/FT Restored 1930's Auto Shop

Wokspaces above 1200 squarefeet.
To avoid these ads, REGISTER NOW!

markviii

Well-known member
Joined
Jan 25, 2010
Messages
1,310
Location
east central IL
No hospitalization warranted in this case. I think it would look out of place on Gus. Plus, running just one small piece like this down to the powder coaters wouldn't make any sense.

Chris
 

mdbeck1

Well-known member
Joined
Mar 7, 2010
Messages
2,297
Location
Norman, OK
No hospitalization warranted in this case. I think it would look out of place on Gus. Plus, running just one small piece like this down to the powder coaters wouldn't make any sense.

Chris

I'm kind of surprised that he hasn't powder coated Gus.... :thumbup:
 
OP
B

BB767

Well-known member
Joined
Dec 24, 2009
Messages
3,724
Location
Philo, IL
Re: What's Not Too Like About Powder Coating?!

I'm starting to get the feeling I'm getting some kind of reputation about my fondness for powder coating! What's not to like about it right? :dunno:

Chris is more than correct about it looking out of place on Gus. He's just a working stiff like the rest of us. Nothing fancy smancy about him!

All the brake parts for Gus are ordered BTW, and on their way. No rigid, hard lines available though, so it looks like I'll be fabricating all those. Stand by for a tutorial on constructing double flares and creating your own brake lines. :)

Still having fun every day - Thomas

PS, if you haven't heard, Bonneville Speed Week has been cancelled this year already due to too much water out on the salt flats. :(
 
OP
B

BB767

Well-known member
Joined
Dec 24, 2009
Messages
3,724
Location
Philo, IL
Re: What's Not Too Like About Powder Coating?!

Plenty of Aussies plan trips round that. Same for many that come to Lake Gairdner here. It happens. :(

Very true HOTFR8 and this is now the second year in a row it's been cancelled. Lou and I had already prepped his truck and trailer ahead of time for the trip out and back so blame us I guess. If we had waited till the last possible second to do that I bet the course would be fine.

Apparently many cars that were expecting to compete have already been shipped here and are waiting at the docks. The SCTA (Southern California Timing Association), which runs the event, is looking for an alternative area and is gaging interest in limited running at the Mojave Airport in Mojave, Ca.

Here's the latest information I have on that location.

Race Track Info:
1. The runway is 12,500' long x 200' wide.
2. The race track will be 1 mile with a 132' laser trap.
3. The run out/shut off is 1.3 miles.
4. All Race Vehicles must comply with all of the current SCTA Rulebook Rules. Including but not limited to Vehicle Classes & Safety Requirements. I.E. All cars are required to have a minimum of two rear brakes, etc.
5. All vehicles competing in car classes with an established El Mirage record of over 160 mph are required to have one parachute.
6. All confirmed pre-entries will be contacted by an SCTA Official due to the specific requirements for the brakes, parachute, tires, etc.

If they get enough entries they're going to try and run there. The proposed race dates are August 8 and 9th. They plan on making an announcement late this Sunday the 26th or the 27th if that race will actually take place. Stand by to stand by.

Unfortunately there will be no exciting salt action photos...


...depicting all the glamorous activities and duties I get involved in out there this year I'm afraid.


I just hope there aren't any more young ladies out there waiting on me to unlock the, uh, ahem facilities. :eek:

Always helpful Thomas
 

stillp

Well-known member
Joined
May 5, 2015
Messages
428
Location
Midlands, UK
Re: What's Not Too Like About Powder Coating?!

I'm starting to get the feeling I'm getting some kind of reputation about my fondness for powder coating! What's not to like about it right? :dunno:
I had the wire wheels of my TR4A powder coated, by a guy who coats truck silencers for Ford. Looked great, till I used some proprietary wheel cleaner on them to try to get the grease/tar/brake dust off. Problem is that it bleached the coating. A good polish helped restore the shine, but the colour is still a bit blotchy.

Pete
 

scramboleer

Active member
Joined
Feb 3, 2013
Messages
37
Location
San Francisco
Hi Thomas (and Chris),

Long-time lurker, first-time poster. Thanks for the update on Gus. I'm a huge Willys fan - especially the early 1946/1947 to early 1950 flat-nosed trucks and wagons (like Gus). It's great to see Gus preserved and cherished as he is.

I can't say enough good things about all that you all have done and taken the time to share with the rest of us. Thank you!

Cheers from San Francisco,


Dan B.
 

babaluba

Well-known member
Joined
Nov 25, 2009
Messages
61
Location
Norway
Thought I'd let you all know the status, Beltsville Shell has been on summer vacation with me here in Norway, a couple of days back we took a trip to the beach nearby my place.

BS_beach%20%28Medium%29%20%28Small%29.jpg


On my way home now, all done with the book, so I'll ship it back to UK according to the flight plan as soon as I get home. :3gears:
 

rmalkow2

Well-known member
Joined
Jun 26, 2009
Messages
4,087
Location
Brighton, MI
Just want to add my thanks to Cary Thomas for a great book. I took my copy on a trip last week and devoured the stories enjoying each and every chapter. What an awesome description of a time gone by that was full of automotive adventure. To all those awaiting their turn to read this book get ready for some "wishing you were there" moments!
 
OP
B

BB767

Well-known member
Joined
Dec 24, 2009
Messages
3,724
Location
Philo, IL
Tggmo

Hi Thomas (and Chris),

Long-time lurker, first-time poster. Thanks for the update on Gus. I'm a huge Willys fan - especially the early 1946/1947 to early 1950 flat-nosed trucks and wagons (like Gus). It's great to see Gus preserved and cherished as he is.

I can't say enough good things about all that you all have done and taken the time to share with the rest of us. Thank you!

Cheers from San Francisco,


Dan B.

Hello Dan and welcome aboard! Many thanks for posting in to let me know you've enjoyed this thread for the last umpteen years now! That kind of feedback really helps motivate me to keep posting in. Bonus, then Chris can see and read here on the thread what I've been doing with myself all day out at the shop. :)

Since you mentioned Willys, here's a quick update on some of Gus's progress. First off, it started to become readily apparent that Willys engineers didn't give much thought (or any thought for that matter :() to actually servicing their products. To remove the front crossover brake line and replace it...


...the radiator needed to be removed.


Since I wanted to have it inspected anyway that was no problem. It's at the radiator repair shop now to have it pressurized and tested. We'll evaluate what to do after those results are in. The original radiator cap looked to be in poor condition but I was able to find a new, correct radiator cap at NAPA. It's rated at 7 lbs.


Next, with the brake master cylinder loacted under the floor boards, the exhaust pipe was in the way, so with Lou manning the acetylene torch...


... and me twisting the pipes and muffler, the simple exhaust was removed. We needed the torch to heat the exhaust connections. With that out of the way the master cylinder was removed.


Here's another example of the lack of future servicing being thought about back in 1948. The brass brake line distribution block (circled yellow) is located within a boxed section of the frame (circled red) that makes it impossible to get a wrench on the front brake line (white arrow) without moving the front brake line. To move the front brake line, the radiator needs to be removed remember?! There were several similar design, ah, irregularities, that reared their nasty, ugly little heads while working on Gus. It's not his fault mind you. He's as noble as ever but what were those engineers thinking????!!!!
BTW, that's mainly light surface rust seen. Gus has good bones! :thumbup:


So here are all the various brake lines removed along with the master cylinder. Not much to all of them really. The Areokroil soaking was a big help. Almost all the fittings were able to be loosened without too much heroic effort. Looking at them it was definitely time for them to be replaced.


The new lines are waiting for fabrication and...


...the double flaring tool is ready to go also.

Today I got a heavy box with what I hope, are all the rest of the materials needed to make Gus sure footed once again. I'll be opening it tomorrow and inventorying everything and continuing with a very rewarding repair project. Check back here as we continue with The Great Gus Make Over, TGGMO.

Thomas
 

bazzateer

Well-known member
Joined
Oct 8, 2009
Messages
6,075
Location
Watford, Great Britain
Re: Tggmo

I knew someone who took the sump (oilpan) off a brand new Hillman Imp, and found inside half a dozen pop-rivet mandrels, a Band-aid, and the handle of a china teacup.it
As a long time fan and current owner of a couple of Imps I can tell you that those were optional extras, very expensive ones too! :lol_hitti
 

stillp

Well-known member
Joined
May 5, 2015
Messages
428
Location
Midlands, UK
Not many of them left now Baz. Shame, they were great cars. I had 6, but no more than 3 at a time.
Just found some inlet valves in the attic, that are now on ebay. Don't think I've much else left.

Pete
 

stillp

Well-known member
Joined
May 5, 2015
Messages
428
Location
Midlands, UK
"Willys engineers didn't give much thought (or any thought for that matter ) to actually servicing their products"
Thomas, I'm sure when you need to give the TR4 the attention it deserves, you'll think the same about the Triumph engineers.
 
Last edited:

bazzateer

Well-known member
Joined
Oct 8, 2009
Messages
6,075
Location
Watford, Great Britain
Not many of them left now Baz. Shame, they were great cars. I had 6, but no more than 3 at a time.
Just found some inlet valves in the attic, that are now on ebay. Don't think I've much else left.

Pete

I just got my main one through the MoT for another year. Other one awaits a rebuild using a BMW K series bike engine. Next year the main one will be re-shelled using a shell I bought a few months ago. Club estimates around 1,000 road going examples left worldwide.
 

SVE Performance

Well-known member
Joined
Feb 14, 2012
Messages
157
Location
Milford,Connecticut
The motor in Gus is not the original it came out of an M38 .The lifting eye ,crank pulley and water pump pulley all are military only usage. I believe that the radiator is incorrect also but I will have to refresh my memory at the shop tomorrow . Bill
 
OP
B

BB767

Well-known member
Joined
Dec 24, 2009
Messages
3,724
Location
Philo, IL
SCTA Mojave Mile Update

To update all you land speed record fans out there I was informed by the SCTA that the Mojave Mile race is a GO for this August 2015.

Registration begins at noon - Thursday, August 6th
Tech inspection all day Friday, August 7th
Racing on Saturday and Sunday, August 8th-9th

See the SCTA web site for further information.

Thomas
 
OP
B

BB767

Well-known member
Joined
Dec 24, 2009
Messages
3,724
Location
Philo, IL
Thought I'd let you all know the status, Beltsville Shell has been on summer vacation with me here in Norway, a couple of days back we took a trip to the beach nearby my place....

....On my way home now, all done with the book, so I'll ship it back to UK according to the flight plan as soon as I get home. :3gears:

Thanks babaluba for the update. Once BS 1.0 reaches the UK and Dom is finished with it unless I hear from anyone else in the UK or mainland Europe he'll be sending it back to me. Last and final warning before it heads back to the USA. :D

Thomas
 
To avoid these ads, REGISTER NOW!
OP
B

BB767

Well-known member
Joined
Dec 24, 2009
Messages
3,724
Location
Philo, IL
Just want to add my thanks to Cary Thomas for a great book. I took my copy on a trip last week and devoured the stories enjoying each and every chapter. What an awesome description of a time gone by that was full of automotive adventure. To all those awaiting their turn to read this book get ready for some "wishing you were there" moments!

Well said rmalkow2. Cary did a terrific job capturing the essence of that era. Once it's back here in the US I'll post a list of members in the states who have requested it before it heads down under to Australia and New Zealand. Lyndon it's getting closer to Sydney all the time. Patience grasshopper. ;)

Thomas
 
OP
B

BB767

Well-known member
Joined
Dec 24, 2009
Messages
3,724
Location
Philo, IL
The motor in Gus is not the original it came out of an M38 .The lifting eye ,crank pulley and water pump pulley all are military only usage. I believe that the radiator is incorrect also but I will have to refresh my memory at the shop tomorrow . Bill

All great information, thanks Bill. Any information you can provide is welcomed. I know very little about Gus's background, only what was passed on to me by the previous owner. :thumbup:

Thomas
 

oberst

Well-known member
Joined
Jan 8, 2008
Messages
205
So, must be a trick of the light, but it looks like Gus's whole radiator shroud is brass. That wouldn't be true, would it?

Are you and Lou (from this day forward to be known as "The Devil with a Hammer and Hell with a Torch", at least to me) going to re- engineer those brake lines with an eye towards future ease of maintenance? I hope so, and I hope you keep us apprised of the plan!

I love these threads!
 
Last edited:

Lyndon

Well-known member
Joined
Aug 11, 2014
Messages
2,535
Location
Sydney, Australia
.......... Once it's back here in the US I'll post a list of members in the states who have requested it before it heads down under to Australia and New Zealand. Lyndon it's getting closer to Sydney all the time. Patience grasshopper. ;)

Thomas

Oh OK, if you insist. Waiting patiently. :willy_nil

:thumbup:

Lyndon
Magnificent sunny 21 degree (C) Sydney (in the middle of winter).
 
OP
B

BB767

Well-known member
Joined
Dec 24, 2009
Messages
3,724
Location
Philo, IL
TDwaHaHwaT!!!!!!!!!!!

So, must be a trick of the light, but it looks like Gus's whole radiator shroud is brass. That wouldn't be true, would it?

Are you and Lou (from this day forward to be known as "The Devil with a Hammer and Hell with a Torch", at least to me) going to re- engineer those brake lines with an eye towards future ease of maintenance? I hope so, and I hope you keep us apprised of the plan!

I love these threads!

Mike, I'm fairly sure the shroud is not all brass but as soon as I get it back I'll check. Once it was removed it went immediately to the repair shop so I didn't spend any time looking it over to be honest. I should hear tomorrow about the radiators condition.

All the hard lines were fabricated and completed today. A check fit shows it's all going to fit. The fabrication went very smoothly and it turned out well. We did modify the lines in a couple of places to facilitate installation and future service requirements. Here are a few quick photos. This is some of the old installation...


..and here is the same area redone...


Much improved over what was there before.


This is the outlet end of the new master cylinder with two new lines sprouting from it. I'll get some more pictures posted shortly including some showing how to fabricate double flares. Tomorrow we'll take it all apart, clean everything and flush the lines with brake cleaner and then reinstall it all. A very satisfying day.


It's such a pleasure working with Lou and he is absolutely going to love his new title Hell with a Torch. :FIREdevil I can't wait to tell him!

Devilish Thomas :evil:
 
OP
B

BB767

Well-known member
Joined
Dec 24, 2009
Messages
3,724
Location
Philo, IL
GUS Update

Here's an quick update on some of the progress with Gus so far. Lou and I have been working daily on Gus for several days now and we're making considerable progress. When servicing an older vehicle you almost always run into "side projects". It's inevitable and I knew there were going to be some unforeseen issues with Gus as well. While working with the brake master cylinder, I had removed both the brake and clutch pedals. That's when I noticed...


...the rather severe wear on the clutch rod linkage as seen between the arrows. You can see how worn that linkage has become from lack of lubrication. To do a proper repair, Lou who we now know is Hell with a Torch...


... decided that he would...


...build up the worn area by welding some new metal onto the linkage.


Once it had cooled down I took a flat file and reshaped the linkage to fit...


...as you can see. Once again we were looking for a serviceable part. My intent in not to do a full blown restoration on Gus.


Here's that clutch linkage installed with a little anti-seize on the rod. There is no slack in the linkage any more, just smooth, progressive movement.

Then there was the matter of seized brake shoe adjustment cams.


Gus has Lockheed style brakes that use an eccentric cam installed in the backing plates as seen here, to adjust for wear on the brake shoes.


That adjustment cam (circled) is suppose to rotate against the inside of the brake shoe to move the shoe closer to the drum as the shoe wears. Trouble was, all 8 adjustment cams were seized and wouldn't even begin to budge.

They were all soaked with Aerokoil for a couple of days and that didn't loosen them up. They were really and truly seized. :(


My biggest concern was twisting off the head of the adjustment bolt an the other side of the backing plate. The head is a 3/8" square head so I had to use an 8 point socket.


Here you can see, some of the heads were already damaged from previous attempts to turn the seized cams without using proper tools.

As you know I'm a stubborn kind of guy. It took me all day but I did eventually get all 8 moving again. I used a combination of...


...CRC "Freeze-Off" and a 3/8" drive impact gun seen in the background. The Freeze-Off cools the part it is sprayed on which shrinks the part enough to allow penetrating oil to creep in and eventually free the part up. Using an impact gun on seized parts can easily twist the heads off. Great care must be taken to gently work the part back and forth until it eventually it frees up. As I said I spent all day, 8 hours, freeing up 8 adjusting cams but they move freely now and nothing was damaged.

Such is the joy of working on older equipment. You should expect the unexpected. Just like taking a dead possum to his greater reward in your shiny sports car with the windows down and having the fur suddenly detach itself all over the inside of the car. I mean "stuff" happens and you have to roll with it. :dunno:

Gus is getting much closer to being roadworthy once again. More is coming. Thanks everyone.

Thomas
 

Type3Tim

Member
Joined
Aug 2, 2011
Messages
15
Location
Oklahoma
Re: GUS Update

Thanks for the tip on "Freeze-Off". I know about Kroil (www.kanolabs.com) and utilize it a lot (as everything I work on is rusty). But hadn't combined it with "Freeze-Off". "Freeze-Off" is on the shopping list for the next run to town.
 

bulletpruf

Well-known member
Joined
Nov 28, 2013
Messages
10,999
Location
San Antonio
Re: GUS Update

Thanks for the tip on "Freeze-Off". I know about Kroil (www.kanolabs.com) and utilize it a lot (as everything I work on is rusty). But hadn't combined it with "Freeze-Off". "Freeze-Off" is on the shopping list for the next run to town.

Ditto. That's a new one for me and on the shopping list, too.

Thomas -- did you or Mr. He11 with a Torch try heat before you tried freeze-off?

Thanks,

Scott
 

oberst

Well-known member
Joined
Jan 8, 2008
Messages
205
Here's Lou!

Hell with a torch!
 

Attachments

  • Hell with.jpg
    Hell with.jpg
    53.1 KB · Views: 173

charlief1

Well-known member
Joined
Dec 1, 2010
Messages
248
A couple of tricks that will help you later Thomas. If you've got a distributor wrench with a connector in the middle so you can change position, the center part is usually a 3/8" square. Works great on square head bolts.

One other trick is to heat the item up that's seized. Then use part of an old wax candle to melt into the area. The wax will turn very liquid and work it's way into the threads, letting you remove it much easier.
 

christopher7390

Well-known member
Joined
Feb 19, 2015
Messages
268
Location
Middletown NY
:thumbup:
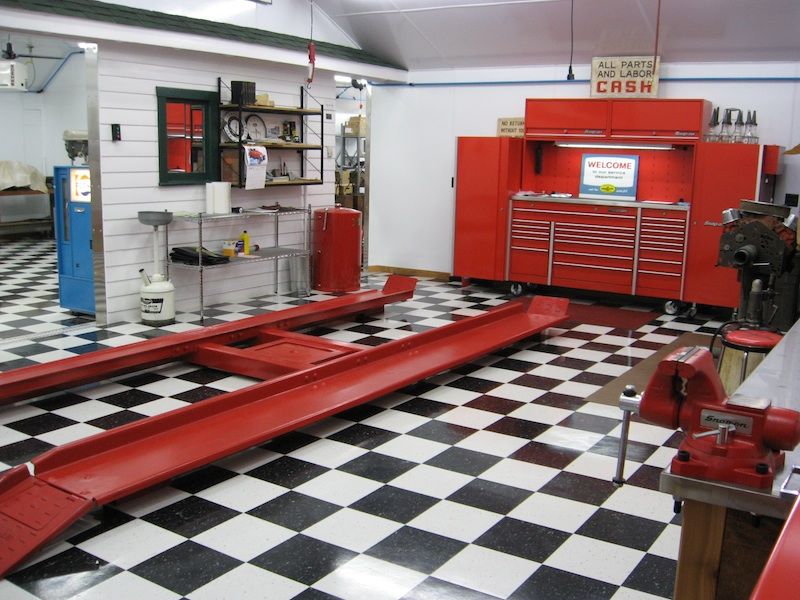
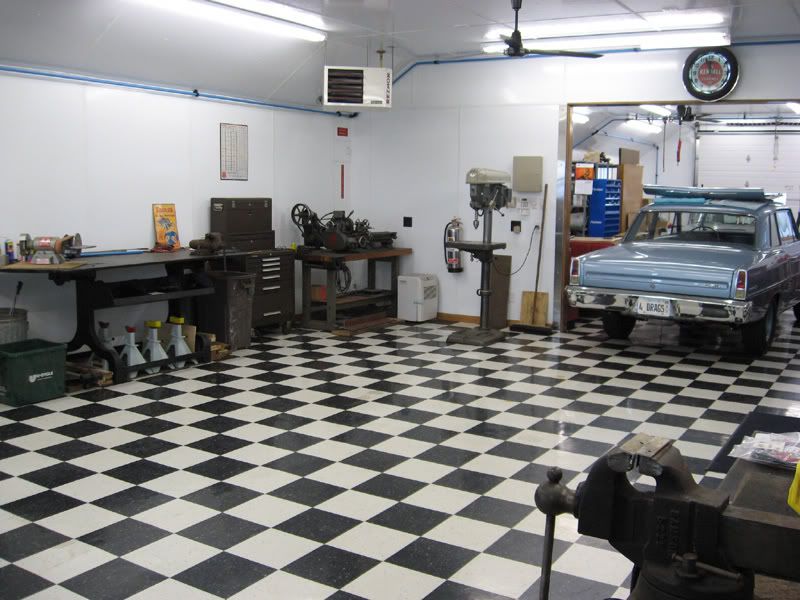
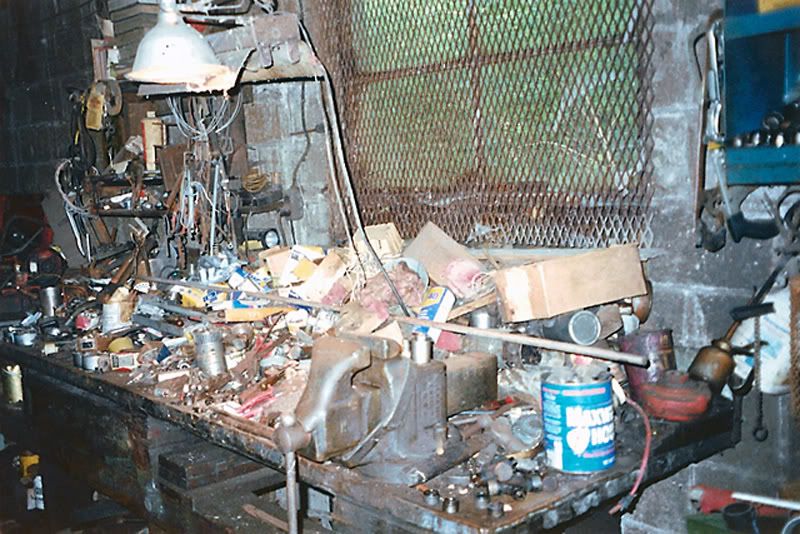
Here are a few before and after pictures of a shop I restored, starting in Nov,2005. It was built in the late 1930's and used by a father as a blacksmith/welding shop and later in the 50's one of his sons did automotive repair there until his death in the mid 1970's. The father carried on until his retirement in the 1980's.The shop was then was slowly under used and finally abandoned.

DiamondInTheRoughEmailSm.jpg


IMG_0505.jpg


EarlyCentralLiftRoomSm1.jpg


LiftRm09Sm1-1.jpg


OrganizedChaosSm1.jpg


NWChevyIIsm.jpg


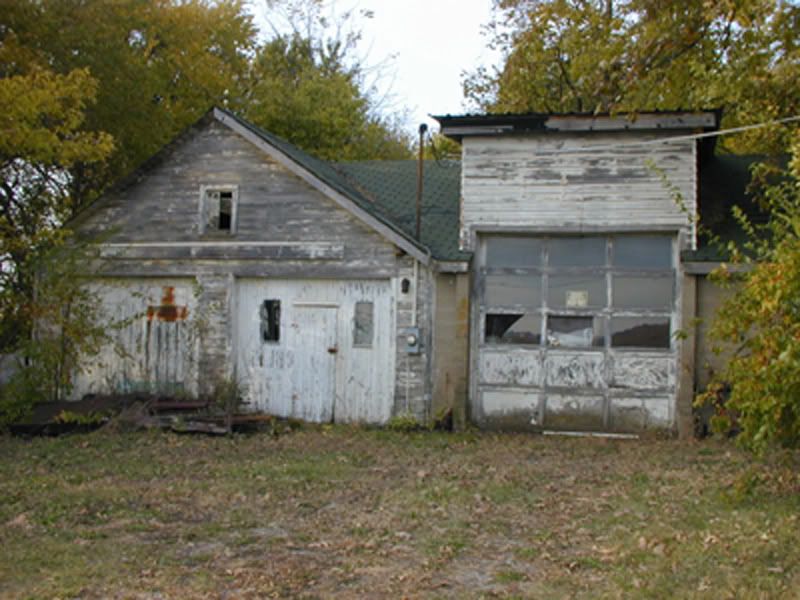
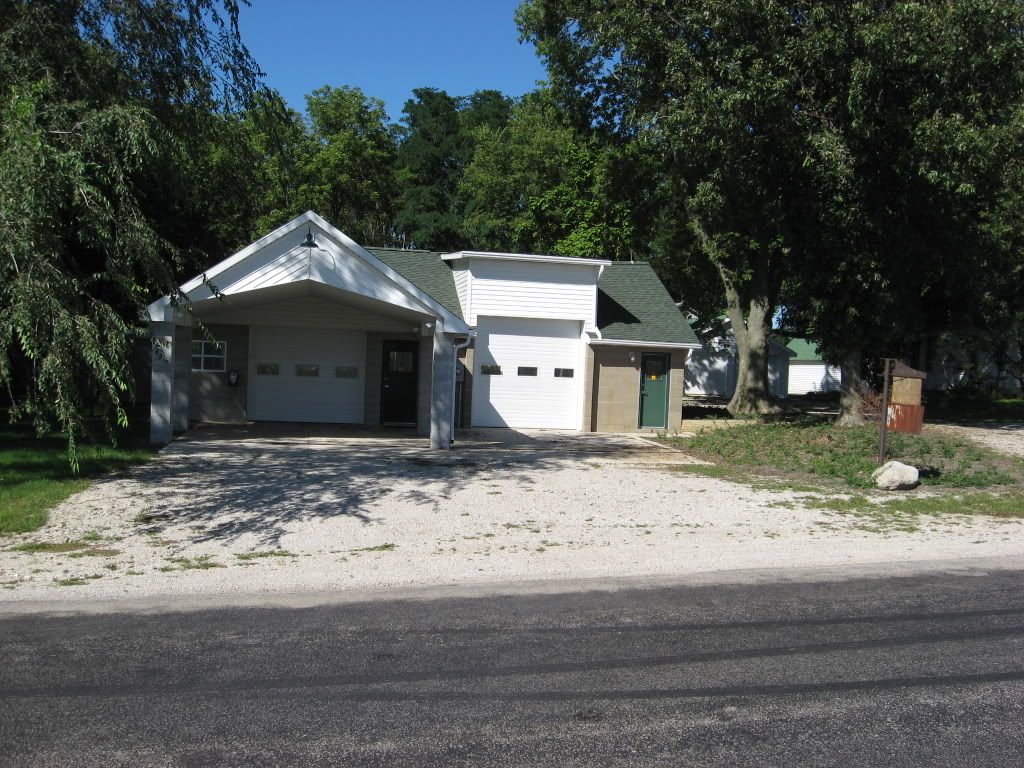
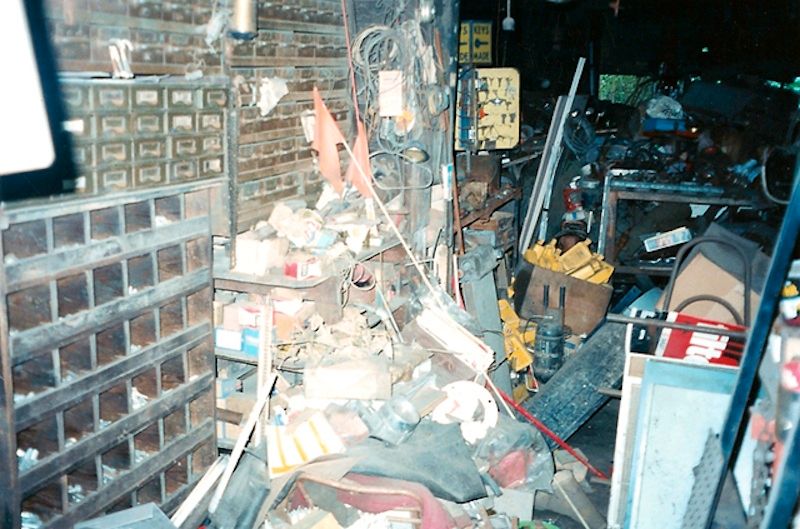
As you'll see nothing was ever thrown out is seems. So far I've removed 48 tons of steel scrap that was recycled.

BenchNRm2005sm.jpg


BenchHvyPlatesm.jpg


Below was his welding corner.


Note the Lincoln arc welder on the right. It's the same welder in the after picture seen below.


That welder is in the same place where it's been for decades and will be cosmetically restored since it works very well as is.


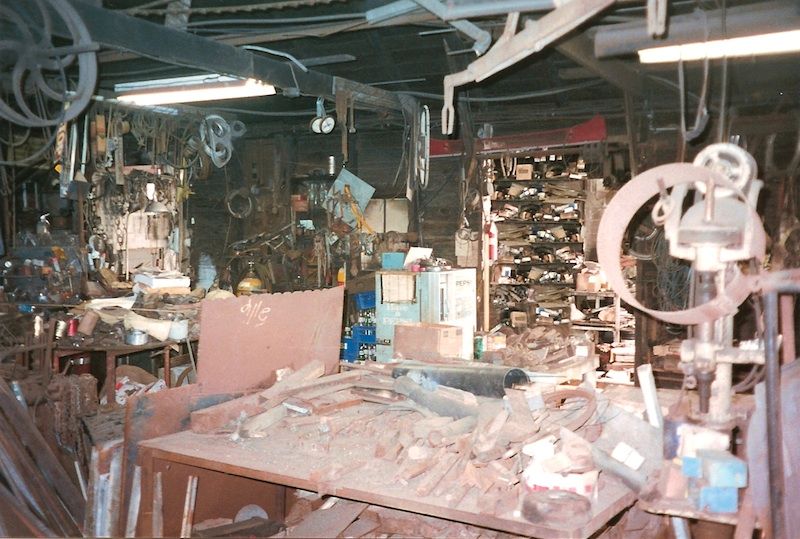
To help orient yourself, look for the Pepsi Machine in the center...


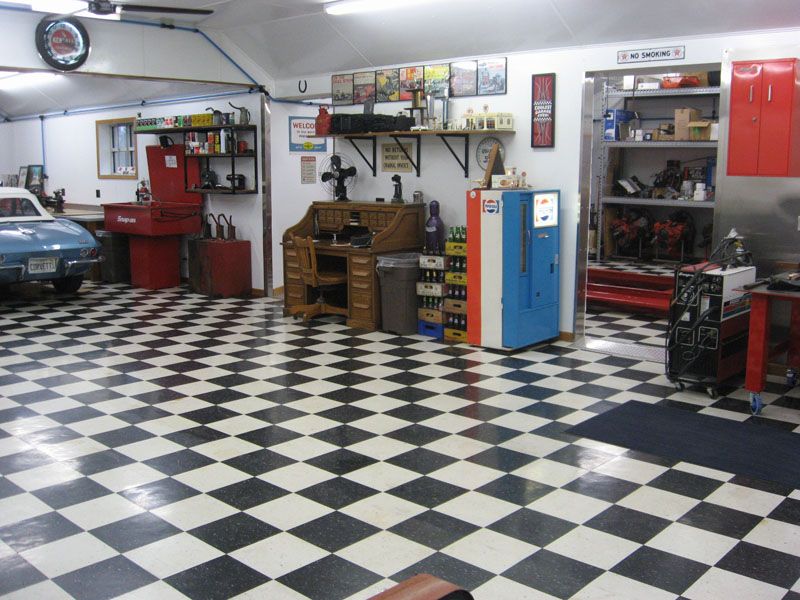
...of both these pictures.

The project was done mainly with my son and one other friend. Couldn't have done it without their help. Outside took about a year and the inside a second year. I'll post some more pictures if there is any interest.

To see additional pages of the shop and this thread, once you reach the bottom of each page, near the bottom right hand corner are numbers to click on for corresponding additional pages.

An index has been added to this thread due to it's advanced size to make referencing a post(s) easier. This index is not a complete detailed one, rather it is just a list of the major, photo-heavy posts focused on the shop. This index is brought to you courtesy board member wrigh003 with my thanks.

Thread Index

Thomas

I'd live in there
 

Bob Heine

ALLIANCE MEMBER
Joined
Oct 24, 2009
Messages
10,706
Location
Boca Raton, Florida
Re: GUS Update

...as you can see. Once again we were looking for a serviceable part. My intent in not to do a full blown restoration on Gus.


Here's that clutch linkage installed with a little anti-seize on the rod. There is no slack in the linkage any more, just smooth, progressive movement.

Thomas
Thomas, seeing those grease fittings brought back memories. Of the cars I've owned, my 1947 Ford had the most grease fittings but every car since then has had fewer and fewer. My 2004 PT Cruiser has none.

I expect an oil change and grease job on Gus is a pretty long and involved process to do correctly. When I owned the Ford I'd spend at lease two hours at my friend's gas station servicing my car. The (optional) oil filter canister was above the engine and once you removed the lid and filter the oil draining process started. With the car up in the air and the drain plug out of the pan, I'd start pumping grease into all the fittings. By the time I finished all the grease fittings and wiping off the excess, the pan was no longer dripping oil.

I didn't have the shop manual for my car (didn't even know they existed) but the OOOOOld Man who worked at the station showed me where the grease fittings were (I think he was 60 back then -- ten years younger than I am today) . This Model A chart is pretty close to what was on my '47 but I didn't have to grease the mechanical brake linkages (1940 and newer fords had hydraulic brakes). The other difference was the interval -- I serviced the car every 2,000 miles rather than every 500.
Grease%20Fittings_zpsobci6ewe.jpg
 
OP
B

BB767

Well-known member
Joined
Dec 24, 2009
Messages
3,724
Location
Philo, IL
.......

Thomas -- did you or Mr. He11 with a Torch try heat before you tried freeze-off?

Thanks,

Scott

Hi Scott, using heat was going to be my last move. The backing plates are relatively thin and I didn't want to risk warping them if I could avoid that. It was going to be difficult to localize the heat only on the areas around the brake adjusters. Freeze-Off allows for good control of where the cold is being applied so I thought I'd try that first and it worked.

Thomas

Hell with a torch!

Mike, Lou got a great laugh out of your picture. Wait till he gets home next month and shows all his friends what mischief he got into at my shop this summer!
Thanks a bunch. :D

Thomas

A couple of tricks that will help you later Thomas. If you've got a distributor wrench with a connector in the middle so you can change position, the center part is usually a 3/8" square. Works great on square head bolts.

One other trick is to heat the item up that's seized. Then use part of an old wax candle to melt into the area. The wax will turn very liquid and work it's way into the threads, letting you remove it much easier.

Thanks Charlie for the tips. I don't have one of those kind of distributor wrenches. Perhaps I'll have to look for one. I've heard about the trick of using candle wax. It's suppose to work very well. Appreciate the information. ;)

Thomas

I love all of the updates on Gus. Keep 'em coming.

Cheers,


Dan
'64 "Willys" Kaiser-Jeep Wagon (Traveller)

Hi Dan, you are most welcome. The list of what we're doing to Gus seems to grow daily. Now I've got much more to post about. I'm just behind getting it on here. It's rather extensive. Stay tuned! :thumbup:

Thomas

Looking at the linkage rebuild, it really does bring into perspective the word "Restoration"

Looking good.

Thanks Grizz for your years of continuing interest in the shop. Seeing your nice work on your thread shows you know a thing or two about "Restoration".

Thomas

So you know you can get replacement cams for the backing plates . The later L6-226 pickup and wagon cams will work on those backing plates .Bill

Thanks Bill, I didn't know that. In fact, there's a bunch I don't know about old Willys but I'm learning as I go.


It's been very helpful...


...to have a comprehensive shop manual to refer to. How nice of the Willys folks to provide those nice flat fenders; they're just right for placing the manual on. :thumbup:

Thomas
 
OP
B

BB767

Well-known member
Joined
Dec 24, 2009
Messages
3,724
Location
Philo, IL
The before and after photos sure show a big change and credit to you for all that work.

Many thanks HOTFR8. Big change is a good way to put it. Here's a few more looks at the brake lines...


The new system is on the right and the old, replaced lines are on the left. This is oriented with the front of Gus at the top and those closest to the camera are at the rear. The dark objects seen toward the top are the master cylinders.


These are the front lines coming from the master cylinders, old lines on top and new on the bottom.


Here's an example...


...of the condition the original lines were in. There were dents and the arrow on the right points to a section showing how rusted and deteriorated the lines had become. Not very safe in my estimation. :eek: There are all completely new lines on Gus so no worries about that any more.


I reused the master cylinder pushrod...


..after it was cleaned up and the threads on it were chased. I don't have a picture but it was given a couple of coats of paint....not powder coated!


Here it is installed with anti-seize on all threads.

I've got much more coming. Thanks again everyone.

Thomas
 

zDomz

Active member
Joined
Apr 4, 2015
Messages
32
Location
Lincolnshire. England
Beltsville shell has landed safely! Once I have read it I will send it on, I have lost track of where it was headed next :( But I am sure you will remind me Thomas!

By the way good work with Gus, I like the running repair resto you are giving him.
 
To avoid these ads, REGISTER NOW!
Top Bottom