To avoid these ads, REGISTER NOW!

Can I remove this Craftsman vise screw?

Bricago

Well-known member
Joined
Mar 2, 2013
Messages
83
Location
Chicago
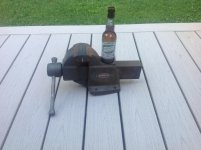
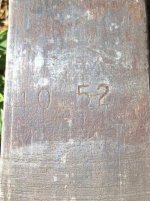
I picked up this whopper of a vise (50+ pounds) with the intention of stripping the paint and knocking off the rust. I'd be curious to see if anyone can ID the model or year. Anyway, I've disassembled most of it, but the base has a 1.5" bolt head on the bottom side that appears to be holding a threaded bolt in place. I can't see under the bolt head. Does anyone know if it can/should be removed? Photo 3 shows a closeup of the bolt head and the small space beneath it. Photo 4 shows the top side of the bottom plate and the threaded rod that holds the static jaw piece.

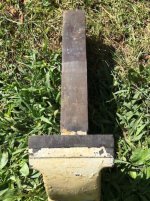
There's also a long set screw (1/8" hex head) threaded through a nut at the rear bottom of the static jaw piece. What does that do?

Thank you for your input.

photo_1.jpg

photo_4.jpg

photo_5.jpg

photo_3.jpg

photo_2.jpg
 
To avoid these ads, REGISTER NOW!

drivesitfar

Well-known member
Joined
Oct 23, 2013
Messages
36,034
Location
Pacific Northwest
BRI: you've got one of the nicest vises Craftsman ever had made for them and the model # should be a 5195 or 5196. the # should be stamped on the end of the big hub attached to the main screw.

it looks like you have it apart and if you have any other questions you might want to ask them on the Vise repair 101 thread where more members see that. there is also a complete restore thread of a 5198 which is just a bigger vise that yours and same design.

if you don't have any #'s stamped on the hub can you tell us the width of the jaws when closed?

nice vise and good luck with the restoration which doesn't look like it needs more than a good cleaning and greasing unless you want to paint it too.
 
OP
B

Bricago

Well-known member
Joined
Mar 2, 2013
Messages
83
Location
Chicago
Wow! That's great info. I found the model number under some rust on the hub. I'll check out the threads you mentioned and repost this one there.

Thank you! :beer:

photo_56.jpg
 

drivesitfar

Well-known member
Joined
Oct 23, 2013
Messages
36,034
Location
Pacific Northwest
Bri: You're welcome and you scored one of the nicest vices made. On the back on top of the dynamic slide there should be a date stamp. Can you see it? Should be late 40's or early 50's.ill post pics of my 5196 that still has most of its original blue grey paint on it if you'd like me to. I'm having issues with my laptop or I'd put on this post.
 
OP
B

Bricago

Well-known member
Joined
Mar 2, 2013
Messages
83
Location
Chicago
Hey Drives, today I managed to remove the shoulder bolt with some PB Blaster and gentle hammer taps on the top of the threaded bolt. I also removed the vise nut and the rectangular piece that holds it in place, as well as three of the screws attaching the removable jaw inserts (the fourth one is sheared off flush with the vise body and will require some heretofore unknown brilliant solution, probably involving a Dremel).

Anyway, I found the date you mentioned. It was stamped a little more than halfway back on the top edge of the slide (see pic). It's stamped 10 52.

Pic 3 is the broken bolt sliced off nearly flush with the jaw face. Advice anyone? Let me hear ya...
 

Attachments

  • photo 1.jpg
    photo 1.jpg
    83.9 KB · Views: 38
  • photo 2.jpg
    photo 2.jpg
    61.9 KB · Views: 31
  • photo-57.JPG
    photo-57.JPG
    74.6 KB · Views: 37

CNGsaves

Well-known member
Joined
Sep 26, 2012
Messages
13,233
Location
KS and OK
Just LOVE those vises . . . . handle really sets it apart !! :thumbup:

Been looking for years for that one . . . and/or torpelo pointed handle C-Man.

OP . . good luck restoring that one. It WILL be a lifetime keeper when you're done. :D
 
To avoid these ads, REGISTER NOW!

GETRIDAONE

Well-known member
Joined
May 21, 2013
Messages
1,549
Location
Auburn, GA
(the fourth one is sheared off flush with the vise body and will require some heretofore unknown brilliant solution, probably involving a Dremel).

Pic 3 is the broken bolt sliced off nearly flush with the jaw face. Advice anyone? Let me hear ya...[/QUOTE]

Use the Dremel to cut a screw driver slot in the screw. If you have some sort of torch put some heat on the screw. Let it cool and put PB blaster on and let it soak in. The blaster will hopefully go down in the threads. If the screw won't come out you will have to start drilling. Start with small bits and move up in size. If you have any easy outs try them but be careful not to break it off in the hole, this causes more problems. If you can get the center drilled out what is left in the threads should come out. Good Luck !!
 
OP
B

Bricago

Well-known member
Joined
Mar 2, 2013
Messages
83
Location
Chicago
Been looking for years for that one . . . and/or torpelo pointed handle C-Man.

Is this the torpedo one you mentioned? Do you know the model number(s)? Looks like it could fly off the bench.
 

Attachments

  • Screen Shot 2015-08-22 at 11.31.11 PM.jpg
    Screen Shot 2015-08-22 at 11.31.11 PM.jpg
    19.4 KB · Views: 39
  • Screen Shot 2015-08-22 at 11.29.23 PM.jpg
    Screen Shot 2015-08-22 at 11.29.23 PM.jpg
    19.8 KB · Views: 34

jrobb316

Well-known member
Joined
May 18, 2014
Messages
1,377
Location
WI
Do you have reverse drill bits? Those usually work for me. I'm wrestling with a Reed 4C right now trying to get the jaws off. A wreckage of broken tools are following in its wake but it will not win. A dremel would be a good idea too, but you're going to need some heat. Preferably oxyacetylene heat. Propane won't cut it and MAPP MIGHT get you there but its going to take a long time. Possibly and impact driver if you can cut a slot in the broken bolt. When its hot give it a smack and hope it moves even just a little and you'll be good.
 
OP
B

Bricago

Well-known member
Joined
Mar 2, 2013
Messages
83
Location
Chicago
Do you have reverse drill bits? Those usually work for me. I'm wrestling with a Reed 4C right now trying to get the jaws off. A wreckage of broken tools are following in its wake but it will not win. A dremel would be a good idea too, but you're going to need some heat. Preferably oxyacetylene heat. Propane won't cut it and MAPP MIGHT get you there but its going to take a long time. Possibly and impact driver if you can cut a slot in the broken bolt. When its hot give it a smack and hope it moves even just a little and you'll be good.

Thanks, Jrobb. That Reed 4c is a great looking vise. The pic I saw showed standard (not Philips) screws holding in those jaw inserts. Is that what you have? Or are the heads cut off on yours, too? The other three bolts on mine were the most stuck bolts I've ever dealt with. The solution turned out to be saturating them with PB Blaster and whacking them that manual impact driver. I had to flip the vise over and brace it against a concrete step so it wouldn't scoot away when I smacked it. I noted the position of the screw head, gave it a whack, then checked to see if it moved. It took many strikes before the screw budged, and even then I had to continue with the impact to get it to turn about two full revolutions before I could back it all the way out with a hand screwdriver. Since that was a success (which felt like winning the Super Bowl) my preference is to stick with that method before venturing into new (for me) territory such as torches. That said, part of the experience of restoring tools is trying new things, right? If you recommend a particular oxyacetylene tool I'd be glad to hear it. I'm also curious to know if the impact driver method failed for you. i can see how standard screws would make it more difficult.
 

jrobb316

Well-known member
Joined
May 18, 2014
Messages
1,377
Location
WI
Thanks, Jrobb. That Reed 4c is a great looking vise. The pic I saw showed standard (not Philips) screws holding in those jaw inserts. Is that what you have? Or are the heads cut off on yours, too? The other three bolts on mine were the most stuck bolts I've ever dealt with. The solution turned out to be saturating them with PB Blaster and whacking them that manual impact driver. I had to flip the vise over and brace it against a concrete step so it wouldn't scoot away when I smacked it. I noted the position of the screw head, gave it a whack, then checked to see if it moved. It took many strikes before the screw budged, and even then I had to continue with the impact to get it to turn about two full revolutions before I could back it all the way out with a hand screwdriver. Since that was a success (which felt like winning the Super Bowl) my preference is to stick with that method before venturing into new (for me) territory such as torches. That said, part of the experience of restoring tools is trying new things, right? If you recommend a particular oxyacetylene tool I'd be glad to hear it. I'm also curious to know if the impact driver method failed for you. i can see how standard screws would make it more difficult.

I just posted a write up about it on the vise repair thread. I detail my failed impact driver try along with other efforts that failed before firing up the tool everyone needs.
 
OP
B

Bricago

Well-known member
Joined
Mar 2, 2013
Messages
83
Location
Chicago
I just posted a write up about it on the vise repair thread. I detail my failed impact driver try along with other efforts that failed before firing up the tool everyone needs.

Just read it. Wow! That's a serious victory, removing those screws. I'll let you know if all else fails and the torch comes out. :bowdown:
 

jrobb316

Well-known member
Joined
May 18, 2014
Messages
1,377
Location
WI
Yeah I even went back and got that locating pin out in the static jaw. Torch, vise grips, and a hammer on the side of the vise grips got it done. Its a press fit so it wasn't happening without heat.
 
To avoid these ads, REGISTER NOW!
Top Bottom