To avoid these ads, REGISTER NOW!

Cabinet for Small Parts Storage Cases

To avoid these ads, REGISTER NOW!
OP
S

soj

Well-known member
Joined
Dec 3, 2007
Messages
729
Location
North Georgia
I have few more questions for you SOJ (JP). Is the length dimension given on the slides when it is closed or fully open? Did you order the 14" slides for this case? I have been racking my brain for so long trying to come up with a plan for these parts trays. I am so glad you posted this. I even showed this to my wife and she loved it too.

Slide advertised length is usually for a closed slide. I used 16" slides. The actual length of the Tru-Trac brand I used is 15 3/4". Note that I used full extension slides. Some only extend 3/4 of the way, leaving the rear of the drawer in the cabinet. Those won't work for this as you wouldn't be able to open the case lid.

Glad you like the design. Now build one for you and one for your wife! :beer:

I have been working on filling mine up. I am not buying anything to put in it, just gathering up nuts and bolts and screws and "stuff" scattered all over the shop. Finding things I didn't know (or remember) I had, and finding some things I knew I had, but couldn't find when I needed it. This is going to be something I will use almost every day I am in the shop. Which is every day.

Any other questions, don't hesitate to ask.
-jp
 

galute

Well-known member
Joined
Jun 28, 2010
Messages
629
Location
Bald Knob AR
What I did was first establish where I wanted the cabinet side of the slide (they come apart for mounting). I made spacers out of scrap wood to set the height above the bottom of the cabinet. Set the slide on the spacer, and drill small holes for the screws. They make special drill bits for drilling hinges that automatically center the drill in the hole. Mount the slides. For a unit like this, I would then make a pair of spacers to set the next slide up, referencing off the the already-installed slide. Just keep going, taking very good care not to let any error creep in. I would check it in relation to the bottom of the cabinet once in a while to make sure I wasn't going off.

Once all of the cabinet part of the slides are mounted, re-install the inner slides. Put a drawer in place, and figure out what size spacers you would need to set it at the height you want. Rest the drawer on the spacers, pulled out a couple inches. Pull the inner slide out flush with the end of the drawer, or to the back of the drawer face, or however you want to position them. You can then drill and screw into the outermost set of screw holes, attaching the inner slide to the drawer. Slide it out some more, until you can work on the middle set of holes. Make sure the drawer is level on the spacers. Drill and screw the middle holes on each side. Now you can pull the drawer out, ans install the rear screws while it is out of the case. Again, for a case like this, the subsequent drawers could be located over the one below it with an appropriate pair of spacers.

In my kitchen, I had stacks of 4 drawers each, so I just made spacers for each set, all located from the bottom of the cabinet. I made one pair of spacers for each drawer height, and then had a pair of spacers that I added on to set the bearing height. I know this is all as clear as mud- I'll see if I took pictures of the process. It really only takes a few minutes per drawer once you are set up and get the hang of it. Make sure the spacers you make are good and parallel (table saw), matched sets, and label them so you don't accidentally throw them on the scrap pile or get them mixed up.

I buy my slides from cshardware.com. They ran about $5 a pair for 22", and I didn't get any duds. They are a perfect knock-off of the KV ones. They sell the screws you need, and the hinge drills, too.

Awesome info! I'm storing this away for when I get to that phase of my project. Thanks very much.

Sorry for the hijack op.
 
OP
S

soj

Well-known member
Joined
Dec 3, 2007
Messages
729
Location
North Georgia
wow that's cool too bad I **** at wood work

Then build it out of metal. I debated metal vs wood at the start. I work with metal about as much as wood. Wood just seemed to be the better choice for me, for this project.

The drawers could be one piece of sheet metal, bent up on each side. Maybe fold the front and rear edge to stiffen up the bottom. The slides could be pop riveted on. An angle iron or square tube frame, covered with sheet metal, would make a strong cabinet.

Don't limit yourself just because I used wood. Work with what you are good at.
-jp
 
OP
S

soj

Well-known member
Joined
Dec 3, 2007
Messages
729
Location
North Georgia
What I did was first establish where I wanted the cabinet side of the slide (they come apart for mounting). I made spacers out of scrap wood to set the height above the bottom of the cabinet. Set the slide on the spacer, and drill small holes for the screws. They make special drill bits for drilling hinges that automatically center the drill in the hole. Mount the slides. For a unit like this, I would then make a pair of spacers to set the next slide up, referencing off the the already-installed slide. Just keep going, taking very good care not to let any error creep in. I would check it in relation to the bottom of the cabinet once in a while to make sure I wasn't going off.

Once all of the cabinet part of the slides are mounted, re-install the inner slides. Put a drawer in place, and figure out what size spacers you would need to set it at the height you want. Rest the drawer on the spacers, pulled out a couple inches. Pull the inner slide out flush with the end of the drawer, or to the back of the drawer face, or however you want to position them. You can then drill and screw into the outermost set of screw holes, attaching the inner slide to the drawer. Slide it out some more, until you can work on the middle set of holes. Make sure the drawer is level on the spacers. Drill and screw the middle holes on each side. Now you can pull the drawer out, ans install the rear screws while it is out of the case. Again, for a case like this, the subsequent drawers could be located over the one below it with an appropriate pair of spacers.

In my kitchen, I had stacks of 4 drawers each, so I just made spacers for each set, all located from the bottom of the cabinet. I made one pair of spacers for each drawer height, and then had a pair of spacers that I added on to set the bearing height. I know this is all as clear as mud- I'll see if I took pictures of the process. It really only takes a few minutes per drawer once you are set up and get the hang of it. Make sure the spacers you make are good and parallel (table saw), matched sets, and label them so you don't accidentally throw them on the scrap pile or get them mixed up.

I buy my slides from cshardware.com. They ran about $5 a pair for 22", and I didn't get any duds. They are a perfect knock-off of the KV ones. They sell the screws you need, and the hinge drills, too.

Awesome info! I'm storing this away for when I get to that phase of my project. Thanks very much.

Sorry for the hijack op.

No problem. Not really a hijack, since the slides are a big part of this project.

I would like to add to what MushCreek said about being cautious not to "let any error creep in" when mounting the cabinet portion of the slides. I had determined that the slides needed to be spaced 1 1/4" apart. I cut a spacer to that width on the table saw, just like MushCreek suggests. After installing slides about a third of the way up, I checked to see if they were even and level by measuring from the top down, and from the bottom up. They were all within a 1/16" except the rear of one was low by almost 1/8". For normal cabinet work this would have never happened, since 4, maybe 5 drawers is all you will have. But I had installed about 10, and a tiny little error multiplies with each slide. I checked my spacer, and with a tape and a ruler it seemed OK. I could only detect a difference from end to end by using a caliper. I don't remember the exact amount, but I didn't think it was enough to add up to the error I was seeing. Still, I made a new spacer. Like the first one, I made it about a 1/2" longer than the slide, to make it easy to remove. I held it against a slide to make sure the edge was straight, and noticed there was a gap between the slide and spacer. The cause was a slight lip on each end, top and bottom, of the slide. It appears that when the groove for the ball bearings was formed it flared the metal out at each end. My solution was to sand a taper on each end of the spacer. The error came in because I didn't always have the spacer all the way to the rear of the slide. So the front was sitting on the lip, but the back was on the smooth, level portion of the slide.

View media item 72073
I adjusted the one slide that was off the most (the screw holes are either slotted or slightly larger than the screws). Using the new spacer the spacing stayed consistent all the way to the top.

Again, for most 4 or 5 drawer cabinets this wouldn't matter, but anything with a lot of drawers, a little error can really add up.

One thing I did differently, I did not drill the screw holes. I used a spring loaded center punch to make a dimple in the wood, in the center of the hole in the slides. In soft wood you could even just run the screw in without doing anything first. I only used the center punch to make the screw easier to start and to be sure the screw was in the center of the hole. With the screw centered the slide could be adjusted up or down if needed. And I had one that needed adjusting.
-jp
 
Last edited:

aka Larry

Well-known member
Joined
May 2, 2012
Messages
8,009
Location
Eastern, NC
I was afraid someone would ask how much. The price really ballooned from the original plan of maybe 15-20 boxes.


Thanks for sharing. I think we all know how project cost can creep up, but in the end what you have built is awesome and well worth what you spent.

If you look in my thread (link in my signature) you'll see a cabinet I built with 2x4s, MDF, and corrugated metal. I built it because the prefab shelving at Lowes is expensive and flimsy at that. As it turns out I probably could have bought their shelving system, enclosed and reinforced it, and come out cheaper. However I like building my own stuff as I'm sure you do as well.
 

Gotcha640

Well-known member
Joined
Jan 27, 2015
Messages
948
Location
Houston TX
This looks like an ideal project to have laser cut. All the drawers, all the slide spacers, everything could be laid out on a sheet, holes cut or at least pilots, tweak for the exact cases and slides and off you go.
 

udderlyoffroad

Well-known member
Joined
Aug 2, 2014
Messages
93
Location
Bristol, UK
Excellent build!
Was planning something similar to house my collection of 'sortacases', but possibly not that scale - you sir have set the bar!

This video on youtoob shows the drawer spacer trick in action for a similar but different project, a cart for Bosch L-boxxess. Ok it's an advertorial but might useful for some on here:

<iframe width="560" height="315" src="https://www.youtube.com/embed/nt9T3KtSnA0" frameborder="0" allowfullscreen></iframe>

Incidentally, how puny and useless are the castors he's used? Absolutely no good for taking to a construction site!

Matt
 
OP
S

soj

Well-known member
Joined
Dec 3, 2007
Messages
729
Location
North Georgia
Excellent build!
Was planning something similar to house my collection of 'sortacases', but possibly not that scale - you sir have set the bar!

This video on youtoob shows the drawer spacer trick in action for a similar but different project, a cart for Bosch L-boxxess. Ok it's an advertorial but might useful for some on here:

Incidentally, how puny and useless are the castors he's used? Absolutely no good for taking to a construction site!

Matt

Some good ideas in those videos. One is the ledges on the front and back edge of the drawers to retain the cases. That would work for almost any design/style/brand of case. My method only works for the HF cases. If you use the front/back ledges any case that would fit could be swapped in.

The work bench height is a good idea as well. Your storage cabinet can double as a work bench.
-jp
 
OP
S

soj

Well-known member
Joined
Dec 3, 2007
Messages
729
Location
North Georgia

jesse72

Well-known member
Joined
Sep 26, 2011
Messages
352
Location
California
That type drawer/cabinet was the inspiration for my cabinet. The key feature is being able to use it as a drawer or take it to the work site.

Nice score on those cabinets. Did you ever separate and clean them up?
-fp

I cut them apart but haven't gotten the time to clean them up yet. It is a great feature that you can take the drawer with you to a job site or just to where ever you are working on a project!
 
OP
S

soj

Well-known member
Joined
Dec 3, 2007
Messages
729
Location
North Georgia
Thanks for sharing. I think we all know how project cost can creep up, but in the end what you have built is awesome and well worth what you spent.

If you look in my thread (link in my signature) you'll see a cabinet I built with 2x4s, MDF, and corrugated metal. I built it because the prefab shelving at Lowes is expensive and flimsy at that. As it turns out I probably could have bought their shelving system, enclosed and reinforced it, and come out cheaper. However I like building my own stuff as I'm sure you do as well.

Nice design on your cabinets with the metal trim. You are right about building your own stuff. "It's the journey, not the destination" is partly true. When you build something useful, it is the journey AND the destination. I like your attention to detail, you do good work!
-jp
 
OP
S

soj

Well-known member
Joined
Dec 3, 2007
Messages
729
Location
North Georgia
Very nice project. Did you get all the containers at once before you started?

Hope some members post thier cabinet here when completed.

I bought the containers over a period of about three months. I had coupons for $5.99 each, with a limit of 9 per coupon. I only bought two to use while figuring out the design. Once I was satisfied my idea was workable I started buying them as I was building the cabinet. Sometimes I used two coupons per trip, sometimes they only had less than 9 in stock. I just stopped by the store whenever I was in the area.

There is a current coupon on http://www.hfqpdb.com/. Just put 93928 in the filter box. There is a limit of 6, but it is good til July 4th.

Several have expressed interest in building something similar, and I would like to see them as well. Even if you post your own build thread, please post a link to it here.
-jp
 

rob1200

Well-known member
Joined
Jul 11, 2013
Messages
519
Location
California
I bought the containers over a period of about three months...
It might be a good idea to buy a few extra containers, seeing as your cabinet is custom-built for the dimensions and recesses of those cases.

You just know that if you need some replacement cases in the distant future, you will find that HF has changed the dimensions, or simply discontinued the item altogether.
 

MushCreek

Well-known member
Joined
Jan 14, 2015
Messages
9,732
Location
Upstate South Carolina
I'm finding that the bin problem is solving itself. I had not realized that they will stay put even if you remove some of them. I took out some so I could put my Kreg fixture and clamp, and then have bins of pocket screws in the remaining bins. Same with my RBY's and crimping tool, and rivet tool and rivets. Now I have surplus bins!
 
OP
S

soj

Well-known member
Joined
Dec 3, 2007
Messages
729
Location
North Georgia
It might be a good idea to buy a few extra containers, seeing as your cabinet is custom-built for the dimensions and recesses of those cases.

You just know that if you need some replacement cases in the distant future, you will find that HF has changed the dimensions, or simply discontinued the item altogether.

Good point. I agree that the lack of replacement cases is a risk. A better design might just be a flat drawer with a ledge front and back to retain the case, such as shown in the video back in post #49. I tend to over think things, and forget to KISS. The simple ledge retainer will work for any case or box that will fit within the drawer.
-jp
 
To avoid these ads, REGISTER NOW!
OP
S

soj

Well-known member
Joined
Dec 3, 2007
Messages
729
Location
North Georgia
I'm finding that the bin problem is solving itself. I had not realized that they will stay put even if you remove some of them. I took out some so I could put my Kreg fixture and clamp, and then have bins of pocket screws in the remaining bins. Same with my RBY's and crimping tool, and rivet tool and rivets. Now I have surplus bins!

The same thing is happening to me as I fill up a few cases. I have several of the large bins left over, fewer medium and no small ones. I am sure it will vary depending on what size "stuff" is being stored.
-jp
 
Last edited:

Top Dog1980

New member
Joined
Sep 12, 2015
Messages
1
I saw this post and this is a awesome idea and craftsmanship! Could I get the plans and measurements? I have a lot of these bins and no way to organize them.
Thank you
 

NUTTSGT

Super Moderator
Staff member
Joined
Sep 14, 2009
Messages
50,849
Location
Northern Central Ohio
I saw this post and this is a awesome idea and craftsmanship! Could I get the plans and measurements? I have a lot of these bins and no way to organize them.
Thank you

If you go back through the thread, you will find that he posted most of what you already need, but in a few different posts.


SOJ, I have seen you post pics of this cabinet more than a few times and it's an outstanding addition to a shop. A lot of storage in a little foot print. One of the best things about this project is being able to pick up pieces/parts as you can, little by little, as you get paid or have some extra cash.

:beer:
 
OP
S

soj

Well-known member
Joined
Dec 3, 2007
Messages
729
Location
North Georgia
I saw this post and this is a awesome idea and craftsmanship! Could I get the plans and measurements? I have a lot of these bins and no way to organize them.
Thank you

If you go back through the thread, you will find that he posted most of what you already need, but in a few different posts.

:beer:

There are a few build tips already posted, and I made some notes to myself in case I wanted to build another one, or something similar. So I have tried to organize those notes in a .pdf file into instructions of how this was built. I had to split the file to meet the GJ size requirements.

If you find any mistakes, like measurements that don't add up, etc., let me know and I will update and repost the file.

If anyone builds something similar, please post it here, or in your own build thread and put a link to it here.
jp
 

Attachments

  • Cabinet for HF Storage Cases Part 1.pdf
    145.7 KB · Views: 714
  • Cabinet for HF Storage Cases Part 2.pdf
    49.8 KB · Views: 534
Last edited:
OP
S

soj

Well-known member
Joined
Dec 3, 2007
Messages
729
Location
North Georgia
SOJ, now that it has been a few months, anything you would change?

I haven't found anything (so far) that I would just HAVE to do differently. I am undecided about adding doors. Not sure they would keep much dust out since not much dust goes in the close space between the drawers. I think they would just be in the way.

The drawers could be simpler to build with just a small strip of wood across the front and rear, to keep the cases from sliding off the drawers, and that would allow other brand and sizes of case to fit. On the other hand, this design only lets the case move about 1/8" in any direction. The drawback is that HF could redesign or discontinue their case at any time. :sad:

Overall, I am pleased with the design, and am really enjoying being able to quickly find "stuff" I have had to dig for in boxes, cans and jars before. I have only filled it about 3/4 full, and have more "stuff" to sort out when I find time.
jp
 
OP
S

soj

Well-known member
Joined
Dec 3, 2007
Messages
729
Location
North Georgia
SOJ, I have seen you post pics of this cabinet more than a few times and it's an outstanding addition to a shop. A lot of storage in a little foot print. One of the best things about this project is being able to pick up pieces/parts as you can, little by little, as you get paid or have some extra cash.

:beer:

It also encourages over buying. I only needed a few T-nuts for a small project, and after a virtual trip to BoltDepot.com, this is what I ended up with:

P1070076.jpg


The sad part is, I still haven't finished that project or used ANY of the T-nuts! But, if I need 'em, I got 'em, and I know right where they are. :eek:

On the other hand, the next three pics are random samples of stuff I had already, scattered here and there, that I was able to get organized. Notice I left room for sizes I didn't have.

P1070078.jpg


P1070079.jpg


P1070080.jpg


jp
 

vertcnc

Member
Joined
Mar 28, 2015
Messages
18

Attachments

  • drawerside.jpg
    drawerside.jpg
    49.2 KB · Views: 1,545

Ainsley

Well-known member
Joined
Jun 12, 2014
Messages
557
Location
Ontario, Canada
Wow, that is an awesome design. I love the height, amount of storage and portability of the whole cabinet and the individual cases.
Makes my ply cabinet for my Plano trays look like a POS!

I have stacks of the Durham trays at work that I keep stocked with a pretty wide assortment of fasteners and fittings and that has definitely added up!
 

snipes

Active member
Joined
Dec 24, 2009
Messages
27
I was wondering what bins you guys like best for this type of project? SOJ, I guess you like the HF bins, I have never tried them. Any tips on buying them? One 20% off coupon at a time would take a while...
 
OP
S

soj

Well-known member
Joined
Dec 3, 2007
Messages
729
Location
North Georgia
I was wondering what bins you guys like best for this type of project? SOJ, I guess you like the HF bins, I have never tried them. Any tips on buying them? One 20% off coupon at a time would take a while...

HF runs the bins on sale from time to time. The ad said 'Limit 9', but the girl at the register said buy all you want, so I bought 20 for $5.99 each.

HF checkout clerks are about like the stuff they sell: you never know what you are gonna get. :( 
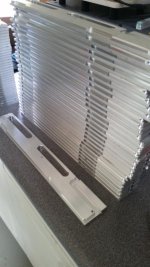
Most of them at my local store are on the low side of friendly. When I do find a nice one, they are never there again. They are usually strict on number of coupons etc. When I was buying these cases sometimes I would get 9, then come back in and get 9 more at a different register/clerk. If my wife was with me, we would make separate purchases.
jp
 
OP
S

soj

Well-known member
Joined
Dec 3, 2007
Messages
729
Location
North Georgia
Thanks for sharing this great idea. I am working on something similar, with 3 columns wide and about 10 tall. I am more of a machinist then a wood worker so I made it all out of alum. 80/20 extrusions for the main structure. drawers all machined components. here is my progress on the drawers sides.
http://www.garagejournal.com/forum/attachment.php?attachmentid=480458&stc=1&d=1443042168

Wow. You gotta start a thread on that build. Give us a link to it here.
jp
 

Trey T

Well-known member
Joined
Aug 3, 2011
Messages
3,749
Location
Houston, TX
soj: Are those organizer w/ removable bin Stanley or HF? I bought a bunch of Stanley bins for my Vidmar cabinet - very useful.
 

vonhef

Well-known member
Joined
Apr 4, 2011
Messages
454
Location
Southern, Ok
That is really nice! I am sure there were several dollars invested to build it, but even more to fill it up. :)
 

vertcnc

Member
Joined
Mar 28, 2015
Messages
18
When I went to HB to buy these with the coupon i was also told buy all you want. I did but I think they had only like 20 in stock the first time around balance on another trip.
 
To avoid these ads, REGISTER NOW!
Top Bottom