To avoid these ads, REGISTER NOW!

NW Ontario Garage Build 40x44

Pythong

Well-known member
Joined
Aug 8, 2012
Messages
76
Location
Thunder Bay, ON, CA
Long time creeper on GJ and finally get to build my own. I have read though a lot of the garage build threads to get some amazing ideas on my garage build.

I moved into a new house in January of 2015 - came from a house with an existing 2 car garage (26x26) that i had jam packed with toys. Very well organized, I just own a lot of stuff :)

The new house did not have a garage which means i was able to build something i really wanted, and knowing my old garage wasn't large enough that I had to go bigger. My new garage is going to be 40x44 with 12' tall ceilings.

Here is a picture of my previous garage just before we ended up finding our new house:

1.jpg

2.jpg

3.jpg


I have a 5 month son so it makes working a bit harder but my wife has been amazing on letting me get all the time needed to get a garage up by winter. I been working at this almost soley myself with the exception of my brother helping me with the excavation process.

My new garage is 40x44' which has a 4' jog to add some character to match our house and will be doing 12' walls with a hip roof, again to match the house.


Here's some pictures:

Ground Breaking:
a.jpg

b.jpg


Backfilling, Compacting & forming:

c.jpg

d.jpg

e.jpg

f.jpg


Floordrain work in progress:
floor.jpg


Trench for water line and gas. Water is 7' down and then gas is going above it at a depth of 2':

water.jpg

waterdepth.jpg

trench.jpg

gas.jpg

cleanedup2.jpg


Laying down Rigid XPS 250 2" Styrofoam:
g.jpg


Rebar near completion.. working late into the night many of days:
h.jpg


2000' of 1/2 Pex for infloor heat. 8 Loops:
i.jpg

j.jpg

k.jpg


Concrete Day:
l.jpg

m.jpg
 
To avoid these ads, REGISTER NOW!
OP
P

Pythong

Well-known member
Joined
Aug 8, 2012
Messages
76
Location
Thunder Bay, ON, CA
Kept the slab wet for a week (tarped 95% of the time). But had to put the sprinkler on it to enjoy the new slab :)

chilled.jpg


Picked up lumber on Sept 9th:

lumber.jpg

lvl.jpg


And walls!
walls1.jpg

walls2.jpg

walls3.jpg

walls4.jpg

walls5.jpg

walls6.jpg

walls7.jpg


And lastly here is where im at as of last night:)

walls8.jpg
 
Last edited:

stu999

Well-known member
Joined
Apr 13, 2014
Messages
92
Location
Scotland
Looks like you will have a nice place there.
Keep the updates coming, I've subscribed!
 

Denwood

Well-known member
Joined
Sep 22, 2014
Messages
4,218
Location
Thunder Bay, Ontario, Canada
Looking awesome. You're smart to go with radiant here in the cold NW. Finish on the slab looks really nice. Drop me a pm if you're in Thunder Bay :)
 
Last edited:
OP
P

Pythong

Well-known member
Joined
Aug 8, 2012
Messages
76
Location
Thunder Bay, ON, CA
Looking awesome. You're smart to go with radiant here in the cold NW. Finish on the slab looks really nice. Drop me a pm if you're in Thunder Bay :)
Yes I am !


Another late night got my second door almost all done. Those lvls sure are heavy lol

6372ae8285aa795255a7262e12a28598.jpg


Sent from my SM-G900W8 using Tapatalk
 

vekster

Well-known member
Joined
Sep 26, 2013
Messages
405
Location
Ontario, Canada
looking great, keep the pics coming!

Slab on grade? you can do that with that size of building?
 
Last edited:
OP
P

Pythong

Well-known member
Joined
Aug 8, 2012
Messages
76
Location
Thunder Bay, ON, CA
looking great, keep the pics coming!

Slab on grade? you can do that with that size of building?

Yes i can, due to the size i had to get a engineer drawing for the slab too.

The sad thing is when i went to apply/pay for my building permit the city guy said i _might_ need to get a engineer drawing for the slab (which i already had and included in the building package). He made a comment that his boss made a few exceptions very recently and let some 36' garages go. Everyone at the office i talked to previously and on the city's website states that exceeding 32' wide requires stamped engineer drawings. Hearing that really annoyed me.


Everyone i talk to now that is applying for a permit i tell them to apply first, if you get denied then go forward with the engineer drawing. Could of saved myself $1200 potentially.
 
To avoid these ads, REGISTER NOW!
OP
P

Pythong

Well-known member
Joined
Aug 8, 2012
Messages
76
Location
Thunder Bay, ON, CA
Been busy with life and the short days (Dark at 5:30PM) has made my motivation go down. But here's some progress shorts leading up to getting the roof on before snow flies!. (Although as i write this we are normally in -20 to -35C weather) and there's still green grass and +3C today.

Here's some pictures from where i left off.


All Framed in Sept 27th:
p1.jpg

p2.jpg


Wrapped Sept 29th:
p4.jpg


Trusses arrived Sept 30th
p3.jpg


Boomed trusses up Oct 9th:
p5.jpg

p6.jpg


So much work framing in a hip roof - first time doing it and i'm happy with how it came out - Oct 14th:
p10.jpg


Got my roof sheeting delivered.. the guy was a little leary on putting the bundles on my pillars but it worked out lol .. Oct 16th

p12.jpg


Started sheeting the roof Oct 18th... with scraps come warm fires during the late nights:
p14.jpg

p15.jpg


Shingles! - Oct 24th:
p17.jpg

p18.jpg


All don November 1st
p20.jpg


Finally can put my car and boat in their new home away from the elements. Got to test out my floor drain and absolutely love it!

p21.jpg
 
OP
P

Pythong

Well-known member
Joined
Aug 8, 2012
Messages
76
Location
Thunder Bay, ON, CA
My door order arrived on Friday (Dec 4th) so i been taking my time over the weekend at installing these doors. Figured id start at the back side to learn how to do them properly so the fronts can come out flawless. I have installed doors in the past but that was many years ago so needed a refresher.

Here's my current beautiful front doors:


p22.jpg


New doors & openers:

p23.jpg

p24.jpg


Glass section for the front doors:

p25.jpg


Rear door is about 90% complete. That's going to be my evening project today to get this guy all done and operational before i move to the two fronts:

p26.jpg
 

1953mercury

Well-known member
Joined
Nov 25, 2012
Messages
701
Location
Steamboat Springs CO
If you haven't used those openers before you will really like them. Very smooth and quiet in operation. You do need to get your torsion spring adjustment just right, and make sure your tracks are plumb and top rails parallel as they only draw 1 amp and the overload switch will pop if everything isn't properly setup. I put two of them in the new shop this year and love em. Nice building, mine is just a little further along, Hoping to finish it up in the spring. Cheers, Mike
 

Denwood

Well-known member
Joined
Sep 22, 2014
Messages
4,218
Location
Thunder Bay, Ontario, Canada
It's looking great. You're smart to have your door rails hugging the ceiling now, rather than later :) Having the glass inserts should add a whole lot of light.

I haven't seen the roof pillar idea before..that saves a lot of lifting!
 
OP
P

Pythong

Well-known member
Joined
Aug 8, 2012
Messages
76
Location
Thunder Bay, ON, CA
If you haven't used those openers before you will really like them. Very smooth and quiet in operation. You do need to get your torsion spring adjustment just right, and make sure your tracks are plumb and top rails parallel as they only draw 1 amp and the overload switch will pop if everything isn't properly setup. I put two of them in the new shop this year and love em. Nice building, mine is just a little further along, Hoping to finish it up in the spring. Cheers, Mike


I got my first door all done last night and am super impressed with these openers. The quietness and smoothness is so unreal compared to my old house that had a chain drive unit.

I loved the look of them after seeing everyone have them on this forum and said i had to get them. Very happy with them and will recommend these openers to anyone looking to pick one up. I just need to get the MyQ internet gateway and i'm all set.

It looks like chamberlain and Liftmaster are identical. Does anyone know if the Chamberlain MyQ Internet Gateway will work with the Liftmaster (They are just more readily available here in Canada @ Home Depot).


It's looking great. You're smart to have your door rails hugging the ceiling now, rather than later :) Having the glass inserts should add a whole lot of light.

I haven't seen the roof pillar idea before..that saves a lot of lifting!


The rails are 19" off the ceiling and now i'm thinking i should of maybe gone for the high lift package to hug it even closer.. none the less with 12' walls it still leaves me with ~120" of headroom as i eventually want to put a 4 post hoist at that location to maximize my storage in the winter.

I came up with the pillar idea because i didn't want all that weight of 35+ sheets coming down on my trusses so i used 2x6x16' boards to transfer all the weight to the floor and it worked great! The boom truck operator was new on the job and was a little sketchy but we got them up there with no casualties hah.

The little i had to bring up a ladder was a huge PITA with 12' walls. I couldn't imagine having to lift 75 bundles of shingles or 4x8' sheets on the roof. Unloading the bundles from the boom truck to the roof was enough for me lol
 

Denwood

Well-known member
Joined
Sep 22, 2014
Messages
4,218
Location
Thunder Bay, Ontario, Canada
I helped my neighbor with 3/4" sheathing to do a 2nd floor porch roof/balcony. It was 12' off the ground. That was a major workout as I has grabbing the sheets off a pile and then sliding them up a ladder to him. I figure your work on the columns was very well worth it :)
 
OP
P

Pythong

Well-known member
Joined
Aug 8, 2012
Messages
76
Location
Thunder Bay, ON, CA
It's looking great. You're smart to have your door rails hugging the ceiling now, rather than later :) Having the glass inserts should add a whole lot of light.

I haven't seen the roof pillar idea before..that saves a lot of lifting!

Ever since your comment i have grown to hate the height of my tracks lol... damn you! I got NUSTEEL getting me a high lift kit for all 3 doors - spools, springs, track to lift me an extra 11-1/2" so the track will be 7" off the ceiling.

Thanks for spending my money Denwood ! lol

Awesome build! Love the car but I am biased :)

Bret

Thanks!


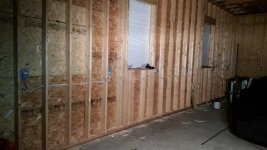
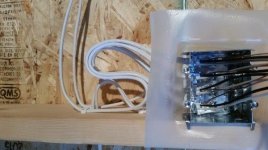
Nothing too much has been going on, just plugging away at little things. Ordered up my breaker panel which should be here this week and i been plugging away at my electrical little by little. Got most of my boxes up and wired on two walls so far.

Lots of little planning needs to go into this to think of everything I need and where i'm going to put it.

Ended up coming across a good deal on pot lights I plan on using throughout parts of the garage plus the house. I want to do soffit lighting on both garage and house. These will come in handy - especially at the price i paid!
 

Attachments

  • score.jpg
    score.jpg
    74.4 KB · Views: 21
  • wall.jpg
    wall.jpg
    55.7 KB · Views: 21
  • outlet.jpg
    outlet.jpg
    69 KB · Views: 22

stu999

Well-known member
Joined
Apr 13, 2014
Messages
92
Location
Scotland
Just catching up on your build. Looking great. Well done so far.

Really like the roof pillar idea. Good work!
 
To avoid these ads, REGISTER NOW!
Top Bottom