
You are using an out of date browser. It may not display this or other websites correctly.
You should upgrade or use an alternative browser.
You should upgrade or use an alternative browser.
1966 F100 EcoBoost Engine Swap (EcoBoosted)
- Thread starter TimeWarpF100
- Start date
- Status
- Not open for further replies.
1949 caddyman
Well-known member
Lookin good!
OP
TimeWarpF100
Well-known member
Think it looks better without the air dam.

bulletpruf
Well-known member
think it looks better without the air dam.
yes ^^^^
PCO6
Well-known member
Great job on the fog lights!  A lot of details to figure out and nicely put together. I'm guessing that making the second one went a lot faster than the first one!
A lot of details to figure out and nicely put together. I'm guessing that making the second one went a lot faster than the first one!Maybe you can design something from metal that goes out to the end of the bumper, then curves down where the core starts. It like a levoure of maybe 5 or 6 levoures. This would help to protect the core from rocks and other debris. Since the truck is so square, but the front of the hood has a little curve in it, so just duplicate the same on the bottom corners. JMO. I like what you are doing and wish I could do something like that, but an old Chevy truck. I give it.
I give it.I agree the without air dam idea. Love reading this blog everyday. I also have and idear. What if you had a air dam the full length of the bumper with holes, slots in the center. Similar to what the newer super duty 6.7's have. just a thought.
OP
TimeWarpF100
Well-known member
^^^^
I agree it looks better w/o the air dam, and the rectangular hole for the i/c looks good too, better than the triangular design. Fog lights are awesome.
Glad your back TW.
yes ^^^^
Great job on the fog lights!
A lot faster but not so sure it turned out any better . .
Maybe you can design something from metal that goes out to the end of the bumper, then curves down where the core starts. It like a levoure of maybe 5 or 6 levoures. This would help to protect the core from rocks and other debris. Since the truck is so square, but the front of the hood has a little curve in it, so just duplicate the same on the bottom corners. JMO. I like what you are doing and wish I could do something like that, but an old Chevy truck.
I agree the without air dam idea. Love reading this blog everyday. I also have and idear. What if you had a air dam the full length of the bumper with holes, slots in the center. Similar to what the newer super duty 6.7's have. just a thought.
like the air dam 81-87 chevy pickups had.
I had not planned on using the stock Eco Air Dam but when I tried it it fit right on using stock bolts. Plan now is to get it driving with any bugs worked out then I will get into more detail like the Air Dam. Most of them I have found are very curved. The new Super Duty one may work and its only around 70.00. I will also consider building my own but my design department has a closed sign in window . . Be nice to have some cad software as my brain is pretty much blank on building my own. Kind of like doing the bumper I did not really have a plan until I started chopping a couple bumpers apart.
Last night I spent nearly all night installing a new EcoBoost engine . .
Dyno Testing . .
When I woke up this morning and headed out to shop it was no longer there . . LOL
Quite the "dream" it was .
https://vimeo.com/91425524
But at 45,000.00 Plus another 12,780.00 for the PCM to run it what I have is just fine! Ha-ha
Last edited:
OP
TimeWarpF100
Well-known member
Know its getting close when I ordered a windshield and it showed today along with a new weatherstrip. I probably have a full day inside of cab installing a extra support piece to lower windshield lip prior to installation of windshield. (It got removed while trying to fit HVAC and Firewall.

I now have Tail, brake, turn, backup lights in rear. Just gotta add the license plate and light.
This feels like everything is in slow motion . . As another month goes by since first test drive.
Made these little brackets for temporary vertical tail light support.


I now have Tail, brake, turn, backup lights in rear. Just gotta add the license plate and light.
This feels like everything is in slow motion . . As another month goes by since first test drive.
Made these little brackets for temporary vertical tail light support.
OP
TimeWarpF100
Well-known member


Had to add a gusset on lower to keep the light itself from flexing.

I had planned on having all the lighting completed today but had a TON of visitors.
A local high $$ restaurant wants add this new Galvalume roofing material to the side of a new building but going horizontal vs vertical. A local metal shop said they could do it then after the metal was ordered and showed up said, "Nope, no can do!"
Like a fool I said I would try to see if I can weld it. Gotta be a perfect 90 deg and its 26 gauge. So thin!
Here is a test panel to see if it could be done. I was able to TIG it but not a easy process. Just trying to help bail out a friend who bid it.

1949 caddyman
Well-known member
Just what you need, another project! LOL. How much rain did you get tuesday? We in Mesa got 2" at our house. I heard there was some flooding in Scotsdale.
Last edited:
OP
TimeWarpF100
Well-known member
Just what you need, another project! LOL. How much rain did you get tuesday? We in Mesa got 2" at our house. I heard there was some flooding in Scotsdale.
Just a sprinkle and to almost get the ground wet . .
I would try to use panel adhesive on the inside with some gussets. Tack weld as you did.
I am at the mercy of what the Architect wants . . It even has to have a special pattern on how its fastened to the wall . . Gotta find a way to pay for those new wheels . . LOL
OP
TimeWarpF100
Well-known member
Since Robert is going to make a new fender for his "project" next month I can spill the beans what the final plan is.
Since dad bought it going on 52 yrs ago it has always been black with white fenders.
But, I decided in part of the tribute to my dad I am going to paint it J code Red with Wimbledon White Fenders to match the EcoProject.
My older brother here standing on scooter, who just turned 60 this past Sunday.
Me standing behind it.

Our other scooter or dad's hunting rig. Its still in the U.P. Never had a way to get it to PHX. Yeah, That's me on the back. Taken at our Hunting Cabin.

Another scooter pic in front of our house. Think the Wagon was a 1961, Had a '57 Ranch wagon prior.

My dad would be 96 yrs old this year. He passed away August 1989.
He bought us go-karts, scooters very early on. He was a Mechanic, Invented a few tools most of us use today. Carved the tools out of wood to see if they would work.
Since dad bought it going on 52 yrs ago it has always been black with white fenders.
But, I decided in part of the tribute to my dad I am going to paint it J code Red with Wimbledon White Fenders to match the EcoProject.
My older brother here standing on scooter, who just turned 60 this past Sunday.
Me standing behind it.
Our other scooter or dad's hunting rig. Its still in the U.P. Never had a way to get it to PHX. Yeah, That's me on the back. Taken at our Hunting Cabin.
Another scooter pic in front of our house. Think the Wagon was a 1961, Had a '57 Ranch wagon prior.
My dad would be 96 yrs old this year. He passed away August 1989.
He bought us go-karts, scooters very early on. He was a Mechanic, Invented a few tools most of us use today. Carved the tools out of wood to see if they would work.
OP
TimeWarpF100
Well-known member
All I have to work with now.
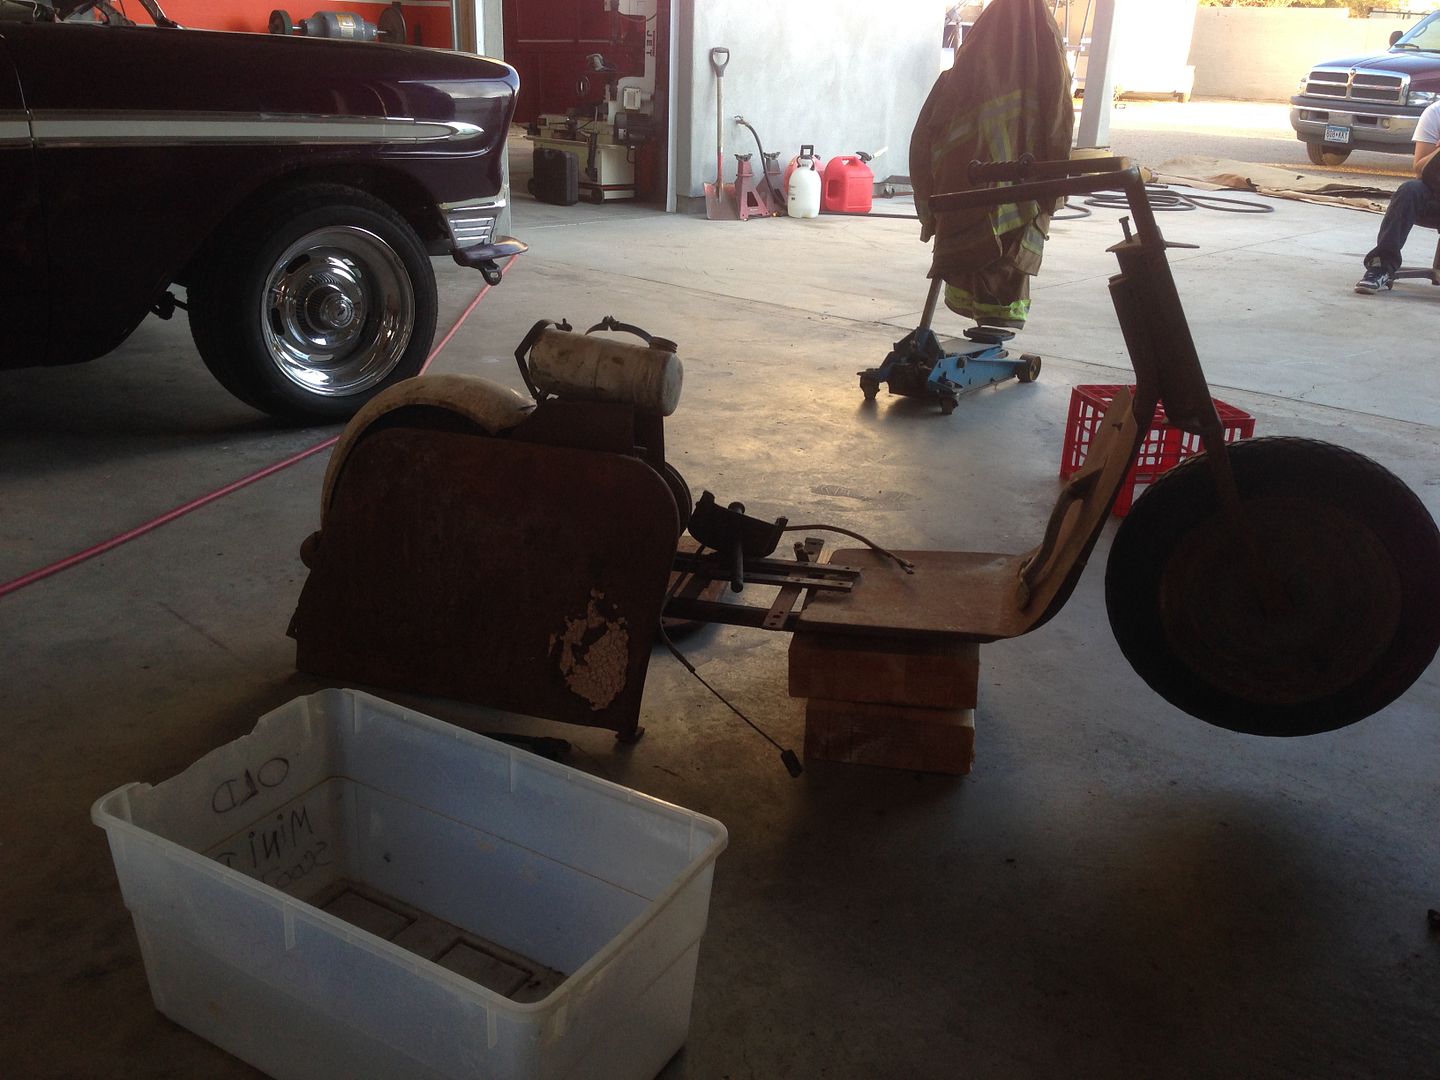
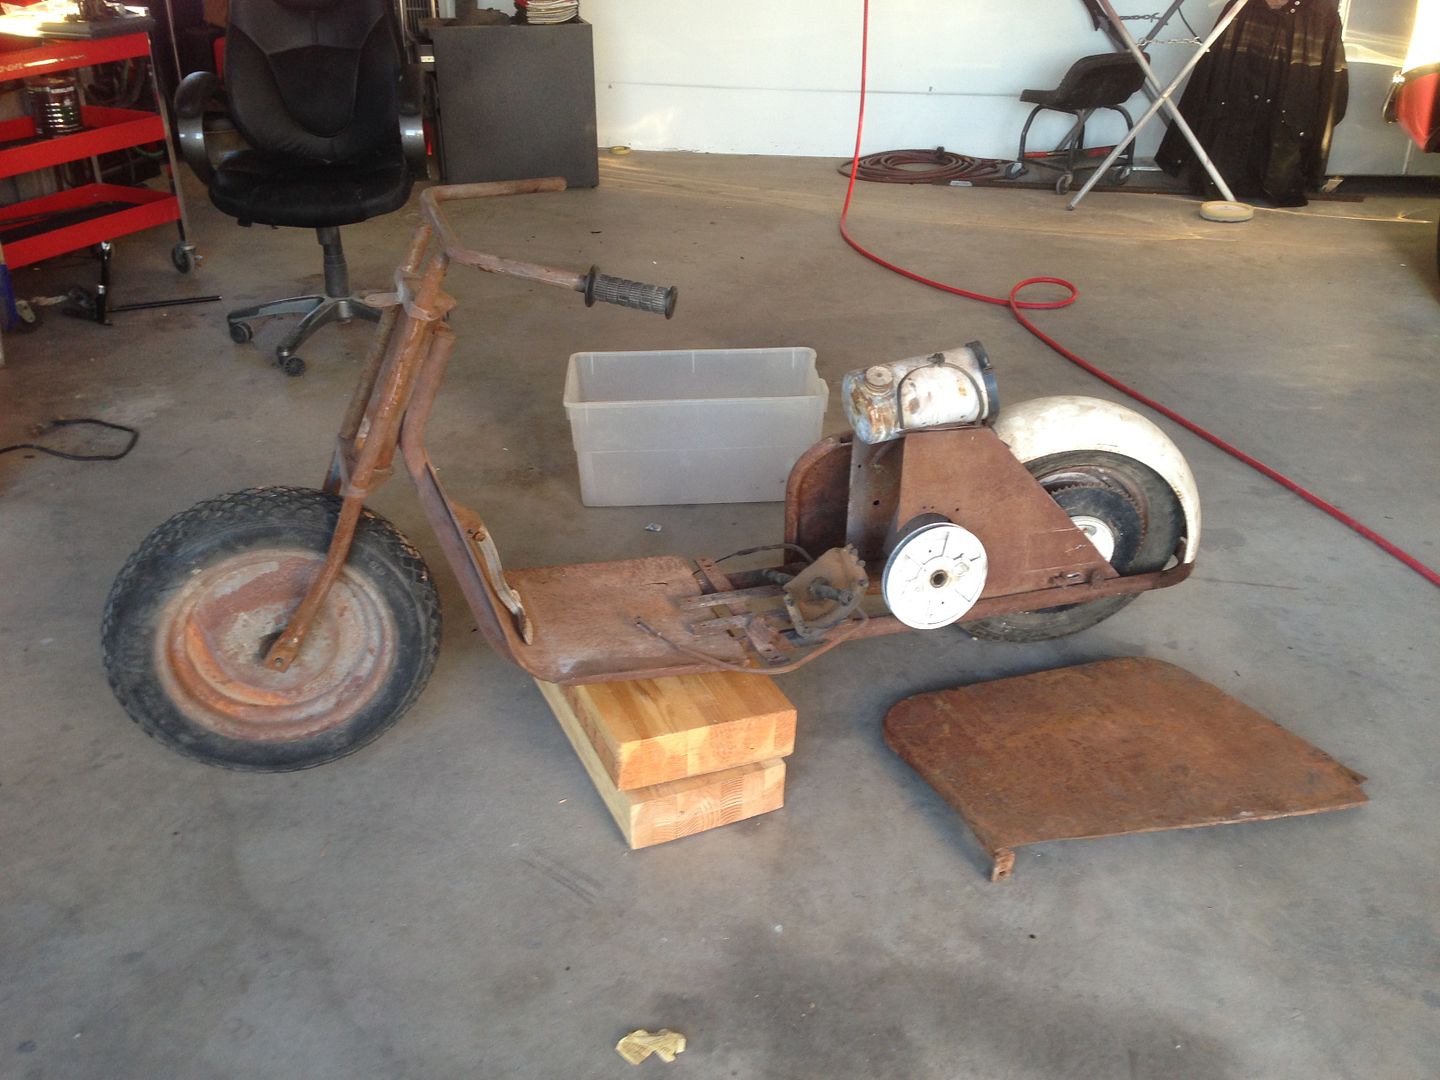
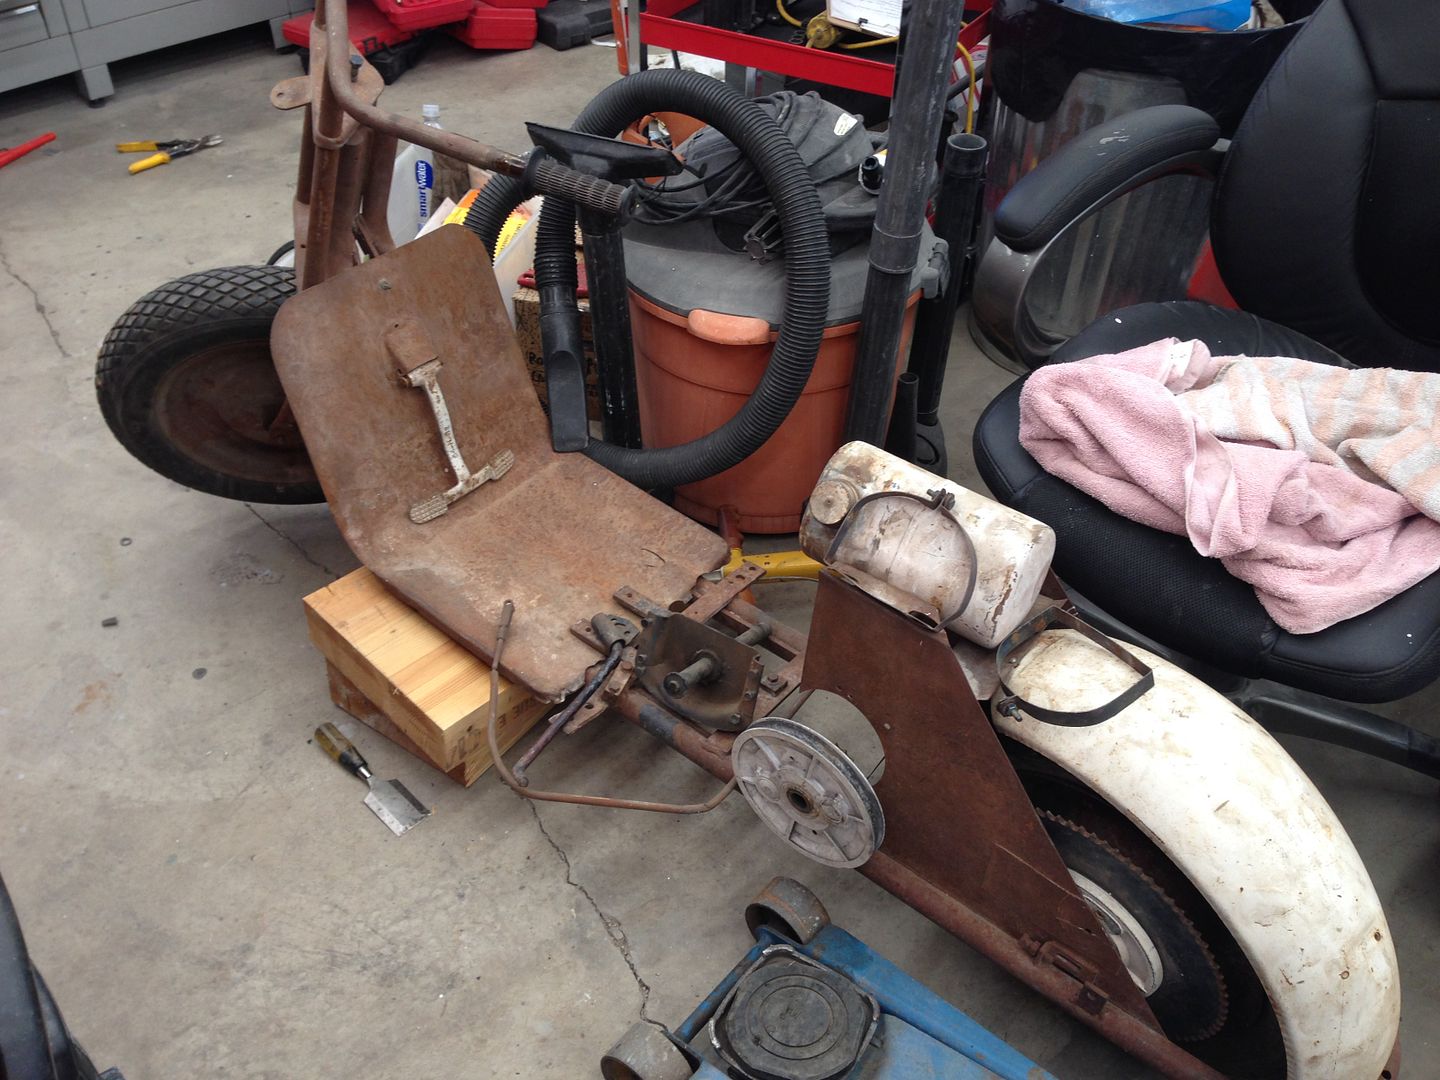
If anyone can point me in right direction to find a tail light and headlight along with the throttle lever and cable it would be much appreciated.
Even if they are "era' correct. Pretty sure its a 1955.
If anyone can point me in right direction to find a tail light and headlight along with the throttle lever and cable it would be much appreciated.
Even if they are "era' correct. Pretty sure its a 1955.
christopher7390
Well-known member
looking forward to seeing the scooter build!
OP
TimeWarpF100
Well-known member
looking forward to seeing the scooter build!
Its been a long time coming. I did some blasting and started the restoration in 1987 or so.
Starting this October I plan on spending 1 hr per week minimum on it in between other projects.
Could not resist this.
The day before the story came out on VW a relative of my wife bought a new one. Dealer will not take it back because not road legal.
I heard this pic was leaving the EPA test station of which it passed with flying colors.

tac
Well-known member
This made my morning!
Could not resist this.
I heard this pic was leaving the EPA test station of which it passed with flying colors.
LOL!! Fantastic build, Great Picture. Keep up the good work!!
OP
TimeWarpF100
Well-known member
This made my morning!
These pics made my day!
LOL!! Fantastic build, Great Picture. Keep up the good work!!
All lighting now working! A longer test drive not too far away . . .
Headlight doors just sitting there, gotta find the screws .

OP
TimeWarpF100
Well-known member

jhn9840
Well-known member
Very cool. Can't wait to see the next test drive. Bet you can't wait to take it.
jhn9840
John
jhn9840
John
sxk122
Well-known member
That truck has a bright future!!
(couldn't resist the lighting pun)
(couldn't resist the lighting pun)
Weekend_warrior
Well-known member
That is one cool truck! I've followed this thread from the begining. Its sure had its ups and downs, but the light is becoming clear at the end of tunnel. You do some great work. There is a ton of detail in this truck. The driving lights in the bumper are slick. I like the looks of it without the air dam on it that you had mocked up. You might just suspend a mess or stone guard off it and leave it like that if it will run cool enough without the air dam.
I've followed your project since your first post.. Cheered your good work and prayed for your good health. I just had 1 quick question... As I looked at the above pics, I was wondering if, as you were considering the cutout on the bumper you thought about mirroring the 2 missile shaped openings in the grill.
JonBoehman
Well-known member
I was wondering if, as you were considering the cutout on the bumper you thought about mirroring the 2 missile shaped openings in the grill.
I have had the same thoughts. I think it would also strengthen the center of the bumper as well.
Fordguy1964
Well-known member
Looking SUPER COOL TW! Getting close. Can't wait to see it when you put your painting skills to work on it! BEAUTIFUL!!!!
Fordguy1964
Well-known member
I have had the same thoughts. I think it would also strengthen the center of the bumper as well.
But if you start doing too much of that people will start thinking it is a Pontiac truck!
8man
Well-known member
Looking good Mr. TW!
walt460
Well-known member
TW, I like that look, keeps with the '66 design but adds functionality for both the inter cooler and your night-time driving, Nice Job!
I saw the episode of MobSteel on TV today where they put a (free from Ford Racing) 3.5L Ecoboost engine into a 1972 F100 using the Ford Racing Controls Pak and a QuickTime bellhousing with a manual trans. They used a hydraulic powersteering rack but failed to explain how they supplied the pressure (Ecoboost has no PS pump). They also did not show it being driven, just starting.
Walt
I saw the episode of MobSteel on TV today where they put a (free from Ford Racing) 3.5L Ecoboost engine into a 1972 F100 using the Ford Racing Controls Pak and a QuickTime bellhousing with a manual trans. They used a hydraulic powersteering rack but failed to explain how they supplied the pressure (Ecoboost has no PS pump). They also did not show it being driven, just starting.
Walt
OP
TimeWarpF100
Well-known member
Very cool. Can't wait to see the next test drive. Bet you can't wait to take it.
jhn9840
John
Looking forward to a longer test drive for sure . .
Man, that looks good TW.
Thanks!
That truck has a bright future!!
(couldn't resist the lighting pun)
By a not so bright operator . . LOL
That is one cool truck! I've followed this thread from the begining. Its sure had its ups and downs, but the light is becoming clear at the end of tunnel. You do some great work. There is a ton of detail in this truck. The driving lights in the bumper are slick. I like the looks of it without the air dam on it that you had mocked up. You might just suspend a mess or stone guard off it and leave it like that if it will run cool enough without the air dam.
Wish I had a CAD program to help decide what to do there . .
I normally have to just keep looking at it and trying different things to come up with a plan. But, Its normally when I get to that point. It does look much better without the air dam but its less than a minute to remove or install. Will have to see how the cooling system and Intercooler react with and without it before I decide what to do. I would rather not have so much of the cooler exposed. Looks to ricer.
I've followed your project since your first post.. Cheered your good work and prayed for your good health. I just had 1 quick question... As I looked at the above pics, I was wondering if, as you were considering the cutout on the bumper you thought about mirroring the 2 missile shaped openings in the grill.
Thanks for following along! I have thought about doing something with the opening and something to match the grille has crossed my mind. I really had not thought about how I would go about doing that. After you mentioned it I looked at it again and know now how to do it. Just not sure what it will look like until I try out the idea.
I want to decide exactly what to do with the grille first.
Been unable to work on it for a week now. Last week I did try some masking tape painted black in vertical bars of grille to see how that would change things up. It may take a bit of experimenting to get the right look.
Tape Black Look .

I have had the same thoughts. I think it would also strengthen the center of the bumper as well.
Plan was to first make the opening as large as possible then decide if and what do do to change the look. As above I will try a few things. Still need to remove bumper for mounting, Plan is to have nothing on outside of bumper showing the mounting bolts. Have a plan for that but will see if it works or not . .
Looking SUPER COOL TW! Getting close. Can't wait to see it when you put your painting skills to work on it! BEAUTIFUL!!!!
Painting has always been my least favorite part of the job but after all I have been through it will not seem so hard anymore . .
But if you start doing too much of that people will start thinking it is a Pontiac truck!
Be a "rare" truck that way! LOL
Thanks!Looking good Mr. TW!
TW, I like that look, keeps with the '66 design but adds functionality for both the inter cooler and your night-time driving, Nice Job!
I saw the episode of MobSteel on TV today where they put a (free from Ford Racing) 3.5L Ecoboost engine into a 1972 F100 using the Ford Racing Controls Pak and a QuickTime bellhousing with a manual trans. They used a hydraulic powersteering rack but failed to explain how they supplied the pressure (Ecoboost has no PS pump). They also did not show it being driven, just starting.
Walt
Walt, I have been aware of the truck but have been unable to find the video until after you mentioned it. Did a search last night and was able to find a video of build. They show very few details of how they did anything.
They had some serious help from Ford Performance. Including wiring help at the shop. It would be nice to get to the point for FREE engines and parts! LOL
The truck was actually built for a EX NFL player.
Was not too impressed with some of the craftsmanship especially with rear suspension. Looked pretty crude to me.
It did show the ex-NFL guy taking it for a spin. A undercarriage shot showed the steering rack but did not see a pump. Maybe its a PS rack but not operable.
OP
TimeWarpF100
Well-known member
Found a hubcap that looks NOS after a major detail. Saw through the dirt with a single pic on ebay. Looks great and same cap dad's truck had.

Park light socket

Other side

Bronco time!
Last Saturday my daughter stopped by and we painted the last 2 pieces for Bronco. The tailgate and gate inside cover.
Daughter hand painted the red stripes on the trim rings. Even the one for the spare. Did a really nice job. Just used the foam pad on buffer while she held them to shine up the rings prior to paint. She added a bit of hardener to the 1shot paint. It worked very well.

Dragged the Bronco out of cobwebs in side shop. Its been color sanded for months now time to take out the buffer!

Park light socket
Other side
Bronco time!
Last Saturday my daughter stopped by and we painted the last 2 pieces for Bronco. The tailgate and gate inside cover.
Daughter hand painted the red stripes on the trim rings. Even the one for the spare. Did a really nice job. Just used the foam pad on buffer while she held them to shine up the rings prior to paint. She added a bit of hardener to the 1shot paint. It worked very well.
Dragged the Bronco out of cobwebs in side shop. Its been color sanded for months now time to take out the buffer!
OP
TimeWarpF100
Well-known member
Painted a couple coats on the bronco parts then mixed another batch of paint.
After the painting was done and gun sitting on bench saw this!
How many catch the slight problem? It worked but could have been quite the mess.
Senile, dumb or Alzheimer's.

Still need to restore the spare tire carrier.

Inside of gate. Of course had to detail all the hardware . .


A bit dirty from sitting for a few months. Needs final buffing, trim, mirrors, a bit of wheel detail, fuel door, bumpers, windshield trim. sooooo much work.

Lots of time spent on gate assy and to get everything to work. Still need the strikers and final adjustment, belt moldings. Adjust topper and tighten down.
I have flat run out of elbow grease on this Bronco.
Daughter plans on moving to MN soon so most likely she will not get a chance to enjoy it. Anyone from MN area that wants a nice & "fresh" bronco? Hate to have her destroy it with MN winter driving after all this work. I was really hoping she would keep it as a second vehicle and get some enjoyment after all her hard work on it.

After the painting was done and gun sitting on bench saw this!
How many catch the slight problem? It worked but could have been quite the mess.
Senile, dumb or Alzheimer's.
Still need to restore the spare tire carrier.
Inside of gate. Of course had to detail all the hardware . .
A bit dirty from sitting for a few months. Needs final buffing, trim, mirrors, a bit of wheel detail, fuel door, bumpers, windshield trim. sooooo much work.
Lots of time spent on gate assy and to get everything to work. Still need the strikers and final adjustment, belt moldings. Adjust topper and tighten down.
I have flat run out of elbow grease on this Bronco.
Daughter plans on moving to MN soon so most likely she will not get a chance to enjoy it. Anyone from MN area that wants a nice & "fresh" bronco? Hate to have her destroy it with MN winter driving after all this work. I was really hoping she would keep it as a second vehicle and get some enjoyment after all her hard work on it.
nonhog
Well-known member
Not so great "paint" version. Someone here probably has photoshop?

Bronco is looking sharp!
Bronco is looking sharp!
Chateau Slate 66
Well-known member
Where is she moving in MN? A clean, rust free, Bronco that was just detailed by you and your daughter will sell in a heartbeat up here.
PugetDude
ALLIANCE MEMBER
Not so great "paint" version. Someone here probably has photoshop?
No photoshop, but another idea...
Attachments
NSmist
New member
Painted a couple coats on the bronco parts then mixed another batch of paint.
After the painting was done and gun sitting on bench saw this!
How many catch the slight problem? It worked but could have been quite the mess.
Senile, dumb or Alzheimer's.
Ha I've forgot the thread on ring before myself. Filled it up and "oops". Never splattered it but I've watched one explode in someone's face when not sealed on tight. Living on the edge at its finest.
- Status
- Not open for further replies.