To avoid these ads, REGISTER NOW!

Tonka Garage ( picture heavy)

TonkaJoe

Well-known member
Joined
Dec 19, 2014
Messages
410
Location
Southern ON, Canada
Tonka Garage + Home Landscape and Other Property Projects ( Picture Heavy)

Hey there everyone, Finally, finally, finally I can share my Shop renovation with you!. So a little about myself... 30yrs young, I'm an Operating Engineer by trade ( Operate any piece of heavy equipment you can think of), I have several years of open pit mining experience combined with several years of Heavy construction experience, avid hunter, love mechanics, woodworking, fabricating, trucks, cash crop / dairy farming and anything iron!.

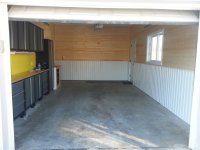
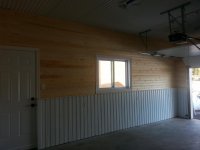
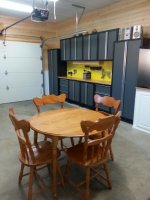
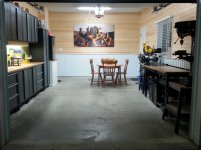
To start off I purchased this home from my grandparents a few years ago and have been working on renovating the whole thing inside and out ( this takes tons of time and cash) which we're all well aware of!. So after doing a lot of outside work it was time to get myself into a nice organized shop!, somewhere I could work on various projects from my truck to small engines, wood working etc... also to enjoy a few cold beverages after a long 12hr shift!.

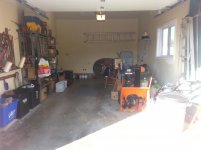
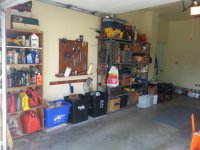
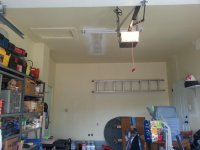
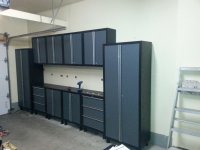
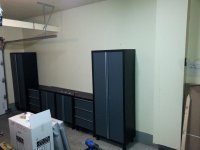
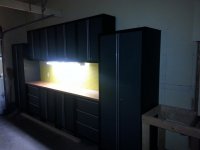
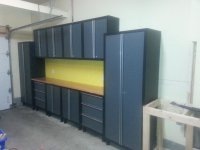
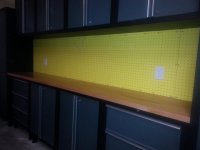
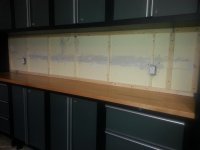
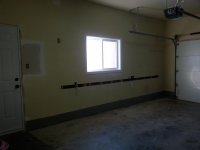
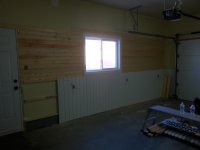
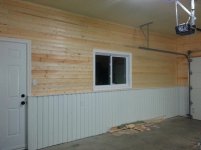
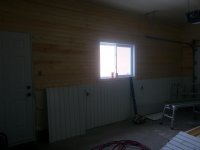
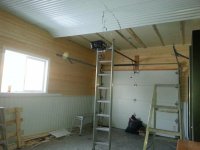
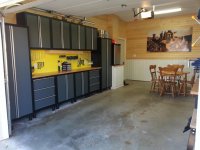
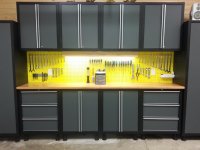
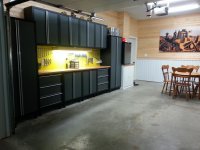
Here is what I started off with.. Single car garage 22L x 13w x 12H and as you can see it's a mess!. The industrial steel racks were nice but I found myself getting lazy and simply stuffing things wherever I could find a spot. VERY BAD habit right there.
 

Attachments

  • 20141210_122404.jpg
    20141210_122404.jpg
    130.5 KB · Views: 957
  • 20141210_122414.jpg
    20141210_122414.jpg
    137.6 KB · Views: 860
  • 20141210_122436.jpg
    20141210_122436.jpg
    131.7 KB · Views: 770
  • 20141210_122446.jpg
    20141210_122446.jpg
    128.3 KB · Views: 741
  • 20141210_122501.jpg
    20141210_122501.jpg
    135.7 KB · Views: 775
Last edited:
To avoid these ads, REGISTER NOW!
OP
T

TonkaJoe

Well-known member
Joined
Dec 19, 2014
Messages
410
Location
Southern ON, Canada
Tonka Garage + Home Landscape and Other Property Projects ( Picture Heavy)

First thing I needed to do was replace the old wooden door, window and garage door with a new North Star window and door and insulated garage door. Secondly I had to make all of this stuff disappear for awhile while I worked on the projects!. I shopped around for garage cabinetry and came across NewAge products while browsing the garages on this site and was quite impressed by the product. So I decided to pull the trigger on the 12pc set!. As you can see from the pictures they came packed tighter than a.. well you know what... :D which was nice to see!.

I received them within 2 weeks of ordering and had absolutely no issues with delivery or damage. They're the fully welded version with adjustable leveling feet which in my case was a life saver due to the 3'' slope I had to contend with from the rear of the garage to the front. I had the set put up and level in about 2 hours with the help of my brother. All the mounting hardware is included ( lags, washers, screws etc) all you need are the tools!.
 

Attachments

  • 20150107_134241.jpg
    20150107_134241.jpg
    140.6 KB · Views: 644
  • 20150107_134301.jpg
    20150107_134301.jpg
    139.4 KB · Views: 580
  • 20150107_135805.jpg
    20150107_135805.jpg
    143 KB · Views: 563
  • 20150110_213756.jpg
    20150110_213756.jpg
    142.6 KB · Views: 654
  • 20150108_220220.jpg
    20150108_220220.jpg
    144.3 KB · Views: 832
  • 20150107_140633.jpg
    20150107_140633.jpg
    146.3 KB · Views: 569
  • 20150107_212747.jpg
    20150107_212747.jpg
    150.1 KB · Views: 587
Last edited:
OP
T

TonkaJoe

Well-known member
Joined
Dec 19, 2014
Messages
410
Location
Southern ON, Canada
Tonka Garage + Home Landscape and Other Property Projects ( Picture Heavy)

Once I had the cabinets in place I decided that I needed to dip into the electrical work... The garage only had 1 small 100w bulb way up in that high ceiling!, and only 1 outlet at the rear of the garage. So I started to rough in the electrical for the workbench and adjacent wall where most of the heavy power tools would be placed like the table saw, bench grinder, drill press etc. I planned for a total of 5 extra outlets and 4 additional lights in the ceiling.


20150118_223147.jpg

20150124_164609.jpg


Also after removing some of the old outlets and light switches I decided to replace them with some nice new Decora style rocker switches.. Not only was it good to update them but it improved the look, and gave me a chance to inspect the wiring.
 

Attachments

  • 20150213_181800.jpg
    20150213_181800.jpg
    133.7 KB · Views: 420
  • 20150206_002408.jpg
    20150206_002408.jpg
    136.8 KB · Views: 412
Last edited:
OP
T

TonkaJoe

Well-known member
Joined
Dec 19, 2014
Messages
410
Location
Southern ON, Canada
In between the electrical I had a whole different issue to deal with. Pictured below in the large drywall column is where the B style Flue vent for my hot water heater exits from the basement. Now with only having a small space left from my cabinet set left I considered it to be " Deadspace" and not really useable for anything.
With that being said I decided to design and construct a built in cabinet complete with a hard wood top to match the workbench set which would hold a beer fridge built into the wall :thumbup: 
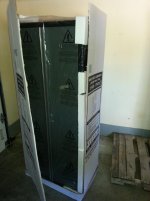
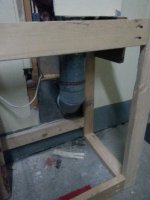
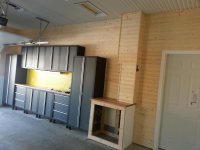
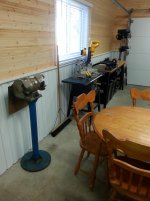
underneath double cabinet doors would take care of hiding the garbage can. This took me a fair amount of time to figure out as I ran into the issue of the sloping floor, and keeping the required space framed around the actual flu vent itself. All the while reframing the wall and incorporating it into my current cabinet set. And I think after that new beer fridge dry fitting it's going to work just fine!.
 

Attachments

  • 20150109_220522.jpg
    20150109_220522.jpg
    158.7 KB · Views: 409
  • 20150109_220602.jpg
    20150109_220602.jpg
    134.1 KB · Views: 425
  • 20150217_182742.jpg
    20150217_182742.jpg
    145.3 KB · Views: 399
  • 20150120_203442.jpg
    20150120_203442.jpg
    146.3 KB · Views: 475
  • 20150121_194233.jpg
    20150121_194233.jpg
    147.7 KB · Views: 436
  • 20150217_183504.jpg
    20150217_183504.jpg
    153.8 KB · Views: 403
  • 20150217_182726.jpg
    20150217_182726.jpg
    135.7 KB · Views: 391
OP
T

TonkaJoe

Well-known member
Joined
Dec 19, 2014
Messages
410
Location
Southern ON, Canada
Next on the list was somewhere to hold all of my high use tools, screwdrivers, wrenches etc... things I like to have at my finger tips instead of going through drawers and what not. So I added some pegboard to the sprawling area under my new cabinetry system.
Once I had the electrical wrapped up in that area I framed in the whole area with 1x2 strapping.. I ripped the vertical pieces down to 1/4" so that I could fit them between holes and not have to sacrifice any. Mounted them using wood glue and drywall screws with pre drilled holes to avoid any splitting. Once I had the pegboard up and mounted I gave it a nice coat of CAT yellow over the normal white or black... besides being different makes it stand out right?!

I also knew that I'd need some under cabinet lighting.. I searched the LED light etc but none really stood out to me, so I customized and mounted a Lithonia dual bulb T-8 fixture to the underside of the cabinets.. AND as you can see she's definitely bright and throws a ton of light all by it's lonesome!.
 

Attachments

  • 20150214_015135.jpg
    20150214_015135.jpg
    158 KB · Views: 474
  • 20150208_184855.jpg
    20150208_184855.jpg
    147.4 KB · Views: 477
  • 20150208_184200.jpg
    20150208_184200.jpg
    148.4 KB · Views: 471
  • 20150208_154503.jpg
    20150208_154503.jpg
    150.7 KB · Views: 462
OP
T

TonkaJoe

Well-known member
Joined
Dec 19, 2014
Messages
410
Location
Southern ON, Canada
Next up were those ugly drywall walls and ceiling... I knew right away that I wanted to brighten this whole work area up and give it a "wow" factor when someone saw it for the first time... Due to drywall soaking up moisture, and deteriorating over time I decided NOT to re drywall the whole thing but give it a facelift instead.
I ended up going with white steel corrugated wainscoting which I laser levelled to correct the slope of the garage floor, capped with a chair rail. From there to the ceiling I decided to break up the white with some tongue and groove pine and finish off the actual ceiling with white corrugated steel again.

I had a few obstacles to overcome like a concrete block ledge pictured below on the opposing wall to my cabinet set which I had to build out over with strapping to accommodate the wainscoting... and not all of the walls were perfectly square but I worked with what I had and I think the results turned out great.. hopefully you'll all agree! :bounce:
 

Attachments

  • 20150223_081915.jpg
    20150223_081915.jpg
    138.4 KB · Views: 625
  • 20150223_163006.jpg
    20150223_163006.jpg
    125.8 KB · Views: 627
  • 20150225_220301.jpg
    20150225_220301.jpg
    150.1 KB · Views: 793
  • 20150224_123454.jpg
    20150224_123454.jpg
    129.4 KB · Views: 606
  • 20150226_170539.jpg
    20150226_170539.jpg
    143 KB · Views: 691
  • 20150226_170519.jpg
    20150226_170519.jpg
    145.2 KB · Views: 674
  • 20150226_170457.jpg
    20150226_170457.jpg
    145.4 KB · Views: 732
OP
T

TonkaJoe

Well-known member
Joined
Dec 19, 2014
Messages
410
Location
Southern ON, Canada
Here are a few more pictures of the steel and wood along with the trim work going up... since I know you guys like pictures :thumbup:

I should also add that The lights I added in the ceiling are
Lithonia Dual bulb T-8 fixtures, I daisy chained these together and added some Philips 6500K Natural Light bulbs. Boy oh boy are these guys bright! even with the cold Canadian winters these turn on instantly and are 3/4 bright at around -25. No complaints here!.
 

Attachments

  • 20150227_162520.jpg
    20150227_162520.jpg
    134.8 KB · Views: 499
  • 20150227_162502.jpg
    20150227_162502.jpg
    129.2 KB · Views: 510
  • 20150227_162451.jpg
    20150227_162451.jpg
    132.2 KB · Views: 510
  • 20150227_162432.jpg
    20150227_162432.jpg
    135 KB · Views: 441
  • 20150227_161936.jpg
    20150227_161936.jpg
    145.6 KB · Views: 510
  • 20150227_162535.jpg
    20150227_162535.jpg
    129.9 KB · Views: 566
  • 20150227_162543.jpg
    20150227_162543.jpg
    135.5 KB · Views: 502
OP
T

TonkaJoe

Well-known member
Joined
Dec 19, 2014
Messages
410
Location
Southern ON, Canada
Here are some more pictures except this time we have some light!.

- Included are a picture of the Beer fridge area all trimmed out and finished
- a picture or two of how I managed to trim out the electrical outlets
- Garage door opener outlet had to be a surface mounted box due to the ribs of the steel on the ceiling.. I was hoping to go flush at first, but I kept it neat!.
 

Attachments

  • 20150228_194711.jpg
    20150228_194711.jpg
    142.1 KB · Views: 463
  • 20150313_012052.jpg
    20150313_012052.jpg
    127.3 KB · Views: 481
  • 20150301_164347.jpg
    20150301_164347.jpg
    146.1 KB · Views: 440
  • 20150301_164223.jpg
    20150301_164223.jpg
    135.2 KB · Views: 427
OP
T

TonkaJoe

Well-known member
Joined
Dec 19, 2014
Messages
410
Location
Southern ON, Canada
Here's my favorite part of the build... filling her up!. Since I'm a big fan of iron I figured my shop needed some as well!
Nothing quite like a 6' x 4' laser printed CAT D11T hanging on your wall :3gears:
This was printed on a polypropylene sheet of plastic which I then built a frame for out of 1x3" pine and Gorilla glued to the back of it. I can't believe how well this gorilla glue holds!. Then mounted the whole picture just like you would with any other picture.
 

Attachments

  • 20150730_220536.jpg
    20150730_220536.jpg
    138.1 KB · Views: 630
  • 20150807_161526.jpg
    20150807_161526.jpg
    139.2 KB · Views: 485
OP
T

TonkaJoe

Well-known member
Joined
Dec 19, 2014
Messages
410
Location
Southern ON, Canada
Started adding tools to the new workbench set up on my pegboard!. Also note that I added a valance made out of pine to direct the light from the T-8 under the cabinet directly down onto the work area.. no more going blind!, and it's perfect for doing fine work with no shadows. I'm currently making some socket rails to go in that empty space to the left of the screwdrivers :thumbup:

Also picked up this used but like new 13" Mastercraft drill press for 100$.. Came with the stand and a 4" clamp.. That was quite the score as the drill alone is worth over 200$
 

Attachments

  • 20150916_003317.jpg
    20150916_003317.jpg
    141.8 KB · Views: 518
  • 1442452430813.jpg
    1442452430813.jpg
    140 KB · Views: 408
  • 20150915_225826.jpg
    20150915_225826.jpg
    139.4 KB · Views: 373
  • 20151011_202241.jpg
    20151011_202241.jpg
    135.1 KB · Views: 362
Last edited:
OP
T

TonkaJoe

Well-known member
Joined
Dec 19, 2014
Messages
410
Location
Southern ON, Canada
Now even though I have a great work area with the cabinetry set I now had another problem.. where do you mount a vise?...
Back to The NewAge website I went, and I found another great product that they have recently come out with. They have 3 sizes I believe although for myself I picked up a 6' L x 2' W steel workbench complete with a bamboo top to match the other work tops, adjustable leveling feet and a tool/ parts tray. This even came with a forward facing power bar under the lip of the table top for quick power supply which I thought was a great addition!. Same as before shipping was quick and assembly was easy.

After the bench was built I still needed to mount my new Mastercraft vise!. The hardest thing you'll ever have to do is drill into a brand new workbench :eyecrazy: BUT after a beer or two I worked up the courage to do it!

I also opted to add a steel plate for any heavy hammering I had to do, also adds strength to the anchor points for the vise.
 

Attachments

  • 20151009_144900.jpg
    20151009_144900.jpg
    133.3 KB · Views: 469
  • 20151009_123753.jpg
    20151009_123753.jpg
    138.1 KB · Views: 419
  • 20151009_123123.jpg
    20151009_123123.jpg
    134.2 KB · Views: 436
  • 20151011_201913.jpg
    20151011_201913.jpg
    127.1 KB · Views: 401
  • 20151001_205539.jpg
    20151001_205539.jpg
    142.9 KB · Views: 380
Last edited:
OP
T

TonkaJoe

Well-known member
Joined
Dec 19, 2014
Messages
410
Location
Southern ON, Canada
Now nearing the end of my project here are some pictures of where I'm currently at.. I have trim to paint, and more CAT memorabilia to find and add, etc, and likely a new racedeck floor in the spring oh and tools.. theres no such thing as too many tools right?! :D
These pictures should show that my beer fridge cabinet now has finished doors and is trimmed out too :thumbup:
 

Attachments

  • 20151011_161603.jpg
    20151011_161603.jpg
    130.5 KB · Views: 436
  • 20151011_161549.jpg
    20151011_161549.jpg
    129.5 KB · Views: 419
  • 20151011_161513.jpg
    20151011_161513.jpg
    130.8 KB · Views: 439
  • 20151011_161458.jpg
    20151011_161458.jpg
    125.2 KB · Views: 433
  • 20151011_161623.jpg
    20151011_161623.jpg
    134.7 KB · Views: 445
  • 20151011_161629.jpg
    20151011_161629.jpg
    126.1 KB · Views: 401
OP
T

TonkaJoe

Well-known member
Joined
Dec 19, 2014
Messages
410
Location
Southern ON, Canada
Some more pictures of where I've finished up to!.
 

Attachments

  • 20151011_195451.jpg
    20151011_195451.jpg
    131.2 KB · Views: 320
  • 20151011_161743.jpg
    20151011_161743.jpg
    135.7 KB · Views: 367
  • 20151011_161734.jpg
    20151011_161734.jpg
    136.3 KB · Views: 355
  • 20151011_161727.jpg
    20151011_161727.jpg
    136.7 KB · Views: 369
  • 20151011_195507.jpg
    20151011_195507.jpg
    129.2 KB · Views: 318
  • 20151011_195548.jpg
    20151011_195548.jpg
    141 KB · Views: 1,364
OP
T

TonkaJoe

Well-known member
Joined
Dec 19, 2014
Messages
410
Location
Southern ON, Canada
And in case you weren't yet sick of pictures...
( these are for the guys who like the " garages at night thread")
 

Attachments

  • 20151011_195748.jpg
    20151011_195748.jpg
    138.2 KB · Views: 332
  • 20151011_195809.jpg
    20151011_195809.jpg
    136.7 KB · Views: 290
  • 20151011_195827.jpg
    20151011_195827.jpg
    133.2 KB · Views: 294
OP
T

TonkaJoe

Well-known member
Joined
Dec 19, 2014
Messages
410
Location
Southern ON, Canada
For those of you who are wondering.. hey where did he hide that snow blower, lawn mower, wood etc.. I have your answer!. I decided that to help organize even further aside from tossing the junk and putting things where they belong I'd get myself a new shed put up!. This now houses all of my lawn and garden equipment, spare lumber, etc. So here it is! 9' x 18'
 

Attachments

  • 20150823_163642.jpg
    20150823_163642.jpg
    145.8 KB · Views: 287
  • 20150820_201712.jpg
    20150820_201712.jpg
    142.4 KB · Views: 298
  • 20150818_201554.jpg
    20150818_201554.jpg
    147.1 KB · Views: 297
  • 20150813_142042.jpg
    20150813_142042.jpg
    144.6 KB · Views: 295
  • 20150826_160628.jpg
    20150826_160628.jpg
    150 KB · Views: 339
  • 20150903_081534.jpg
    20150903_081534.jpg
    146.3 KB · Views: 317
  • 20150903_081604.jpg
    20150903_081604.jpg
    146.7 KB · Views: 303
OP
T

TonkaJoe

Well-known member
Joined
Dec 19, 2014
Messages
410
Location
Southern ON, Canada
And here she is.. dutch style barn build!.

I still have to landscape the entrance with raised flower beds and a ramp but I'll save that for the spring since it's already fall here now. I have plenty of up coming projects planned for next year so I'll be sure to add more pictures in the spring of this project along with any new additions to the garage workshop!. :3gears:
 

Attachments

  • 20150906_111559.jpg
    20150906_111559.jpg
    147.5 KB · Views: 199
  • 20150904_142411.jpg
    20150904_142411.jpg
    142 KB · Views: 186
  • 20150904_142123.jpg
    20150904_142123.jpg
    144.1 KB · Views: 205
  • 20150904_142111.jpg
    20150904_142111.jpg
    142.3 KB · Views: 217
OP
T

TonkaJoe

Well-known member
Joined
Dec 19, 2014
Messages
410
Location
Southern ON, Canada
Looking good. Nice to see another operating engineer. Now where are the tonga toys?

I have a few up there on top of the cabinets! but they're hard to come by where I live, people want an arm and a leg for the good ones!. Although I'm working on getting more haha. Hope to find some old tin CAT signs or black and white framed construction pictures to add on the walls also.
 
To avoid these ads, REGISTER NOW!

taumac

Well-known member
Joined
Aug 30, 2011
Messages
8,104
Location
Brooksville, Fl
Wow, looks damn good. Great job! My only question is why don't New age or cabinet company's in general make a tall cabinet taller to line up with the uppers? Visually it makes sense to line them all up.
 
OP
T

TonkaJoe

Well-known member
Joined
Dec 19, 2014
Messages
410
Location
Southern ON, Canada
Wow, looks damn good. Great job! My only question is why don't New age or cabinet company's in general make a tall cabinet taller to line up with the uppers? Visually it makes sense to line them all up.
That's a good question, I honestly have no idea... they have so much room as it is that I'm not sure what I'd fill them up with if I had even more space!.

Sent from my SGH-I747M using Tapatalk
 

mark883

Well-known member
Joined
Aug 25, 2012
Messages
68
Looks good.
Now's the time to pick up your own personal D11T. The market value has absolutely crashed due to the coal and commodities markets dropping, especially here in the US.
 
OP
T

TonkaJoe

Well-known member
Joined
Dec 19, 2014
Messages
410
Location
Southern ON, Canada
Looks good.
Now's the time to pick up your own personal D11T. The market value has absolutely crashed due to the coal and commodities markets dropping, especially here in the US.
Thats something one can only dream of... I was looking at starting up a small excavation business at one point but the start up costs on equipment is through the roof up here, maybe one day.. for now I'll use other peoples fuel and equipment! [emoji12]

Sent from my SGH-I747M using Tapatalk
 

bargainhuntingking

Well-known member
Joined
Nov 22, 2013
Messages
434
Location
The Amazing Pacific Northwest
I hadn't heard of the New Age Products workbenches. They seem like a good value and I like the variety of sizes and stainless vs wood tops. I like to get a couple of them and put some heavy duty locking casters on them. Thanks for posting up!
 
OP
T

TonkaJoe

Well-known member
Joined
Dec 19, 2014
Messages
410
Location
Southern ON, Canada
I hadn't heard of the New Age Products workbenches. They seem like a good value and I like the variety of sizes and stainless vs wood tops. I like to get a couple of them and put some heavy duty locking casters on them. Thanks for posting up!
They're definitely well worth the money, no complaints here!. One thing I wanted to look into when I have more time is to see if I can find a locking castor with the same threads as the adjustable feet on the steel frame workbench I just purchased from them. I know that they currently don't offer them for that piece as I already checked.. but I'm always up for the challenge of customizing something!. Plus having that bench with the vise on it as a mobile unit would come in extremely versatile!.

Sent from my SGH-I747M using Tapatalk
 
OP
T

TonkaJoe

Well-known member
Joined
Dec 19, 2014
Messages
410
Location
Southern ON, Canada
So I was recently asked by a couple of people how much my cabinets can, or currently do hold... so here are a couple of pictures to give you guys an idea. First one is the 72" floor cabinet, second is the 3 drawer floor cabinet and the third is another 3 drawer floor cabinet at the opposite end of the set.

My hanging wall cabinets are the only ones that aren't completely full as I'm still slowly organizing things between work and hunting season!.


Sent from my SGH-I747M using Tapatalk
 

Attachments

  • 20151011_202031.jpg
    20151011_202031.jpg
    138.7 KB · Views: 353
  • 20151011_202049.jpg
    20151011_202049.jpg
    138 KB · Views: 332
  • 20151011_202104.jpg
    20151011_202104.jpg
    134.3 KB · Views: 370
Last edited:

JohnnieMo

Well-known member
Joined
Nov 25, 2014
Messages
1,175
Location
Calgary, Alberta
Thanks for posting. I came across this while looking at the New Age cabinets. I like the simplicity of your build (and your thread!) Very easy to read.

I'm a big fan of the Mastercraft tools too. Nothing fancy but they do the job just fine. I have most of the tools you do.
 
OP
T

TonkaJoe

Well-known member
Joined
Dec 19, 2014
Messages
410
Location
Southern ON, Canada
Thanks for posting. I came across this while looking at the New Age cabinets. I like the simplicity of your build (and your thread!) Very easy to read.

I'm a big fan of the Mastercraft tools too. Nothing fancy but they do the job just fine. I have most of the tools you do.
Thanks JohnnieMo! Appreciate the kind words.. I've always liked Mastercraft tools, like you said.. the price is right and for the quality you get its tough for the everyday user to complain!.

Sent from my SGH-I747M using Tapatalk
 

OCD

Well-known member
Joined
Dec 30, 2014
Messages
1,316
Location
Edmonton, Ab. Canada
And here she is.. dutch style barn build!.

I still have to landscape the entrance with raised flower beds and a ramp but I'll save that for the spring since it's already fall here now. I have plenty of up coming projects planned for next year so I'll be sure to add more pictures in the spring of this project along with any new additions to the garage workshop!. :3gears:

That shed is cool looking!! Nice build!!
 

TheJudge

Member
Joined
Mar 29, 2014
Messages
23
Location
Fingerlakes, New York
TonkaJoe,
Very nice utilization of space man. I dig it.
I'm envious though of your career choice, as that's what I always wanted to be; a dozer and shovel operator in a pit. :bowdown: I've been around the big tonka toys since i was just a young tyke, but never could get my foot in the door being an EO, so I went with my second passion of railroading, and got in doing that.
 
To avoid these ads, REGISTER NOW!
Top Bottom