To avoid these ads, REGISTER NOW!

What did you do "IN" your garage today?

PCO6

Well-known member
Joined
Dec 25, 2008
Messages
4,573
Location
Newmarket, Ontario
I replaced the seats in my '95 Jeep Cherokee XJ today with a pair out of a '03 Hyundai Tiburon. I made the same swap about a year ago in my '03 Jeep TJ. I was happy with the results so I decided to do the XJ as well.

Here's how the XJ turned out ...
View media item 54290
And here is the TJ from about a year ago (post # ??? in this thread).
View media item 46451
Here are details on the TJ. The XJ was pretty much the same.
http://www.jeepforum.com/forum/f9/tj-seat-swap-2917009/
 
To avoid these ads, REGISTER NOW!

Astro-t

Well-known member
Joined
Jan 5, 2010
Messages
55
Location
Pennsylvania
I ripped the insulation picking that freaking hood up by my self...LOL! It gets real heavy every foot you get off the ground....
 

ambenz

Well-known member
Joined
Dec 12, 2010
Messages
4,237
Location
NW Chicago Suburbs
Fired up the Pro com today after I gave it a good blow out, spider inspection, and cleaning.
View media item 47391
With temps dipping below the frost mark already, keeping my consumables unfrozen is a necessity.
I also cleaned up the work benches, brought in and put away the tiki torches, sun sails, and table umbrella with water filled base. The leaves are about to fall and I won't have time if I am cleaning up leaves.
 

dittle fart around

Well-known member
Joined
Jan 9, 2011
Messages
2,455
Location
Vancouver, Washington, USA
Started on a new project Tore down this old compressor wagon


11jw7pg.jpg

Hey dude, I'll take the wagon, you can keep the compressor.

:pimpflash:
 

vetron

Well-known member
Joined
Sep 4, 2013
Messages
74
Location
Idaho
My poor jeep had a rough time in moab; broken exhaust, smashed skid plate, water in the axles, transmission and tcase. Here is a repack of the wheel bearings and full maintenance day:lol:
 

Attachments

  • YJ spindle repack.jpg
    YJ spindle repack.jpg
    116.7 KB · Views: 94

NewShockerGuy

Well-known member
Joined
Oct 12, 2010
Messages
2,481
Location
Northern Virginia / DC
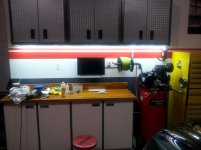
Wanted a way to get a lot of light underneath my cabinets in the garage.

I really like LED light strip and depending on the leds you get (this strip is 5630leds) can be quite bright. I got pure white. I had blueish tinted one down in my basement modding room and plan on re-doing it this weekend with the same exact setup I got here in the garage.

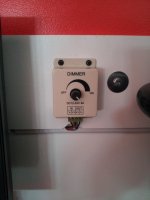
Ended up using an 80watt power adaptor. 16' of led strip lights that pulls about 70 watts total, an LED dimmer switch. Came out really nice. I wish the picture captured just how bright it is but it's awesome. Total cost was about $50.

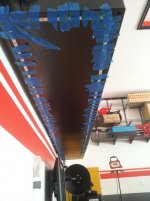
Because the gladiator cabinets have that hammered finish on them the 3m double sided tape didn't want to stick well to the cabinet. I ended up attaching the strip lights using GOOP and then taping the entire thing up and leaving it overnight. Pretty much exactly what I did for my LED solar shed lighting project. I never had this problem with the 3528 leds but those aren't nearly as bright or get nearly as warm..( I think less than 30watts are put out by those).

Only thing I have to do is paint the small channel I used to run up and behind the cabinet. I have to paint it white and do the stripe to match and flow with the wall. I thought about running the wire behind the wall but had left over cable tubing and figured might as well use it compared to drilling holes in the wall. This worked out better I think.

-Nigel
 

Attachments

  • 5.jpg
    5.jpg
    135.8 KB · Views: 125
  • 4.jpg
    4.jpg
    145.1 KB · Views: 106
  • 3.jpg
    3.jpg
    138.7 KB · Views: 112
  • 2.jpg
    2.jpg
    137.6 KB · Views: 117
  • 1.jpg
    1.jpg
    134.1 KB · Views: 114

JimVonBaden

Well-known member
Joined
Dec 2, 2011
Messages
15,716
Location
Northern Virginia
Wanted a way to get a lot of light underneath my cabinets in the garage.

I really like LED light strip and depending on the leds you get (this strip is 5630leds) can be quite bright. I got pure white. I had blueish tinted one down in my basement modding room and plan on re-doing it this weekend with the same exact setup I got here in the garage.

Ended up using an 80watt power adaptor. 16' of led strip lights that pulls about 70 watts total, an LED dimmer switch. Came out really nice. I wish the picture captured just how bright it is but it's awesome. Total cost was about $50.

Because the gladiator cabinets have that hammered finish on them the 3m double sided tape didn't want to stick well to the cabinet. I ended up attaching the strip lights using GOOP and then taping the entire thing up and leaving it overnight. Pretty much exactly what I did for my LED solar shed lighting project. I never had this problem with the 3528 leds but those aren't nearly as bright or get nearly as warm..( I think less than 30watts are put out by those).

Only thing I have to do is paint the small channel I used to run up and behind the cabinet. I have to paint it white and do the stripe to match and flow with the wall. I thought about running the wire behind the wall but had left over cable tubing and figured might as well use it compared to drilling holes in the wall. This worked out better I think.

-Nigel

Nicly done Nigel.

I assume your eyes are at least a few inches higher than the bottom of your cabinets. Glare can ruin all that great light.
 

NewShockerGuy

Well-known member
Joined
Oct 12, 2010
Messages
2,481
Location
Northern Virginia / DC
Jim,

I'm 6'2" so everything in my garage is a lot higher than normal. I have everything set up so that I am standing for the most part. IF need be and I am sitting on that little stool then I just dim them down but the way it sits now if I am standing my head is at the top of the handles on the cabinets. So no glare in the lighting when at the workbench on the computer. I actually thought about getting the aluminum channel that the led light strip can fit in and then adding the diffuser but at almost $40 per 3' section I didn't think that was worth it for "garage" lighting...lol If this was in a location that people would see or be highly visible that needed to look professional then most definitely would have used them.

I only wish I would have done it sooner honestly. I was going to put overhead cabinet lighting facing down but now having done this there is no need to :)

I love LEDS, there are so many possibilities and things to do that you just can't do with other lighting, it's awesome!

-Nigel
 

rodsnratfinks

Well-known member
Joined
Jan 13, 2015
Messages
1,397
Location
California
Nice work Nigel! I actually have a spool of that stuff sitting around that I wasn't sure what to do with. Now I have an answer.

Sent from my SM-G920V using Tapatalk
 

NewShockerGuy

Well-known member
Joined
Oct 12, 2010
Messages
2,481
Location
Northern Virginia / DC
Where did you get the leds from? Would like to do something like that when I get my cabinets done.

Power supply:
http://www.amazon.com/gp/product/B00MXROQCQ/?tag=atomicindus08-20

LEDs:
http://www.amazon.com/gp/product/B01339FVZS/?tag=atomicindus08-20

Dimmer:
http://www.amazon.com/gp/product/B00NI306JG/?tag=atomicindus08-20


I have purchased strip lighting from superbrightleds.com, ebay, amazon, etc. For the most part they all seem to be the same until you get to the commercial grade ones then those are on a different level. For 90% of people and what they want to do the above amazon ones are great. I started buying them from amazon because if there is any issues amazon has ALWAYS been cool an taken care of them. I wish I would have used these in my shed and everywhere else that I have strip lighting.

I'd say stay away from the smaller leds like 3528. 5050 is good but older and usually the same price as 5630. The ones pictured and what I used are the 5630s.

This is a nice short comparison of the 3 standard sizes that you will see in led strip lights.
http://heracolights.com/2014/03/10/3528-vs-5050-vs-5630-led-smd-diodes/


rodsnratfinks:

I have a ton of it. I have color changing ones under our modern looking bed, so when you push a button it has a glow to it and can change colors/fade/alternate.
Like this but cooler

under-bed-led-glowing-light.jpg


-Nigel
 

rodsnratfinks

Well-known member
Joined
Jan 13, 2015
Messages
1,397
Location
California
Sweet. I like the bed idea, too. What bed platform do you have. My wife and I are looking for a modern one like what you describe.

Sent from my SM-G920V using Tapatalk
 
To avoid these ads, REGISTER NOW!

exranger06

Well-known member
Joined
Aug 9, 2015
Messages
1,686
Location
CT
I tried to (unsuccessfully) fix my leaf blower. I'm officially throwing in the towel and bringing it to the dealer this morning. :shoot5:

I also got to use my new Harbor Freight mini tire changer to remount my snowblower tire. After much frustration and swearing, I figured out how to use it correctly and the tire went on pretty easy. :lol_hitti I won't call it a success until I check the tire pressure tonight though. If it has the same pressure tonight as what I inflated it to last night, then I can declare it a success.
 

PassnThru

Well-known member
Joined
Jan 5, 2010
Messages
6,512
Location
Bowling Green KY
Fired up the Pro com today after I gave it a good blow out, spider inspection, and cleaning.
View media item 47391
With temps dipping below the frost mark already, keeping my consumables unfrozen is a necessity.
I also cleaned up the work benches, brought in and put away the tiki torches, sun sails, and table umbrella with water filled base. The leaves are about to fall and I won't have time if I am cleaning up leaves.

It would really really really be a good idea to hang that heater higher on the wall in a garage.
 

polexican23

Banned
Joined
Jun 11, 2013
Messages
2,168
Location
burbs-Illinois
Watched the Cubs get swept by the Mets.. :(
Scrapped more paint off the Buggy
Surfed CL for Mazda Miata seat to fit the buggy.

Why do people think 25 year old seats out of a Miata are worth more than a gold bar?
 

zmotorsports

ALLIANCE MEMBER
Joined
Oct 20, 2009
Messages
21,436
Location
Northern Utah
Didn't get anything done in the shop last night, got out of work late and by the time I got home I was mentally drained. I did put the cooler in the Jeep and checked it over real quick getting her ready to hit some trails.

Mike.
 

gorilla

Well-known member
Joined
Dec 13, 2007
Messages
1,653
Finished my hoist install!


And removed the rear suspension from a Jaguar to replace a caliper.


Fun stuff!
Ive done that job many times, caliper are still a ***** even with the whole rear end out of the car. Perfect example of British anti-engineering.
 

JimVonBaden

Well-known member
Joined
Dec 2, 2011
Messages
15,716
Location
Northern Virginia
Washed and waxed my bike for winter. It may not be warm enough to do it in the near future, and since I ride all winter I wanted it protected from the salt on the roads.
 

Steevo

Well-known member
Joined
Aug 18, 2009
Messages
8,738
Location
43.49600, -112.04300
Worked on some drill press modofications

My drill press came with a very heavy table:
i-dXktr6S-L.jpg


And this table originally had a gear driven lifting mechanism on it:
i-BNcvRhx-L.jpg


Unfortunately, among the previous owners/users of this drill press was some mental midget who apparently hammered on the lift crank without loosening the column pinch bolts, thereby breaking off several teeth on the lift crank pinion gear, and damaging the mating rack gears.

So, when I got the press, I disassembled it and removed the broken gear and rack, and planned to fabricate a lifting mechanism for it. (original rack parts are extremely rare and prohibitively expensive.)

First, I got a HF trailer jack to modify for lifting/lowering the table, and cut some uni-strut to use for mounting it:
i-8Df6g4v-L.jpg


I used a pair of muffler clamps to mount the uni-strut sections to the drill press column, and bolted the trailer jack mount plate to them:
i-fXxhVRP-L.jpg


I originally made a delrin roller to fit where the jack wheel was, but clearances under the drill press table precluded its use, so I went with just butting the wheel bracket against the bottom of the table:
i-DS57ffG-L.jpg

i-cfH2qCJ-L.jpg


None of this is original thinking. I have seen this done on other forum postings, and simply did what they did.

The column pinch bolts for this table were 3/4" nuts, requiring the use of a wrench to loosen/tighten them for table adjustments.

So, I made some hand lever nuts to replace them with.
First I cut a slot through a couple of coupling nuts:
i-CfCfNmF-L.jpg

Then I cut and modified a couple of bolts:
i-qfQBLvH-L.jpg

And mated the two pieces with roll pins:
i-L6hFb5M-L.jpg

And installed them in place of the original pinch nuts:
i-9wxprtk-L.jpg

i-rVqjkx3-L.jpg

i-95SBZzF-L.jpg


I also shortened the crank handle on the trailer jack, to reduce the circumference of the circle required to operate it:
i-Jrrr4MV-L.jpg


Now I have an easy, no-tools-required way to raise/lower the table, and plenty of range:
i-Q2Hr4Xz-L.jpg

i-gQv6tbC-L.jpg


And, if I need more room than that, I can always flip the jack out of the way and drop the table more:
i-sW5b4wz-L.jpg


All I have left to do to finish this drill press refurbish is to find a new chuck to replace the worn out one it came with.
 
Last edited:

TauntDevil

Well-known member
Joined
Mar 19, 2014
Messages
194
Location
Mesa, AZ
Pulled everything out of the garage and cleaned/re-organized it to make it cleaner. Packed some of it up as well to take to storage since I am moving soon. Pulled the dryer out for the plumber who never showed to fix the water heater fitting leak... so another night with it leaking out and us trying to slow it down to prevent any other damage. Hate how unreliable companies are now days. Seems like it is hard to count on many of them. Tomorrow, pulling it out again and while waiting, going to finish working on my friends car.
 

oldmxracer

Well-known member
Joined
Jan 29, 2006
Messages
1,204
Location
Ohio
Replaced a bent intake valve and timing chain on a Yamaha Warrior ATV, came to Me after some other paws had been in there, guess They did not know how to set the cam timing correctly ! Owner got lucky. Runs great now !!
 

zmotorsports

ALLIANCE MEMBER
Joined
Oct 20, 2009
Messages
21,436
Location
Northern Utah
Re: Worked on some drill press modofications

My drill press came with a very heavy table:
i-dXktr6S-L.jpg


And this table originally had a gear driven lifting mechanism on it:
i-BNcvRhx-L.jpg


Unfortunately, among the previous owners/users of this drill press was some mental midget who apparently hammered on the lift crank without loosening the column pinch bolts, thereby breaking off several teeth on the lift crank pinion gear, and damaging the mating rack gears.

So, when I got the press, I disassembled it and removed the broken gear and rack, and planned to fabricate a lifting mechanism for it. (original rack parts are extremely rare and prohibitively expensive.)

First, I got a HF trailer jack to modify for lifting/lowering the table, and cut some uni-strut to use for mounting it:
i-8Df6g4v-L.jpg


I used a pair of muffler clamps to mount the uni-strut sections to the drill press column, and bolted the trailer jack mount plate to them:
i-fXxhVRP-L.jpg


I originally made a delrin roller to fit where the jack wheel was, but clearances under the drill press table precluded its use, so I went with just butting the wheel bracket against the bottom of the table:
i-DS57ffG-L.jpg

i-cfH2qCJ-L.jpg


None of this is original thinking. I have seen this done on other forum postings, and simply did what they did.

The column pinch bolts for this table were 3/4" nuts, requiring the use of a wrench to loosen/tighten them for table adjustments.

So, I made some hand lever nuts to replace them with.
First I cut a slot through a couple of coupling nuts:
i-CfCfNmF-L.jpg

Then I cut and modified a couple of bolts:
i-qfQBLvH-L.jpg

And mated the two pieces with roll pins:
i-L6hFb5M-L.jpg

And installed them in place of the original pinch nuts:
i-9wxprtk-L.jpg

i-rVqjkx3-L.jpg

i-95SBZzF-L.jpg


I also shortened the crank handle on the trailer jack, to reduce the circumference of the circle required to operate it:
i-Jrrr4MV-L.jpg


Now I have an easy, no-tools-required way to raise/lower the table, and plenty of range:
i-Q2Hr4Xz-L.jpg

i-gQv6tbC-L.jpg


And, if I need more room than that, I can always flip the jack out of the way and drop the table more:
i-sW5b4wz-L.jpg


All I have left to do to finish this drill press refurbish is to find a new chuck to replace the worn out one it came with.

Very ingenious and well executed Steevo.

Mike.
 

k-os

Well-known member
Joined
Dec 29, 2012
Messages
995
Location
WI
Worked on some of my shock rebuild. Got new dust seals installed and the bottom re-assembled. Discovered that the seal kit I bought is missing some parts, so waiting to hear back from the supplier.


Slick111

Well-known member
Joined
Feb 6, 2012
Messages
249
Location
Everett Wa
Ive done that job many times, caliper are still a ***** even with the whole rear end out of the car. Perfect example of British anti-engineering.

Why don't you do the 94-96 XJS swap they have outboard brakes and have a power lock standard too it will make you life much easier.
 

Hustler388

Well-known member
Joined
Dec 26, 2012
Messages
191
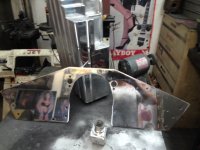
Polishing mid plate, oil pan,water neck on race car
 

Attachments

  • Camaro motor plate 10-22 15.JPG
    Camaro motor plate 10-22 15.JPG
    105.2 KB · Views: 81
  • Camaro billet fab oil pan polish 10-15.JPG
    Camaro billet fab oil pan polish 10-15.JPG
    92.7 KB · Views: 78

zmotorsports

ALLIANCE MEMBER
Joined
Oct 20, 2009
Messages
21,436
Location
Northern Utah
Last night washed the Jeep and the coach. Then about an hour later a thunderstorm rolled through and washed the coach again.:sad: Oh well, the Jeep was in the garage so at least it stayed clean.

Mike.
 
To avoid these ads, REGISTER NOW!
Top Bottom