To avoid these ads, REGISTER NOW!

Getting the door to shut tighter

Model A Mark

Member
Joined
Mar 9, 2014
Messages
14
Hey guys, my door leaks water when it rains hard, and at night you can see light under the door.
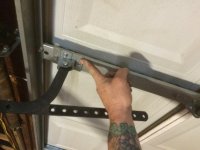
I checked the rubber seal on the bottom of the door, it looks good, its thick and springy,
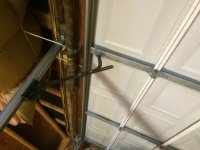
In my opinion, the door just isn't shutting tight enofe, is there a way to do this?
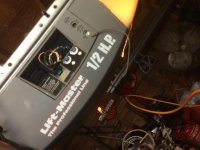
I monkeyed around with the dials on the opener, but no luck,
I dont remember it leaking like this a couple winters ago, but I cant remember anything changing with the door...
Thanks ..
Mark .....
 

Attachments

  • IMG_1361.jpg
    IMG_1361.jpg
    127.8 KB · Views: 177
  • IMG_1364.jpg
    IMG_1364.jpg
    137.3 KB · Views: 242
To avoid these ads, REGISTER NOW!

upndown

Well-known member
Joined
Dec 5, 2010
Messages
3,107
Location
Desert Hills/Peeples Valley AZ.
First of all, which dials did you monkey around with? Second, your operator arm is way too long! It should be just slightly angled back towards the motor head. The way you have it the pressure is outward not downward. Also have you tried the door manually? Just to make sure it does close all the way.
 

stikman56

Well-known member
Joined
Jun 12, 2014
Messages
3,127
First of all, which dials did you monkey around with? Second, your operator arm is way too long! It should be just slightly angled back towards the motor head. The way you have it the pressure is outward not downward. Also have you tried the door manually? Just to make sure it does close all the way.

Yeah, this for starters.
 
OP
M

Model A Mark

Member
Joined
Mar 9, 2014
Messages
14
hey guys, thanks for the replies..
umm, I monkeyed around with the dial that points toward the door going down more, it didn't seam to help any.
as far as the light under the door, its just a small crack of light, not a big gap, but it does show me its not pushing down hard on the rubber seal.
and yes it will go down all the way manually,
tonight ill shut it manually and stand on the bottom lip inside and see if it will seal the light from coming out ...
thank you all again...
hey upndown, im not real sure what you mean, is there any way you could dray something, or post a pic ?
thanks ...
 

mgilde13

Well-known member
Joined
Aug 24, 2010
Messages
274
What upndown meant is that the black bar with the 90° elbow attached to it, which connects the door to the trolley, needs to be shortened so that the opener can provide more down force. Once that is shortened, you'll need to readjust the settings on the opener to account for the added travel distance that the trolley will make. Hope that helps.
 
Last edited:
OP
M

Model A Mark

Member
Joined
Mar 9, 2014
Messages
14
hey guys, thanks again for the help.
so should i shorten the arm its self to get the trolley closer to the door, or should i leave the arm long and move the door mount further down the door..
 

Attachments

  • IMG_1364.jpg
    IMG_1364.jpg
    137.3 KB · Views: 75
  • IMG_1376.jpg
    IMG_1376.jpg
    137.4 KB · Views: 75
  • IMG_1377.jpg
    IMG_1377.jpg
    139.1 KB · Views: 79

padroo

Well-known member
Joined
Nov 25, 2011
Messages
564
Location
Chesterton, In.
Yes you want the trolley closer to the door. I would release the trolley and move it closer to the door header. You will have to seperate both pieces of linkage to do this, then see which holes line up and reconnect it. Now reconnect the trolley to the opener an start your adjustment until it touches the floor. If it goes too far the door will try to reverse, this is a safety device and is normal. There is a procedure for adjusting the down force also.
 
To avoid these ads, REGISTER NOW!

pepi

Well-known member
Joined
Mar 27, 2013
Messages
2,883
Location
Woodstock, GA
First of all, which dials did you monkey around with? Second, your operator arm is way too long! It should be just slightly angled back towards the motor head. The way you have it the pressure is outward not downward. Also have you tried the door manually? Just to make sure it does close all the way.


And third the door in on the ceiling...
 

upndown

Well-known member
Joined
Dec 5, 2010
Messages
3,107
Location
Desert Hills/Peeples Valley AZ.
Mark, another thing just to be aware of is the sensitivity adjustments may have a slot for a flathead screwdriver, they are just a trim pot! Don't start cranking on it like a screw.

And no, don't raise the front of the opener! Use the arms to make that difference along with your up and down limit switch adjustments.
 

gnpenning

Well-known member
Joined
Jan 25, 2015
Messages
2,754
Location
I have more questions than answers.
Mark, another thing just to be aware of is the sensitivity adjustments may have a slot for a flathead screwdriver, they are just a trim pot! Don't start cranking on it like a screw.

And no, don't raise the front of the opener! Use the arms to make that difference along with your up and down limit switch adjustments.

This is important to note.
 

rayra

Well-known member
Joined
Dec 1, 2014
Messages
4,724
Location
Escaped from Los Angeles
There are also garage door threshhold seals, that go on teh ground. Some are like a speed bump and some are like a tin wedge that you install with the shallow slope aimed out of the garage, to shed water.

84550_main
 
OP
M

Model A Mark

Member
Joined
Mar 9, 2014
Messages
14
hey guys, thanks again for the help..
ok, i adjusted the arm, heres a pic, but the trolley wont run up far enofe to engage.
you can see the trolley coupler not connected .
i turned the down screw a little at a time to see if it would run the coupler up closer, but no change.
im really not sure of the past how much i may have, or have not ran the screw in.
i was wondering if there is a starting point at which i can adjust the screws, basically to start the adjustment process from the factory settings ?
cheers .......
 

Attachments

  • IMG_1379.jpg
    IMG_1379.jpg
    140.6 KB · Views: 36
To avoid these ads, REGISTER NOW!
Top Bottom