To avoid these ads, REGISTER NOW!

1966 F100 EcoBoost Engine Swap (EcoBoosted)

Status
Not open for further replies.

BBChevro

Well-known member
Joined
Jan 24, 2014
Messages
2,235
Location
Brisbane, Qld., Australia
Happy new year TW...

Wow, amazing work for "the opposite of an engineer". :lol:

Great work (as we've all come to expect from you) on the bed modifications. :bowdown:


...and a belated happy birthday too. :beer:
 
To avoid these ads, REGISTER NOW!
OP
T

TimeWarpF100

Well-known member
Joined
Aug 21, 2010
Messages
6,784
Location
not here
Looks like you have an engineers best quality, Attention to detail. Beautiful job so far!

Thanks!

Happy belated birthday!

I've been following this thread through the trails and tribulations and am so pleased for you to be nearing a finish!!

Absolutely amazing!!

Thanks! Made great progress again today . . More pics soon

Looks awesome! Glad to hear you are fighting through your health issues. I love this build and celebrate with you -as many do- as you post up progress pics and video.

What type of laser set up are you using for your truck bed?

Thanks!

Happy new year TW...

Wow, amazing work for "the opposite of an engineer". :lol:

Great work (as we've all come to expect from you) on the bed modifications. :bowdown:


...and a belated happy birthday too. :beer:

Thanks!

Trying to upload updated pics but my head wants to hit the keyboard, Less than 6 hours sleep for past 2 nights combined. In much need of a decent sleep.

Pics will have to wait until morning . . .


The box is pretty much mounted now. I had to fab each and every mount which took a ton of time. I am quite pleased with how the new floor and tubs are fitting in. Hoping in morning to attack the fuel filler system, try to get it integrated into the bedside. Think I know how to at least attempt it.

I have one piece to add to the left wheel tub, right side is spotted in.

From neutral box position I should have 1/2" movement in any direction for fine tuning if needed.

Just because I had little to do on truck (LOL) I had yet another brainstorm.

That is to integrate a nice tool/storage bin's into the box floor behind tubs.

Still not sure exactly how I will do that but pretty sure my brain is saying yeah yeah . . My body is saying no, no . . Ha~ha
 
OP
T

TimeWarpF100

Well-known member
Joined
Aug 21, 2010
Messages
6,784
Location
not here
I lied . . A couple pics then shuttin' things down for the day.

This is the fabbed up box mount. I even had to mod the clips to get them to work.

114.00 Just for the clips and bolts.

Tubing is just to show how they will mount/weld to the frame.

Also visible is where I added plug welds to hold the back of floor to box. No spot welder so felt plug welds best solution. THey may need a bit of touchup but pretty close.

157D36E7-7F7C-4655-B4BF-DB1432A2F4C7_1.jpg

2CAC9CFC-F9D2-4590-BF68-A7F0F7794B3E_1.jpg

2A748825-EABC-4660-8DCB-F3962093B944_1.jpg

F336655D-4666-44A7-AC53-2A3DD4A67727_1.jpg

9DA05FCD-6ED0-4494-BF05-EA9F061FCC12.jpg
 
Last edited:
OP
T

TimeWarpF100

Well-known member
Joined
Aug 21, 2010
Messages
6,784
Location
not here
Very little sleep but back at it again. B4 I get going thought I would do a bit of catch up here.

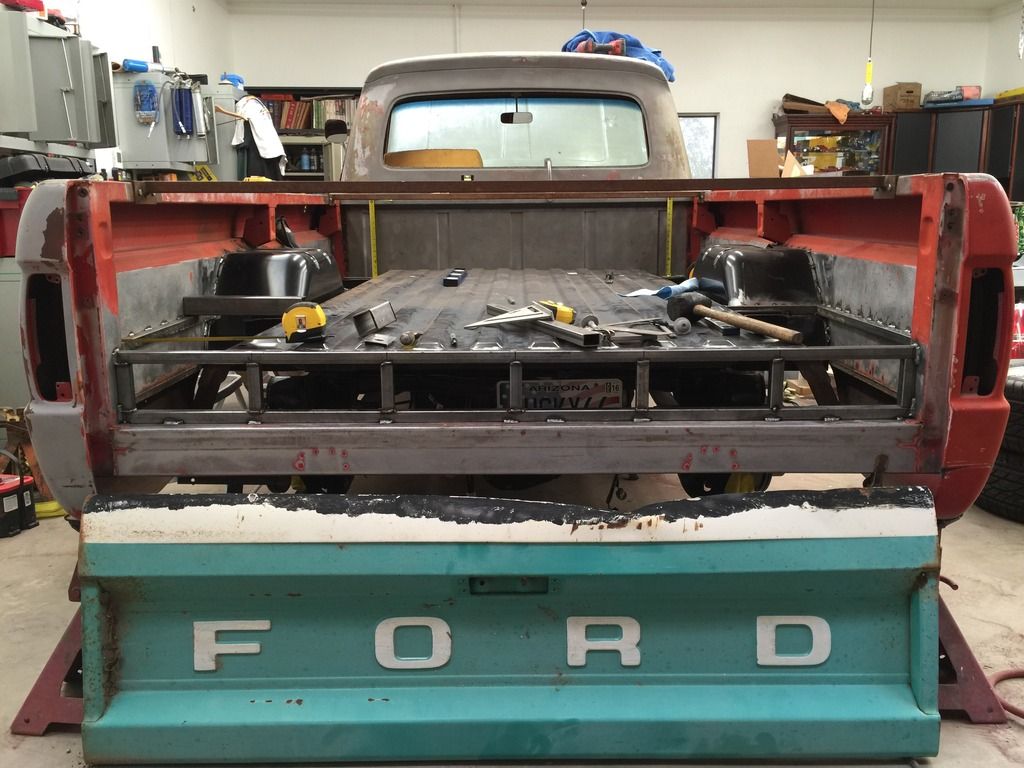
Another item in back of mind was what am I going to do for Tailgate.

I have 4 '66 Trucks all need to have a gate.

My '66 427 Truck will get the best of 6 Gates I have. The only gate I had that was perfect was the one I put on the Tan 1970 F250. But, It was a 67-72 Gate not a '66 Style.

Gate # 1 (not in order of condition) Was a perfect gate until someone left it open and backed into a tree. I plan on cutting this gate apart along with Original Gate from my 427 Truck to make a nice gate but just so much work for the moment.

6F85896D-0F43-40CD-80AD-7758F3C2FAD6.jpg


Gate 2 This is one I had planned on using on the 427 Truck but will most likely be the EcoProject gate. Very very nice with just a couple minor dings where I started to repair. The double panels make it quite difficult.

F8030199-F21C-4A49-9605-E6C6000B18E0.jpg


Gate 3: This is original gate for the EcoProject. Pretty decent but has some rust pinholes above the F O

051474AA-2BC6-47F0-AC9C-B9ADE395F13C_1.jpg


This is my '66 Trailer, the gate looks decent on exterior but inside a few good sized dings. The bumper here is pretty similar to what I remember dad's bumper to look like. Wish I had a pic of his bumper.

Not sure if I remember exactly what it looked like but dad enclosed forward side of rear bumper and made little trap doors in it. Before the snow flew he would fill the bumper full of lead for traction.
Take it out in the spring. I can still remember him melting down all his lead wheel weights into a mold that would fit the bumper. With a posi it outdid most 4x4's.

BC856209-B031-46B8-AB07-604C44C1993B.jpg


Gate 4: This is original from 427 Truck that I will cut apart and blend in with the Turquoise gate.

45E160D3-4EF3-4D77-B234-6BE4468D0B6F.jpg


I will most likely steal this gate for the 427 Truck. About as perfect as one could expect to find.

B224BDB7-9C45-4D13-AD19-3D4637CF4AAC.jpg
 
Last edited:

OHSCrifle

Well-known member
Joined
Mar 11, 2013
Messages
178
Location
Atlanta
Tool boxes sound great. Would the recess be low enough to mount an upright spare tire (up against the bedside) ?
 
OP
T

TimeWarpF100

Well-known member
Joined
Aug 21, 2010
Messages
6,784
Location
not here
When I installed the new bed floor in the Orange/White 427 Truck I had to eliminate one of the crossmembers. I used it on rear of the EcoProject but had to move the mounting holes inward approx 2". Drilled out 6 spotwelds and bored a new 1 1/8" hole then just slid it down and rewelded. A lot more support If and when I want to haul something heavy.

A299A023-582A-4D37-944E-A93C6B35DBB2.jpg


This is the Pad for the 4th cross support. It will be attached to frame when the box is removed for final cleanup & paint.

19EEC7EB-25C4-45AD-990D-B441CDC2D5D4.jpg


Bottom side of cross support #4. Obvious a bolt thru mount>

E5A9E299-7146-4026-B266-04EDC0BD9458_1.jpg


More material showed up yesterday . .

3C81DBA6-C1F5-47D0-9B63-FB050B13F5A1.jpg


140' worth 350.61 lbs worth.

D5CB3F8B-9B83-4B8E-9F98-59489C2603D5.jpg


Most is for other projects coming up.

D5CB3F8B-9B83-4B8E-9F98-59489C2603D5.jpg
 
OP
T

TimeWarpF100

Well-known member
Joined
Aug 21, 2010
Messages
6,784
Location
not here
Tool boxes sound great. Would the recess be low enough to mount an upright spare tire (up against the bedside) ?

Not quite because I have another support there that I added. A bit narrow too.

Finished bed depth will be only 13 1/2". Good for adding storage though.

The toolbox/storage area will end up being 22" long x 10" wide by 12" deep.

I do have figured in plan to mount a spare tire in stock '11-14 Location.

I thought a nice flush locking compartment would be neat for some basic tools and maybe tie down straps etc. Extra ballast for those dragstrip runs . . LOL

Or for plowing thru 2' of fresh snow . .

It would be helpful if anyone can give me some pointers on possible hinges, doors like in a utility truck. It would be neat to find Original 1966 Side Toolbox doors to install there.

Kind of like this on my 1965 Truck. Sure miss this truck!

Something like this but flush mounted.

DSC02065_zps57c80d2b.jpg
 
Last edited:
OP
T

TimeWarpF100

Well-known member
Joined
Aug 21, 2010
Messages
6,784
Location
not here
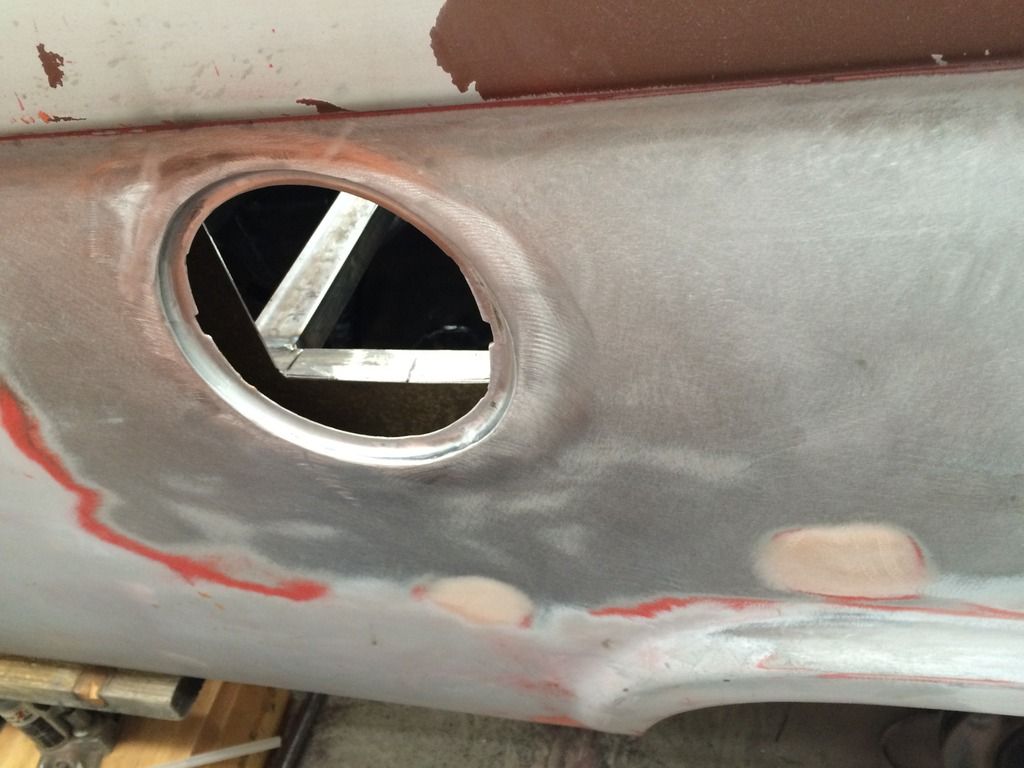
Thin wall 1 3/4 x 1 Tubing cut at a 50 deg angle for a pocket for fuel door and to support floor at front of wheel tub driver side. THe piece I cut off fit perfectly for support on rear of tub driver side.

931B1C9D-987E-4902-B85C-E2FCA23EC743.jpg


Just flipped it upside down . .

550DDA0E-AF12-40CF-8216-2AF312173411.jpg
 
OP
T

TimeWarpF100

Well-known member
Joined
Aug 21, 2010
Messages
6,784
Location
not here
Exciting day for me. A cousin who I had not talked to for prob 35 yrs called earlier in the week & conversation came up that I was looking for any and all pics with my dad's '66 F100. He said his dad used to take slides back in the 60's and that he would do a search.

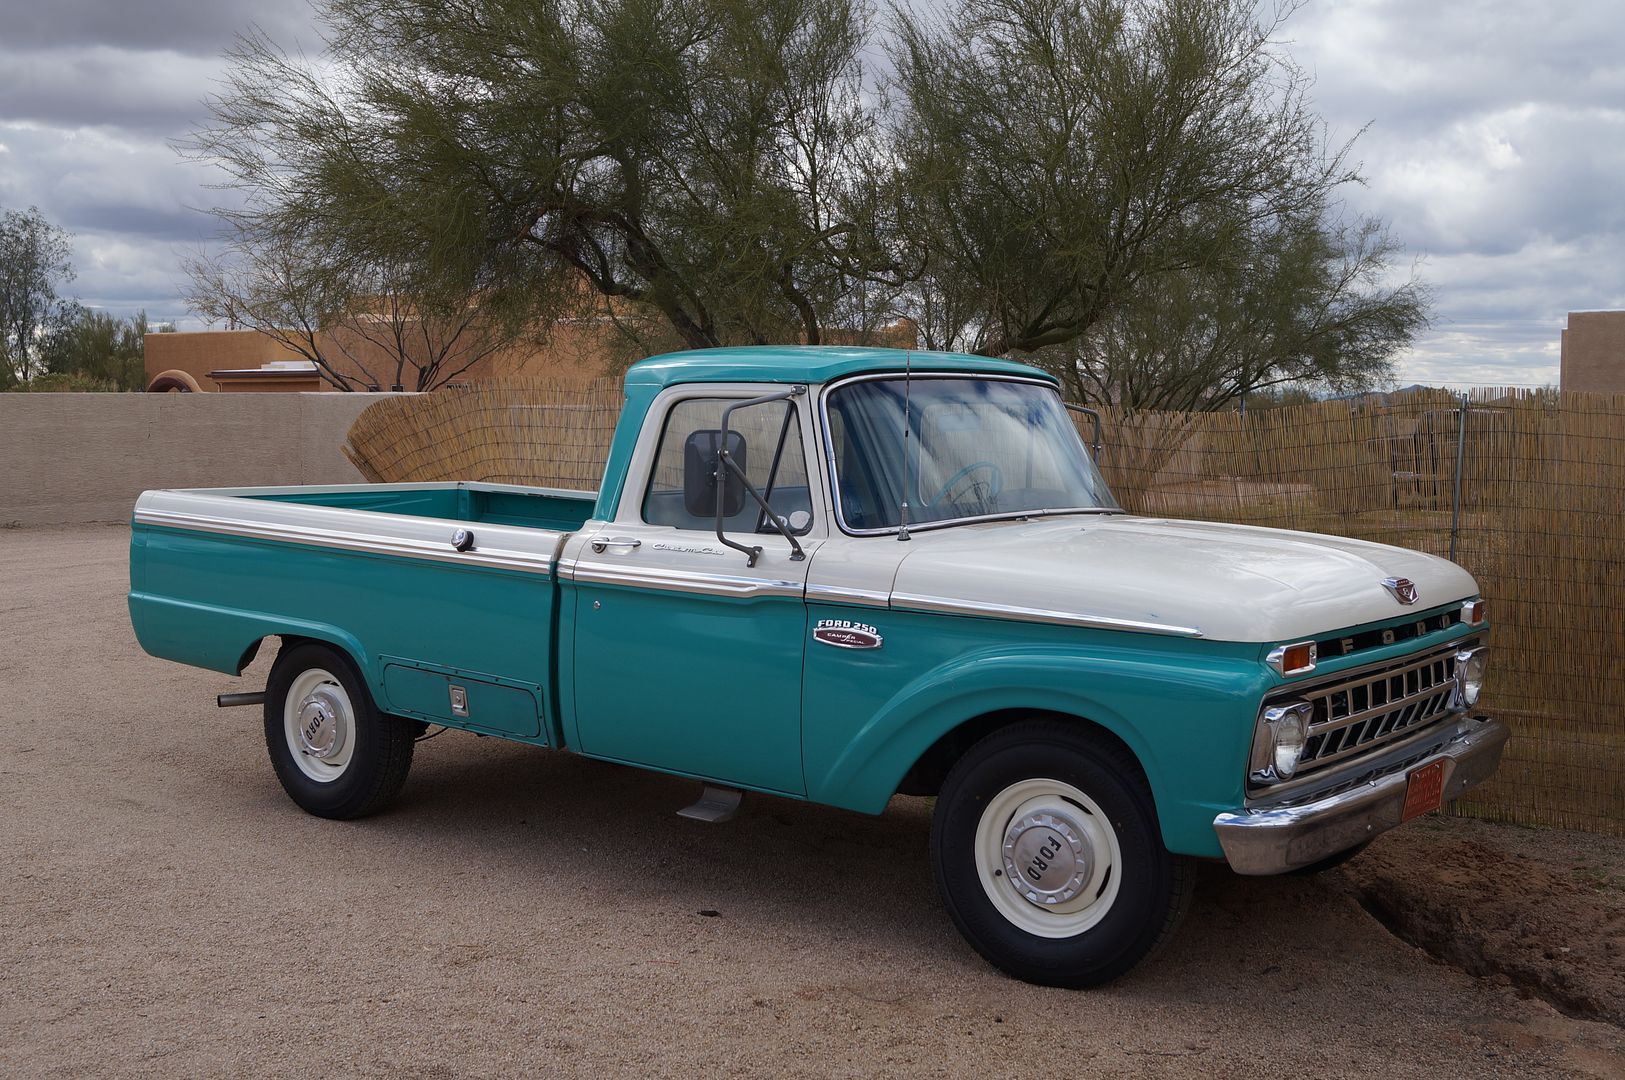
He found this photo taken November or December 1965 When the truck was only a month or so old. I was pretty sure it had the white wheels with silver/red hubcap not the white/red hubcap. Pretty clear in this pic they were silver/red. Would be nice to find pics of the entire truck but having a photo when it was a month or so old is such a great thing. Really means a lot to me.

I forget the name of snowmobile in pic but am sure it would be pretty rare today.

This was our hunting cabin "Buck Heart Lodge" Many a fond memory, this is where we would load up the scooters and head out to camp. (1955 Montgomery Ward's that I still own and a 50's Cushman Eagle)

1BCBB8E5-0856-4799-B2EF-E1DDF0AA7647.jpg
 
Last edited:
OP
T

TimeWarpF100

Well-known member
Joined
Aug 21, 2010
Messages
6,784
Location
not here
Today's challenge was to see if I could get the Capless filler system to work in the '66 Box.

I had cut out a portion with filler from the original mangled '11 bedside. Took a hour or more to find the piece along with the '11 door.

94A85592-BBF7-4270-A9BE-18B5CC0C679F.jpg


Cut out inside of box for the unit to fit.

6793431C-E97D-43B0-8BD9-43FF25AF48B1.jpg


After messing with it what seemed like forever cut a hole in outer bedside.

834EEF8C-8337-43AB-A07E-8AFAA1DB90CC.jpg


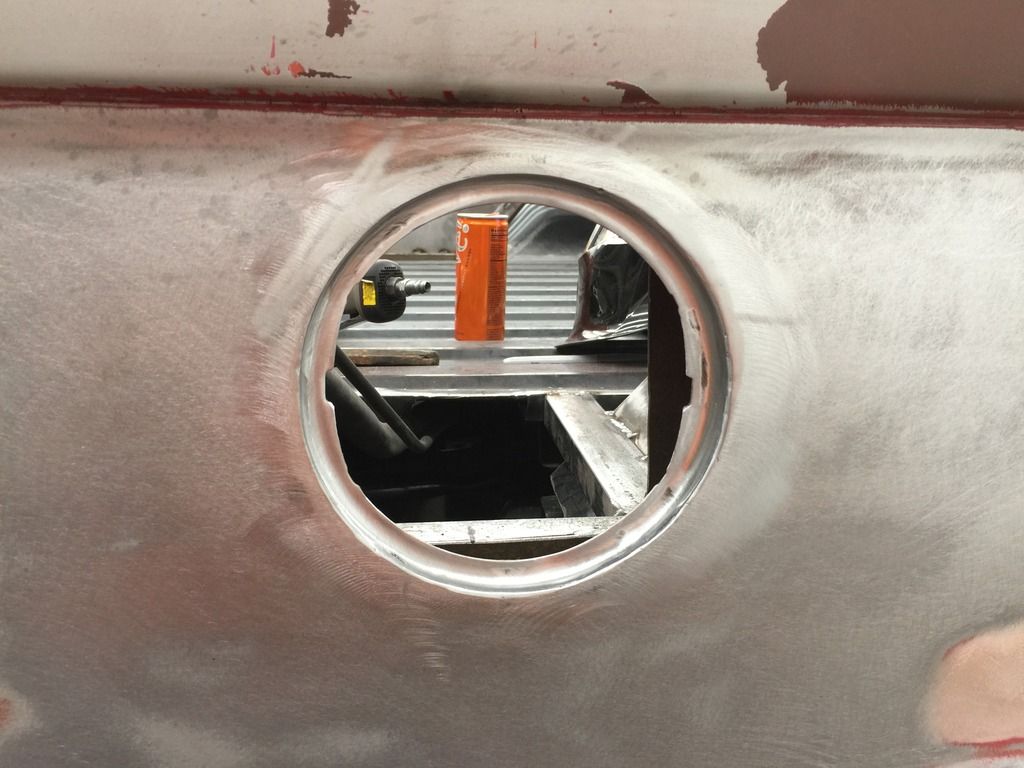
Yes, The hole is very large. There could have been a zillion other ways to do this but really wanted to stick with the capless system to assure no check engine lights or codes related to the system not working.

953FAE3E-FB9A-4507-BD37-B1D40F4517F5.jpg


After a bunch of trimming the insert now looked like this.

A3A276C5-E86C-4047-AF4D-6F9CC4F22636.jpg


sooooo time consuming trying to get a good fit.

After a bunch of fiddling it looked like this fit into the bedside.

DD71CB76-F311-4356-A435-C9403366B953.jpg


After welding and a bit of grinding touch up it looks like this:

(still a bit of final touchup but getting there)

A bit tricky because the bedside is curved. There were prior a couple dings filled so the bottom 1/3 moved around and sucked in a bit, top portion stayed perfect. Will most likely have to chase it around a bit . .

D1A6905A-C025-44C5-9765-5C9F2FE56EC1.jpg


32D6BBD3-00EA-49A7-AC95-A103F6AD9526.jpg
 
Last edited:
OP
T

TimeWarpF100

Well-known member
Joined
Aug 21, 2010
Messages
6,784
Location
not here
Not happy with the plastic door so may make a metal door and hinge. All the time being spent on this little stuff is killing me. Progress seems sooooo slow. Should have taken a few hours but ended up the better part of a day.

Trying to move forward but feels like am in super low range.

Simply a very overwhelming amount of work yet to do before the paint~body work starts.

E2B0BDC3-D34A-4419-A446-742068E62A8D.jpg
 

1969

Well-known member
Joined
Jan 8, 2010
Messages
1,412
Location
East Coast
Absolutely fantastic! Thank you for ALL the pictures and explanations you are providing. Amazing work and attention to detail.
 

BBChevro

Well-known member
Joined
Jan 24, 2014
Messages
2,235
Location
Brisbane, Qld., Australia
Not happy with the plastic door so may make a metal door and hinge. All the time being spent on this little stuff is killing me...

The "little" things may not seem like much in the grand scheme of things now, but it's definitely time well spent.

When it's all finished, folks will be looking over it and slowly noticing those "little" things and going "Wow, look at that...and look at this".

Great work TW :thumbup:
 
OP
T

TimeWarpF100

Well-known member
Joined
Aug 21, 2010
Messages
6,784
Location
not here
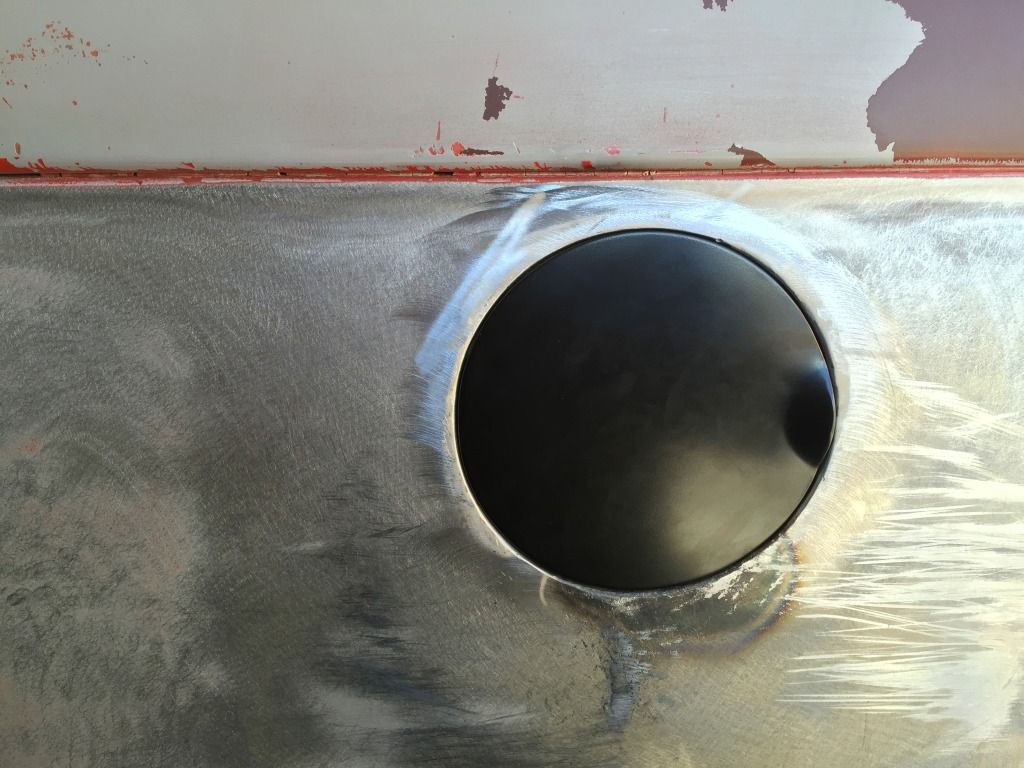
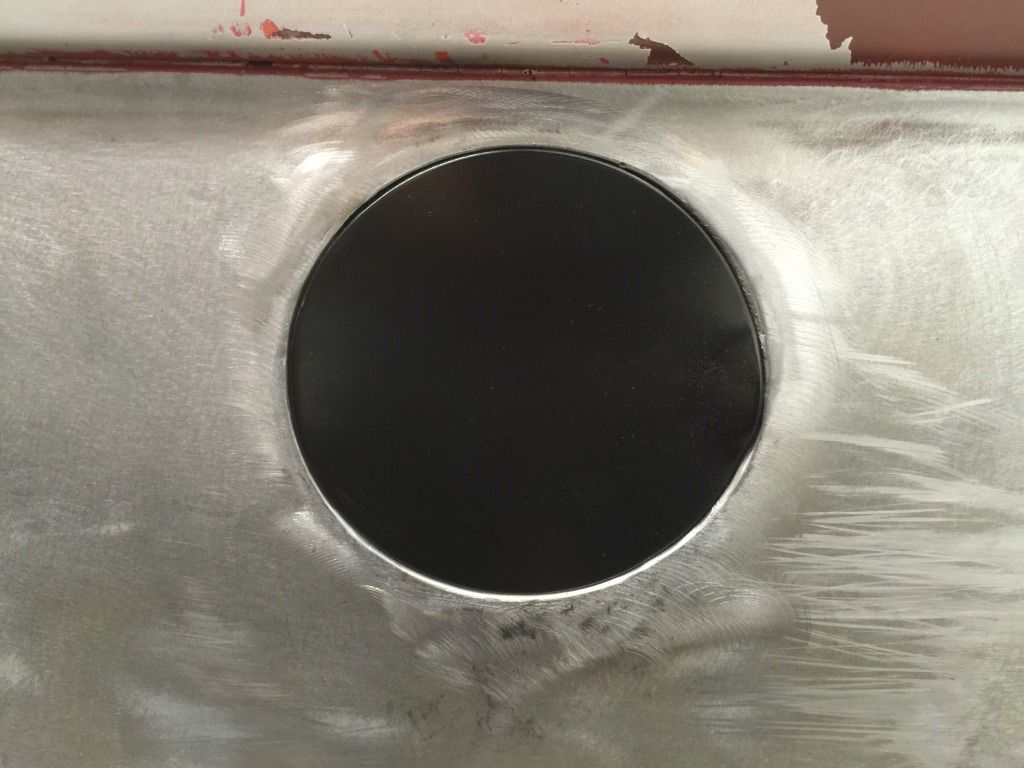
Looking good Randy. Nice job on the fuel door hole!

Thanks Robert! Now I have to figure out how to take care of a bit of distortion near bottom.

Absolutely fantastic! Thank you for ALL the pictures and explanations you are providing. Amazing work and attention to detail.

Thanks!

wow! that fuel door hole looks factory. amazing work tw.

jim

Thanks!


A few more pics on the fuel opening install.

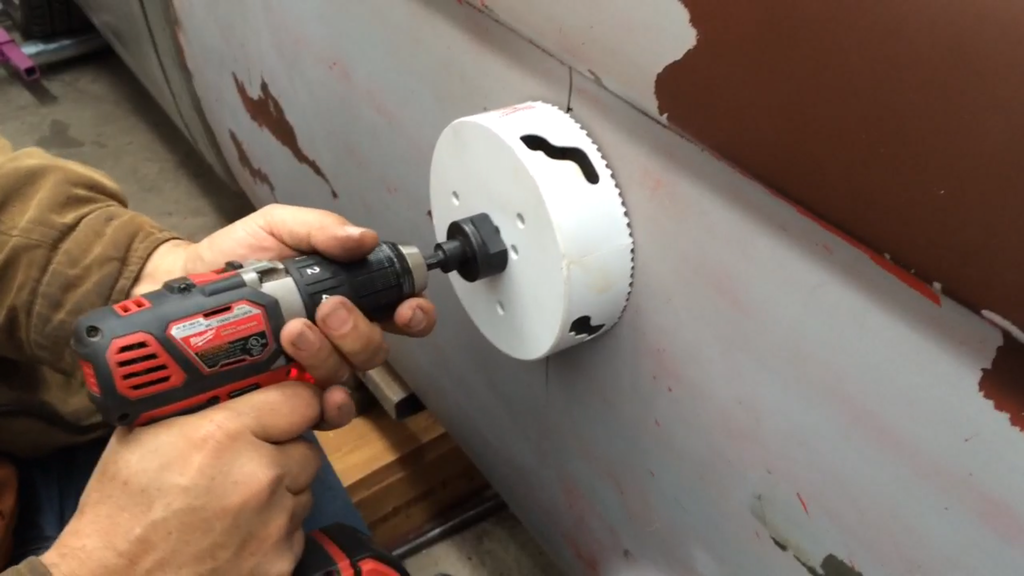
A very large hole for sure.

I started out with a hole saw that was 1/2" smaller than what was needed.

257B22DC-896B-49E6-9E18-2C2AE53D65DE.png


Then using something round that was closest to opening needed I traced it out on back of a sticky sanding disc.

5D44CA0F-0223-481A-B515-4B805638FBFF.png


With sticky disc stuck to side of bed I traced it then used the Milwaukee nibbler to cut very close to mark.

DC084535-16DE-4C1E-97D9-E5229E41B13A.png


2F630764-2FC2-418F-AF93-32D04BB50258.png


I then used the belt grinder to make the piece cut out from the '11 fit perfectly. Of course a bit of touch up with small belt grinder was needed on opening. I have found this tool to become invaluable to the job . .

E7EC21F0-A597-4FE6-8D59-A7C51A0B3D8E.png


Once happy with fit I used the MIG to tack it into place

3CC69DF8-F292-42D0-AF66-7CB57629D95B.png
 
OP
T

TimeWarpF100

Well-known member
Joined
Aug 21, 2010
Messages
6,784
Location
not here
820ED6A4-27D0-4BE2-9502-739A29E6103B.png


Checking it with a machinists straight edge (thick paint to left held it up slightly but all was good at this point.

1D8233AB-D159-48A7-8D8E-0E23B292E2CC.png


Checking fuel door fit.

0368DD3B-DA52-46D0-831C-E921A2A6A411.png


Vent tube on filler takes up a ton of room.

4377B9D7-6728-447A-AC84-5880A9AB07DF.png
 

Wanna Ride

Well-known member
Joined
Jul 28, 2010
Messages
2,790
Awesome progress!

I travel a lot for work this time of the year, and don't get the opportunity to stop in here as much as I'd like, but this is always one of my favorite threads to check up on.
 

rustytruck66

Active member
Joined
Jul 1, 2010
Messages
32
Location
Kingston, WA
Re: 1966 F100 EcoBoost Engine Swap & 1966 427 Project

Beautiful! Going to be a nice truck. Keep on the good work!

Sent from my SCH-I545 using Tapatalk
 
To avoid these ads, REGISTER NOW!

JamieK

Well-known member
Joined
Aug 13, 2009
Messages
1,760
Location
Winston-Salem, NC
The listing says its for 64-72, but that's probably what all it fits. I'm assuming the FORD logo must have changed through the years. Worst case, the heavily damaged green tailgate could have the FORD logo cut out and welded into the new tailgate.
 

gsloan

Well-known member
Joined
Nov 6, 2012
Messages
67
Location
Campbell, CA. Valley of hearts delight
I put a 71' tailgate on my 66' because I thought it looked better. My brother in-law gave it to me after storing it since his truck was only two weeks old and totaled in an accident. It didn't even have a scratch on it. Score!
 

MP&C

Well-known member
Joined
Oct 21, 2009
Messages
4,405
Location
Leonardtown, MD
The 67 and later had that bead detail that borders around the text. Randy's earlier pictures which are all 66's do not. He would be twitching every time he looked at the wrong tail gate on a 66 :lol_hitti
 
OP
T

TimeWarpF100

Well-known member
Joined
Aug 21, 2010
Messages
6,784
Location
not here
The 67 and later had that bead detail that borders around the text. Randy's earlier pictures which are all 66's do not. He would be twitching every time he looked at the wrong tail gate on a 66 :lol_hitti

E X A C T L Y ! ! !


That's why I already used the perfect take-off when new 67-72 gate on a truck I was selling.

Not only is it the border around text and the text itself but the upper body line is completely different. yes it will bolt on but does not look correct.

I have 6 gates with enough to combine 2 to have 5 very nice gates for only 4 trucks. Of course the trailer would be the 5th gate needed

Gates from nicest to not so nice

1) Best gate goes on the Orange/White '66 F100

2) Next up will be the EcoProject

3) The 1966 F250 Ranger

4) The light Blue '66 F100

5) The '66 Long bed trailer
 
OP
T

TimeWarpF100

Well-known member
Joined
Aug 21, 2010
Messages
6,784
Location
not here
The listing says its for 64-72, but that's probably what all it fits. I'm assuming the FORD logo must have changed through the years. Worst case, the heavily damaged green tailgate could have the FORD logo cut out and welded into the new tailgate.

Not really possible to change just the outer lettering portion of gate.
The inner portion of lettering is a separate piece making it not probable.
 

ShadowRuleZ

Well-known member
Joined
Feb 27, 2011
Messages
1,916
Location
Detroit
I hear you guys, my dad been looking for a 62 tailgate for his unibody forever. I think they finally started reproducing the 61-63 but I haven't heard if they're any good.
 

nine4gmc

Well-known member
Joined
Mar 24, 2012
Messages
14,357
Location
Dallas
Re: 1966 F100 EcoBoost Engine Swap & 1966 427 Project

Personally I like the cleaner look of the fuel door more than a big honking chrome gas cap but you gotta look at it everyday so...

Great work so far, keep it up!

Sent from my SM-T230NU using Tapatalk
 
OP
T

TimeWarpF100

Well-known member
Joined
Aug 21, 2010
Messages
6,784
Location
not here
Can you put that cap on a hinge? It will look fantastic with that bed.

Personally I like the cleaner look of the fuel door more than a big honking chrome gas cap but you gotta look at it everyday so...

Great work so far, keep it up!

Sent from my SM-T230NU using Tapatalk

Very nice work!

Thanks!

That cap pic was posted out of frustration trying to get the other to actually work. Cheap plastic that was much too large to fit between the inner and outer panels. About the only way I can deal with that is to make a joke about it and laugh it off.

On a 1-10 Scale of trying my patience 10 being worst this job was a 12.6 .

Spent a lot of time trying to figure it out.

 
OP
T

TimeWarpF100

Well-known member
Joined
Aug 21, 2010
Messages
6,784
Location
not here
After quite a bit of attempts the large thick plastic '11 F150 was flat out not going to fit.

It was time to be on the hunt for the metal simple style. Wishing I had not made the decision to use the '11 door in the first place.

LuCkY '66 was there tho today. A friend that was helping took a wander in the yard and discovered a 2005 F250 that another friend had left here had a very similar fuel door and it was metal. I wandered out to look with a tape measure in hand and it was off by nearly 3/16" too small in diameter.

Thinking I could somehow make it fit called my local dealer and they had one in stock along with the mounting screws. Anxiously opening the box to see what I would find it was slightly larger than the OEM unit on the '05 F250.

It was an absolutely LuCkY Find it fit Perfectly with about a 1/16 gap all around!

A quick eyeball told me I would need to modify the current opening where hinge would be so took a cutoff wheel and made a little slice.

E6760DBE-3A3C-4352-9275-DD40A4148FF5.jpg


436A9326-6C5D-423E-8097-33A113481669.jpg


Too late to stop now! lol

3B63A550-7A99-4AE5-845D-32F303D4EF62.jpg


I thought I took pics but guess not. Made a little piece to fit the hinge.

DB5816E0-E393-47C7-84B5-9C0FDE923D73.jpg


BABE8A45-3C3D-4CB0-B9A7-B193BAF15228.jpg


Put it in place and instant perfect fit!

C4FC370B-EE24-4D7C-8656-1D4C929B5F2B.jpg
 
OP
T

TimeWarpF100

Well-known member
Joined
Aug 21, 2010
Messages
6,784
Location
not here
I then tacked the piece in place.

A6D9F6C8-FC87-44C7-B245-F0A6B10CE5F7.jpg


Ran the screws in and this . .

165FB61C-36E8-4708-A176-424F289EC20A.jpg


No rubber stops at this point but happy with fit.

165FB61C-36E8-4708-A176-424F289EC20A.jpg


5D117FA4-BEBA-44EE-B5C6-0C5B68A75C92.jpg


Note how it clears within the 2 panels.


790E1F8D-AA02-48B9-9FE5-46B3F6C97869.jpg


I then fabbed up this piece from a left over piece of exhaust from the Fog Light Project.


14990724-6A8E-4E58-BC3C-35A3B60B05F7.jpg


B0A55F79-C6BF-4431-9126-16FF43692713.jpg


Comparing it in size to the stock '11 unit.

Angle on the '11 unit was way off also.


750EF578-5DC3-46C1-87A7-D6AF465BF619.jpg
 
OP
T

TimeWarpF100

Well-known member
Joined
Aug 21, 2010
Messages
6,784
Location
not here
Instead of scrapping the new '11 unit I cut off the seal portion from bottom.

22F74667-152A-4D68-805F-E1D7FBFBBCBF.jpg


A bit of TIG work and the mounting surface for filler was on.

6C6343B8-CBA3-4B00-9955-8918EC85AA0D.jpg


Near final fit with filler mount in place. Still need to add the rubber stoppers.

DCC1389D-3526-401B-B6D4-B8D4BE5FA414.jpg


Dealer had them in stock also.

A9F83C65-0303-44DC-96EC-D2EEF2C54C20.jpg
 
OP
T

TimeWarpF100

Well-known member
Joined
Aug 21, 2010
Messages
6,784
Location
not here
Here we are, just needs a final fine grind prior to paint. Maybe a couple specs of filler, primer may take out the imperfections.

676033E4-CFF2-43B2-9944-041A64388BBF.jpg

What it looks like from inside the box. Next up is to make a cover to cover all this. It will be similar to the factory 1970 Truck style.

45AE8890-3711-4FFB-929D-7070CFE032E8.jpg


WHEW! My knee's were knocking on this project. Just do not have the confidence to try, had no choice I guess. nobody else to do it for me.
Way and above anything I have tried before


Met the goal with the Stock '11 filler tube untouched.

I just called LuCkY '66 to wish me well . .lol
 
Status
Not open for further replies.
To avoid these ads, REGISTER NOW!
Top Bottom