
You are using an out of date browser. It may not display this or other websites correctly.
You should upgrade or use an alternative browser.
You should upgrade or use an alternative browser.
Shawn's 32x32 two story Garage
- Thread starter sreno
- Start date


Did some more garage siding today. Moved to the north-facing side.

Played hooky again and got the lights, grill and air induction system connected on the T-Bolt.

There's no such thing as a bolt-on, it seems. Always requires a bit of tweaking. What fun, though!

Last edited:
autoist
MEMBER EMERITUS
AH! You're like me...hop from one project to another & rarely get any completely finished!


Solicited or not, they're great. You've got a cool car there.
Thanks again!
At least there's an upside to all that rain: The trench where I buried the 100 amp cable, hose and telephone line is almost completely grown back in.

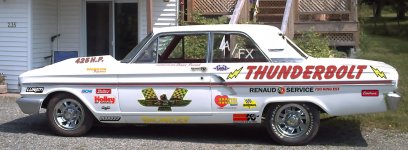
Front and rear body parts are going on nicely. What a sleeper! The engine note kinda gives it away, though.


Now I need to test my nerve by drilling into brand-new fenders in order to install mouldings. Yikes! I need a drink...

Last edited:
The wife surprised me this week; in a GOOD way. I came home and she had built a 'closet' for the electric box.

I didn't know she could swing a hammer like that!

In Fairlane news: I installed the rear window glass, cranks and some interior metal trim...

I also found the courage to drill into the left front fender and install its moulding and I installed new sail panel emblems.

I finished up intake ducting from the grille to the air breather.


Last edited:
Chateau Slate 66
Well-known member
Great car. Those little back tires are going to be begging for mercy. 
Great car. Those little back tires are going to be begging for mercy.
Maybe!
")
The fun part of the shop is scratch-built DIY. Here's my solution to missing clips on a lazy Sunday...
This is a classic case of reassembling someone else's project

Here's how the stainless side trim is held in place.

I'm missing several clips like this.

I ended up making my own.


Last edited:
Never underestimate the value of a woman who is willing to pick up a hammer.
Well done, Shawn. That car looks top notch. As stated earlier I think the rear tires are a tad small for a TBolt.
I see some rust on the rear bumper in one shot, you have the fiberglass bumpers, right?
Well done, Shawn. That car looks top notch. As stated earlier I think the rear tires are a tad small for a TBolt.
I see some rust on the rear bumper in one shot, you have the fiberglass bumpers, right?
Never underestimate the value of a woman who is willing to pick up a hammer.
Well done, Shawn. That car looks top notch. As stated earlier I think the rear tires are a tad small for a TBolt.
I see some rust on the rear bumper in one shot, you have the fiberglass bumpers, right?
I have both bumpers. The front was easy to install; the holes were already drilled and squared-off.
In a fit of optimism, I slapped on the old rear bumper, taking it out for a quick ride.
Chateau Slate 66 is right about the tires...I'm not sure which solution I'll go with. I don't like the current wheels.
Got to install the 4.56 gears (9 inch Equa-Loc) to see if the diff is road-worthy.

Last edited:
As far as I know 9" axles were available in 28, 31 and 35 (in trucks) spline variants.
I corrected it
Good thing I'm not in charge of a nuclear power station!As I understand it, the 28 spline axles are tapered, the 31's could actually be cut/shortened and then resplined. The aftermarket now has more elegant solutions, I gather...
Last edited:
rburke65
Well-known member
Shawn...better late than never, but thanks for the response back in Feb about info on the Rotary lift.
I'm not sure about the construction differences between 28 and 31 spline. Most people I know advocate replacing axles with new in high HP applications (especially if you're runnin' a mansmission). A friend of mine sheared an original 31 spline axle with his 4 speed 70 Torino Cobra. $3000 in body work and frustration >> couple hundred for new axles.
Shawn...better late than never, but thanks for the response back in Feb about info on the Rotary lift.
I hope you found what you were looking for, rburke65
I'm not sure about the construction differences between 28 and 31 spline. Most people I know advocate replacing axles with new in high HP applications (especially if you're runnin' a mansmission). A friend of mine sheared an original 31 spline axle with his 4 speed 70 Torino Cobra. $3000 in body work and frustration >> couple hundred for new axles.
YIKES! What's my old equa-loc in for, then? At least the trannie's a slush-box...
The 3rd member has a 4.56:1 ratio.


Last edited:
Heh heh, slush box. 
Your equa-loc is probably fine. I guess it all depends on how much HP that TBolt is puttin' to the street.
Mike's axle sheared at the wheel, too (hence the $3000 in body work bit, quarter skins run $600-1200).
Your equa-loc is probably fine. I guess it all depends on how much HP that TBolt is puttin' to the street.
Mike's axle sheared at the wheel, too (hence the $3000 in body work bit, quarter skins run $600-1200).
Last edited:
Heh heh, slush box.
Your equa-loc is probably fine. I guess it all depends on how much HP that TBolt is puttin' to the street.
Mike's axle sheared at the wheel, too (hence the $3000 in body work bit, quarter skins run $600-1200).
I was reading something about garage jewelry here somewhere and remembered some achievement plaques my Dad received from various oil companies; the first plaque dates back to 1955. There are interesting stories behind many.
I also have more recent Deere and T-Bolt signage that fit the 'decor' nicely...


BONUS: The wife found great matching fabric for the Ford interior.
Took the Fairlane out for a bit. It toasted the tires and felt like it was in friggin' neutral! It's more -uh- capable than I thought.


Last edited:

Shawn,
Great rendering, I like where you're going with that project!
Are you installing the van seats that were in the original TBolts or are you going with the standard Fairlane seats?
It, uhh, looks like you lost a little rubber pulling into the garage there...
Great rendering, I like where you're going with that project!
Are you installing the van seats that were in the original TBolts or are you going with the standard Fairlane seats?
It, uhh, looks like you lost a little rubber pulling into the garage there...
GearBeer, I'm reinstalling the original Fairlane seats, reupholstered.Shawn,
Great rendering, I like where you're going with that project!
Are you installing the van seats that were in the original TBolts or are you going with the standard Fairlane seats?
It, uhh, looks like you lost a little rubber pulling into the garage there...


Back at the garage; right side exterior siding is now also done.

Last edited:
The rear stairs are now in the works but the Fairlane is my priority due to our short summers.
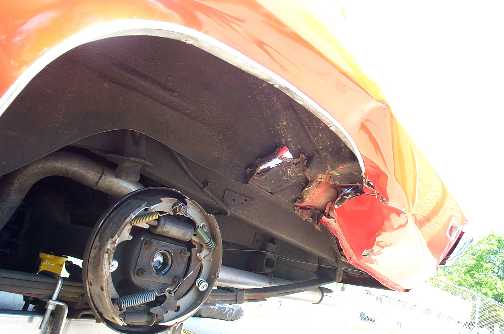
Axles were a disappointment as bearings and seals required replacement.
The differential chunk turned out to be a 4.56 gearset; not 4.11's as advertised.
Electrics on the car are a shambles but simple enough to deal with.
Heater motor and wiper motor no longer fit due to FE big block, set too far back.
But seats are installed (modifications required to circumvent T-bolt style frame connectors) and I finally got to go for a spin! It really hauls with that stiff rear end ratio...
Shawn
Last edited:


Here's a quick pictorial of my homemade coilover/cartridge project.
The Carreras were too short and too soft, with bent shaft on one.
Now the Fairlane headers don't drag anymore! It was about an 80% diy job.
The front suspension was eventually modified.
Here's the link to my project thread.
https://picasaweb.google.com/104009...spensionREINVENTED?authuser=0&feat=directlink


The Carreras were too short and too soft, with bent shaft on one.
Now the Fairlane headers don't drag anymore!
It was about an 80% diy job.The front suspension was eventually modified.
Here's the link to my project thread.
https://picasaweb.google.com/104009...spensionREINVENTED?authuser=0&feat=directlink
Last edited:
McDowell
Member
what kind of decking did you use for the 2 decks? i'm assuming it's watertight??
what kind of decking did you use for the 2 decks? i'm assuming it's watertight??
The base is roof-grade OSB for a more solid feel underfoot.
Then, it's a rubber roof membrane. Treated plywood product went over top.
The soffit below seems to keep the critters out and the whole thing is set at an angle to be sure that the rain rolls off.
Snow is another matter
No problems so far but it's only been about a year.I can dig up a few photos of that part of the project...
Shawn
Last edited:
Fairlane Update!
Another reason to expect more trouble from a basket case (a car that requires assembly)
Now it's a damaged, misaligned 9 inch axle. Had to lengthen one side and align the tubes.
Good thing I was able do much of the work in the garage myself. $$$


Another reason to expect more trouble from a basket case (a car that requires assembly)
Now it's a damaged, misaligned 9 inch axle. Had to lengthen one side and align the tubes.
Good thing I was able do much of the work in the garage myself. $$$
Last edited:


Filler and blocking a car in the dark is one thing.Wet sanding to 600 grit without decent lighting is another!
Here, we've installed some suspended lighting (using scrap material) and added an additional pair on the wall near the entrance. Just need to secure the wiring.
Combined with the big portable 500 watt tripods, light shouldn't be a problem any more.
Shawn


Here, we've installed some suspended lighting (using scrap material) and added an additional pair on the wall near the entrance. Just need to secure the wiring.
Combined with the big portable 500 watt tripods, light shouldn't be a problem any more.
Shawn
Last edited:
jktruck150
Well-known member
Shawn, I like how you are working on both your shop and your car(s) at the same time! keeps you busy i take it? I also like your step by step pictures on EVERYTHING, I think that really helps we "going to do" people turn into "got it done" types. Keep up the photos and info coming!
Shawn, I like how you are working on both your shop and your car(s) at the same time! keeps you busy i take it? I also like your step by step pictures on EVERYTHING, I think that really helps we "going to do" people turn into "got it done" types. Keep up the photos and info coming!
Thanks, jktruck150!
On to the Fairlane. The wife won't get in without seatbelts so, it's compromise time.
The compromise is 'installing seatbelts'.
Here are some shots from that project.
Shawn


Last edited:
I like the low-cost approach, whenever possible.
Keeping my clunkers' exhausts tight and safe is no exception.
The materials needed to set yourself up might seem expensive but in my area, the first couple projects could very well save enough to cover it.
Oh yeah; a drawer-full of different sized muffler clamps and a few universal support/hangers will come in handy.
Tip 1: tack-weld your pieces on the car but do the finishing work where you can turn your piece for full access.
Tip 2: while it's all still apart, I try to find the low spot and apply some weld-through primer inside, to protect against the accumulation of water. In extreme cases I'll drill a small hole at the lowest point.
In the end, the bender is used sparingly. I prefer cutting straight and curved sections from the mandrel-bent Dynomax stock. Then it gets welded together to the length and shape I need.
Pic#5 is the result of a good weekend's work.
Check out my procedure here: https://picasaweb.google.com/104009...e64ExhaustDiyPipes?authuser=0&feat=directlink
Shawn


Here are the DIY extension pipes for the Fairlane. 3 inch mandrel-bent and welded air-tight.

Keeping my clunkers' exhausts tight and safe is no exception.
The materials needed to set yourself up might seem expensive but in my area, the first couple projects could very well save enough to cover it.
Oh yeah; a drawer-full of different sized muffler clamps and a few universal support/hangers will come in handy.
Tip 1: tack-weld your pieces on the car but do the finishing work where you can turn your piece for full access.
Tip 2: while it's all still apart, I try to find the low spot and apply some weld-through primer inside, to protect against the accumulation of water. In extreme cases I'll drill a small hole at the lowest point.
In the end, the bender is used sparingly. I prefer cutting straight and curved sections from the mandrel-bent Dynomax stock. Then it gets welded together to the length and shape I need.
Pic#5 is the result of a good weekend's work.
Check out my procedure here: https://picasaweb.google.com/104009...e64ExhaustDiyPipes?authuser=0&feat=directlink
Shawn
Here are the DIY extension pipes for the Fairlane. 3 inch mandrel-bent and welded air-tight.
Last edited:
tenorplayer23
Well-known member
Shawn,
Amazing work....and, even better documentary/picture-mentary!
You've fabricated it all................and have all that you need to fabricate anything.
A couple of questions.......why no interior paint? You have just sheathing in most areas from what I can see. Wouldn't it be much brighter?? In this neck of the world, we need all the help w/lighting we can get. Also, this looks like a full time job, so much effort & work for an individual+. What do you do for a living??
Enjoyed the post thus far and the information about the Ford. I had forgotten about that car............very interesting story. (And the car looks so much better with your molding finally installed - very impressive).
Thx. so much for allowing me to see it. It's quite entertaining & enjoyable.
See ya.
Bob
Shawn,
Amazing work....and, even better documentary/picture-mentary!
Enjoyed the post thus far and the information about the Ford. I had forgotten about that car............very interesting story. (And the car looks so much better with your molding finally installed - very impressive).
Bob
Thanks Bob for the kind and encouraging words.
I'm probably testing the admins' patience by bringing my projects under the garage thread umbrella...but to me; it's all the same hobby.
Last edited:
tenorplayer23
Well-known member
Shawn, you're quite welcome. It's very nice work and a broad set of capabilities that you have acquired.
Interesting career, as well. Unusual mix (no pun intended) of music, technology, etc.. Am surprised that somehow you acquired all the know-how to do all the tasks related to the new garage/car build, etc. with the career you have. Maybe you could drop a post (or PM) and tell me a little bit more about where the skill set came from.............
Me, I have a couple of mechanical engineering degrees/MBA, have worked in product development, marketing, sales ops., et. al. for many years.....big companies. Have a great interest in the automotive industry, though only worked in it for a very short time, cars, etc.. Plus, I'm a sax player (funny how that lines up w/the user name). But, in all these yrs. never acquired the skill set/or used it, to build anything like you've done. So, I find it fascinating.......the mix of backgrounds and the projects you've gotten into. Like the fabrication stuff you do, reference: the bench, the Fairlane axle, etc.. And the fact you have a tire changer, balancer, lift and all, IN HOUSE. Nothing like having everything available...of course, I would have loved it too....especially the lift.......but, the justification is never there. So, I guess I'll stick with the compressor, a handful of air tools, a couple of jacks, and so forth. And of course, the shiny cars!
Not sure where you are in Quebec, used to date a girl from there and visited Quebec City many times...........quite the haul from here, especially the part where you take a "left" at Montreal in the winter & have to drive about 3hrs. more. But, was such a beautiful place..........
Look forward to more from the build & about the car. Unusual find you have there. I've been looking a little for a "vintage" muscle car myself. Happened upon a '69 340 Dart and am going to check it out. Might be fun to have a Mopar again.........loved that late 60's/early 70's Mopars (just can't afford a really nice Cuda or Challenger Hemi!)
Thx. for the info. Take care.
See ya.
Bob
Thanks Bob for the kind and encouraging words.
I'm probably testing the admins' patience by bringing my projects under the garage thread umbrella...but to me; it's all the same hobby.
why no interior paint?
One word: Laziness. When it's not fun it's not done!
What do you do for a living??
I'm director of an audio deptartment that supplies original music-sfx-lyrics-dialogue and voice work for video games, industrial films (long commercials) and casino games.
I work 40 hours/week and the office is 61 miles from home so I'm driving 10 hours beyond that. The diy helps to keep 'em clunkin'!
Keep tuning in, Bob. Your comments will always be welcome!
Shawn


Looks good man, is there anything you don't do yourself ?
Looks good man, is there anything you don't do yourself ?
Yup! Cook & pay bills on time.
The wife has me covered!Thanks!
Back to the garage, I was too hasty on the cabinets' original placement, though. Should've left the front wall bare from day-one...
Had to shuffle a few things around. Oh well...


Last edited: