Hi all, looking for some advice in getting this thing cleaned up. Alot of the metal is kinda bumpy like the 2 pieces on the bottom of the pic, was wondering how to or if I should try and remove that to smooth it out? Also what kind of paint do you use on these things? I'm pretty new to this stuff so go easy on me. =)

You are using an out of date browser. It may not display this or other websites correctly.
You should upgrade or use an alternative browser.
You should upgrade or use an alternative browser.
Looking for advice for restoring a grinder
- Thread starter Vyper
- Start date
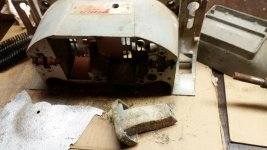
Hi all, looking for some advice in getting this thing cleaned up. Alot of the metal is kinda bumpy like the 2 pieces on the bottom of the pic, was wondering how to or if I should try and remove that to smooth it out? Also what kind of paint do you use on these things? I'm pretty new to this stuff so go easy on me. =)
That looks alot like the Thor grinder I restored last year. To be honest, you can spend many hours getting it all pretty, but with sleeve bearings and a shaded pole motor you will end up with a crappy grinder that has minimal value. Just saying.......
Bobioz1
Well-known member
I think you should find a better candidate for your first attempt at a restore. If you're really in love with that one, put it under your work bench for three or forty years and get back to it then. Lots of aggravation and little reward there.
Richard Cranium
Well-known member
Welcome to our group,
Please update your profile to include your state at least if not your city also.
Please update your profile to include your state at least if not your city also.
Mark in Indiana
Well-known member
Vyper,
Here's my suggestion:
To smooth out the metal, you can try Scotch-Brite pads. I feel that they're safer than a wire wheel or sand paper. Repainting it, I'd use a Rustoleum Hammered finish. The textured finish looks cool and it will help cover many of the blemishes.
Good luck.
Here's my suggestion:
To smooth out the metal, you can try Scotch-Brite pads. I feel that they're safer than a wire wheel or sand paper. Repainting it, I'd use a Rustoleum Hammered finish. The textured finish looks cool and it will help cover many of the blemishes.
Good luck.
Bogash
Well-known member
So what can I do to work with the metal, make it look nice again, type of paint to use etc?
What about wire wheel the heck out of it then maybe even use body filler and block and sand it? That's pretty extreme though. I'd just sand it/wheel it down then use the hammertone paint as mentioned above. That would end up looking good I think. I did an old ceiling fan like that, just cleaned it up and used the hammertone and it came out okay.
SMKS
Well-known member
Hey OP, be aware that this is not a rule or anything, just something this member wants you to do.
Welcome to our group,
Please update your profile to include your state at least if not your city also.
dngrmse
Well-known member
I would try all of the above. It will give you a feel what the capabilities are of the different techniques recommended. You may be pleasantly surprised at what you will learn. At the end of the day, some decent hammered paint will cover up most imperfections. Good luck.
Wabash
Active member
I have had good luck using a wire cup brush in a die grinder to remove paint and minor rust scale. Being mindful of the speed and pressure and it will remove the old finish and rust without leaving any deep scratches. Make sure to cover and tape off and exposed motor windings. I them blow all the parts off wipe them down with a wax/grease remover then prime and paint. The rustoleum hammered rattle cans are a great way to go. The primer will cover a lot of surface imperfections and combined with the textured finish of the paint will leave you with a tool I'm sure you'll be happy with. Granted my goal isn't to win the Concours d'Elegance of shop tools, but they always turn out to my satisfaction and that is what matters to me.
Attachments


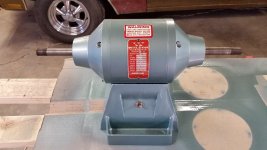
Do you guys get off every little part of old paint left on or just the majority before hitting it with rustoleum? Wondering if I should be worried about lead paint in the air. Also the metal plate label on it, tape over it before painting? Not sure how to take it off. Trying to drill the hole with my luck I'll end up hitting the plate a bunch sliding off the rivet I figure.
Wabash
Active member
I usually remove all the old paint, and always wear a dust mask when sanding/grinding. I find 3m green tape works best for me when taping off details like decals I'm trying to save or data plates. It is very flexible, adheres well and leaves crisp lines with no paint bleed. Plus you can find it at just about any automotive store.
I've been putting it back together and now the axle wont spin, not sure if I didn't line something up correctly. It starts up and hums, the block the axle is in moves a little like its trying to spin it but it just doesn't. Any ideas what would cause this, other than its old etc. Thanks for reading!
Attachments

Last edited:
I've been putting it back together and now the axle wont spin, not sure if I didn't line something up correctly. It starts up and hums, the block the axle is in moves a little like its trying to spin it but it just doesn't. Any ideas what would cause this, other than its old etc. Thanks for reading!
Alignment of those bearing blocks is a pain in the ****. I spent at least an hour trying to get my Thor working when I restored it. I found that some bits of aluminum foil to shim the the crappy bearings worked out ok. That shaded pole motor has essentially zero startup torque, so any binding will just stall it and make it hum.
Attachments

Last edited:
This is where you have to adjust it right? Where the 4 screws are holding the shaft down? Sorry, I'm a noob with this stuff, but I'm trying to learn.
Yes you need to fully tighten them, but you also need to keep turning the shaft as you tighten to feel if it is binding. On mine, I had to slip some foil under the actual sleeve bearing (the bronze part under the bearing cap) as the main housing was slightly dented in and allowed the bearing to shift when you tightened the cap. It's a very tricky ordeal, and the very reason I warned you that it wasn't worth all the effort in the first place!! Good Luck.
under the copper parts is a piece of cotton in a groove, for the oil to absorb into I think. You put foil down there to shim it up?
I put a small piece at the top edge of that oil groove as there was a dent right where the bearing contacted. Your situation might be different, and unfortunately you will need to play around with it indefinitely....
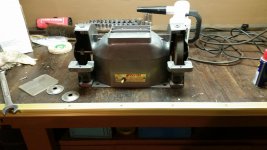
Messed with it last night, got it started but wouldn't start on its own without a little push. I go down there this morning, the thing is now starting on its own... go figure. So this is what I ended up with, not the prettiest job but it seems to be working fine. Still missing the shields though.
Attachments
Bogash
Well-known member
Messed with it last night, got it started but wouldn't start on its own without a little push. I go down there this morning, the thing is now starting on its own... go figure. So this is what I ended up with, not the prettiest job but it seems to be working fine. Still missing the shields though.
Looks good, man!