To avoid these ads, REGISTER NOW!

parts drawer cabinet

To avoid these ads, REGISTER NOW!
OP
R

royce

Well-known member
Joined
Jun 22, 2014
Messages
3,110
Location
fairbanks ak
Royce: I bet that cabinet is getting close to weighing 200 pounds empty. WELL DONE and keep posting more pictures as you have time to.

you might want to make a plan on how to move it into it's permanent place soon before it gets too heavy.

HAPPY EASTER

Yes, she's getting heavy, but still manageable.
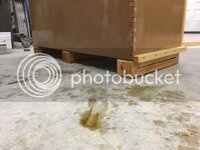
I still need to put some 2x skids under it to get the bottom drawers up off the floor and to be able to move it with a pallet jack.
Happy Easter to you as well.
Royce
 
OP
R

royce

Well-known member
Joined
Jun 22, 2014
Messages
3,110
Location
fairbanks ak
It is going to look really nice with all those drawers in it!
I'm anxious to see the face boards on.
I was going to nail them on with horse shoe nails and rust them but at 10 cents apiece, I opted out of that.
I found some small head trim screws with a black phosphate finish I think I'll use.
Royce
 

drivesitfar

Well-known member
Joined
Oct 23, 2013
Messages
36,053
Location
Pacific Northwest
Royce: great idea putting some supports under it and spaced so you can use a pallet jack to move it if you need to.

i'm sure whatever method you choose to put the trim pieces on will look great. are you going to paint it or stain it and what color??

good luck
 
OP
R

royce

Well-known member
Joined
Jun 22, 2014
Messages
3,110
Location
fairbanks ak
Royce: great idea putting some supports under it and spaced so you can use a pallet jack to move it if you need to.

i'm sure whatever method you choose to put the trim pieces on will look great. are you going to paint it or stain it and what color??

good luck

I'm thinking I'll put a coat of linseed oil on it.
Royce
 

drivesitfar

Well-known member
Joined
Oct 23, 2013
Messages
36,053
Location
Pacific Northwest
Royce: you've got my vote for linseed oil. BLO (boiled linseed oil) is my recommended color for a vise (vice) so I bet it will look great on your wood cabinet.

WELL DONE
so far
 
OP
R

royce

Well-known member
Joined
Jun 22, 2014
Messages
3,110
Location
fairbanks ak
Royce: you've got my vote for linseed oil. BLO (boiled linseed oil) is my recommended color for a vise (vice) so I bet it will look great on your wood cabinet.

WELL DONE
so far

I too like BLO for iron or wood.
I got the perimeter trim on this morning.
Now headed to celebrate Easter with the kids and grand kids.
 
OP
R

royce

Well-known member
Joined
Jun 22, 2014
Messages
3,110
Location
fairbanks ak
Finished Easter dinner and just had to put one horizontal trim piece on, because they also serve as stops for the drawers and I needed to check fit.
To get a drawer out, raise the front up about 3" when pulling out.
Works great.
 
OP
R

royce

Well-known member
Joined
Jun 22, 2014
Messages
3,110
Location
fairbanks ak
Looks absolutely wonderful. Thanks for showing every step.

My previous post mentioning labels was a bit of an inside joke. My label maker, ok I own several, are labeled too.

Outstanding job...
Pelican,
It is good to know that out there somewhere is someone as bent as I!
Now then, would you have any suggestions for a label maker.
I am looking for something that makes good sized letters for these tired eyes and could be applied to magnetic strips.
Thanks much.
Royce
 

drivesitfar

Well-known member
Joined
Oct 23, 2013
Messages
36,053
Location
Pacific Northwest
Royce: your CABINET keeps getting better. i'll let Pines chime in on the best labelmaker because it sounds like he might have some knowledge in that department.

here's a suggestion i'd probably do. i'd probably put blue tape on the drawers to start off with and once you have it like you want it then maybe make something more permanent. there are pre made magnetic labels for tool boxes for sale on Amazon that might give you some ideas and here's a link.

http://www.amazon.com/gp/product/B00GG3K6S6/?tag=atomicindus08-20

another member bought some blank magnetic business cards and a label maker and put labels on the magnets so he can move them around easily if need and they won't stick to his cabinets. Check out Jeremy's Hodgepodge Garage and post #227 to see some pictures. and here's the link.

http://www.garagejournal.com/forum/showthread.php?t=247057&highlight=magnetic&page=4

keep up the great work.
 
Last edited:

PelicanPines

ALLIANCE MEMBER
Joined
Apr 30, 2014
Messages
38,129
Location
New Jersey, USA, Earth, My own reality
I use the Brother PT-P700 for 1 inch labels... Via a PC application
And the Brother TC20 for 1/2 inch labels... Standalone... sits in a drawer in my middle toolbox.

I also use magnetic strips... but cover them with my printed labels. OCD and the preprinted ones never cover what exactly is in that drawer.

Feel free to look at my profile... I have an album showing "some" of my garage. My shops name is Tetris... because everything fits just right...
 

Strouty

Well-known member
Joined
Mar 21, 2010
Messages
38,224
Location
Southern Maine
If you get the white magnetic tape, I have found that a dry erase marker can be used to temporarily label them, then you can do all your printed labels at once. The marker wipes off almost completely, but you don't see any remnants after applying the label.

I also use blue painters tape and a sharpie for temporary labels.
 
OP
R

royce

Well-known member
Joined
Jun 22, 2014
Messages
3,110
Location
fairbanks ak
Thanks for the tips Drivesitfar, Strouty, Pelican, racingtadpole, Zeet.
Well, I got the rest of the horizontal trim pieces glued and screwed tonight.
That leaves a measly 65 vertical trim pieces left.
Not quite the end, but I can see it from here.
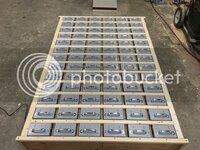
For some reason, I had to load the drawers in, just to see I guess
RoyceIMG_0092.jpg
 

drivesitfar

Well-known member
Joined
Oct 23, 2013
Messages
36,053
Location
Pacific Northwest
Royce: I love metal cabinets, but I like wood too and your project has become one of my favorite ones here on GJ. like Strouty says you are making something your grand kids and their grand kids might be passing down for years to come after you are gone. or if you don't have kids then somebody will definitely not let this cabinet end up not being used or cherished.

if you have time to post up a bunch of pictures in the wood cabinet thread I started over in vintage tools here's the link and please do.

http://www.garagejournal.com/forum/showthread.php?p=5633081#post5633081

you can also post it in the metal cabinet thread in the same section since it's almost 50% metal too.

in any case I know it was a lot of work putting in all those drawers just to take them out again after the picture, but it put a smile on my face looking at that.

WELL DONE
 
To avoid these ads, REGISTER NOW!

drivesitfar

Well-known member
Joined
Oct 23, 2013
Messages
36,053
Location
Pacific Northwest
Royce: i'm sure you are getting tired of it about now, but it's looking fantastic so hang in there a bit longer because it's going to be AWESOME when you are finished. looks great with the little pieces in place.

good luck
 

drivesitfar

Well-known member
Joined
Oct 23, 2013
Messages
36,053
Location
Pacific Northwest
Royce: i'm guessing you already have a plan for the supports under the cabinet so you can move it around on a pallet jack or just out from the wall to clean or paint if you want to. In case you don't I might get some 4 x 4's and put 3 of them under it with 2 on the ends and one in the middle. also to add a little flare to the design maybe angle the last half of the 4 x 4 edge with a 30 or 45 degree instead of straight like I did on the 4 x 4's on top of my pergola.

I don't have pictures to post here currently from this laptop, but i'll get a few if you need some.

again WELL DONE on taking on this HUGE project to make a home for your metal bins and eventually so you'll have all your small parts organized.
 
OP
R

royce

Well-known member
Joined
Jun 22, 2014
Messages
3,110
Location
fairbanks ak
Royce: i'm sure you are getting tired of it about now, but it's looking fantastic so hang in there a bit longer because it's going to be AWESOME when you are finished. looks great with the little pieces in place.

good luck

Can't say I'm tired of it, but can say I'm ready for it to be done!
Royce
 
OP
R

royce

Well-known member
Joined
Jun 22, 2014
Messages
3,110
Location
fairbanks ak
Royce: i'm guessing you already have a plan for the supports under the cabinet so you can move it around on a pallet jack or just out from the wall to clean or paint if you want to. In case you don't I might get some 4 x 4's and put 3 of them under it with 2 on the ends and one in the middle. also to add a little flare to the design maybe angle the last half of the 4 x 4 edge with a 30 or 45 degree instead of straight like I did on the 4 x 4's on top of my pergola.

I don't have pictures to post here currently from this laptop, but i'll get a few if you need some.

again WELL DONE on taking on this HUGE project to make a home for your metal bins and eventually so you'll have all your small parts organized.
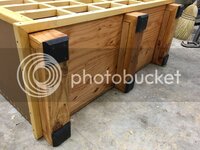
I am building the skids out of 2 layers of 2x4's and will leave the ends square for the bigger foot print it will provide.
I will also cut some plastic for feet to keep the wood off the floor.
I got the last of the trim on tonight and the first layer of skids on.
Royce
 

BUGTHUG

Well-known member
Joined
Nov 12, 2010
Messages
2,960
Location
Kansas
I would put those casters that are under the green table saw on the bottom of your project? Lot easier to move around.
 

drivesitfar

Well-known member
Joined
Oct 23, 2013
Messages
36,053
Location
Pacific Northwest
Royce: I like the idea of the double 2 x 4's with the ends covered up. I think i'd leave it without casters like you are designing because you won't need to move it often and if you do a pallet jack will do so fairly easily.

I can see the finish line. I just finished filling up 18 of those bins yesterday with nuts and bolts out of other bins that took several hours and I bet it will take you longer to fill those bins of yours than it did take you to build the cabinet.

WELL DONE
 
OP
R

royce

Well-known member
Joined
Jun 22, 2014
Messages
3,110
Location
fairbanks ak
I would put those casters that are under the green table saw on the bottom of your project? Lot easier to move around.

I thought about casters, but am afraid it would be too top heavy and tipsy at 70" tall and only 18" deep.
Royce
 

BUGTHUG

Well-known member
Joined
Nov 12, 2010
Messages
2,960
Location
Kansas
You could use some heavy duty small casters to keep it lower to the ground.
Now days , I'm putting wheels on just about everything in my shop. It makes it easy to move to clean under and if you want to change things around it shure beats dragging heavy stuff etc.:dunno:
Could go to HF and buy 2 or 4 of the wooden mover dollys, rated at 1000# each, then IF you don't like them, they are always handy for something
 
OP
R

royce

Well-known member
Joined
Jun 22, 2014
Messages
3,110
Location
fairbanks ak
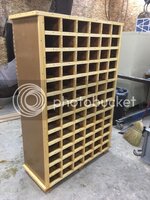
Finished up the skids and slopped some oil on it this morning.
Now I got to dig in the snow for some 1/2" plastic for feet, that is out there somewhere.IMG_0105.jpgIMG_0106.jpg
 

EdT

Well-known member
Joined
Sep 21, 2010
Messages
1,104
Location
North Georgia
About now is when I usually find that the drawer I based everything off of is just a bit smaller than all the rest. Nice job, I'm sure it'll be useful.
 

drivesitfar

Well-known member
Joined
Oct 23, 2013
Messages
36,053
Location
Pacific Northwest
Royce: IMPRESSIVE. I do like the way you cabinet looks empty and it will only improve when you put the Equipto or Lista drawers in it.

also nicely done on the pallet style feet. look sharp. :thumbup:
 
OP
R

royce

Well-known member
Joined
Jun 22, 2014
Messages
3,110
Location
fairbanks ak
Thanks Strouty and EdT.
Got the feet on and even as heavy as it is, the uhmw makes it slide easy.
I have it set where I need it, drawers in.
I think I'll call it done.
So, now on to the next project.
RoyceIMG_0108.jpgIMG_0109.jpg
 

iajonesy

Well-known member
Joined
Feb 8, 2009
Messages
2,467
Location
Iowa
That is one sweet build. I'll send you my address if you want to send it my way for any reason.

Mike
 

thickhead

Well-known member
Joined
Apr 4, 2014
Messages
817
Location
Connecticut
That will be around 100 years from now when your great great great grandchild 3D prints a copy for his Tesla port.

Quality will always matter.
Well done sir.
 
Last edited:
To avoid these ads, REGISTER NOW!
Top Bottom