To avoid these ads, REGISTER NOW!

Neglected century barn is becoming my workshop and garage

To avoid these ads, REGISTER NOW!
OP
T

Techie1961

Well-known member
Joined
Feb 18, 2014
Messages
1,520
Location
Pickering Ontario Canada
Man o man, you are going to love using this, I know I would, especially with the hyd blade turn operation. Great design also, especially given you designed around materials on hand. Do you plan to use grease fitting(s) on the outer collars of the turn mechanism? How did you come up with the height of the drawbar in relation to the blade and your tractor, it appears low to me? Now if you could just make it tilt hydraulically.:)

Dude you are pretty darn skilled in both the design and implementation. Enjoy following all your projects. You're a doer for sure!!
Thanks BF, I appreciate the comments. I am going to put grease fittings on the collars and also cap them off on the top and bottom.

The height was an interesting challenge. I looked at a lot of rear blades on Google and them compared to what I have. A lot of the Cat 1 blades seem to be made for larger tractors than my 455 so that was one consideration. Most of the rear blades that I saw were very short in height and the main draw bar seemed to be a bit higher than the blade. Since the 54 blade is very tall by comparison, I had to compensate for both factors. Once I started to lay it out, I drew in the height of the lower 3PH bars and made them level. It all seemed to come together at that point with what you see at 11" high.

Nothing like stone walls for your workshop and garage

Yeah, I do love the look of them. I am curious to see how they look after a bit of dust, grinding, etc. is done in there. I'm thinking I'll have to do a dust up with the leaf blower on occasion and then clean up after that.
 
OP
T

Techie1961

Well-known member
Joined
Feb 18, 2014
Messages
1,520
Location
Pickering Ontario Canada
I had an old air cylinder that was a Hydraulic cylinder when it was born. I pulled it from an old machine that I scrapped a while ago. I kept it because, well you know, because. It was suitable to the task but I had to make a new piston for it as well as shorten it. It's now about the same size as the JD that is used for blade rotation.

26094963216_9e46087c4c_c.jpg


All cleaned up, shortened and ready for its new piston. Another old piece donated the chunk of aluminum.
25539180733_ee12f6ddc3_c.jpg


25537032314_41e40090e7_c.jpg


26141796185_ee4f3d2756_c.jpg


The cylinder is drawn in to CAD and that gave me the go ahead to put in the upright for the top link. I didn't take any photos of the process as it was more or less, cut piece, weld piece. I figured it was time to see if I was in the ball park with the design so outside it went. I have a piece of 2x2 that is sticking out of the main beam which should be in the right spot to hold the fixed end of the cylinder.
26049307342_b5a499f284_c.jpg


26115837136_c04377ca09_c.jpg


25536988784_c8283662e0_c.jpg


25537020934_acae823e11_c.jpg
 

86turbodsl

Well-known member
Joined
Jul 1, 2005
Messages
6,558
Location
Michigan
Very cool. You should post this on tractorbynet too. Those guys love this type of stuff.

Sent from my SM-N910T using Tapatalk
 

bulletpruf

Well-known member
Joined
Nov 28, 2013
Messages
10,999
Location
San Antonio
Dang it, Techie - it's threads like this that have me spending a weekend "restoring" my 20 year old engine stand instead of using it as-is!

Just kidding. Really enjoy seeing your fab projects. Thanks for letting us peek over your shoulder as you restore and build some really cool stuff.
 

BuickFarmer

Well-known member
Joined
Apr 5, 2006
Messages
1,415
Location
Athens, Georgia
Damn you're resourceful!!! OK now I get the picture of size of the tractor and blade, I had it in my head that they were larger and was wondering how you were handling them with your back. How is that back btw, be careful!
 

BuickFarmer

Well-known member
Joined
Apr 5, 2006
Messages
1,415
Location
Athens, Georgia
You will be amazed at how adjusting the angle of the blade with the top link makes a difference in the cut of the blade. Turning it around 180 and adjust the top link out will make a good drag for smoothing out ground, gravel etc. you're gonna love playin with this thang
 
OP
T

Techie1961

Well-known member
Joined
Feb 18, 2014
Messages
1,520
Location
Pickering Ontario Canada
Very cool. You should post this on tractorbynet too. Those guys love this type of stuff.

Sent from my SM-N910T using Tapatalk
Thanks 86, I had a look at tractorbynet; cool site that I haven't been on yet. There are a couple of others that I am on as well. Thanks for the tip.

Dang it, Techie - it's threads like this that have me spending a weekend "restoring" my 20 year old engine stand instead of using it as-is!

Just kidding. Really enjoy seeing your fab projects. Thanks for letting us peek over your shoulder as you restore and build some really cool stuff.
You're welcome and thanks for dropping in again. I suppose that any work in the shop is better than sitting to watch TV all the time; even if it's cleaning stuff up for fun.

Damn you're resourceful!!! OK now I get the picture of size of the tractor and blade, I had it in my head that they were larger and was wondering how you were handling them with your back. How is that back btw, be careful!

Good to see you here again BF. Yeah, they're not very big but they are heavy at times. I try to drag and use leverage as much as possible as well as bending at the knees. It still hurts all the time though and has me thinking that damn, I have 40-50 more years of this pain.:( Maybe they'll come up with some good medicine soon that isn't addictive. I have this bottle of Percocets that I don't want to use because they're addictive. I keep them for the really bad days. It's difficult though because I know they will help but I can't use them.

Regarding your next post, yes, I can't wait to get this thing functioning and play with it. I'm setting up a quick adjust to create a 0 degree cutting angle for it.
 
OP
T

Techie1961

Well-known member
Joined
Feb 18, 2014
Messages
1,520
Location
Pickering Ontario Canada
cool set up

Thanks!:beer:

My little rear blade is pretty much done from a fabricating standpoint and before I do the hydraulics, I'm going to work it a bit to make sure everything is copacetic. There are a few little features that I have to work out as well like how I will be running the hydraulics to the rear as well as some brackets for changing the cutting angle. I want to be able to rotate the blade forward to make it a sort of zero degree scraper and maybe even a negative angle.

To mount the hydraulic cylinder, I made up some pieces of 3/4 x 2 HRS as well as some pins from some old shaft that I had. I first attached the movable attachment point so that I could hang the cylinder on it. Once that was on, I could put a square to it so the the fixed mount was in the correct spot.
26085755122_b88330b35b_c.jpg


26178215425_09d302372f_c.jpg


After it was all welded up, I took it all outside for assembly. The bottoms of the tubes that hold the blade were a bit long so I cut them off by a quarter of an inch. That way, I can attach the blade by laying it on the ground, backing over it and then dropping the yoke over it.
26178212865_80d30d0c1e_c.jpg


And here she is:
26178168015_345ed14632_c.jpg


25905308950_d9004bc00a_c.jpg


The blade angles a bit more than 20 degrees which I think will be fine. I have rarely had to put the front blade any further than that except for snow. I think that with dirt, it would kick the tractor out too easily.
26152233836_d97ecc95a0_c.jpg


26111844751_0d669660af_c.jpg


26085736312_6bca2449cd_c.jpg


26178204035_c28318d546_c.jpg


25573445924_73c9bff2c6_c.jpg
 

TedBrown

New member
Joined
Mar 11, 2016
Messages
4
Location
Shawville, Quebec
I am a newbie on his forum, this is my first post and am very pleased that it will be on this thread. I have spent the morning reading, got to page 14 will continue but need to get outside and do some work.

I note that most folks compliment the thread or specifics within. Others no doubt have said something similar but YOU, SIR, ARE "OFF THE HOOK!!". The breadth of your interests, capabilities and excellence of execution are beyond what any normal guy has. Makes me proud to be a Canadian. Your legacy will live as long as that Century barn you have converted.
 
OP
T

Techie1961

Well-known member
Joined
Feb 18, 2014
Messages
1,520
Location
Pickering Ontario Canada
I am a newbie on his forum, this is my first post and am very pleased that it will be on this thread. I have spent the morning reading, got to page 14 will continue but need to get outside and do some work.

I note that most folks compliment the thread or specifics within. Others no doubt have said something similar but YOU, SIR, ARE "OFF THE HOOK!!". The breadth of your interests, capabilities and excellence of execution are beyond what any normal guy has. Makes me proud to be a Canadian. Your legacy will live as long as that Century barn you have converted.

I'm honored Ted and you're comments are very kind if not maybe a little too generous. Glad you could drop in and especially that you like the thread.:beer:
 
OP
T

Techie1961

Well-known member
Joined
Feb 18, 2014
Messages
1,520
Location
Pickering Ontario Canada
This is a quick video of it in use; I couldn't wait to get it into the gravel and dirt. I thought that I had a good idea where I could put a valve between the two hydraulic ports and angle the blade manually with the valve open and then close it to lock. I forgot about the displacement of the piston rod though and it was obvious while filling it that it wouldn't work. I have a work around with a small reservoir in my head that should do the trick and will get at that tomorrow.

For now though, here's a bit of video.
 
OP
T

Techie1961

Well-known member
Joined
Feb 18, 2014
Messages
1,520
Location
Pickering Ontario Canada
Just so you guys don't think this is a display only shop, here are some photos of it right now.:scared: The lathe and mill are full of chips, the benches are covered, the drill press is a mess and there is a pile of dust under the belt sander. I might tend to lose track of things when I get into a project.:D

The last photo is of a shirt press that I'm going through that is sold. Yay! Some income. It'll be nice to get it out of there though as it takes a fair bit of space.
26189776516_8987c54e2e_c.jpg


26215689335_8beb423208_c.jpg


25942820410_6a34deb06a_c.jpg
 
To avoid these ads, REGISTER NOW!
OP
T

Techie1961

Well-known member
Joined
Feb 18, 2014
Messages
1,520
Location
Pickering Ontario Canada
This is a photo timeline of adding the rear hydraulics to the tractor and rear blade. It's not really about my shop but what I did in the shop and since there were some photos about the blade, I figured I'd wrap it up a bit.
26059035270_b90aaf83b1_c.jpg


25729140463_2683efe072_c.jpg


25727039894_05e67c4c1f_c.jpg


26059027250_550b3bbfb7_c.jpg


25729131583_aa79640439_c.jpg


26305937686_32e71eb532_c.jpg


26331891355_4184362ba1_c.jpg


26331884915_52675fec8d_c.jpg


25727024074_24b57cbbe6_c.jpg


26305925126_17dc52eeab_c.jpg


25729112633_caf36563b2_c.jpg


26239458282_16677d0b52_c.jpg
 

vekster

Well-known member
Joined
Sep 26, 2013
Messages
405
Location
Ontario, Canada
Nice job on the hydraulics.
Love all the pics, but they do make me feel a bit lazy.
Keep up the nice work!


Sent from my iPhone using Tapatalk
 

NedNorton

Well-known member
Joined
Jul 14, 2012
Messages
608
Location
Colorado, USA
Techie1961,
I've been following along since the beginning and it is great to see you getting to use the shop. Your fab skills and attention to detail are motivating, to say the least. :thumbup:

Looking forward to seeing the next project!

Cheers,
Chris
 

BUGTHUG

Well-known member
Joined
Nov 12, 2010
Messages
2,960
Location
Kansas
Nice job! that stuff looks heavy for a small tractor, but I know they can take a lot of punishment.
 
OP
T

Techie1961

Well-known member
Joined
Feb 18, 2014
Messages
1,520
Location
Pickering Ontario Canada
Techie1961,
I've been following along since the beginning and it is great to see you getting to use the shop. Your fab skills and attention to detail are motivating, to say the least. :thumbup:

Looking forward to seeing the next project!

Cheers,
Chris
Thanks Chris, very kind of you to say and it's great that you have been visiting for so long. It is so so nice to be working in there rather than the old trailer or the cold barn. Many years of yuck is now rewarded and I can build things again.

Nice job! that stuff looks heavy for a small tractor, but I know they can take a lot of punishment.
Thanks again bugthug. These John Deere 4x5 (425,445,445) series tractors are incredible. More like a subcompact than a garden tractor and seem to be able to handle what ever I've thrown at it. Every time I use it, I smile.

Nice job on the hydraulics! The bends on those lines are awesome :thumbup:
Thanks BearsFan. I like the look of hard lines a lot. In the work that I do, we will often use soft copper tubing and all the other guys that I know just run them with their hands. I always use the same bender and you pick up a few tricks. It's good practice for when the important stuff like this comes along.:lol:
 
OP
T

Techie1961

Well-known member
Joined
Feb 18, 2014
Messages
1,520
Location
Pickering Ontario Canada
This is a little tour from the front door to the back as it is today. I got a chance to tidy up a bit and figured some photos were in order.
26481246690_0a738ac381_c.jpg


26728867756_ffdca417fc_c.jpg


26148216754_efa2aeaaeb_c.jpg


26754283035_bc6bc51fbd_c.jpg


26148160974_d84d52ecfe_c.jpg


26660706902_860cef36fa_c.jpg


26481146940_fdba0ab722_c.jpg


26150276013_34f8efa498_c.jpg


26481116070_a128eed5f6_c.jpg


26687125461_d2b9e69557_c.jpg


And the back of the shop in the electronics department and "warehouse area.
26148040204_0b5d44a320_c.jpg
 
Last edited:
OP
T

Techie1961

Well-known member
Joined
Feb 18, 2014
Messages
1,520
Location
Pickering Ontario Canada
I found this tool post grinder on Kijiji and the guy was decent enough to hold onto it for the week until I could manage it. Now I have to figure out how to mount it on my lathe and where to get wheels.

I got it VERY cheap and was shocked last night when I looked at how much they are new. Almost $2K USD!
26754095305_37dcb75bf3_c.jpg


26147973504_e336d0b8bd_c.jpg


26481017500_52b5acfabe_c.jpg
 

Bears Fan

Well-known member
Joined
Jan 26, 2012
Messages
3,438
Location
Indiana
Wow! What a cool, cool space, thanks for the tour. The pictures make me want to come over and fabricate something with you :D 
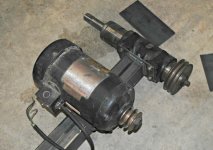
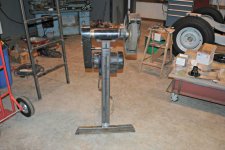
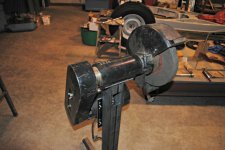
It will be interesting on how you will mount the tool grinder to the lathe? Keep posting...
 

Bib Overalls

Well-known member
Joined
Dec 4, 2006
Messages
3,318
Location
Jonesboro, Arkansas
I got one of the big Dumore tool post grinders at an auction for $175. Lots of professional used tool dealers in attendance and they all let me have it. So, despite the current price of new ones there does not appear to be much of a market for used.

Made a grinder/buffer out of mine.
 

Attachments

  • 12 In Grinder-Buffer 01s.jpg
    12 In Grinder-Buffer 01s.jpg
    63.9 KB · Views: 121
  • 12 In Grinder-Buffer 02s.jpg
    12 In Grinder-Buffer 02s.jpg
    63 KB · Views: 142
  • 12 In Grinder-Buffer 03s.jpg
    12 In Grinder-Buffer 03s.jpg
    55.9 KB · Views: 139

xtremek

Well-known member
Joined
Apr 13, 2012
Messages
11,603
Location
St. Johns, Mi
I love the tour. When you said you were going to put up slat wall, I was afraid it wouldn't fit the look, but keeping to a minimum, it looks good. Are your windows going to remain covered with insulation, or are you going to replace them in the future with something energy efficient? The lighting looks really good, but to me, nothing beats natural lighting. Anyway, the place looks awesome.
 

Drill

Member
Joined
Jan 30, 2015
Messages
20
WOW!!!!!!!!!!!!!!!!
That's all I can say. I just went through all 32 pages. Your very inspirational. I need to get my mess cleaned up now.
 

Denwood

Well-known member
Joined
Sep 22, 2014
Messages
4,191
Location
Thunder Bay, Ontario, Canada
This is a photo timeline of adding the rear hydraulics to the tractor and rear blade. It's not really about my shop but what I did in the shop and since there were some photos about the blade, I figured I'd wrap it up a bit.
26059035270_b90aaf83b1_c.jpg


25729140463_2683efe072_c.jpg


25727039894_05e67c4c1f_c.jpg


26059027250_550b3bbfb7_c.jpg


25729131583_aa79640439_c.jpg


26305937686_32e71eb532_c.jpg


26331891355_4184362ba1_c.jpg


26331884915_52675fec8d_c.jpg


25727024074_24b57cbbe6_c.jpg


26305925126_17dc52eeab_c.jpg


25729112633_caf36563b2_c.jpg


26239458282_16677d0b52_c.jpg

I looked this post over a bit more carefully after the last post...very nice work! I'm guessing there are not too many back blade setups quite that nice out there.

We're doing a prototype hydraulics project right now with some very small (3/8" bore) cylinders in a master/slave system. It may or may not be the core to a pretty cool new jib system we're working on. Working on Solidworks and our Alaris 30 prototyper to print kibbles and bits for the system.
 
To avoid these ads, REGISTER NOW!
Top Bottom