To avoid these ads, REGISTER NOW!

Vintage Tool Box Mini-Restoration

theboxfool

Member
Joined
Apr 15, 2016
Messages
5
Location
Santa Ana, CA
Hi everybody,

First time posting.

Just picked up a nice vintage tool box at what I think is a steal of a price. I will just say this was advertised @ $150 and let you guess about my negotiation skills. This was a Craiglist posting. I had been watching for a few months now for something like this and was able to get lucky by snapping it up with an email to the seller within 20 minutes of posting his ad.

My "wants" were as follows: Vintage, Heavy, Matching Top, No major rust or dents, Many shallow drawers as opposed to few deep drawers. Under $200

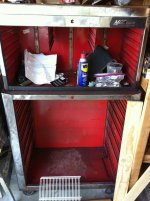
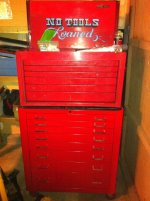
This one nailed it. As you hopefully can see, It has a whopping 9 drawer bottom and 5 levels on top (3 small top drawers and 4 full length).
IMG_6100.JPG
FullSizeRender.jpg

The two drawers you see out are filled with the tools and parts that came with the box. The top box has a clam shell top.

IMG_6099.JPG

Each drawer slides more or less smoothly, nothing that a good cleaning and some dry lubricant or paraffin wax on the slides won't improve.

The only noticeable problems thus far is a few of the drawers are missing this little black "clip" or "catch" on the side that prevents the drawers from pulling all the way out. IMG_6101.JPGIMG_6102.JPG Can anybody direct me to where I might be able to find these?

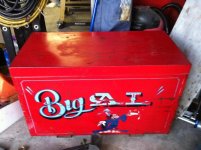
As for the brand, there are no noticeable markings on it and it looks like it has been painted black on the outside (more than once). I do not have much experience with these but have bought and sold a few older Craftsman, Kennedy, Cornwell, & Snap-On boxes. If i was pressed to guess, based on the handles and slide hardware, I would say Cornwell. But I have not seen too many Matco or Mac vintage up close to have enough experience to say for sure. Perhaps somebody out there may be able to help I.D. this thing.

As for the restoration, I want to avoid having this become my 8 month obsession project and would rather try to limit this to a thorough disassembly and cleaning followed by perhaps a prep and proper paint job (maybe exterior only) to bring it back to its original red. This is where I am unsure as to how I will proceed as this is my first restoration. I'm even considering starting with a less desirable older Snap-On I have sitting around to see how the process goes. In any case, I have a good amount of cleaning to do, so I will get to it and hopefully I can find some guidance on how to proceed.

-cheers
 

Attachments

  • FullSizeRender-1.jpg
    FullSizeRender-1.jpg
    126.8 KB · Views: 152
  • FullSizeRender-2.jpg
    FullSizeRender-2.jpg
    132.2 KB · Views: 160
To avoid these ads, REGISTER NOW!

larryq

Well-known member
Joined
Jul 12, 2011
Messages
2,421
There are two ways you can do this:

1) As you described, spend three hours degreasing the box with a nylon scrub brush, a little Simple Green or dishwashing liquid and a hose with jet spray attachment and some fine steel wool and wd-40 for the slides. This will bring the box to full working condition.

1a) If you still want to, do a quick scuff of the sections you want to paint, get a few cans of rattle spray red rustoleum and bring it back to red. Then call it done and put the box to use.

2. Otherwise you can go the full monty, strip the box to bare metal, pound out dents, use epoxy primer and an automotive top coat. This will take a long time, especially given all the nooks and crannies a box has and the fact you have about 12 drawers to treat.

People who tried to do #2 without knowing what they were in for have abandoned the project more often than not. It's hard to admit defeat and fall back to rattle cans after you've got a box halfway stripped.
 

jipps

Well-known member
Joined
Dec 1, 2014
Messages
210
Location
UK
The only noticeable problems thus far is a few of the drawers are missing this little black "clip" or "catch" on the side that prevents the drawers from pulling all the way out. Can anybody direct me to where I might be able to find these?

First, welcome! I don't know about US boxes, but looks like you did well.

I don't know exactly what you're saying above: either the drawers won't release, or they won't retain.

There are tabs cut into the runners, that are bend inward so as to interfere with a notch towards the rear of outside sides of the drawers. To release the drawers, just push em back.

However, I think you're saying that these are missing, which would mean they've been bent hither and thon until they snapped off... to retain the drawers, you'll need to introduce a new form of interference with the drawer notches... but remember, you want these to be reversible so as to be capable of releasing the drawers in future. Short small bolt into a little 2mm thick square nut perhaps? Something like that, anyway.

Find one drawer side that is still working right, pull the drawer out to its stop and have a good look up the side of the runner. That will tell you everything you need to know about the correct operation and whether you have snapped off tabs elsewhere.

Best of luck with it :)
 

bobcatdan

Well-known member
Joined
Jan 4, 2011
Messages
9,948
Location
Kaukauna,WI
Box looks to be of the Matco/ Mac family. They were one company before 1980. Even after that, their boxes were the same for a while. Normally all their drawer pulls had their name on them. Yours maybe earlier before they did that. Pre 1980's Matco/Mac boxes seem to have few examples pop up for comparison sake.
 
OP
T

theboxfool

Member
Joined
Apr 15, 2016
Messages
5
Location
Santa Ana, CA
Update:

About a 2.5 hour disassembly and scrub session. Took some steel wool and abrasive paste cleaner starting on the underside and going all around the box and the finished with the inside. Had to switch to a metal scraper and goo gone to get duct tape residue off. Labelled each drawer and drawer slide just to be safe. Drawers are all in remarkably good condition. Some of the insides still show shiny paint. Very light rust on the back and bottom interior of bottom box.

Also forgot to mention and didn't even realize that to my surprise, this is not a 27" wide as I thought. It seemed bigger but I didn't confirm until I was done cleaning that the box is a very spacious 34". Perhaps this explains the double handle design?

FullSizeRender-4.jpg

Thanks for the input so far.

@larryq : I may be going for a variation on your first suggestions. I am looking at prepping just the drawer fronts and outside of the box and taking down to a friend who does auto paint. The idea is to to most of the labor myself and come low (or trade) on the cost of primer and paint.

As for the "clip" situation, this item does indeed RETAIN the drawers. FullSizeRender-3.jpg. Thanks for the link @Flattie.
 

zkling

Well-known member
Joined
Jan 23, 2007
Messages
16,939
I think those are Yorktown or the like boxes. The 2 horizontal rails on the bottom box are the giveaway. :headscrat
 

taumac

Well-known member
Joined
Aug 30, 2011
Messages
8,104
Location
Brooksville, Fl
I've seen proto, Mac, and Matco with same pulls except they had brand name on the handle. Those clips can be found although I don't have a link for you off hand. I know same clip was used on late 70's 80's Craftsmans made by Waterloo. IMO since the whole drawer wasn't painted I wouldn't be too considered with painting the entire drawer and I would just do the outer and drawer fronts. Usually, you cover the bottom with a liner. I had a friend with similar box brand Matco I believe and it's a stout box with friction slides. Good luck in your project.
 
To avoid these ads, REGISTER NOW!

Empty Pockets

Well-known member
Joined
Sep 21, 2015
Messages
4,942
Location
Rural New York
The little black clips on the drawer slides are a bit pricey. I had one missing on a Mac box that came to me through my dad's estate. After a few calls and emails, I simply made one from a small piece of metal strapping that our parts people use to secure core returns to pallets.

I asked the parts guy for some strap, he was willing to give me yards of it, I only tok about a foot.

Good luck, and welcome
 
OP
T

theboxfool

Member
Joined
Apr 15, 2016
Messages
5
Location
Santa Ana, CA
Update: (Warning Pic and word heavy)

Put in about 1.5 to 2.5 hours each day for the last few days. Scrubbing, more scrubbing, a little sandblasting, touch of automobile or rust specific primer-in- a-can,a little sanding, and more scrubbing. I also spent some extra "late night session" with experimentation on the clip as well work on the handles.

As for the clip, i took some "thicker" flat steel square pieces of stock .04" thickness, (almost as thick as the .05" original black clip). I drew a line, scored it a few times with utility knife, cut the line with a hacksaw in a vice and then belt sanded to final dimension and bent to its final shape on the vice. Here is my first attempt:
clips.jpg
I have yet to fit it.

As for the handles, they are nice and heavy and appear to have been cast (they have little batch numbers on the backside of the handle). They all show pretty good tarnish and two of them had some spots of "i-don't know-what-to-call-it", maybe "pitting" but i understand pitting to be a "pit". What is happening here is like a metal "pimple", raised from the surface. There is a close-up photo foremost to the right of one of these that I beltsanded down next to one that was untouched. I sanded quite a bit and you can still see evidence of this phenomena.
For the rest in good condition, i buffed one down on a bench grinder outfitted with buffing wheels and buffing compound (leftmost in closeup) and treated another one (next to the buffed one) with Brasso. I enjoyed the buffing more and the finish was better, but the chemical cleaner took the tarnish off quickly and easily.
allhandles.jpg
handles.jpg


As for the slides. I got lucky with the top box. It was spared the dark grey grease treatment, but you can see that the bottom box is just swimming in it:
slides.jpg
slideclose.jpg

Observations/methods: As for cleaning the rust from the 1 bottom drawer that did have a good amount of it; I tried various products and tools and must say that I found my best progress from using some old (but resharpened) sacrifice chisels and scrapers (but still hit it with sandblasting for good measure). Small chisel especially good at scraping rusted seams and getting the rusted corners. This method made for a dry, relatively dust free, and easy to clean up way of getting the bulk of the surface rust out. Heres a shot of my makeshift outdoor cleaning area:
cleaning.jpg

As for the boxes and drawers, all have received the hot water, industrial degreaser, rubber glove treatment with scotchbrite and steel wool and some brushes for the slide areas. This thing was loaded with grease, duct tape & sticker residue, multiple paint jobs, & a touch of rust,. I emptied a dirty bucket for each box & every 3 drawers. I sprayed drawer fronts and box outsides with canned auto primer,finished by sanding with fine sandpaper. Here is the result.
Boxreadyforpaint.jpg
Will load up soon and take to auto paint shop to try to convince them that I've done most of the work and all they need to do is probably finishing my poor priming and sanding job and spray all drawer fronts and outsides. Feel like I'm past the hump on this project and ready to start filling this thing with tools.
 
OP
T

theboxfool

Member
Joined
Apr 15, 2016
Messages
5
Location
Santa Ana, CA
Update: After a couple test drawers at the auto body shop and an eventual price quote of $400 to prep, seal, and paint it, he gave me a half gallon of expensive red paint for free and it appears I will be going the extra way on this project on my own. I'm determined not to do the insides and only want to paint drawer fronts, but here we go...exactly as I feared. This may take all summer. :headscrat
 

elguappo

Well-known member
Joined
Dec 15, 2008
Messages
247
Location
SACRAMENTO, CA
Those are very similar to my Mac/Matco boxes.
The top I left, because the oldskool custom paint was just too cool.
The bottom had many layers of paint.
I took it down to bare metal with paint removal discs on my grinder.
Some Rustoleum pro primer and safety red paint, and the bottom box looked pretty damn good.
(The stripped top box is obviously a different one than the Big Al painted box)
 

Attachments

  • iPhone pics Backup 101812 959.jpg
    iPhone pics Backup 101812 959.jpg
    142.3 KB · Views: 34
  • MAC & Matco rollaway.jpg
    MAC & Matco rollaway.jpg
    146.8 KB · Views: 52
  • MAC top box 1.jpg
    MAC top box 1.jpg
    146.4 KB · Views: 42
OP
T

theboxfool

Member
Joined
Apr 15, 2016
Messages
5
Location
Santa Ana, CA
As many (including myself) expected, this has drawn out quite a bit, but after much research and down time (hard to motivate in this summer heat), I am ready to lay down epoxy primer and then paint. I ended up ordering stuff from Eastwood auto paint supply. Will post pics as I resume my work.
 

a52-830

Well-known member
Joined
May 28, 2016
Messages
4,644
Location
north of boston, massachusetts
The drawer slides have a catch that needs to be depressed before the drawer can be fully removed.

Snap-On sells a tool for this purpose, or some people have been successful using a hacksaw blade.

Snap-On 52638

Remove friction drawer slides

i have done it both ways, with a home made tool, and with a snapon tool.

that is the best 1.75$ you will spend. in a weird twist, shipping is free from snapon for orders *less* than 500$.

really. get the tool from snapon. the tool you make will be wrong in some subtle way. it will work, but it will be finicky.
 
To avoid these ads, REGISTER NOW!
Top Bottom