To avoid these ads, REGISTER NOW!

Craftsman Drill Press 103.0305 Restoration for a Good Cause

Cman101

Well-known member
Joined
Oct 11, 2015
Messages
112
Location
Northern CA, State of Jefferson
In my search for vintage Craftsman power tools (thanks in no small part to GJ), I came across this ad on CL. Not exactly what I was looking for but it looked like a piece of history/old iron that needed rescuing. Little did I know the rest of the story.

View media item 59694
I sent an email and received a phone call from the seller the next day telling me that someone was lined up to see it that evening. I told her to let me know if it later became available. She told me it was at the Butte Creek Mill in Eagle Point, OR and I could Google it if I needed directions. The first thing I came across on a web search was that the flour mill was destroyed in a fire on Christmas day. And from their website www.buttecreekmill.com “On the National Register of Historic Places, the world famous Butte Creek Mill is the last water-powered grist mill, still commercially operating, this side of the Mississippi.”

The seller called me back to let me know the other person was not interested so I made a trip up there to take a look. This drill press and some other tools were kept in the basement of the mill, which was untouched by the fire. I gave her the asking price even though she offered it to me for less. I told her that I was thinking about restoring it, selling it and then donating that money toward the fund to rebuild the mill. The town has their 9th Annual Vintage Faire on May 14 and part of that is a fundraiser is to help rebuild the mill.

I started a separate thread in hopes you can help me out with questions and advice. I have learned a lot here on GJ but am new to restoring older tools. Thanks in advance.

Model 103.0305. It has a lot of rust, which probably came the combination of being in the basement (probably had a lot of water from the firefighting efforts) and being stored in at tent outside the past few months. From doing some preliminary work on it yesterday, I think that will clean up fairly well. I did locate the Operating Instructions/Parts List at VM. http://vintagemachinery.org/pubs/detail.aspx?id=2097

So here is what I have and only a few weeks to see if I can do a restore on this and put it up for sale at their faire.

View media item 59683
Note pull cord on/off switch and chuck release wedge attached with wire.

View media item 59706
View media item 59686
View media item 59678
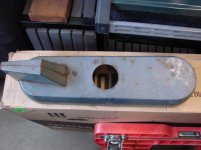
I was apprehensive about what the table top looked like under the arc of shame on the plywood. Drum roll….. Relief, looks good with only one small drill hole.

View media item 59675
GE ¼ hp motor. I finally got brave enough to plug it in. The motor made some noise but did not turn the pulley and then a small amount of smoke came out of it. This will likely be the biggest part of the project, rebuild the motor (never done that before but read Frank Lee’s thread on a Craftsman motor rebuild). Tomorrow I will drop this off at Doc’s electric motor repair to get an estimate since I have zero experience with AC motors. They can probably help me out with a replacement switch and new power cord also. May need to look for a replacement motor if a rebuild does not work out.

View media item 59687View media item 59707

Belt will need replacing. Maybe this is the original belt since it is marked Dunlap?

View media item 59677
One of the feed lever knobs is cracked. It would be nice to replace with an original but not high on list of priorities.

View media item 59708
Jacobs chuck, missing a chuck key. Could use some help on which one I need to get. Hoping the drill chuck will clean up and work and runout won’t be an issue. Guessing this drill press might have spent it’s entire life at the mill. Thanks for taking a look.
 
To avoid these ads, REGISTER NOW!

Cruzan80

Well-known member
Joined
Jul 22, 2015
Messages
4,200
Location
Denver, CO
If it ends up not being functional as is, I am restoring a 103.0303 and could use some specific parts.arts. My guess is either they cut the pipe or the base came from another machine, as it looks like a bench size and the 0305 was a floor model.

Good luck on this restore. Craftsman apparently stopped production on these after ~18 months for WWII production.
 

bmw57isetta

Well-known member
Joined
Apr 27, 2010
Messages
268
Location
Austin, Texas
CMan 101:

Nice score on the "Mohawk" model. That thing will clean up better than you might think right now. And a great cause you're doing if for as well.

I've gotten virtually identical knobs from both JW Winco and Essentra Components. Very inexpensive, choice of colors, threads, brass inserts, etc. Shipping will probably run slightly more than the knobs.

I've restored three vintage drill presses and swear by Evaporust for de-rusting drill chucks, handles, etc. Other GJ'ers have used alternative methods and achieved great results as well.

Please take plenty of pix and let us know how your progressing. Restoring vintage tools like this is a pretty gratifying way to spend your time.
 
OP
C

Cman101

Well-known member
Joined
Oct 11, 2015
Messages
112
Location
Northern CA, State of Jefferson
Cruzan, Thanks. Figure 1 in operating instructions sure looks like a bench top to me. I'm sure we will find out as there are others on here with the same drill press.

bmw57, Thanks especially for the lead on the knobs. I will be picking up some Evaporust tomorrow. I was surprised that I could not find it at either Lowes or HD a couple days ago. I think they carry it at Wally World. I bought a small bottle of Krud Kutter to see how that works.

Worked it over yesterday with PB Blaster and heading out to see if I can get the table and base freed up.
 

thieltech

Well-known member
Joined
Sep 3, 2013
Messages
297
Location
Beaver Dam
if your going to donate the money to the mill restore , id be happy to give you a new jacobs chuck and key if you like , i love old buildings and would hate to see another left go to waste .
 

Craptain

Well-known member
Joined
Apr 18, 2013
Messages
4,028
Location
Tampa Bay FL
I have the same (Mohawk) drill press but a floor model. It is a good general purpose drill press. I have the Luxury of dedicating this one to wood, and a second (150) machine for metal work.
There was no switch on mine, though I can see where it once was, but I happened to have a foot switch and use that. It works very well.

FrankLee has a great thread and it covers everything you will need to know.
 
Last edited:

AdrianBoomer

Well-known member
Joined
Jan 16, 2015
Messages
235
Location
Novato, California
Here is mine. I did the whole treatment and it was fairly quick and I have some good info if you find yourself in need. Have fun with it!! I use mine fr wood projects but I do plan on adding the shaft pulley to slow it down for metal projects.

image35_zpsyhvdamly.jpg
image25_zpsjtadsr3l.jpg
 

tool_scrounge

Well-known member
Joined
Jul 20, 2010
Messages
4,179
Location
Southern California
Please note that the oil cups on that motor are for horizontal operation only. You will eventually have bearing issues using it vertically on a drill press. So I would plan on using another motor.
 
OP
C

Cman101

Well-known member
Joined
Oct 11, 2015
Messages
112
Location
Northern CA, State of Jefferson
Thieltech, Thanks for the generous offer of Jacobs chuck and key. I plan to pay for the restoration myself and then donate the total amount the drill press sells for to the fund to rebuild the mill. I am hoping one of the folks who come to the faire will be interested in the drill press especially because of the history and because the money they spend will be going to a good cause. Will I need a new chuck or should I be able to get this one restored? I did some external only cleanup on it today. If you want to send a new chuck my way, I won’t turn that offer down. As nines said, “Awesome”.

View media item 59715
View media item 59713
Nines, Craptain, and Adrian, good to have some of the Craftsman restoration gang stop by and offer advice and encouragement.

Adrian, I will likely take you up on your offer. Nice job on your restore. What motor do you have on that? I also noticed from your photo a part I am missing... the set screw for the feed lever. It had been locked in place due to rust but it broke free today. You may need to give me a photo so I can find a suitable replacement.

I made some good progress today taking it apart. The table broke loose fairly easily after the PB soak. I noticed this on the motor pulley. Drilled out to balance the pulley?

View media item 59716
I got the model # plate off fairly easily with a 3 in 1 painters tool. The heads broke off and it left the brass body in the base. Any ideas where to order these round head pins? And are they the same ones that hold the Craftsman badge in place?

View media item 59719
I took the set screws off for the pulley but it did not seem to want to budge. Any suggestions to getting the pulley off?

View media item 59712
I am amazed to find loose items like this table leveling pin that have stayed with the machine since it was made in the 40’s. Correct me if that is not when this was made.

View media item 59717
tool_scrounge, thanks for that info. Just looked at the motor and yes both oil cups are oriented for horizontal operation. Likely the original motor wore out and they had this one around to put on. It also does not spin smoothly, one rough spot, so the bearing may already be gone. I was going to get an estimate on repairing the motor tomorrow but this confirms I need to start searching for a different replacement motor.

And before I could get this posted, an offer of a motor comes along. Ricky Joe, I will send you a PM to find out when is a good time to give you a call tomorrow. Awesome, thanks. Cman
 

AdrianBoomer

Well-known member
Joined
Jan 16, 2015
Messages
235
Location
Novato, California
This Drill press was made for about 6 months in 1942. I am running an old General Electric motor that is designed for vertical use. Here are a few more pics to show you a bit more and hopefully it helps. I can take a pic of the missing piece tomorrow when I am in the shop. I'm in Novato, in NorCal. If you are passing through stop by :)


Red Leader

Well-known member
Joined
May 15, 2011
Messages
2,689
Location
Denver, CO
I have the same (Mohawk) drill press but a floor model. It is a good general purpose drill press. I have the Luxury of dedicating this one to wood, and a second (150) machine for metal work.
There was no switch on mine, though I can see where it once was, but I happened to have a foot switch and use that. It works very well.

FrankLee has a great thread and it covers everything you will need to know.

Craptain,

Is yours the one that is on the OWWM photo index? 103.0304 is your model number, yes?

If it is not posted, it would be great to get the picture of it up there, as there is only 1 in the index right now. A rare tool at that.
 

Red Leader

Well-known member
Joined
May 15, 2011
Messages
2,689
Location
Denver, CO
Cman101,

that press looks good at should clean up real nice. A long as the table looks good (check!) and the sheet metal pulley cover isn't too damaged, there is not a whole lot else that would need much attention other than some paint/polish and maybe bearings.
 

Craptain

Well-known member
Joined
Apr 18, 2013
Messages
4,028
Location
Tampa Bay FL
Red Leader, no it's not. But it could be sometime. If I have time when I get home in a couple of days I will see if I can do something about it. Mine is completely unrestored and in regular use.

Sent from my LG-D801 using Tapatalk
 
OP
C

Cman101

Well-known member
Joined
Oct 11, 2015
Messages
112
Location
Northern CA, State of Jefferson
Looks like some potential motors out there on CL like this one. Seller says it is still available. In working order, gray in color. Would be nice to see a photo as this is a 2+ hour drive.

Belt Driven GE Motor. 1/3 HP, 1725 RPM 115V, 1 Spd model # 5KH45ER552S - $20 (chico)

Adrian, zoomed in on your GE motor photo but unable to make out the model number. Could you take a look at that when you have a chance?

FYI - my PM inbox may or may not be working. Not too long ago, 30 read PM's disappeared. I sent Ryan a PM but have not heard back yet.
 
OP
C

Cman101

Well-known member
Joined
Oct 11, 2015
Messages
112
Location
Northern CA, State of Jefferson
Cman101,

that press looks good at should clean up real nice. A long as the table looks good (check!) and the sheet metal pulley cover isn't too damaged, there is not a whole lot else that would need much attention other than some paint/polish and maybe bearings.

Red Leader, thanks. Your work on the 1950's Craftsman Garage has been inspiring to say the least. Sheet metal on the belt gaurd is a little banged up. Looks like the pulley at one time came loose and dented the top. Could use a little body work (something else I have never done but willing to try). Probably OCD but it would be nice to cover up the seams around the mohawk. Would it be sacrilege to put Bondo on a vintage 1942 machine? Front trim piece is missing a few screws and thinking about using acorn nuts instead of the screws.
 

Attachments

  • thumb_DSC00047_1024.jpg
    thumb_DSC00047_1024.jpg
    76.2 KB · Views: 115
  • thumb_DSC00048_1024.jpg
    thumb_DSC00048_1024.jpg
    68.8 KB · Views: 126

Cruzan80

Well-known member
Joined
Jul 22, 2015
Messages
4,200
Location
Denver, CO
I can take close up pictures of the screws used to hold mine on. Small little flat-heads.

In return, can someone who has one of these make a rubbing of the front nameplate on a sheet of standard printer paper and scan it for me? Mine is missing the Craftsman vertical nameplate, and I have a feeling I will be fabbing one out of bar stock with a dremel. Unless someone knows of a parts machine for sale...

Mine is running an old Dayton motor, no idea if it was original or not.
 

bulletpruf

Well-known member
Joined
Nov 28, 2013
Messages
10,947
Location
San Antonio
One small recommendation - use Kroil instead of PB Blaster. Not cheap, but works MUCH better.

If can't find Kroil (may have to order from Amazon), try 50/50 (mix of acetone and auto trans fluid).

Kudos to you for taking on this project.

Scott
 

Red Leader

Well-known member
Joined
May 15, 2011
Messages
2,689
Location
Denver, CO
Red Leader, thanks. Your work on the 1950's Craftsman Garage has been inspiring to say the least. Sheet metal on the belt gaurd is a little banged up. Looks like the pulley at one time came loose and dented the top. Could use a little body work (something else I have never done but willing to try). Probably OCD but it would be nice to cover up the seams around the mohawk. Would it be sacrilege to put Bondo on a vintage 1942 machine? Front trim piece is missing a few screws and thinking about using acorn nuts instead of the screws.

I think as far as the sacrilege goes, you're probably fine:) Its the 'restomod' idea and sometimes the attention to detail a private owner can give is a lot more than the factory would ever give as far as time and attention to the item/tool. This is the case a lot with large cast iron machines and rough castings. Some factories cared, and some really didn't. There are some restorations that would blow a NOS tool out of the water.

Also, because these tools are not highly prized in the same way, say, a vintage guitar or car is, with such incredible emphasis being placed on complete and total originality, I think it frees us up. In my restorations, I try to keep a balance between originality and beauty. For example, the Atlas table/cabinet saw I restored a while back was originally an uninspiring gray. So I went with a little slicker of a gray color, somewhat of a dark metallic gray, with gold for underneath the table.

When I restore my Craftsman/Belsaw planer, I will try to keep close to the 'dark gray' that Craftsman went with, but may end up doing something like the metallic gray again just to polish it up a bit. There are no hard and fast rules.

Regarding the restoration - a very experienced metal worker told me that when steel is dented, it actually stretches, so sometimes body filler makes a straighter repair than to hammer back the steel. However, if you have a solid backing, you may be able to get closer. Also, prime before bondo. When bondo goes directly on metal, it can bring moisture to the surface of the metal, which of course can destroy the repair.

Maybe not quite as critical on a tool part like this, but might as well get as close as possible to doing it right:)
 

Red Leader

Well-known member
Joined
May 15, 2011
Messages
2,689
Location
Denver, CO
Red Leader, no it's not. But it could be sometime. If I have time when I get home in a couple of days I will see if I can do something about it. Mine is completely unrestored and in regular use.

Sent from my LG-D801 using Tapatalk

Yes, please post yours up! The floor model is very rare and never officially appeared in any Craftsman catalogs, so it may have been a one-time deal on the factory floor where they decided to do a small run of them.

Would love to see pictures of it!

Also, feel free to post up the pictures in my garage thread so we can discuss:)
 
To avoid these ads, REGISTER NOW!

bulletpruf

Well-known member
Joined
Nov 28, 2013
Messages
10,947
Location
San Antonio
Regarding the restoration - a very experienced metal worker told me that when steel is dented, it actually stretches, so sometimes body filler makes a straighter repair than to hammer back the steel. However, if you have a solid backing, you may be able to get closer. Also, prime before bondo. When bondo goes directly on metal, it can bring moisture to the surface of the metal, which of course can destroy the repair.

Yes, steel stretches when dented. But instead of filling the dent with bondo, get it close by shrinking the metal (Google is your friend, but it involves heating the metal with a torch) and doing some hammer and dolly work. Using some filler is going to be inevitable, but the goal is to use as little as possible.

As for putting filler down over primer, that depends on the primer. Works fine with epoxy primer, but not etching primer.

Scott
 

AdrianBoomer

Well-known member
Joined
Jan 16, 2015
Messages
235
Location
Novato, California
while having a night capper in the shop, I got the GE model number.....
1/3HP
MOD: 5KH47AB1021X
1725 RPM

Hope this helps. BTW this was a fun resto for me, I got through 3 layers of paint to the original Blue but I was torn as too whether I could selvage it, and thus went to bare iron and built it back up.

The hardest part to find and adjust/make work is the return spring. I found one out of an old General Machinery press that was in a scrapyard. Springs can be had but you will be hard pressed to find the exact specs. I would find one that is the same thickness of metal (1/2" or 5/8")and cut it down and make it fit into the cup. it only needs to travel 4". I was successful but what a pain in the **** it was, I bled.
 
OP
C

Cman101

Well-known member
Joined
Oct 11, 2015
Messages
112
Location
Northern CA, State of Jefferson
I can take close up pictures of the screws used to hold mine on. Small little flat-heads.

In return, can someone who has one of these make a rubbing of the front nameplate on a sheet of standard printer paper and scan it for me? Mine is missing the Craftsman vertical nameplate, and I have a feeling I will be fabbing one out of bar stock with a dremel. Unless someone knows of a parts machine for sale...

Mine is running an old Dayton motor, no idea if it was original or not.

I have found replacement screws. I can make a rubbing for you or maybe an impression out of modeling clay or something similar? Could you get me the model number of your Dayton motor please? Thanks.

One small recommendation - use Kroil instead of PB Blaster. Not cheap, but works MUCH better.

If can't find Kroil (may have to order from Amazon), try 50/50 (mix of acetone and auto trans fluid).

Kudos to you for taking on this project.

Scott

Scott, thanks. So far the PB Blaster has been working well. I will need to get some Kroil to have around for upcoming restorations. Seems like 9 out of 10 GJ members highly recommend it.
 

Attachments

  • thumb_DSC00046_1024 2.jpg
    thumb_DSC00046_1024 2.jpg
    96 KB · Views: 90
OP
C

Cman101

Well-known member
Joined
Oct 11, 2015
Messages
112
Location
Northern CA, State of Jefferson
I think as far as the sacrilege goes, you're probably fine:) Its the 'restomod' idea and sometimes the attention to detail a private owner can give is a lot more than the factory would ever give as far as time and attention to the item/tool...............

Red Leader, thank you for the suggestions. I like your philosophy. Since this is a 1942 piece of history, I would like to keep it as original as possible. I like the original blue/gray color over using a plain machine gray. But it seems like I am not going to find that in a spray can option. Still thinking through what I will use for paint color. Thanks for the info on the metal work. Right now making the pulley guard look pretty is lower on my list.
 
OP
C

Cman101

Well-known member
Joined
Oct 11, 2015
Messages
112
Location
Northern CA, State of Jefferson
GJ to the rescue! I really like how folks are chiming in for the cause. Good on ya!

It is awesome. I shared this thread with a friend the other day to show her what I was up to. She was really impressed with the response from other members who are chipping in to help me with this project.

while having a night capper in the shop, I got the GE model number.....
1/3HP
MOD: 5KH47AB1021X
1725 RPM

Hope this helps. BTW this was a fun resto for me, I got through 3 layers of paint to the original Blue but I was torn as too whether I could selvage it, and thus went to bare iron and built it back up.

The hardest part to find and adjust/make work is the return spring. I found one out of an old General Machinery press that was in a scrapyard. Springs can be had but you will be hard pressed to find the exact specs. I would find one that is the same thickness of metal (1/2" or 5/8")and cut it down and make it fit into the cup. it only needs to travel 4". I was successful but what a pain in the **** it was, I bled.

Thanks, that does help. Still working on a couple leads for a replacement motor. The look and design of that GE motor just looks like it belongs on the drill press. At some point here shortly I could use your assistance with getting the pulley off and the return spring you mentioned. It is a little sluggish on the return but hoping that will improve with some cleanup and lubrication. I will PM you my phone number. While I would much rather be working on the drill press, TurboTax needs my attention today.
 

Cruzan80

Well-known member
Joined
Jul 22, 2015
Messages
4,200
Location
Denver, CO
Just a rubbing or tracing would be fine. Like I said, I will probably have to take a dremel to make it.

Alternatively, there is one on Ebay in Vegas, and I do have extended family there...Get it for parts and piece out what I don't need?

Edit: Motor is a 5k221B motor. Split phase design. Took a picture on my phone, and will upload it soon.
 

AdrianBoomer

Well-known member
Joined
Jan 16, 2015
Messages
235
Location
Novato, California
your pulley bearings are 6204s and I believe the quill bearings are standard bore 6202s.

link to my restoration at OWWM with some helpful info:
http://www.owwm.org/viewtopic.php?f=1&t=158659&p=1071275&hilit=103.0303#p1071275

Macgee on here has a really nice original color 103.0303

side note: I really want a couple of old school Craftsman Ball bearing decals. Someone here had some but I was unable to ever connect with him. If anyone can hook me up I would be very stoked.
 

Cruzan80

Well-known member
Joined
Jul 22, 2015
Messages
4,200
Location
Denver, CO
Adrian, did yours come with the nut for securing the feed handle? Mine is missing, and I haven't been able to source one.
 

Cruzan80

Well-known member
Joined
Jul 22, 2015
Messages
4,200
Location
Denver, CO
I have a bolt in there right now to hold it in place. Is the nut the same diameter as the rod it threads into? If so, I should be able to figure out measurements. I think in the short term I may get a flat headed bolt so I can easily tighten/loosen.

The three main pieces I need for mine are that bolt, the feed stop nuts (may end up sourcing a new depth rod complete with nuts from ebay for that one to make sure they fit), and the front nameplate. Otherwise most of it is tearing it down, cleaning, new bearings, etc.

Where did you source the new bakelite handle ends from?


I think this one is going to be a bit further down the restore list, as it is decently functional as-is, and the 150 I picked up is cleaning up extremely easy. So get that one done, then tackle this one.
 
OP
C

Cman101

Well-known member
Joined
Oct 11, 2015
Messages
112
Location
Northern CA, State of Jefferson
your pulley bearings are 6204s and I believe the quill bearings are standard bore 6202s.

link to my restoration at OWWM with some helpful info:
http://www.owwm.org/viewtopic.php?f=1&t=158659&p=1071275&hilit=103.0303#p1071275

Macgee on here has a really nice original color 103.0303

side note: I really want a couple of old school Craftsman Ball bearing decals. Someone here had some but I was unable to ever connect with him. If anyone can hook me up I would be very stoked.

Adrian, thanks for your OWMM restoration link and the info on the bearings. Appreciate the call also, it was good to connect with you. Hoping my bearings will come off easier than yours did. I noticed in the 1942 catalog that the side of the head had both the long C logo and Craftsman ball bearing decal. That would be a nice touch to find a source for both decals.

http://www.blackburntools.com/artic...ves/sears/pdfs/sears-craftsman-1942-power.pdf

Adrian, did yours come with the nut for securing the feed handle? Mine is missing, and I haven't been able to source one.

Mine does not have one either. Adrian's feed lever looks exactly like the one in the catalog with no knobs on the end. Mine has knobs.:headscrat Not sure what type of fastener is used as there are no threads on the inside on my DP.
 

Attachments

  • thumb_DSC00054_1024.jpg
    thumb_DSC00054_1024.jpg
    85.2 KB · Views: 80
  • thumb_DSC00056_1024.jpg
    thumb_DSC00056_1024.jpg
    73.3 KB · Views: 83
  • thumb_DSC00057_1024.jpg
    thumb_DSC00057_1024.jpg
    59.2 KB · Views: 89

jakemac

Well-known member
Joined
May 21, 2013
Messages
9,035
Location
New England
One of the members here used the handle off of modern Cman stubby screwdrivers as the knobs on his DP. Just sayin, you can always personalize if you can't find original looking knobs.
 
OP
C

Cman101

Well-known member
Joined
Oct 11, 2015
Messages
112
Location
Northern CA, State of Jefferson
One of the members here used the handle off of modern Cman stubby screwdrivers as the knobs on his DP. Just sayin, you can always personalize if you can't find original looking knobs.

Yes, FrankLee did an nice job with those on a Craftsman 150 restoration. Thanks for the reminder.
 

Attachments

  • FrankLee's Cman 150 Restoration.jpg
    FrankLee's Cman 150 Restoration.jpg
    106.9 KB · Views: 123
Last edited:
OP
C

Cman101

Well-known member
Joined
Oct 11, 2015
Messages
112
Location
Northern CA, State of Jefferson
I'm thinking that some beer tap handles might make good, unusual, DP handles. :beer2:

lol, guessing you were either drinking a beer or thinking about having a beer when that idea popped into your head. Why not just build a combination drill press/beer dispenser? But then it would need some Don't drink and Drill warning stickers. Then a designated driller ad campaign?… slippery slope.

Now back to our regularly scheduled programming. I have pretty much taken it all apart and it’s ready for some Evaporust and paint stripper. Will hopefully get a quote tomorrow on what media blasting will cost so I can decide if I want to go that route. I have been taking a lot of photos and bagging/labeling the small parts in hopes that it all goes back together with no “spare” parts.

View media item 59952
Ad from the 1942 Craftsman Power Tools catalog. They sold 3 benchtop models that ranged from $17.95 to $45.95 (price without motors) and 1 floor model for $49.95.

View media item 59953
 
Last edited:

Cruzan80

Well-known member
Joined
Jul 22, 2015
Messages
4,200
Location
Denver, CO
Thanks for that ad! Confirms that my trend is still going (paid less than original list price for all my power tools). I am also planning on printing these out and framing them behind each tool as an art-deco decoration.

What is everyone else doing for the "quick release" seen in the ad to hold down the top cover? Look above the circle for holding the head to the post. Is it a threaded bolt that gets removed, or do the pieces match to hold it together?
 
OP
C

Cman101

Well-known member
Joined
Oct 11, 2015
Messages
112
Location
Northern CA, State of Jefferson
Another GJ member to the rescue… OldeTimeEtc has both the experience and the right tools to restore the Jacobs chuck for me. Awesome deal for no charge. Thank you, much appreciated. Chuck’s in the mail along with a postage paid bubble mailer for the return trip.


Just a rubbing or tracing would be fine. Like I said, I will probably have to take a dremel to make it.

I did your pencil rubbing the other day. For some reason my scanner is not talking to my computer today. PM me and I can mail a hardcopy to you. It appears to me that this name badge could be used as a mold for a new one. Thinking that one could use a release agent like silicone spray and then fill with a material that would harden and pop out? I have no idea what material would work but I bet someone else out there may have an idea. It is attached with a couple 1/2" long round head brass brads. I drove them out from behind and will be able to reuse them. I still need a couple small U drive screws to attach the model plate to the base. I had to snap the heads off as those holes do not go through.

What is everyone else doing for the "quick release" seen in the ad to hold down the top cover? Look above the circle for holding the head to the post. Is it a threaded bolt that gets removed, or do the pieces match to hold it together?

Attached is a photo that has the original knurled knob to secure the pulley guard. Guessing it is around ¾” OD and there is a recess in the head to accommodate it. It is also probably the first part to get lost. I am trying to find something similar for mine but no luck yet. A couple of my ideas from a trip to the local hardware store today. It would be nice to find something closer to the original.
 

Attachments

  • thumb_DSC00084_1024.jpg
    thumb_DSC00084_1024.jpg
    67.3 KB · Views: 105
  • thumb_DSC00085_1024.jpg
    thumb_DSC00085_1024.jpg
    65.4 KB · Views: 94
  • Pulley Gaurd knurled nut.jpg
    Pulley Gaurd knurled nut.jpg
    18 KB · Views: 109
  • thumb_DSC00100_1024.jpg
    thumb_DSC00100_1024.jpg
    57.3 KB · Views: 117
To avoid these ads, REGISTER NOW!
Top Bottom