
You are using an out of date browser. It may not display this or other websites correctly.
You should upgrade or use an alternative browser.
You should upgrade or use an alternative browser.
1966 F100 EcoBoost Engine Swap (EcoBoosted)
- Thread starter TimeWarpF100
- Start date
- Status
- Not open for further replies.
OP
TimeWarpF100
Well-known member
Can you use a band type tpms sensor?
They just put some type of bands in there on fronts 2nd attempt. I told them how much shorter the valve stem had to be but they did not listen. I even showed them a pic . . They have now scuffed up the wheels in the process.
This is the clearance right now. Still a bit shy of being able to rotate.
I have been just too busy to deal with it but today I plan on getting it solved. Needs a very short stem or a 90 deg. Not needing a TPMS would be that much easier.

Chateau Slate 66
Well-known member
Were the valve stems put on the inside for aesthetics or because they had to be, due to the offset?
OP
TimeWarpF100
Well-known member
For some reason I find weights interesting. Total weight, front to back bias . .
This is complete rolling chassis for Eco 2. 2389 lbs. Hoping for curb weight to be 4000 lbs or less.


This is total weight for Eco 1 as it sits in photo's. 4238 lbs. Goes to show how much more all the electronics and fancy gizmos weigh. Still a BUNCH lighter than the truck the engine/trans came out of but pretty heavy. I was hoping it would be under 4500 lbs complete. Same truck with a 460 with added a/c is 4650 lbs.


This is complete rolling chassis for Eco 2. 2389 lbs. Hoping for curb weight to be 4000 lbs or less.
This is total weight for Eco 1 as it sits in photo's. 4238 lbs. Goes to show how much more all the electronics and fancy gizmos weigh. Still a BUNCH lighter than the truck the engine/trans came out of but pretty heavy. I was hoping it would be under 4500 lbs complete. Same truck with a 460 with added a/c is 4650 lbs.
OP
TimeWarpF100
Well-known member
Were the valve stems put on the inside for aesthetics or because they had to be, due to the offset?
Pretty much because of offset. I think its possible if he had machined the hole at proper angle on outside it could have been done. In hindsight that may have been a better route. He did ask me which way I preferred and told him inside was fine. I do not remember details of what it would have taken to keep them on outside. But, a lot easier to keep on inside of wheel.
just need to find/order a shorter stem to clear. Everything else is very very close. Wheel to spindle is about 3/16" maybe a touch more to caliper. A 20" wheel would have helped but thought they were just too big for look I was after. 18" smallest to clear.
To me the valve stem looks too far tipped from actual surface. It could be how the band/ring is mounted on inside of wheel. The proper stubby valve should clear.
Last edited:
HammerMechanic
Well-known member
What about something like those Flush Mount Valve Stems?
Summit Racing among others sell them.
http://www.summitracing.com/oh/parts/gor-vs407c/all

Summit Racing among others sell them.
http://www.summitracing.com/oh/parts/gor-vs407c/all
nsula_country
Well-known member
What about something like those Flush Mount Valve Stems?
Summit Racing among others sell them.
http://www.summitracing.com/oh/parts/gor-vs407c/all
I was going to suggest the same product. Flush valve, but must use an adapter to charge the tire with air. May be your only option.
I assumed that the inside valve stem was for appearance. Now that I look at the offset, it would have been interesting to place them outside.
CT
OP
TimeWarpF100
Well-known member
What about something like those Flush Mount Valve Stems?
Summit Racing among others sell them.
http://www.summitracing.com/oh/parts/gor-vs407c/all
I was going to suggest the same product. Flush valve, but must use an adapter to charge the tire with air. May be your only option.
I assumed that the inside valve stem was for appearance. Now that I look at the offset, it would have been interesting to place them outside.
CT
Thanks for the tip! Tire store will have them tomorrow.
OP
TimeWarpF100
Well-known member
I was able to track down a used & a new OEM BCM. hoping that will do the trick to get it to start. I am able to program it up to point of needing the Key re-programming.
Have a couple volunteer's to tow it to the dealer to have that done.
Have a couple volunteer's to tow it to the dealer to have that done.
APEowner
Well-known member
I was able to track down a used & a new OEM BCM. hoping that will do the trick to get it to start. I am able to program it up to point of needing the Key re-programming.
Have a couple volunteer's to tow it to the dealer to have that done.
Good deal TW!
OP
TimeWarpF100
Well-known member
Looking for a few ideas on My Dash Cluster for Eco 2
This is what the Stock 1966 Custom Cab had in 1966. (this original to truck)

Here is the Bezel from Eco 1 which someone had done a very crappy black paint job. The gauge package is one I had custom made & what I will be using. I really like the 2015 gauge cluster too which will fit nicely but takes away a bit of the "Older" look & since I spent the $ on the custom one will probably stick with it.

The above will not stay black but installed custom gauges just to get an idea what to do for color.
Next up is the optional analog style clock I was thinking of using to fill the holes of another dash bezel. I had forgot about the stock Eco 1 Bezel.


In looking for idea's by using the original Eco 1 Bezel and the custom made Gauges what color or accent should the bezel be? I had originally thought of just Wimbledon white like a stock '66 non custom cab would be like my dad's would have had. His did not have the extra gauge package like the one in light blue '66 (418 swap truck)
This is the optional gauge package for non custom cab.
I do have an extra of this setup.


Here is the one in the '61 Uni Custom Cab. To me this one looks the best. Not original to the '66 but the chrome accent would be more in line to the '66 Ranger (Custom Cab) I would just have to maybe paint area that is blue Wimbledon white or maybe strip it and leave it natural depending on color.

A lot of options but what does everyone think? It was idea's from the folks here that helped me decide on the wheel combo.
This is what the Stock 1966 Custom Cab had in 1966. (this original to truck)
Here is the Bezel from Eco 1 which someone had done a very crappy black paint job. The gauge package is one I had custom made & what I will be using. I really like the 2015 gauge cluster too which will fit nicely but takes away a bit of the "Older" look & since I spent the $ on the custom one will probably stick with it.
The above will not stay black but installed custom gauges just to get an idea what to do for color.
Next up is the optional analog style clock I was thinking of using to fill the holes of another dash bezel. I had forgot about the stock Eco 1 Bezel.
In looking for idea's by using the original Eco 1 Bezel and the custom made Gauges what color or accent should the bezel be? I had originally thought of just Wimbledon white like a stock '66 non custom cab would be like my dad's would have had. His did not have the extra gauge package like the one in light blue '66 (418 swap truck)
This is the optional gauge package for non custom cab.
I do have an extra of this setup.
Here is the one in the '61 Uni Custom Cab. To me this one looks the best. Not original to the '66 but the chrome accent would be more in line to the '66 Ranger (Custom Cab) I would just have to maybe paint area that is blue Wimbledon white or maybe strip it and leave it natural depending on color.
A lot of options but what does everyone think? It was idea's from the folks here that helped me decide on the wheel combo.
Last edited:
MP&C
Well-known member
the more chrome.... the better!

All your NOS parts, you've got to have a chrome one sitting on the shelf..
All your NOS parts, you've got to have a chrome one sitting on the shelf..
75CrewDeutz
Well-known member
I agree with Robert, chrome dash cluster is my favorite.
nonhog
Well-known member
I have to wonder how argent would look?
OP
TimeWarpF100
Well-known member
the more chrome.... the better!
All your NOS parts, you've got to have a chrome one sitting on the shelf..
I agree with Robert, chrome dash cluster is my favorite.
I have to wonder how argent would look?
I like the Chrome too. There is the one in 61 Uni but I have a partner in that truck who so far has said. NO! I guess I will take the Cluster he can have the rest of truck . . . LOL
Not sure on the Argent. A little experimenting is in order.
It would be nice to have the Custom Cab trim below the cluster like Roberts had
I also need to decide if I should add the additional gauges.
I could always send one of mine out for chrome but in these parts that takes MONTHS!
Here is a white one along with the 2015 cluster which will actually fit with a bit of trimming.


lorne
Well-known member
As much as I like the idea of keeping ECO2 looking totally stock, I do like blending the 2015 gauges into the 66 dash (assuming that wiring hasn't already been removed)
OP
TimeWarpF100
Well-known member
As much as I like the idea of keeping ECO2 looking totally stock, I do like blending the 2015 gauges into the 66 dash (assuming that wiring hasn't already been removed)
Nice thing is I already have the 2015 cluster for the $$ of 50.00! Its already programmed to work and works fine. I have the steering column too and all the buttons work on wheel. Sure is tempting to use the 2015. Had I known prior would not have spent the big $ on the aftermarket..
I have another cluster option now. Will post pics later on this evening.
I have found Ford's MPG, DTE, Gallons used, Gallons left to be very accurate and would be nice to have in this 50yr old heap. Looks like I may be able to utilize the cruise control running it off the can bus.
Just soooo much to think about as the project moves forward.
Another biggie coming up soon is trying to stuff a 41" Radiator into a 26" opening. LOL
APEowner
Well-known member
Hey TW-I'm a little reluctant to weigh in here since every time you've done something different from what I would have it comes out great but since you asked. I like the '66 cluster for EcoII. I'd try to subtly integrate a check engine light and the cruise control controls somehow but keep it as stock looking as possible. On EcoI I'd use the new custom center gauge that you bought and put something in the outer two locations. I've always thought that they look like somethings missing without gauges there. I'd need to know what the rest of the interior looks like before giving an opinion on color.
OP
TimeWarpF100
Well-known member
Hey TW-I'm a little reluctant to weigh in here since every time you've done something different from what I would have it comes out great but since you asked. I like the '66 cluster for EcoII. I'd try to subtly integrate a check engine light and the cruise control controls somehow but keep it as stock looking as possible. On EcoI I'd use the new custom center gauge that you bought and put something in the outer two locations. I've always thought that they look like somethings missing without gauges there. I'd need to know what the rest of the interior looks like before giving an opinion on color.
For Eco 1 I am using this cluster: It is needed to be able to read all the parameters needed including YAW, Trailer Sway, Stability Control etc. Its already programmed for the trailer towing. The computer will record the MPG and Distance of up to 7 Different trailers and keep it separate from empty. It will know when a trailer is hooked up. Already programmed in is my 1966 Trailer shown here.

On Eco 2 I am going to use a stock '66 Cluster but have not decided what color or finish.
This is original cluster for Eco 2 Ranger

As I said before this is the optional cluster for a non custom cab as in my Blue F100.

A pile of different cluster options.

Just to try I took the Stock Eco 1 cluster that was solid black and stripped it down to the zinc plating, gave it a quickie detail.
I then took a 3 1/4" hole saw and removed material up to the high ridge.


I then took a cutoff wheel and trimmed it smooth and flush on backside.
Thought If I took the '70 mustang style gauges and installed them from back by removing the '70 mustang style mounting from gauge front. Drilled holes in bezel that would sync with lens mounting.

This is the outcome from that attempt:

Because the Speedometer, Tachometer and other gauges on a 2015 run through a can bus I have to use this type system to make it all work.
I just need to figure out what color or finish this bezel should have.
This zinc type finish with a bit more polish. Maybe polish the raised portions to a chrome like finish or have the entire cluster chromed like Robert mentioned. Other options could be paint it Wimbledon white but that will kind of take away from the Custom Cab look. Another but now thinking it may not look so good is interior metal color which is Tahoe Turquoise.
The interior metal colors will also have the Stock White on dash and doors and the Black dash pad. (have a perfect original) The seats will be the stock Palomino (light tan) the door panels will match. The carpet a bit darker shade a cross between gold and brown or a darker Tan.
Interior and exterior stock body color. Interior paint other than lower dash is close to perfect.

OP
TimeWarpF100
Well-known member
Update on Eco 2 starting attempt:
After trying to tidy up all the wiring so I can leave most including column and other sensors attached to frame a volunteer (Friend Mel) came this morning to haul the chassis once again down to dealer.
Of course I chose a day when its supposed to hit 109 deg!

Getting ready to leave and I had forgotten to charge the battery! We did other things while the battery was charging including making sure each and every item needed would be with us.
Up and loaded and actually left. Forgot the Electronic throttle. Not sure it would be needed or not so turned around to get it. ( A few blocks away) It was in the '66 Eco 2 cab where I was fitting it to firewall.
We leave and of course there is a bad accident where around 7 lanes merge together get stalled in traffic. Started thinking is this how the day is going to be?
Finally arrive at dealer which is 45 miles from my place one way.
We need to hook up the PCM & Install the battery. I had the 2 different BCM's attached to frame with plastic ties.
As we are hooking up the Battery and PCM realize I had forgotten the Instrument Cluster on bench with the rest of them. Its now nearing 100 deg temps . .
Yep, That is how my day started out.
After trying to tidy up all the wiring so I can leave most including column and other sensors attached to frame a volunteer (Friend Mel) came this morning to haul the chassis once again down to dealer.
Of course I chose a day when its supposed to hit 109 deg!
Getting ready to leave and I had forgotten to charge the battery! We did other things while the battery was charging including making sure each and every item needed would be with us.
Up and loaded and actually left. Forgot the Electronic throttle. Not sure it would be needed or not so turned around to get it. ( A few blocks away) It was in the '66 Eco 2 cab where I was fitting it to firewall.
We leave and of course there is a bad accident where around 7 lanes merge together get stalled in traffic. Started thinking is this how the day is going to be?
Finally arrive at dealer which is 45 miles from my place one way.
We need to hook up the PCM & Install the battery. I had the 2 different BCM's attached to frame with plastic ties.
As we are hooking up the Battery and PCM realize I had forgotten the Instrument Cluster on bench with the rest of them. Its now nearing 100 deg temps . .
Yep, That is how my day started out.
OP
TimeWarpF100
Well-known member
We leave dealer and decide to stop in at a Culver's near my place for a bite to eat.
Standing in line at Culver's Thinking when will it all end? We order and this is what our number was.
Lucky '66 Was thinking about us once again . .
Ok, Things are looking up! While eating I get a call from Discount Tire saying the flush mounted valves are in for Eco 1 Wheels . .

We got back to my place, rolled the chassis into shop then removed the wheels from Eco 1 and headed to Discount Tire. Waited for a hour to get that done. Installed on truck and they clear quite nicely. A HUGE thanks to those that mentioned the flush mounts! Discount will handle the wheel scuffing when things are not so hectic
Standing in line at Culver's Thinking when will it all end? We order and this is what our number was.
Lucky '66 Was thinking about us once again . .
Ok, Things are looking up! While eating I get a call from Discount Tire saying the flush mounted valves are in for Eco 1 Wheels . .
We got back to my place, rolled the chassis into shop then removed the wheels from Eco 1 and headed to Discount Tire. Waited for a hour to get that done. Installed on truck and they clear quite nicely. A HUGE thanks to those that mentioned the flush mounts! Discount will handle the wheel scuffing when things are not so hectic
OP
TimeWarpF100
Well-known member
Hey TW-I'm a little reluctant to weigh in here since every time you've done something different from what I would have it comes out great but since you asked. I like the '66 cluster for EcoII. I'd try to subtly integrate a check engine light and the cruise control controls somehow but keep it as stock looking as possible. On EcoI I'd use the new custom center gauge that you bought and put something in the outer two locations. I've always thought that they look like somethings missing without gauges there. I'd need to know what the rest of the interior looks like before giving an opinion on color.
And yes the center gauge setup will have the proper lights at top of cluster. Only visible when Illuminated. The cruise control switches will be hidden. Tempted to use the new column but again, really want to keep it looking more '66. A lot more work but want the stock looking interior. I will shorten a stock floor shift column. But, now that I am typing think about the floor shifter . . from a '15 again much easier to add the '15 column from a column shift. (current '15 column is a floor shift)
The right gauge looks blank but will will show a bunch of different parameters like Turbo Boost, Transmission Temp etc. What ever is avail from the can bus can be shown here.
Last edited:
OP
TimeWarpF100
Well-known member
I may have left out the portion of while at dealer the tech programmed the PCM, BCM, parameter reset and keys to what I thought would work & truck did run. 

stinkity stoink
Well-known member
Awesome!!!!!!!!!
Oggy
Well-known member
Re: 1966 F100 EcoBoost Engine Swap & 1966 427 Project
Very nice, you'll be flipping a coin to see which one to drive in no time.
Sent from my SM-G928V using Tapatalk
Very nice, you'll be flipping a coin to see which one to drive in no time.
Sent from my SM-G928V using Tapatalk
lorne
Well-known member
I may have left out the portion of while at dealer the tech programmed the PCM, BCM, parameter reset and keys to what I thought would work & truck did run.
That little piece of update slipped your mind???
Sent from my iPhone using Tapatalk
Last edited:
APEowner
Well-known member
I may have left out the portion of while at dealer the tech programmed the PCM, BCM, parameter reset and keys to what I thought would work & truck did run.
Hey, you sneaky little so and so! That's a fairly important little detail!
That's awesome news!!!
Sweet Old Bill
Well-known member
Did you get a flush mount for your spare?
walt460
Well-known member
Earlier you commented on the weight of Eco2
"For some reason I find weights interesting. Total weight, front to back bias . .
This is complete rolling chassis for Eco 2. 2389 lbs. Hoping for curb weight to be 4000 lbs or less."
Well the 2015 F150 with 3.5L Eco runs 0-60 in 5.8 seconds and does the 1/4 mile in 14.6 secs at 95mph and it weighs 5220. At over 1000 pounds lighter, Eco2 is going to be a rocket ship!
"For some reason I find weights interesting. Total weight, front to back bias . .
This is complete rolling chassis for Eco 2. 2389 lbs. Hoping for curb weight to be 4000 lbs or less."
Well the 2015 F150 with 3.5L Eco runs 0-60 in 5.8 seconds and does the 1/4 mile in 14.6 secs at 95mph and it weighs 5220. At over 1000 pounds lighter, Eco2 is going to be a rocket ship!
bulletpruf
Well-known member
Earlier you commented on the weight of Eco2
"For some reason I find weights interesting. Total weight, front to back bias . .
This is complete rolling chassis for Eco 2. 2389 lbs. Hoping for curb weight to be 4000 lbs or less."
Well the 2015 F150 with 3.5L Eco runs 0-60 in 5.8 seconds and does the 1/4 mile in 14.6 secs at 95mph and it weighs 5220. At over 1000 pounds lighter, Eco2 is going to be a rocket ship!
TW -
Yikes! I didn't realize they were this quick!!! Are the EcoBoost trucks going to whip the 427 truck in the quarter???
Congrats on getting it running -- I know that had to be a great feeling when it started for the first time in the 66 chassis.
Scott
OP
TimeWarpF100
Well-known member
Awesome!!!!!!!!!
Very nice, you'll be flipping a coin to see which one to drive in no time.
Sent from my SM-G928V using Tapatalk
yep, I have mentioned before that getting old the mind has a tendency to slip once in a while . .That little piece of update slipped your mind???
Sent from my iPhone using Tapatalk

"Pretty Good" Yeah, Important news too. Mind is going, sometimes too many details other times miss the details . .Hey, you sneaky little so and so! That's a fairly important little detail!
That's awesome news!!!
Yes, Have 2 Extra's. The wheel builder is getting new Forgings on June 6th. In design stages now but spare will be only 7" wide so no clearance issues expectedDid you get a flush mount for your spare?
And add a few HP . .Earlier you commented on the weight of Eco2
"For some reason I find weights interesting. Total weight, front to back bias . .
This is complete rolling chassis for Eco 2. 2389 lbs. Hoping for curb weight to be 4000 lbs or less."
Well the 2015 F150 with 3.5L Eco runs 0-60 in 5.8 seconds and does the 1/4 mile in 14.6 secs at 95mph and it weighs 5220. At over 1000 pounds lighter, Eco2 is going to be a rocket ship!
TW -
Yikes! I didn't realize they were this quick!!! Are the EcoBoost trucks going to whip the 427 truck in the quarter???
Congrats on getting it running -- I know that had to be a great feeling when it started for the first time in the 66 chassis.
Scott
I do expect at least Eco 2 will put down same or better HP/TQ numbers than 482 FE Truck but '66 482 Should be 300-400 lbs lighter. Eco 1 will make close to 400HP at tire. Eco 2 Should be in the 450+ Range at the tire plus being a bunch lighter. So all 3 trucks should run pretty well. Eco 2 F250 should run deep in the 12's no problem. Guesstimate is 113+ MPH 1/4
Getting too tired now for more details or pics, falling asleep at the keyboard.
Did upload another video with yet another uploading now. 2nd one is at 67%.
Here is one uploaded yesterday.
Last edited:
OP
TimeWarpF100
Well-known member
BBChevro
Well-known member
Good video TW, great to hear that both Eco trucks are taking shape. 
OP
TimeWarpF100
Well-known member
The OFFICIAL first start run video!
Lots of work but Eco 2 is : fill in the blanks
cjcocn
Well-known member
Sweet!
Your work is top notch!
Your work is top notch!
OP
TimeWarpF100
Well-known member
Sweet!
Your work is top notch!
Thanks!
Another video. It may take a while before able to view in HD . .
A few people coming over to lend a hand in the morning.
OP
TimeWarpF100
Well-known member
Brother in law & Nephew showed up yesterday to lend a hand. What a difference in getting things accomplished when good help shows up!
After a bit of piddling around decided now would be a good time to drop the cab back on Eco 2 for a test fit. It has not been on since the engine and trans were mounted. Was hoping for a no sheet metal mod mount.
First rolled the cab out and got it in position on the hoist (115 deg outside)

We then lowered the cab onto chassis and positioning of chassis at same time (chassis was on car dolly's)

Then using the dolly's just rolled it back in shop. Dropping cab down on chassis took just a few minutes. Time to get out of the heat and back into the shop.


After a bit of piddling around decided now would be a good time to drop the cab back on Eco 2 for a test fit. It has not been on since the engine and trans were mounted. Was hoping for a no sheet metal mod mount.
First rolled the cab out and got it in position on the hoist (115 deg outside)
We then lowered the cab onto chassis and positioning of chassis at same time (chassis was on car dolly's)
Then using the dolly's just rolled it back in shop. Dropping cab down on chassis took just a few minutes. Time to get out of the heat and back into the shop.
OP
TimeWarpF100
Well-known member
Got Wiring?

next up was trying to get the core support & inner fenders to fit (make an attempt)
The '66 radiator being 26" wide and the '15 Radiator being 41" wide where it mattered.
I knew it was going to be one of the toughest remaining challenges to the build.
When things happen fast its difficult trying to get pics. Here are a few of the mods to core support.


Bro-in-law's idea to drop the core support over the drill press to save doing it by hand. this way we could get at an part of the core support to drill.

next up was trying to get the core support & inner fenders to fit (make an attempt)
The '66 radiator being 26" wide and the '15 Radiator being 41" wide where it mattered.
I knew it was going to be one of the toughest remaining challenges to the build.
When things happen fast its difficult trying to get pics. Here are a few of the mods to core support.
Bro-in-law's idea to drop the core support over the drill press to save doing it by hand. this way we could get at an part of the core support to drill.
OP
TimeWarpF100
Well-known member
1st up was trying to route the transmission cooling lines thru the support.

Note the smiley face on air intake. We fired up the engine and heard a pop. The factory packaging plastic had not been removed. Good thing it never sucked it into the engine . .

Initial fit of core support was saying, dont think so . .

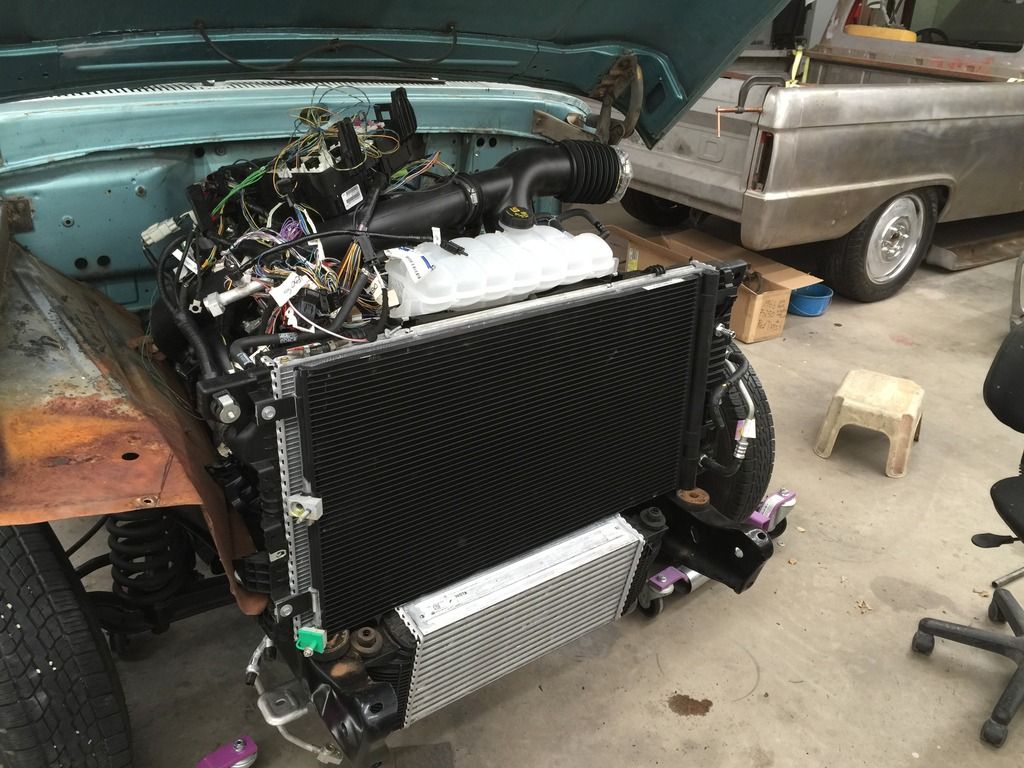
Using stock '66 core support mounting it actually cleared the intercooler! No clue how that happened. I guess Lucky 2 is here. I will be able to drill a hole in bottom of core support to mount the intercooler. Bottom of intercooler will get a stock '15 mount that looks like it will fit. This will save WEEKS of time and fabricating!

Another very lucky fit was the transmission cooler. Its the PERFECT width and shape to fit the '66 core support!


Indentation in the '66 inner fender for a 1966 FE engine in great spot to fit the '15 Turbo!

The '15 gear driven vacuum pump shape fits the contour of the '66 firewall perfectly too!

A few modifications in the form of a cut and a bit of bending we had the inner fender and core support in place!

A few holes for A/C lines and PRESTO! It looks like the front clip issue "nearly" solved.

The intake air tube is sitting up about 1" too far for hood to clear so still need a solution to that and then its onto the left inner fender and then how do we fit all the wiring on rt inner fender and how will be fit it to cab?
ZERO mods needed to cab or frame so far.


Inner fender mod. Still needs some fabrication & welding but it fits!

Note the smiley face on air intake. We fired up the engine and heard a pop. The factory packaging plastic had not been removed. Good thing it never sucked it into the engine . .
Initial fit of core support was saying, dont think so . .
Using stock '66 core support mounting it actually cleared the intercooler! No clue how that happened. I guess Lucky 2 is here. I will be able to drill a hole in bottom of core support to mount the intercooler. Bottom of intercooler will get a stock '15 mount that looks like it will fit. This will save WEEKS of time and fabricating!
Another very lucky fit was the transmission cooler. Its the PERFECT width and shape to fit the '66 core support!
Indentation in the '66 inner fender for a 1966 FE engine in great spot to fit the '15 Turbo!
The '15 gear driven vacuum pump shape fits the contour of the '66 firewall perfectly too!
A few modifications in the form of a cut and a bit of bending we had the inner fender and core support in place!
A few holes for A/C lines and PRESTO! It looks like the front clip issue "nearly" solved.
The intake air tube is sitting up about 1" too far for hood to clear so still need a solution to that and then its onto the left inner fender and then how do we fit all the wiring on rt inner fender and how will be fit it to cab?
ZERO mods needed to cab or frame so far.
Inner fender mod. Still needs some fabrication & welding but it fits!
bulletpruf
Well-known member
TW -
Some days you're the bug, some days you're the windshield. Looks like a windshield day for you!!!
Hope you can keep up the momentum; it's really looking good.
Scott
Some days you're the bug, some days you're the windshield. Looks like a windshield day for you!!!
Hope you can keep up the momentum; it's really looking good.
Scott
- Status
- Not open for further replies.