To avoid these ads, REGISTER NOW!

Between 265 & 485 SQ/FT New 20 x 20 garage/shop in Seattle

Workspaces sized between 265 and 485 squarefeet.
OP
R

RSwannabe

Well-known member
Joined
Dec 17, 2009
Messages
403
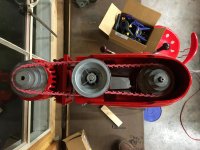
The old craftsman drill presses had an optional third drive pulley that mounted in the top of the column between the motor and the spindle, called the slo-speed option, that allowed a greater range of RPMs for the drill, including letting it go below 200 RPM, which it great for drilling and milling larger holes in steel. The slo-speed options are very hard to come by and expensive when you can find one, so I made my own. This weekend I finished up my slo-speed option and got it up and running.

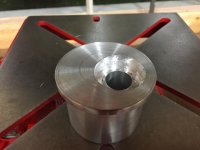
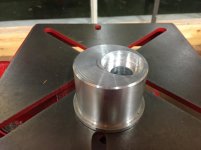
I turned a piece of 6061 aluminum on the lathe to make the body, and then bored it for an axel and bearings. I found a new four ratio pulley for 1/2" belts that has the same 2", 3", 4", and 5" steps as the stock pulleys (needed to keep the same belt length as you swap ratios). I put it all together and used new link belts. It works great. So now I'm pretty much done with my drill project and just get to enjoy using it and looking at it.
 

Attachments

  • IMG_3281.jpg
    IMG_3281.jpg
    135.7 KB · Views: 305
  • IMG_3282.jpg
    IMG_3282.jpg
    138.6 KB · Views: 281
  • IMG_3295.jpg
    IMG_3295.jpg
    134.9 KB · Views: 284
  • IMG_3327.jpg
    IMG_3327.jpg
    139.5 KB · Views: 330
  • IMG_3328.jpg
    IMG_3328.jpg
    132.6 KB · Views: 312
  • IMG_3329.jpg
    IMG_3329.jpg
    139.9 KB · Views: 323
To avoid these ads, REGISTER NOW!

UKAuto

Active member
Joined
Feb 25, 2016
Messages
40
Location
East of Toronto - Canada
I have two garage projects in my future. First is converting a 'studio' in to a garage, have done the hack phase to get it usable, but will be moving on to the doing-it-right phase when weather warms up.

Next project is still in very early planning, but it is a flat roof addition to house some of the cars, and I thought it would be nice to use the roof as a deck - your thread has inspired me to at least consider the possibility of bringing the roof to life. It all looks great to this point, looking forward to seeing the rest of the project.
 
OP
R

RSwannabe

Well-known member
Joined
Dec 17, 2009
Messages
403
I should be starting on the rooftop planters and irrigation system soon. This weekend I am putting up trellis on the garage in preparation of planting Star Jasmine this spring to grow over and cover the garage.
 

Attachments

  • image.jpg
    image.jpg
    24 KB · Views: 406

Scav

Well-known member
Joined
May 10, 2014
Messages
63
Beautiful design. I love the engineered beams that make up your roof.

I am going on craigslist right now to find an old craftsman!
 
OP
R

RSwannabe

Well-known member
Joined
Dec 17, 2009
Messages
403
Work has continued to progress, albeit at a slow pace. Still, I have a few updates to report. I finally got my finished bench tops in place. I previously had 1.75" thick solid core doors and I intended to put a stainless cap over that. Well, I found a steal on Craigslist for a 4' x 8' x 1/2" thick steel welding table that I picked up for $200 near my work. I picked it up with the work forklift and brought it back to my work, I cut the steel top off the base, and sold the heavy steel base for $200 on craigslist. I then used the forklift to carry the steel plate over to the water jet cutter next door and had them cut it into 24" pieces for my bench tops.
 

Attachments

  • Welding table 3.jpg
    Welding table 3.jpg
    146.1 KB · Views: 214
  • Welding table 2.jpg
    Welding table 2.jpg
    148.3 KB · Views: 217
  • Welding table 1.jpg
    Welding table 1.jpg
    147.7 KB · Views: 222
Last edited:
OP
R

RSwannabe

Well-known member
Joined
Dec 17, 2009
Messages
403
I removed the door core tops from my benches and put the steel plate on them with and inch of wood under the plate so total thickness was 1.5". I then had a local sheet metal shop make me up some 16 gauge stainless steel tops to go over the 1/2" plate. I now have bench tops that should be resistant to most spills and staining and I can still wail on them with big heavy projects without serious denting or deformation. They are complete overkill, but I like overkill.
 

Attachments

  • Stainless bench top 1.jpg
    Stainless bench top 1.jpg
    137.6 KB · Views: 358
  • Stainless bench top 2.jpg
    Stainless bench top 2.jpg
    138.9 KB · Views: 285
OP
R

RSwannabe

Well-known member
Joined
Dec 17, 2009
Messages
403
Finished the deck around the hot tub using 5/4 (true 1" thick) clear cedar. Also finished covering the last of the exposed ecology blocks on the north end of the patio. We brought this up to a height even with the back of the outdoor seating we put there.
 

Attachments

  • 13244680_10154206174571532_2504384208485867112_n.jpg
    13244680_10154206174571532_2504384208485867112_n.jpg
    94.2 KB · Views: 276
  • 13239957_10154206174586532_7294578447959548126_n.jpg
    13239957_10154206174586532_7294578447959548126_n.jpg
    111.9 KB · Views: 316
OP
R

RSwannabe

Well-known member
Joined
Dec 17, 2009
Messages
403
I also built a fully insulated compressor house off the back of the garage for my Quincy 325 compressor. The air inlet holes you see enter into a fully baffled inlet track. I built the compressor house so I can easily remove the large side panel and the roof for relatively easy access to service the compressor.

With the Quincy compressor itself being a relatively quiet 900 rpm unit, and the doghouse insulated and on the outside of the 8" thick concrete east wall of my shop, I think it should be pretty quiet for me and my neighbors.
 

Attachments

  • 13221545_10154206174526532_3133560535822672641_n.jpg
    13221545_10154206174526532_3133560535822672641_n.jpg
    111.1 KB · Views: 323
OP
R

RSwannabe

Well-known member
Joined
Dec 17, 2009
Messages
403
With the compressor in place, next up was to frame and build the stairs up to the roof of the garage for access to the garden. These are almost done, so it is time to start on the planters on the roof.
 

Attachments

  • 13240512_10154206174556532_7928535726063751816_n.jpg
    13240512_10154206174556532_7928535726063751816_n.jpg
    111 KB · Views: 318
  • 13238980_10154206174541532_8571567064881637830_n.jpg
    13238980_10154206174541532_8571567064881637830_n.jpg
    115.9 KB · Views: 355
Last edited:
OP
R

RSwannabe

Well-known member
Joined
Dec 17, 2009
Messages
403
Thanks guys! We have built the first planter box for the roof and I like the result. It is built out of 2x8 cedar with 4x4 cedar corner posts and 2x4 cedar reinforcing in places. It measures 2'w x 2'h x 8'l and is held together with galvanized lag bolts. It's built solid as I don't want to have to rebuild them for a long time. It will also be lined with a polypropylene (food safe plastic) drain board to keep the soil from making direct contact with the cedar. This will let the wood breath, even on the inside surface. I think this should result in a very long service lift for these planters.
 

Attachments

  • image.jpg
    image.jpg
    29.7 KB · Views: 191
OP
R

RSwannabe

Well-known member
Joined
Dec 17, 2009
Messages
403
So, here are the finished planters on the roof arranged in close to their final configuration. The drain board liner for them arrives today, so this weekend I'll install the liners, place them in their final, leveled positions, and bolt them all together. The 12 cubic yards of light weight planter soil (using pumice rock but still weighing in at about 18,000 lbs) will be delivered by hose truck on July 2. Then we can get to planting.
 

Attachments

  • Planters.jpg
    Planters.jpg
    144.8 KB · Views: 331
Last edited:
OP
R

RSwannabe

Well-known member
Joined
Dec 17, 2009
Messages
403
Once the planters are secured and filled with soil, the isle ways will be "paved" with these 1 SF teak deck tiles that link together for a more stable walking surface than the loose gravel.
 

Attachments

  • Teak tile.jpg
    Teak tile.jpg
    117.7 KB · Views: 132
OP
R

RSwannabe

Well-known member
Joined
Dec 17, 2009
Messages
403
Got the planters on the sides of the garage done, the irrigation system installed (more on that later) and planted with Star Jasmine. It smells lovely and I can't wait until a few years from now when it has grown to cover the garage.
 

Attachments

  • Jasmine.jpg
    Jasmine.jpg
    109.8 KB · Views: 244
  • Jasmine 2.jpg
    Jasmine 2.jpg
    76.9 KB · Views: 179
OP
R

RSwannabe

Well-known member
Joined
Dec 17, 2009
Messages
403
Rebuilt the "temporary" (they had been there for over a year) stairs between the garage and the back yard. This is the entry we use most into and out of the house. I had thrown together a set of stair out of pressure treated timber last year. Well, we finally got around to rebuilding them with Ipe treads and cedar risers. We also clad the concrete retaining walls with the 1x2 cedar boards like we did the ecology block retaining walls elsewhere in the yard. It's nice to have a much more finished appearance there now.
 

Attachments

  • Stairs 2.jpg
    Stairs 2.jpg
    85.1 KB · Views: 244
  • Stairs.jpg
    Stairs.jpg
    102 KB · Views: 255
  • Stairs 140813.jpg
    Stairs 140813.jpg
    86.9 KB · Views: 228

drivesitfar

Well-known member
Joined
Oct 23, 2013
Messages
36,034
Location
Pacific Northwest
RS: sorry i haven't popped in on your thread before this since you are almost in my neighborhood. i didn't see how you installed the other cedar on the cement so can you tell me are you screwing the cedar to the cement or glueing or both?

also i'm guessing you are going to put in a railing just because?

thanks for posting up information on your build and i'll try to catch up and see where you are at on the build when i have more time.

in case you didn't know I started a thread in Free Parking for just the PNW members that you are welcome to stop in and say hi and meet a few of us if you want. or just lurk and see what we are up to which varies as often as our weather.

http://www.garagejournal.com/forum/showthread.php?t=314689

cheers and ice tea for me
 
OP
R

RSwannabe

Well-known member
Joined
Dec 17, 2009
Messages
403
Drivesitfar, the cedar strips are finish nailed (stainless nails) to pressure treated 2x4 sleepers that are lagged into the concrete wall. You can see some pics of how I did this earlier on my ecology block wall in this thread starting at post #95.

There will be a railing as well, but that will be integrated with the steel posts of a carport structure. Just finishing design and bidding the steel fab for that now. It will all mount on top of the concrete wall. There will of course be posts documenting that later.

I'll check out the PNW forum. Thanks for the heads up.
 
Last edited:
To avoid these ads, REGISTER NOW!
OP
R

RSwannabe

Well-known member
Joined
Dec 17, 2009
Messages
403
Not just that 9 tons (wet) soil load, but also 5 tons of gravel as the drainage layer on the roof. It's rated for all that plus snow load. Structure is 20" x 5.5" x 20' glulam beams, supporting 2x12 joists (6.6' spans), with 1.125" decking. No columns inside the garage either (clear span). It's built to take it.
 
Last edited:

iceman5

Active member
Joined
Dec 30, 2014
Messages
26
Location
Lititz, PA
Nice use of the red PowerTwist Plus belting on the drill press. I used to work for the manufacturer and designed/improved some of the manufacturing equipment used to make it.
 

drivesitfar

Well-known member
Joined
Oct 23, 2013
Messages
36,034
Location
Pacific Northwest
RS: i haven't read all your thread, but a good portion of it last night and i have to wonder why i didn't stop in and congratulate you and watch it closer sooner. you do amazing work, have some great old tools and you are doing some of the same projects i've done and am doing now.

keep up the great work and keep posting pictures because even if it seems like you are maybe not getting any responses you will and it does help us and hopefully you too if we can offer some.

i'll read more thorough as i have time and i might have a few more questions, but first one is what are you planning on growing in all those raised beds on your garage roof?

good luck
 
OP
R

RSwannabe

Well-known member
Joined
Dec 17, 2009
Messages
403
356Vintage - Thanks! Like your handle. First car I ever bought myself (in high school in the '80's) was a '61 356 Karman Notchback in special order Condor Yellow. Would love to know where that one is now.

Iceman5 - My compliments on the link belts. These are the first I have used and I like them.

Drivesitfar - The plan for the rooftop planters are vegetable garden, herbs, some flowers, and whatever else my wife wants to grow up there. We also plan to add a little arbor with a hanging hammock chair for relaxing in the middle of it. As for people following my thread, I'm not worried about it. I'm sure I'd get more eyes if I had a racier thread title, but marketing has never been my strong suit.
 

wmrra13

Well-known member
Joined
Apr 28, 2008
Messages
93
Location
PNW
Very nice build! I love your use of repurposed materials and CL finds to build something clean, stylish and functional.

I'm not clear on your exact location but, we own a rental that we lived in for 16 years within about a mile of your place so I can really appreciate the challenges you faced working with a 5k ft2 lot.

I'm subscribed!
 
OP
R

RSwannabe

Well-known member
Joined
Dec 17, 2009
Messages
403
Wmrra13 - Thanks! I am working with a lot of zoning and space restrictions, but doing what I can within those constraints. I'm pretty close to a Ballard High. You still live in the area?

Major Lee - Thank you as well. I'll do my best to keep impressing.
 
Last edited:
OP
R

RSwannabe

Well-known member
Joined
Dec 17, 2009
Messages
403
This weekend I lined the first set of planters with polypropylene drain board. It is taking me longer than I expected to get them done, but that is par for the course. The drain board lines the inside of the planters and wraps under them as well. This will keep the cedar from being in direct contact with the soil in them or with the gravel under them. I also reversed the drain board compared to its typical orientation so the "flat" side is towards the soil and the gravel, and the "waffle" side is towards the wood. This allows a clear drain path for any moisture between the drain board and the wood and maintains an airway to allow the wood to breath. Again,my goal is to make these planters last for decades hopefully.
 

Attachments

  • image.jpg
    image.jpg
    21.2 KB · Views: 207
Last edited:
OP
R

RSwannabe

Well-known member
Joined
Dec 17, 2009
Messages
403
With the south line of planters lined, leveled, and bolted together, I then built a privacy screen along that side of the garage roof so my neighbors can still have their privacy in their back yard. The screen is only 3' above the top of the planters, and consists of upright cedar 2x4's attached to the planters every 4', some filter fabric stapled to the uprights to make the screen opaque, with reed screens draped over that for a nicer appearance. The reed screens alone did not obscure the view enough, hence the fabric under them. This is all temporary until we figure out the type of perminant decorative screen to use here.
 

Attachments

  • image.jpg
    image.jpg
    29.3 KB · Views: 263
OP
R

RSwannabe

Well-known member
Joined
Dec 17, 2009
Messages
403
After the screen was up and my neighbors had their privacy back, I finished wiring up my irrigation valves and installed an irrigation zone along the north wall of the yard so my wife can start planting there.

For the irrigation system I chose to go with the Rachio gen 2 controller for its wifi compatibility (I can control it from my phone) and smart scheduling. It access NOAA weather data online for my area and ajusts the watering schedule accordingly. The controller is mounted high and out of the way in my garage. So far install was simple and the smart scheduling is working well.
 

Attachments

  • image.jpg
    image.jpg
    14.7 KB · Views: 148
Last edited:
OP
R

RSwannabe

Well-known member
Joined
Dec 17, 2009
Messages
403
I used an Orbit six valve manifold that I mounted under the stairs behind the garage (only three valves/zones plumbed in so far). The valve manifold and lines are not in ground, so freezing would be an issue in the winter if I don't blow the water out of the system. To this end, I have the water feed to the irrigation system on an isolation valve with a separate input valve with an air fitting. So come fall I can simply shut off the valave under the sink in the garage (without turning off the water to the sink) then plug in an air hose and cycle the valves to clear all the lines of water for winter. With this setup, winterizing the system should take less than half an hour.

Edit Dec 20, 2016 - I winterized the system a few weekends ago prior to a cold snap here in Seattle. Blowing out the system was very easy, but I needed to run each zone for about 15 minute to get most the water out of each zone, so total time for winterization actually took about 45 minute for my three current zones. I can be doing other things while each zone cycles though, so its pretty easy.
 

Attachments

  • image.jpg
    image.jpg
    17.9 KB · Views: 257
Last edited:

wmrra13

Well-known member
Joined
Apr 28, 2008
Messages
93
Location
PNW
Wmrra13 - Thanks! I am working with a lot of zoning and space restrictions, but doing what I can within those constraints. I'm pretty close to a Ballard High. You still live in the area?

Nope, we moved from NW to SW a couple of years ago. We outgrew our place and the commute was killing me. My office is down here and I fly a lot so it made sense to move to the 'burbs. I never thought I'd move out of the city but I have to say I'm loving it.

Also, we upgraded our garage space significantly.


Careers!
 
OP
R

RSwannabe

Well-known member
Joined
Dec 17, 2009
Messages
403
Here is an extreme wide angle shot of the backyard my wife took. This is really a 180 degree view panorama shot with your back to the house.
 

Attachments

  • Epic wide angle.jpg
    Epic wide angle.jpg
    159.6 KB · Views: 439
Last edited:

wmrra13

Well-known member
Joined
Apr 28, 2008
Messages
93
Location
PNW
Here is an extreme wide angle shot of the backyard my wife took. This is really a 180 degree view panorama shot with your back to the house.

Awesome, it's going to look exceptionally cool when the vines fill in.
 

drivesitfar

Well-known member
Joined
Oct 23, 2013
Messages
36,034
Location
Pacific Northwest
RS: the panoramic picture really shows how you have transformed your yard. WELL DONE

also your thread title is fine and i recall checking in on your thread many months ago, but I was thinking we were going to move and get some acreage so building in tight spaces and a smallish shop/garage didn't interest me as much. Now seeing what you have done with yours and all the many many improvements that are top quality i'll keep checking in to see what you are doing next. also the more we look around to move our place doesn't seem so bad except that my garage is too small. i also didn't know you yet as a member of GJ and there are thousands of members and cool garages to read about as you know. I'll be back to check in on your progress and see your skills often i'm sure now.

i also have a flat roof and maybe a 200+ degree sound view from the their and before we had the twins 25 years ago i was planning a second story, but with 5 kids and my wife quitting her job to take care of them that never happened. i have thought about putting a deck up there, but NEVER any plants and as much weight as you have on your flat roof so i'll read more on how you did that too.

good luck with the plantings and sprinkler system.
 
To avoid these ads, REGISTER NOW!
Top Bottom