To avoid these ads, REGISTER NOW!

New 24'x24' Bungalow Woodshop/Autoshop in California

To avoid these ads, REGISTER NOW!

camarosrus69

Well-known member
Joined
Aug 7, 2013
Messages
243
Location
South central Kansas
As everyone has said, you've done a fantastic job. It has come together quickly. Of course, being in the business definitely helps. I too am planning on acquiring the same Greg Smith lift, and eagerly await your installation.
 
OP
N

nitro3421

Well-known member
Joined
Jan 28, 2011
Messages
317
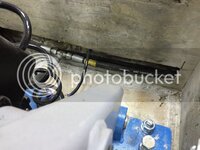
Lift showed up yesterday, barely. Someone had the not-so-brilliant idea of stacking the two lifts (around 800 pounds each) on top of each other, with the control unit on top of that... Then, they stacked all this on two pallets. Needless to say, the pallets collapsed in the truck and the whole thing was precariously leaning when it arrived. After some sketchy forklift maneuvering, I was able to drag the pallet out (they couldnt get a pallet jack under the bottom pallet) and get it out. Some of the hoses were damaged, so not too happy about that. Here's how it showed up after I pulled it off the truck:


Then I spent a few hours last night re-palletizing so it wouldnt slip off.


ryanp77

Well-known member
Joined
Mar 9, 2013
Messages
157
Location
Wesfield In
Big fan of this build, nice transformation from just 1 year ago. Can you send the lift company the photos and try to get new hoses for free since it was shipped so half assed?
 

HSpencer

ALLIANCE MEMBER
Joined
Nov 28, 2010
Messages
2,854
Location
South Central US
The garage, house and grounds are just totally beautiful. The attention to detail on everything is fantastic. You are to be commended for such great work. I enjoy your thread a lot.

Best Regards
Herb
 
OP
N

nitro3421

Well-known member
Joined
Jan 28, 2011
Messages
317
Big fan of this build, nice transformation from just 1 year ago. Can you send the lift company the photos and try to get new hoses for free since it was shipped so half assed?

Yup, that's in the works. Just hope there's not a bunch more damage I can't see at first.
 

camarosrus69

Well-known member
Joined
Aug 7, 2013
Messages
243
Location
South central Kansas
I don't know your shipping arrangements, so I'm wondering if your lift came all the way from Smith's warehouse this way, or did the shipper have to reload it before delivering to your house. Unfortunately, your grievance may be with the shipper rather than Greg Smith. On the bright side, your pictures have the issue documented, and someone else will be paying for the new hoses. The question is who, and how long will it take?
 

Sailor22

New member
Joined
Dec 30, 2015
Messages
1
Location
Haida Gwaii
What's the status of the M3?
And not to go without mention is your impressive garage. I can hardly waiting for your updates to see what is next.
 
OP
N

nitro3421

Well-known member
Joined
Jan 28, 2011
Messages
317
I don't know your shipping arrangements, so I'm wondering if your lift came all the way from Smith's warehouse this way, or did the shipper have to reload it before delivering to your house. Unfortunately, your grievance may be with the shipper rather than Greg Smith. On the bright side, your pictures have the issue documented, and someone else will be paying for the new hoses. The question is who, and how long will it take?

Luckily Greg Smith is shipping new hoses at no cost, just hope there's not further damage to be discovered during install.
 
OP
N

nitro3421

Well-known member
Joined
Jan 28, 2011
Messages
317
please document your lift install. I am on the fence about ordering this unit.

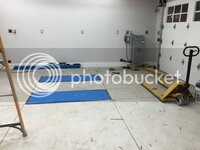
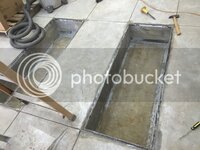
I'm having a local professional auto lift installer put it in, so I wont see each step but hoping it goes smoothly. Here are some pics of the pits which I opened up this weekend and detailed.

 
OP
N

nitro3421

Well-known member
Joined
Jan 28, 2011
Messages
317
What's the status of the M3?
And not to go without mention is your impressive garage. I can hardly waiting for your updates to see what is next.

I received full warranty approval on a factory remanufactured motor replacement last week. Just waiting on payment before I place the order for the motor itself ($20k just for the "part")!
 

camarosrus69

Well-known member
Joined
Aug 7, 2013
Messages
243
Location
South central Kansas
Luckily Greg Smith is shipping new hoses at no cost, just hope there's not further damage to be discovered during install.

Glad to hear that you had a minimum of hassle, and hope, as you, that there is no more damage. As I said earlier, I'm planning on purchasing this lift as well, and one of the main reasons is that I hope that dealing with issues like this would be easier, considering that they are on the same continent. I'm about 400 miles from their Iowa warehouse and plan on a road trip to pick it up myself. Please take lots of pictures, even if you don't get to witness the installation. I want to see how well it fits in those pits. Good luck and thanks for keeping us informed.
 

polexican23

Banned
Joined
Jun 11, 2013
Messages
2,168
Location
burbs-Illinois
I'm having a local professional auto lift installer put it in, so I wont see each step but hoping it goes smoothly. Here are some pics of the pits which I opened up this weekend and detailed.


do you know the dimensions they used are from the manual or did they cut them larger/smaller?
 
To avoid these ads, REGISTER NOW!
OP
N

nitro3421

Well-known member
Joined
Jan 28, 2011
Messages
317
do you know the dimensions they used are from the manual or did they cut them larger/smaller?

I went off the exact ones in the manual. I double checked a few days ago against actual lifts and I think I'm in good shape. Should leave about a 5/8" gap around the perimeter.
 

RSwannabe

Well-known member
Joined
Dec 17, 2009
Messages
403
Beautiful build! The design and details are top notch. I can sympathize with your design constraints, as my build was behind my 1910 house with a driveway running past the side of the house with only 9' clearance. I hope you keep documenting the house and yard work in this thread as well.

Good luck on the M3 motor replacement. Hope you get the warranty coverage.
 
OP
N

nitro3421

Well-known member
Joined
Jan 28, 2011
Messages
317
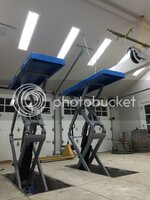
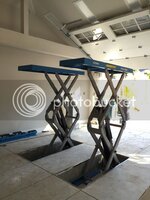
Lift is in! Install went fairly smooth according to the installer. There were a few small missing bolts but wasnt a big deal.

I had to install a "buck boost" transformer. Apparently the motor is super sensitive and needs voltage within 5% of 220 and mine was 246. Found this out the day before so I had to scramble to find one and install it.

The only complaint i have so far about the lift is that if you take it ALL the way up, you manually have to override the limit switch to bring it back down. There may be a work around but it's not a big issue for occasional use.

DA10F2F5-FC76-473B-A87C-DDDF1CD6FBC5.jpgCF4D675C-1474-447F-ABCA-56DD433DE853.jpg0B27D11E-89F3-4280-BA19-74AFC097631B.jpg163742B3-566A-4349-A3D1-4FBF31E736CA.jpg916B805B-7BE3-4A20-A3C0-04D52D966660.jpgB92408B3-1295-493C-9A72-E200E76257E7.jpg
 
OP
N

nitro3421

Well-known member
Joined
Jan 28, 2011
Messages
317
New motor swap is underway on my M3 as well. Huge job to swap this out - practically the entire drivetrain gets dropped.


polexican23

Banned
Joined
Jun 11, 2013
Messages
2,168
Location
burbs-Illinois
Did you have to have the steel edging around the openings made? if so do you have more info on those. I assume it is to limit and edge crumbling.
 
OP
N

nitro3421

Well-known member
Joined
Jan 28, 2011
Messages
317
Did you have to have the steel edging around the openings made? if so do you have more info on those. I assume it is to limit and edge crumbling.

Correct. It's just some 1"x1" angle iron welded to the exact rough opening spec'd by the manufacturer.
 

camarosrus69

Well-known member
Joined
Aug 7, 2013
Messages
243
Location
South central Kansas
That's a very nice lift installation. I do have some questions, though. Is the amount of rebar in your floor required in your area, or do you just like "hell for stout"? Also, what kind of wood is that on the bottom of your walls? Our pressure treated lumber always looks like green stained pine or fir. Yours looks dark brown, and I couldn't see the wood grain. I noticed you put conduit at both ends of your pit. Was that because you weren't sure which end the plumbing would be on? Finally, it looks like the conduit was up against the outside surface of your pit forms. How did you, or they, dig them out? I am sorry for all the questions, but I am very interested your installation and appreciate any help you can give me.:bowdown:
 
OP
N

nitro3421

Well-known member
Joined
Jan 28, 2011
Messages
317
That's a very nice lift installation. I do have some questions, though. Is the amount of rebar in your floor required in your area, or do you just like "hell for stout"? Also, what kind of wood is that on the bottom of your walls? Our pressure treated lumber always looks like green stained pine or fir. Yours looks dark brown, and I couldn't see the wood grain. I noticed you put conduit at both ends of your pit. Was that because you weren't sure which end the plumbing would be on? Finally, it looks like the conduit was up against the outside surface of your pit forms. How did you, or they, dig them out? I am sorry for all the questions, but I am very interested your installation and appreciate any help you can give me.:bowdown:

Yes - rebar is all California code driven

Pressure treated wood comes in several varieties. Most lumber yards stock the "ground contact" type out of simplicity, which is the most moisture resistant (and most corrosive) so you need to be careful about which fasteners come into contact with it. Hot dipped galvanized or stainless nails only.

Conduit - correct. I didnt know how the plumbing would be laid out on the lift and since I poured it several months before it showed up I roughed in both sides to be safe. I ran the conduit flush up against the edge of the form and after the concrete cured I took a diamond blade on my angle grinder and cut out a rectangle to get into the pipe (4" SDR 35). Worked out pretty well.
 
OP
N

nitro3421

Well-known member
Joined
Jan 28, 2011
Messages
317
Finally had a few minutes last night to try out the lift for the first time. It's a very tight fit with my truck and I'll position it slightly different next time but overall I'm thrilled with how simple and quick it is to lift. I have an oversized 50 gallon fuel tank on the truck which hangs about 9" below the frame rails, so I had to use multiple blocks between the lifting platforms and rail to avoid crunching the fuel tank. I could have lifted it up another 3' higher or so than the photo below if I had pulled the truck another foot into the garage but that's for next time.


OP
N

nitro3421

Well-known member
Joined
Jan 28, 2011
Messages
317
I ordered 12 NewAge cabinets over the weekend for upper cabinets on the rear and left walls:
http://www.sears.com/newage-product...gclid=CLaThN-0j84CFQtnfgodtFcBww&gclsrc=aw.ds


Not a bad deal at around $120 each, fully assembled, to my door. I'll be using these "lowers" as "uppers" instead since the cost per cubic foot was much lower for whatever reason and they can be wall mounted. Going with the Steevo inspired HF44" lower cabinets/sheet metal work bench top.
 
Last edited:

dittle fart around

Well-known member
Joined
Jan 9, 2011
Messages
2,455
Location
Vancouver, Washington, USA
Yep that's the bold series. Those will work great for uppers. With all the mounting holes in the back of the cabinets you could hang these using french cleats and save some money. Plus you could move them around if you need too.

:beer:
 
OP
N

nitro3421

Well-known member
Joined
Jan 28, 2011
Messages
317
First coat of epoxy/chips went on yesterday. Clear coat over the chips goes on today and I should be able to walk on it tomorrow and move back in Thursday. I'll have to separately coat the tops of the lifts - that 700 pound refrigerator was too tall to move out of the doors and too heavy to lean to the side so the lifts were put to use.

D8224870-EF64-4AC8-A1ED-248ACFB01415.jpg
700F2625-3E5F-4A77-BBDB-8D2B36BF3D4C.jpg
 
OP
N

nitro3421

Well-known member
Joined
Jan 28, 2011
Messages
317
The epoxy looks great! Got any close up shots? Looks like you laid down some serious chips!

Yup - thick layer of 1/8" chips. Some will get vacuumed up before the clear coat goes on.

 
Last edited:

polexican23

Banned
Joined
Jun 11, 2013
Messages
2,168
Location
burbs-Illinois
check the New Age Cabinets the second they arrive. don't let the driver go until you inspect the. Helped my buddy set up his garage with a 12 piece setup and 50% was damaged and then half of the replacements were damaged. It took about 3 or for 4 tries to get all the cabinets with no damage.

But they did let him keep all the damaged ones. I think he might have gotten one or 2 good cabinets out of pieces of the damaged ones.
 
To avoid these ads, REGISTER NOW!
Top Bottom