To avoid these ads, REGISTER NOW!

VISE REPAIR 101 all vise repairs, lubricants, sources for parts and the tricks to fix

KMScott

Well-known member
Joined
Feb 14, 2012
Messages
4,642
Location
Daufuskie Island, South Carolina
I actually wrote a blog about it, look HERE Having a lathe with a collet set up is best but you could hacksaw a 5/16:18 nut thru on one side and 1/2 way through on the other side so it will collapse some then clamp it in a drill chuck so it squeezes on the 5/16 set screw then use a angle grinder with a corse sanding disc and work the pin diameter down to a 1/4 diameter. The threads are cut deeper so you can gauge your process. Good Luck.
 
To avoid these ads, REGISTER NOW!

WWShop

Well-known member
Joined
Aug 25, 2015
Messages
948
Location
MN
I actually wrote a blog about it, look HERE Having a lathe with a collet set up is best but you could hacksaw a 5/16:18 nut thru on one side and 1/2 way through on the other side so it will collapse some then clamp it in a drill chuck so it squeezes on the 5/16 set screw then use a angle grinder with a corse sanding disc and work the pin diameter down to a 1/4 diameter. The threads are cut deeper so you can gauge your process. Good Luck.

Thanks, Scott. I will definitely study up on what you wrote and give it a shot real soon. Much appreciated.
 

Brorex

Well-known member
Joined
Feb 23, 2016
Messages
126
Brazing or silicon bronze tig welding are your options.

Even then it takes some experience to get it right on cast metal.

Both fixes if done right will make the base fully functional and strong again. Neither will raise the value.

So if you are gonna use it go for it otherwise try to find a donor vise.


Sent from my iPhone using Tapatalk
Thanks for the reply. I do plan on using this vise. I may just mount without the swivel base until I can get it to a welding shop to get braised. Here's the vise with a coat of paint on it. I'm using oil based rustoleum for paint. I did no prime before painting. Should I of primed prior to paint? I thought that with it blasted down to bare metal and it being a somewhat rough surface that I wouldn't need to primer. Am I right or wrong in this thinking?
f37a280914c3e2e37f38330e0a2c2ff8.jpg

Sent from my SAMSUNG-SM-N920A using Tapatalk
 

Mark in Indiana

Well-known member
Joined
Aug 11, 2010
Messages
3,057
Location
Southern Indiana
Pretty new here. And no ability to braise really but is there a way to fix this and is it worth fixing? It is the base from a craftsman 5160

Brorex,
IMO: I'd have the base cracks brazed or silver soldered. It will last for a long time (likely, your grandkids will be using that vise). If you can do some prep work and take the piece in to be brazed, it will save you some money. You will need to clean the areas to be brazed with a wire brush, drill some holes in the cracks & at each end of the cracks for relief and cut a gouge along the cracks.

Even if you don't have the tools to prepare the base for brazing, I feel that it would be worth repairing.

Attached are some pictures of a 100+ year old Reed base that I did the crack repair on:
 

Attachments

  • REED CRACK REPAIR1.jpg
    REED CRACK REPAIR1.jpg
    149.9 KB · Views: 41
  • REED CRACK REPAIR2.jpg
    REED CRACK REPAIR2.jpg
    143.1 KB · Views: 45
  • REED CRACK REPAIR3.jpg
    REED CRACK REPAIR3.jpg
    143.3 KB · Views: 45

Brorex

Well-known member
Joined
Feb 23, 2016
Messages
126
Brorex,
IMO: I'd have the base cracks brazed or silver soldered. It will last for a long time (likely, your grandkids will be using that vise). If you can do some prep work and take the piece in to be brazed, it will save you some money. You will need to clean the areas to be brazed with a wire brush, drill some holes in the cracks & at each end of the cracks for relief and cut a gouge along the cracks.

Even if you don't have the tools to prepare the base for brazing, I feel that it would be worth repairing.

Attached are some pictures of a 100+ year old Reed base that I did the crack repair on:
Wow thanks. I definitely have the tools to do the prep I cleaned it up with aluminum oxide media. So I need to clean the crate with a wire wheel really well also? What size holes should be drilled? I could even attempt the brazing myself just don't want to make more of a mess. Is the holes drilled just for the braze to penetrate better? Thanks for the encouragement that's my plans on looking for and buying these old vises. Passing down tools that simply cannot be had anymore. I've got 2 sons that I hope see the un replaceable value in these. I just wished I lived in a place that they were easier to find. Or would've started to find sooner than now. I was able to find a columbian D44 M3 that was in good shape. c7510366b4adf0cf8e8cb9bd4bbf76e6.jpg

Sent from my SAMSUNG-SM-N920A using Tapatalk
 

HCNDM

Well-known member
Joined
Oct 20, 2015
Messages
682
Location
Netherlands (tiny little country in western Europe
Wow thanks. I definitely have the tools to do the prep I cleaned it up with aluminum oxide media. So I need to clean the crate with a wire wheel really well also? What size holes should be drilled? I could even attempt the brazing myself just don't want to make more of a mess. Is the holes drilled just for the braze to penetrate better? Thanks for the encouragement that's my plans on looking for and buying these old vises. Passing down tools that simply cannot be had anymore. I've got 2 sons that I hope see the un replaceable value in these. I just wished I lived in a place that they were easier to find. Or would've started to find sooner than now. I was able to find a columbian D44 M3 that was in good shape. c7510366b4adf0cf8e8cb9bd4bbf76e6.jpg

Sent from my SAMSUNG-SM-N920A using Tapatalk


The holes allow the surrounding metal to expand into them. The result being the crack won't get worse and no new crack forms as the metal heats up and expands.

I don't think it has a huge amount of impact on braze penetration.

Silver soldering is basically the same process as brazing just a different filler method.

Silicon bronze tig welding is a little different as the heat is applied locally by the tig welder rather than hearing the whole area with a brazing torch. Often a preheat using a torch is required for best silicon bronze tig results.

The reason I mentioned it is because it is often easier to find someone that can tig wel but brazing seems to be a slowly dying art [emoji26]

The only real difference is the use of a silicon bronze filler rod, technique and skill are the same as any other tig weld. So a pipeliner welder who is used to pre heating could do this with no second thought.

Sent from my iPhone using Tapatalk
 
Last edited:

bulletpruf

Well-known member
Joined
Nov 28, 2013
Messages
11,085
Location
San Antonio
Thanks for the reply. I do plan on using this vise. I may just mount without the swivel base until I can get it to a welding shop to get braised. Here's the vise with a coat of paint on it. I'm using oil based rustoleum for paint. I did no prime before painting. Should I of primed prior to paint? I thought that with it blasted down to bare metal and it being a somewhat rough surface that I wouldn't need to primer. Am I right or wrong in this thinking?
f37a280914c3e2e37f38330e0a2c2ff8.jpg

Sent from my SAMSUNG-SM-N920A using Tapatalk

I think most folks use spray cans. There was a good thread on painting a few weeks ago; think it was on this thread.

My technique - Blasting gives the best surface, in my opinion; it gives the paint something to adhere to. Make sure you get all the grease and grit off; I use brake cleaner (the nasty chlorinated stuff). Make sure your paint can is nice and warm; see instructions for recommendations. Also paint in a well ventilated but warm area. Other folks also pre-heat the part that you're painting; I don't but if it's sunny, I do leave it out in the sun to warm up.

If you have lousy results, I find that the paint itself is usually the problem. Strip it and try another brand.

I prefer to mask off the machined areas, handle, etc, so I don't have to strip the paint off later. I'm assuming you're going to take a wire brush to these areas, right?

I would recommend stripping this one and starting over.

Good luck.

Scott
 

Brorex

Well-known member
Joined
Feb 23, 2016
Messages
126
I think most folks use spray cans. There was a good thread on painting a few weeks ago; think it was on this thread.

My technique - Blasting gives the best surface, in my opinion; it gives the paint something to adhere to. Make sure you get all the grease and grit off; I use brake cleaner (the nasty chlorinated stuff). Make sure your paint can is nice and warm; see instructions for recommendations. Also paint in a well ventilated but warm area. Other folks also pre-heat the part that you're painting; I don't but if it's sunny, I do leave it out in the sun to warm up.

If you have lousy results, I find that the paint itself is usually the problem. Strip it and try another brand.

I prefer to mask off the machined areas, handle, etc, so I don't have to strip the paint off later. I'm assuming you're going to take a wire brush to these areas, right?

I would recommend stripping this one and starting over.

Good luck.

Scott
OK I can blast all the paint back off. I was using oil based paint and brushing it on. If spray is better then I will try that. I painted that handle because it was pretty badly busted so I blasted it also but it left it with a dull gray vulnerable surface. I though painting it would be best to atleast protect the metal. I will look for the painting thread. Thanks. Should the slide be painted? What can be used to just seal the metal after blasting it? And I'm using aluminum oxide media. It's what I had here. Should I be using glass beads or something of that nature?

Sent from my SAMSUNG-SM-N920A using Tapatalk
 
Last edited:

GETRIDAONE

Well-known member
Joined
May 21, 2013
Messages
1,549
Location
Auburn, GA
After blasting use a wire wheel to polish the metal. You will be surprised how shiny it will get. Put some oil on the polished areas, it will darken it but the rust should stay away if you recoat it occasionally. All the parts in the picture were blasted with Alum. oxide before polishing.
 

Attachments

  • IMG_20160701_072340.jpg
    IMG_20160701_072340.jpg
    134.6 KB · Views: 65

Brorex

Well-known member
Joined
Feb 23, 2016
Messages
126
After blasting use a wire wheel to polish the metal. You will be surprised how shiny it will get. Put some oil on the polished areas, it will darken it but the rust should stay away if you recoat it occasionally. All the parts in the picture were blasted with Alum. oxide before polishing.
Wow I had no idea of that. Thanks a lot. That's looks great. Are you using a bench grinder with wire wheel or a die grinder, drill, etc? Also what wire are you using carbon?

Sent from my SAMSUNG-SM-N920A using Tapatalk
 

HCNDM

Well-known member
Joined
Oct 20, 2015
Messages
682
Location
Netherlands (tiny little country in western Europe
Wow I had no idea of that. Thanks a lot. That's looks great. Are you using a bench grinder with wire wheel or a die grinder, drill, etc? Also what wire are you using carbon?

Sent from my SAMSUNG-SM-N920A using Tapatalk


I use a grinder (handheld Makita) with a twisted bristle brush.

Remember the full face protection and don't forget to secure the piece you are working on properly.

I often follow up with some sanding cloth 800 1000 and then 1500 grit if I want a fine finish. To get mirror finish you need too final polish on a bench grinder with a buffing wheel and some rouge.

I don't mirror polish my vices, but I do mirror polish the carbon steel knives I make. An added bonus of a mirror polish is that moisture has no cavities to live in and as a result it almost doesn't rust.

Mirror polish is a shitload of work and simple not worth the effort on large industrial tools imo.

Some of the finest mirror polishing in history was done to Japanese Katana swords and their brethren like the wakasashi. The sword smith always outsourced the polish work to a master polisher who could take up to four months to polish a single sword using water stones grit 80 all the way up to 10000.


Sent from my iPhone using Tapatalk
 
OP
D

drivesitfar

Well-known member
Joined
Oct 23, 2013
Messages
36,037
Location
Pacific Northwest
WW: starting at post #171 of this thread RayH talks about getting out the pins that support his Wilton Bullet. then Carla and he and a few others guide him through the process of him making new pins that are threaded if you want a little more to read. probably the only really hard part about taking apart Wilton Bullet vises is the pins and for maintenance it really would be nice to have the pins threaded so you can pull out the vise nut give it a thorough cleaning before re greasing and putting the vise back together.

if you have any questions just ask and feel free to post up lots of pictures.

good luck
 

GETRIDAONE

Well-known member
Joined
May 21, 2013
Messages
1,549
Location
Auburn, GA
Wow I had no idea of that. Thanks a lot. That's looks great. Are you using a bench grinder with wire wheel or a die grinder, drill, etc? Also what wire are you using carbon?

Sent from my SAMSUNG-SM-N920A using Tapatalk

Mostly just use a 6" steel wheel on a bench grinder. On large vises I will just pick up the whole grinder to polish the slide. The grinder weighs a lot less than a large slide !!
Use light pressure or you will burnish the metal and go from different directions to get all the dull spots off. I finish up with a stainless steel hand brush if the wheel missed any low spots.
Polish the jaws and all machined surfaces, mask with blue painters tape before spray painting. Blow off the piece before painting to get rid of any leftover media and use a light coat of primer.
GOOD LUCK on the repaint. !!!!!
 

bulletpruf

Well-known member
Joined
Nov 28, 2013
Messages
11,085
Location
San Antonio
OK I can blast all the paint back off. I was using oil based paint and brushing it on. If spray is better then I will try that. I painted that handle because it was pretty badly busted so I blasted it also but it left it with a dull gray vulnerable surface. I though painting it would be best to atleast protect the metal. I will look for the painting thread. Thanks. Should the slide be painted? What can be used to just seal the metal after blasting it? And I'm using aluminum oxide media. It's what I had here. Should I be using glass beads or something of that nature?

Sent from my SAMSUNG-SM-N920A using Tapatalk

Aluminum oxide should be fine.

The machined areas of the slide should be left natural/bare. Some folks use paste wax (Johnson's, for example) on bare metal. I use grease or oil; all my vises are users so it doesn't bother me if it darkens the metal a bit.

Scott
 

Buddy G

New member
Joined
Sep 1, 2016
Messages
4
Question:

I’m trying to resuscitate a scrap Morgan Chicago #145 that is missing its lead screw.

I was wondering if anyone can tell me the thread pitch and screw’s various general dimensions used on these, and if there is another vintage brand/model of vise that used a screw which would serve as a replacement for the Morgan #145??

I'm aware that the company which acquired Morgan sells a retro-fit nut and screw replacement, but the condition of the vise makes that replacement route undesirable.

Thanks
 
OP
D

drivesitfar

Well-known member
Joined
Oct 23, 2013
Messages
36,037
Location
Pacific Northwest
MORGAN: i don't have my Morgan vises handy to get you the measurements so maybe another member has those for you. are you thinking of machining/making a new main screw or do you have a friend that will?

Morgan also made several other brand's vises like Standard and a few others so you might just find a donor vise.

welcome to the forum too. good luck
 

Buddy G

New member
Joined
Sep 1, 2016
Messages
4
Thanks for the reply and the forum welcome, Drivesitfar.

Learning that Morgan apparently manufactured other brands is intriguing.

As far as machining a replacement screw goes, that is unfortunately outside of my personal capabilities, but another avenue of possibility none the less.

Hopefully a Morgan aficionado here can share some #145 screw specs, and I can be one step closer to getting this old girls other foot out of the grave.

Thanks again.
 
OP
D

drivesitfar

Well-known member
Joined
Oct 23, 2013
Messages
36,037
Location
Pacific Northwest
Buddy: if you want to learn how to post pictures maybe posting a few of your Morgan and it's broken screw would be a good one to start on. if you have pictures loaded on your laptop or cell phone do you see the paperclip just above where you write your posts? click on it and you can download up to 7 pictures per post and give it a try.

also if you go in your GJ profile and put in your area it might help you find a local guy that either has a broken Morgan with a good screw to sell or trade you or maybe a different vise or just recommend help close by. also while you are in your GJ profile click on Avatar and download one of your favorite pictures like i did with this old Bison made from scraps and old tools. here's a few more of the welder's gems i could have chosen and i have changed avatars a few times and even had my cat for a while after she passed in my arms.

also Morgan is still in business so if you win the lottery you can maybe buy a new screw to replace the old one that broke. can you or did you mention how the screw broke and is the vise nut and rest of the vise ok?

cheers
 

Attachments

  • shiny horse.jpg
    shiny horse.jpg
    120.2 KB · Views: 40
  • horse.jpg
    horse.jpg
    112.5 KB · Views: 44
  • rodeo rider on horse.jpg
    rodeo rider on horse.jpg
    143.7 KB · Views: 40
  • deer.jpg
    deer.jpg
    91.7 KB · Views: 36
  • bull1.jpg
    bull1.jpg
    132.3 KB · Views: 40
  • bear.jpg
    bear.jpg
    118.8 KB · Views: 38
  • bull4.jpg
    bull4.jpg
    115.6 KB · Views: 41

GETRIDAONE

Well-known member
Joined
May 21, 2013
Messages
1,549
Location
Auburn, GA
The lead screw is, I think Acme thread ? 7/8" diameter & 5 teeth per inch. It is 17 3/4" long. The lenght of the handle is 11"
 

Attachments

  • IMG_20160902_101153.jpg
    IMG_20160902_101153.jpg
    141.8 KB · Views: 37

Buddy G

New member
Joined
Sep 1, 2016
Messages
4
Thank you both for all of the various helpful info and photos.

In a word.. fantastic! :thumbup:
 
To avoid these ads, REGISTER NOW!

jreb10

Well-known member
Joined
Oct 18, 2014
Messages
329
Location
Westby, WI
Thank you both for all of the various helpful info and photos.

In a word.. fantastic! :thumbup:

Buddy, I have a Morgan 145 with a "destroyed" static jaw. I have been looking for a replacement static for quite a while. Depending on condition, I might buy or trade for your static, if you are so inclined. Let me know if you want to talk about some such arrangement.

IMG_0466 (Medium).jpg
 

Buddy G

New member
Joined
Sep 1, 2016
Messages
4
Drivesitfar: I decided to follow your suggestion and try to add a few photos of my Morgan #145.

As you can see by it’s condition, it wouldn’t be prudent for me to dump $100+ into a repair. The metal sculpting photos you shared are amazing works of art btw.

Getridaone: Thanks again for the screw info. I wonder if someone can verify or dismiss the thread type as in fact being Acme?

Jreb10: My heart is with the Morgan at the moment. Working or not, it just makes me happy to look at, but if for some reason that should change, you’ll be the first person I contact.

Your Morgan looks like it’s seen some serious use over the years.
Seems every vise has a story to tell. If only we might all add another chapter. :)

Thanks
 

Attachments

  • Morgan 4.jpg
    Morgan 4.jpg
    18.9 KB · Views: 52
  • Morgan 6.jpg
    Morgan 6.jpg
    18.8 KB · Views: 51
  • Morgan 7.jpg
    Morgan 7.jpg
    20.1 KB · Views: 51
  • Morgan 5.jpg
    Morgan 5.jpg
    15.1 KB · Views: 45
  • Morgan 1.jpg
    Morgan 1.jpg
    18.9 KB · Views: 71
  • Morgan 2.jpg
    Morgan 2.jpg
    19 KB · Views: 64
  • Morgan 3.jpg
    Morgan 3.jpg
    19.7 KB · Views: 60

KMScott

Well-known member
Joined
Feb 14, 2012
Messages
4,642
Location
Daufuskie Island, South Carolina
Buddy do not spend to much time on that Morgan, you did not mention that the Dynamic jaw support was welded. Welded Dynamic and broken screw is a death sentence for most vises. You can help jreb10 out and at least get one workable vise. Just my two cents.
 

Outlawmws

Well-known member
Joined
Aug 9, 2011
Messages
39,285
Location
The Badlands
Buddy do not spend to much time on that Morgan, you did not mention that the Dynamic jaw support was welded. Welded Dynamic and broken screw is a death sentence for most vises. You can help jreb10 out and at least get one workable vise. Just my two cents.

:+1: notice where the screw broke? Almost the same place as installed, as the slide breaking on the Dynamic.
 

Shiftless

Well-known member
Joined
Mar 9, 2014
Messages
14,553
Location
East Bay SFO
Buddy:
I'm with KMScott and Outlaw...
Find another vise to restore. That Morgan is too far gone with its broken screw and even worse, the broken and welded jaw.
 
Last edited:

va.grouseman

Well-known member
Joined
Mar 26, 2011
Messages
4,965
Location
Southern-Central VA.
Yep, they are right Buddy G.---You're going to spend more time and money on that thing than another good used one in good condition will cost you.---But it's got some good donor parts that can live on in another needy vise.---So they never really die, they just transform. Good hunting.
 

jreb10

Well-known member
Joined
Oct 18, 2014
Messages
329
Location
Westby, WI
Buddy,

All hope is not lost. Between the two of us we have a good used vise. We just need to get the parts in the same spot.

You seem quite taken with the Morgan. Perhaps you can tell us more about your interest. Are you looking for a vise you can use? Do you want a vise to restore and then sell? Do you have other vises as well?

Important: Vise pieces are heavy, and not cheap to ship around. Can you tell us where you are located?

Let's get the conversation started....
 

KMScott

Well-known member
Joined
Feb 14, 2012
Messages
4,642
Location
Daufuskie Island, South Carolina
Repairing Dynamic Tail Splits.
This is about fixing those Prentiss tail splits that everybody hates. I hope this is not too long of a post. I have a bunch of pic's since I was asked to show how I do it. I did not go to the books for heats and such but just went with a feel.

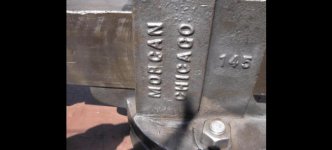
So anyway, I bought a Chas Parker #79. A big heavy 6-1/4 jaw width 180lb vise that had an issue with its split tail. It spread .060 where it was difficult to remove from the static jaw support.

<a href="https://visejaws.smugmug.com/Jaw-Cutting/i-sfTPrfC/A"><img src="https://photos.smugmug.com/Jaw-Cutting/i-sfTPrfC/0/S/Parker%2079%20%284%29-S.jpg" alt=""></a>

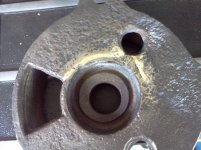
This is what the tail looks like after stripping the paint and cleaning the oil and grease.

<a href="https://visejaws.smugmug.com/Jaw-Cutting/i-rNn9jDQ/A"><img src="https://photos.smugmug.com/Jaw-Cutting/i-rNn9jDQ/0/S/Parker%20%2379-Dynamic%20Jaw%20Support%20%284%29-S.jpg" alt=""></a>

First I had to clean the split and after using lacquer thinner I used my torch to burn out the oil and grease. Brushed with an SS brush, heat top and underneath for a good 45 minutes till it quit smoking.

<a href="https://visejaws.smugmug.com/Jaw-Cutting/i-jtJPvbg/A"><img src="https://photos.smugmug.com/Jaw-Cutting/i-jtJPvbg/0/S/Parker%2079%20crack%20repair%20%282%29-S.jpg" alt=""></a>

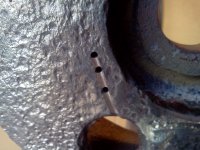
Then I grooved the split with a carbide burr after drilling to stop that crack hole. The next step I took was to clamp it down on my milling machine and add two 5/16:18 Socket Head Cap Screws buried and plugged. I used the clamping to close the tail section close to 1/16 of split.

<a href="https://visejaws.smugmug.com/Jaw-Cutting/i-TswqMXm/A"><img src="https://photos.smugmug.com/Jaw-Cutting/i-TswqMXm/0/S/Tail-Split-1%20%286%29-S.jpg" alt=""></a>

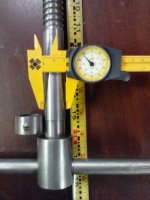
Preheated the casting before TIG welding with my favorite cast rod Castolin Eutectic 224. I preheated till it got around 375-400F. I checked it only because of recording my heat, I actually went by feel, just kind of know when it is ready.

<a href="https://visejaws.smugmug.com/Jaw-Cutting/i-Ttvbq68/A"><img src="https://photos.smugmug.com/Jaw-Cutting/i-Ttvbq68/0/S/Parker%2079-finishing-1%20%287%29-S.jpg" alt=""></a>

Next I scrub the groove and start welding the groove. The tail section was beat on for decades and there was no way I was going to fill the whole area, so I just concentrated on the groove. I welded a root pass and cleaned and welded the final pass. Using a small peening hammer I peened the welded area to stress relieve the weld. Makes you look close to see if you missed a spot. Preheat again, wrap the weld up in heat pads and cool slowly. I use old leather gloves and heavy blankets.

<a href="https://visejaws.smugmug.com/Jaw-Cutting/i-ZDBR74m/A"><img src="https://photos.smugmug.com/Jaw-Cutting/i-ZDBR74m/0/S/Parker%2079-finishing-1%20%2813%29-S.jpg" alt=""></a>

It's not real pretty, but after cleaning it up it fit like a champ. I will use B.L.O. on this vise since it will hide some of the ugliness on the tail and eventually show off the finished vise mounted on custom stand in the Vise thread.

<a href="https://visejaws.smugmug.com/Jaw-Cutting/i-TTQPPMx/A"><img src="https://photos.smugmug.com/Jaw-Cutting/i-TTQPPMx/0/S/Parker%2079-finishing-1%20%2817%29-S.jpg" alt=""></a>

I know there are other ways to repair this type of split, but this is the way I felt comfortable doing it. Brass and arc welding are other methods you can use. The secret is the bolts in my method. Guys show your methods.
 

Mark in Indiana

Well-known member
Joined
Aug 11, 2010
Messages
3,057
Location
Southern Indiana
KM,
Great post! Very well detailed. I plan to do the same repair to my Prentiss 54 when I get around to it. However, I plan to braze the crack after drawing it in with the cap screws.
 

KMScott

Well-known member
Joined
Feb 14, 2012
Messages
4,642
Location
Daufuskie Island, South Carolina
KMScott: thanks very much for the detailed explanation and photos. This is exactly the kind of thing I look forward to when I look at this thread.


Sent from my iPad using Tapatalk

Thanks IHmachinery I really appreciate your words. I build vise parts and repair vises everyday and some times I have a little time to take photos and try to explain a repair or a method of manufacturing. A story like this takes me a half of a day but with the kind words you and others has written really says a lot. I wish one of my 8 grandsons would like to learn a trade but the computers/phones has grabbed them. I'll post more repairs especially when the big guys show up in the next couple of weeks. Repairing three Prentiss 58's at one time.
 

IHmachinery

Well-known member
Joined
Apr 28, 2015
Messages
134
Location
Pacific Northwest, Canada
Thanks IHmachinery I really appreciate your words. I build vise parts and repair vises everyday and some times I have a little time to take photos and try to explain a repair or a method of manufacturing. A story like this takes me a half of a day but with the kind words you and others has written really says a lot. I wish one of my 8 grandsons would like to learn a trade but the computers/phones has grabbed them. I'll post more repairs especially when the big guys show up in the next couple of weeks. Repairing three Prentiss 58's at one time.


Very much looking forward to future installments!


Sent from my iPad using Tapatalk
 

G-ManBart

Well-known member
Joined
Jan 24, 2015
Messages
2,059
Location
Michigan
Hey all,

I haven't read all 166 pages of this thread (lots of it though), so I'm not sure if anybody has posted this technique before, but here goes nothing...

I've needed to straighten a few vise handles, and haven't been completely happy with any of the prior methods....heat and a hammer, shop press with press plates and flat stock, etc. I came up with the idea of making a couple of blocks to rest the handle on so the ball ends are off the plates, and cut a channel in them with my little table-top mill so the handle is really cradled and won't move around. You simply put the bend between the blocks and lower the ram until it's straight, or a touch beyond. I made the blocks thin enough that I could put them close to the ball ends if necessary. I've only used them once (Wilton 400 handle) but it worked like a charm. I won't say that handle is perfectly straight, but it's pretty darned close.


Here are a couple of quick pics to show the basic idea...forgot to take a pic with the setup in the press!


Outlawmws

Well-known member
Joined
Aug 9, 2011
Messages
39,285
Location
The Badlands
Good post G-man

For those without a mill simply drilling a hole in a plate, and the cutting it in half will get you the same blocks.
 

Carla

MEMBER EMERITUS
Joined
Nov 27, 2010
Messages
672
Good post G-man

For those without a mill simply drilling a hole in a plate, and the cutting it in half will get you the same blocks.

Actually, just clamping two blocks together, and then drilling on the 'parting line' of the two parts is even easier..... : )

cheers

Carla
 

Will561

Well-known member
Joined
Jul 20, 2016
Messages
52
Location
Hypoluxo, FL
Having trouble finding the correct vise jaws for this utility Wilton. Wilton tech support can't find much but this catalog page. Mine is a 645 with 5" jaws that need replacing. One side is missing and one side is worn badly.

I have attached the flyer Wilton tech sent me for your review.

Vise jaw measures 5"L X 3/4"H X 1/4"W (thicker would be ok) with 1/4" -20 threads and holes spaced 3 1/4" apart.

Even the guy from wiltonparts.net didn't stock but could make me a set for about $70.00 he said the common Wilton holes are 2 3/8"

My question: I can use the ones I bought from Wilton, $40 all correct but the screw holes don't align. they are 2 3/8" center

If I did use them would you tap new holes in the vise itself or drill new holes in the jaws?

Thanks,

Will
 

Attachments

  • Wilton 640 Vise line cut.jpg
    Wilton 640 Vise line cut.jpg
    15.2 KB · Views: 40

Mintgrun

Well-known member
Joined
Oct 7, 2015
Messages
2,134
Location
Kingston, Wa.
I would definitely drill/tap the vise to align with the 2 3/8" jaw holes and consider it an UPgrade to be able to use both styles in the future.
 
To avoid these ads, REGISTER NOW!
Top Bottom