To avoid these ads, REGISTER NOW!

Chas Parker 204 Pat. 1930 Restoration Thread

thehorse13

Well-known member
Joined
Mar 15, 2015
Messages
3,479
Location
Jefferson County, WV
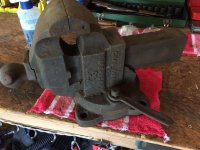
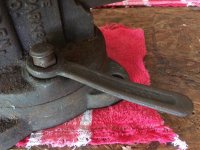
I grabbed this vise from the local flea market for 40 bucks. It feels about 60 pounds and appears to be in great shape underneath all the grime. I'm going to go with a nice blue color on this one, possibly hammered finish.

Welcome aboard the restoration ride.
 

Attachments

  • IMG_3840.jpg
    IMG_3840.jpg
    142.9 KB · Views: 133
  • IMG_3841.jpg
    IMG_3841.jpg
    143.4 KB · Views: 105
  • IMG_3842.jpg
    IMG_3842.jpg
    146 KB · Views: 93
  • IMG_3843.jpg
    IMG_3843.jpg
    136.9 KB · Views: 87
To avoid these ads, REGISTER NOW!
OP
T

thehorse13

Well-known member
Joined
Mar 15, 2015
Messages
3,479
Location
Jefferson County, WV
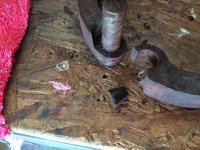
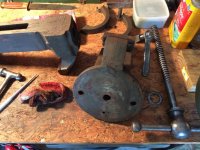
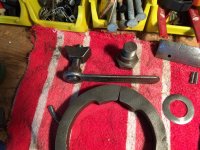
I tore down the vise with the exception of the jaws. The pins appear to be frozen so I turned the body and the dynamic jaw upside down and shot them with Kroil. Hopefully this helps out.

After looking over all the parts, I found one small problem with this vise. The brake shoe hinge suffered failure at some point. I suspect this happened when someone tried to unfreeze the rusted solid base. I will be able to clean up the issue and thankfully it will never be seen and will not impact the functionality of the swivel base.

I cleaned up a few parts just to see if things are as clean as I had hoped. They are for sure. This thing will shine up beautifully when complete.
 

Attachments

  • IMG_3844.jpg
    IMG_3844.jpg
    134.2 KB · Views: 91
  • IMG_3845.jpg
    IMG_3845.jpg
    148.5 KB · Views: 99
  • IMG_3846.jpg
    IMG_3846.jpg
    147.7 KB · Views: 85
OP
T

thehorse13

Well-known member
Joined
Mar 15, 2015
Messages
3,479
Location
Jefferson County, WV
Today I got around to prepping all of the surfaces for paint. I have to tape everything up and of course select a color. I'm still on the fence here but should come down to a final selection by mid week.

The pins came out after soaking in Kroil overnight. A few taps from the underside of the jaws and they popped right out.

After inspecting and cleaning all of the hardware, no additional surprises were found.
 

Attachments

  • IMG_3847.jpg
    IMG_3847.jpg
    147.8 KB · Views: 82
  • IMG_3848.jpg
    IMG_3848.jpg
    145.1 KB · Views: 84
OP
T

thehorse13

Well-known member
Joined
Mar 15, 2015
Messages
3,479
Location
Jefferson County, WV
I've decided on a color. That's the good news. The bad news is that I had to custom order the paint because none of my local stores carry it.

Now that I'm going with this light blue hammered finish, I will have to high polish the jaws and handle. I have about a week on my hands before the paint shows up so at least I have something to do to keep me busy.
 

Attachments

  • 81nkacoaErL._SL1500_.jpg
    81nkacoaErL._SL1500_.jpg
    122.4 KB · Views: 37
OP
T

thehorse13

Well-known member
Joined
Mar 15, 2015
Messages
3,479
Location
Jefferson County, WV
The start of the polishing process. I only have the rough flap wheel so I will have to wait for the fine flap wheels to show up in the mail before continuing the process. I have to be careful not to over-polish these parts because there are scars in the metal that are far too deep to remove. It will look odd if I go any farther than a brushed aluminum look.

You'll notice my old workhorse Prentiss #52 on my portable shop bench helping out during this restore.
 

Attachments

  • IMG_3850.jpg
    IMG_3850.jpg
    140.7 KB · Views: 97
To avoid these ads, REGISTER NOW!
OP
T

thehorse13

Well-known member
Joined
Mar 15, 2015
Messages
3,479
Location
Jefferson County, WV
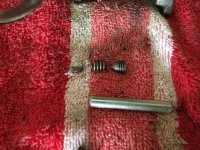
While I'm waiting for supplies to arrive, I decided to remove the parts that make up the adjustable handle brake.

You'll notice the screw, set spring and brake pad along with a piece of bar stock I'm going to use to make a new brake shoe.

Getting that spring and worn out shoe to come out was a little bit tricky but eventually I got things sorted. I had to use a dremel tool to grind a little material off the brake shoe and then tap it out from the side of the handle.
 

Attachments

  • IMG_3852.jpg
    IMG_3852.jpg
    148.3 KB · Views: 56
OP
T

thehorse13

Well-known member
Joined
Mar 15, 2015
Messages
3,479
Location
Jefferson County, WV
Time has been pretty tight this holiday weekend so I was only able to do a few little things on this vise restoration. I even missed a chance to hit up a flea market with Twertsy and Beatcad. *Sigh*

I fabricated a new brake shoe for the vise handle. You can see the original and the one that I made in the picture below. Best guess is that the original was the size of an eraser head so I used that as a guide.

I taped up the vise parts so that the day the paint arrives, after a quick wipe down of the metal, off to the spray table they go.

Since I haven't had a chance to try out my, "new to me" Plomb 1430 brass hammer, I decided to use it to straighten out the vise lock wrench. It's now back to the proper shape without so much as an additional nick in the surface.

Hopefully next week I will be able to have this vise completed.
 

Attachments

  • IMG_3857.jpg
    IMG_3857.jpg
    149.3 KB · Views: 50
  • IMG_3858.jpg
    IMG_3858.jpg
    145.5 KB · Views: 55
  • IMG_3859.jpg
    IMG_3859.jpg
    151.2 KB · Views: 55
OP
T

thehorse13

Well-known member
Joined
Mar 15, 2015
Messages
3,479
Location
Jefferson County, WV
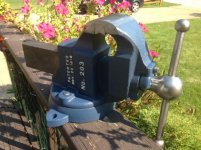
So here is where I am at with this restoration. I did the rough assembly today but several small adjustments are still needed. The majority of the work left is metal polishing to bring up that blinding shine.
 

Attachments

  • IMG_3884.jpg
    IMG_3884.jpg
    144.6 KB · Views: 103

McBrownie

Well-known member
Joined
Mar 27, 2014
Messages
1,827
Location
Cleveland, OH
Very nice restoration! That is an interesting vise from a patent perspective. I thought that all Patent 1930 Parker's had the cylindrical handle knob, not the bulb one. Here is my Patent 1910 203. The differences from yours are the lock down handle and my "brake shoe" is one piece, not two pieces like yours.

Edit: Also, your dynamic jaw support looks beefier. That is a good thing, because mine had a hairline crack in it.
 

Attachments

  • pv203_1.jpg
    pv203_1.jpg
    54.2 KB · Views: 81
  • pv203_2.jpg
    pv203_2.jpg
    55.3 KB · Views: 75
Last edited:
OP
T

thehorse13

Well-known member
Joined
Mar 15, 2015
Messages
3,479
Location
Jefferson County, WV
Very nice restoration! That is an interesting vise from a patent perspective. I thought that all Patent 1930 Parker's had the cylindrical handle knob, not the bulb one. Here is my Patent 1910 203. The differences from yours are the lock down handle and my "brake shoe" is one piece, not two pieces like yours.

Edit: Also, your dynamic jaw support looks beefier. That is a good thing, because mine had a hairline crack in it.

Yea, this thing is built like a tank. It operates glass smooth now that it's been properly cleaned and greased. My only real issue is the number of small nicks in the handle and slide. I will polish them up as best that I can and then give the metal a nice coat of car wax to keep the rust away.

This is my first Chas Parker vise so I'm not well versed in variations over the decades. Yours looks extremely nice to me though.
 
To avoid these ads, REGISTER NOW!
Top Bottom